


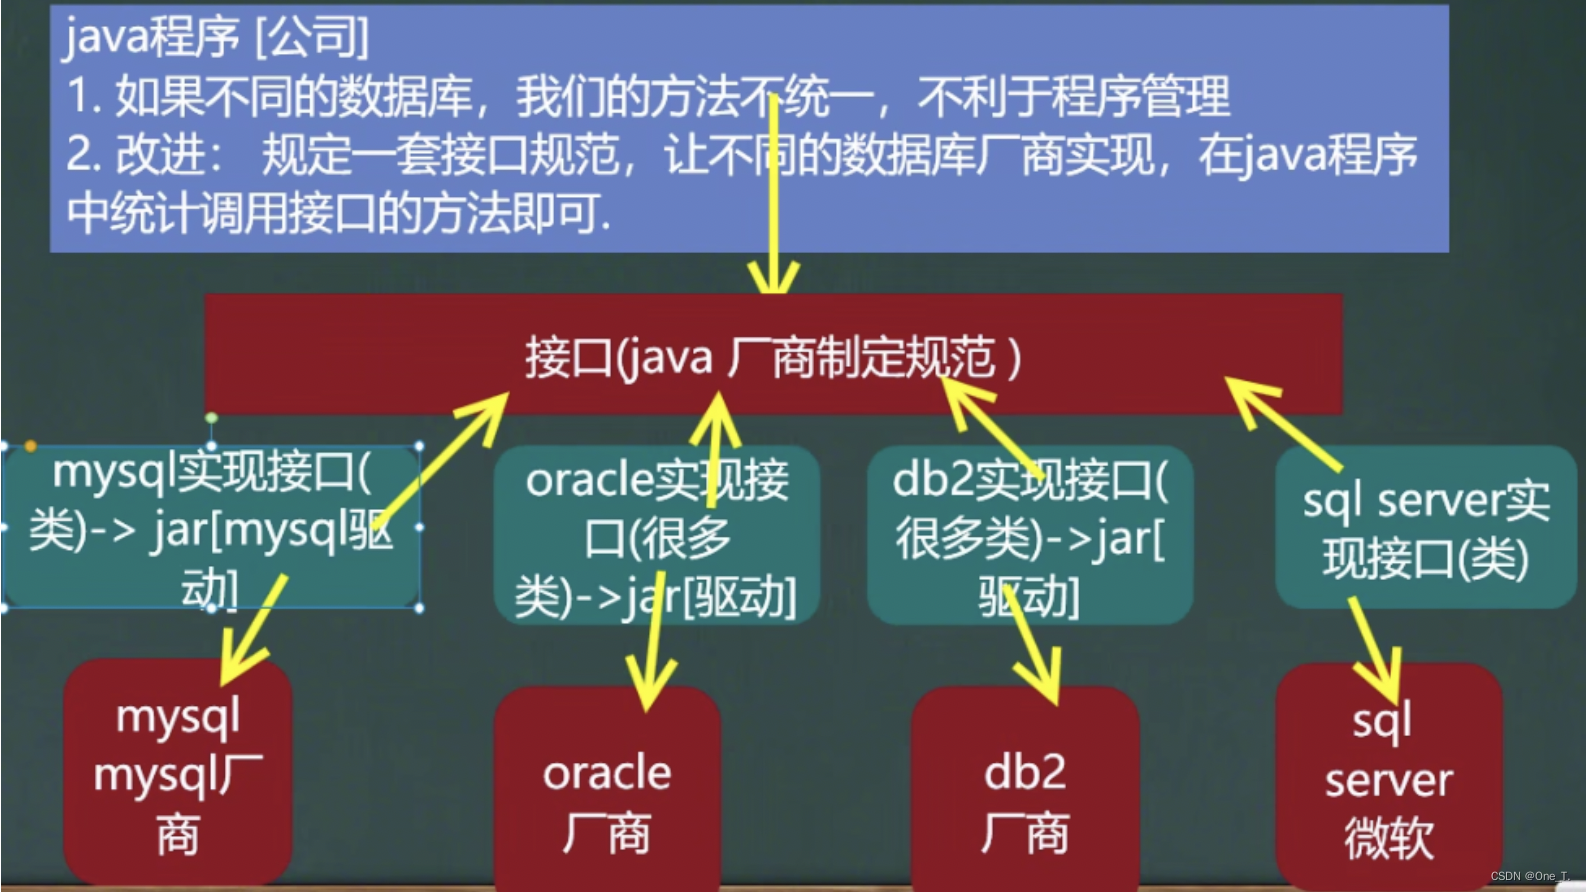
JDBC
JDBC为访问不同的数据库提供了统一 的接 口,为使用者屏蔽了细节问题。Java程序员使用JDBC, 可以连接任何提供了JDBC驱动程序的数据库系统,从而完成对数据库的各种操作。
JDBC程序编写步骤 背!!!
- 注册驱动----加载Driver类 告诉java程序,即将要连接的是哪个品牌的数据库
- 获取连接-得到Connection 表示JVM的进程和数据库进程之间的通道打开了
- 获取数据库操作对象(专门执行
sql语句的对象) - 执行增删改查
- 处理查询结果集 只有当第四步执行的是select语句的时候,才有这第五步处理查询结果集
- 释放资源-关闭相关连接
执行DML语句的模版
package _JDBC;

import com.mysql.cj.jdbc.Driver;
import java.sql.*;

public class _01 {
    public static void main(String[] args) {
        Connection connection = null;
        Statement statement = null;
        ResultSet resultSet = null;
        try {
           // 1.注册驱动
            DriverManager.registerDriver(new Driver());
           // 2.获取连接
           // jdbc:mysql: 表示协议
           // localhost:3306	表示ip和端口,如果是连接远程需要把ip改成对应机器的ip
           // Demo是mysql里面具体的一个数据库名
            connection = DriverManager.getConnection("jdbc:mysql://localhost:3306/Demo", 																		 "root", "ymy19990505..");
           // 3.获取数据库操作对象
           statement = connection.createStatement();
           // 4.执行sql之查询。执行select操作时只能用 executeQuery,并返回一个 ResultSet
            String sql = "select empno, ename, sal, deptno from emp";
            resultSet = statement.executeQuery(sql);
           // 5.处理查询结果集。resulSet.next()会先向下移动一行并返回布尔值表示该行是否有内容
            while (resultSet.next()){
               // 不管数据库中某个字段是什么类型的值,都可以用getString将其解析成字符串;也可以用							getInt将原字段为int型的数据解析成对应的数据类型。
               // 获取内容的方式:1.可以直接通过字段名  2.也可以通过索引1,2,3.。。。该顺序是按照						select语句查询字段的顺序排列的。
               // JDBC中索引是从1开始的
                System.out.println(resultSet.getInt("empno") + "\t" +
                                resultSet.getString("ename") + "\t" +
                                resultSet.getDouble("sal") + "\t" +
                                resultSet.getString("deptno"));
            }
        } catch (SQLException e) {
            throw new RuntimeException(e);
        }finally {
           // 6.释放资源。一定要按级别从内到外释放
            if (resultSet != null) {
                try {
                    resultSet.close();
                } catch (SQLException e) {
                    throw new RuntimeException(e);
                }
            }
            if (statement != null) {
                try {
                    statement.close();
                } catch (SQLException e) {
                    throw new RuntimeException(e);
                }
            }
            if (connection != null) {
                try {
                    connection.close();
                } catch (SQLException e) {
                    throw new RuntimeException(e);
                }
            }
        }
    }
}
执行DQL语句的模版
package _JDBC;

import com.mysql.cj.jdbc.Driver;
import java.sql.*;

public class _01 {
    public static void main(String[] args) {
        Connection connection = null;
        Statement statement = null;
        try {
            // 1.注册驱动
            DriverManager.registerDriver(new Driver());
           // 2.获取连接
           // jdbc:mysql: 表示协议
           // localhost:3306	表示ip和端口,如果是连接远程需要把ip改成对应机器的ip
           // Demo是mysql里面具体的一个数据库名
            connection = DriverManager.getConnection("jdbc:mysql://localhost:3306/Demo", 																		 "root", "ymy19990505..");
            // 3.获取数据库操作对象
            statement = connection.createStatement();
            // 4.执行sql之增删改。执行增删改操作时只能用 executeUpdate,并返回一个 int 型返回值
            //   该值表示被影响的行数
            String sql = "insert into stu values(9, 77)";
            int count = statement.executeUpdate(sql);
            System.out.println(count == 1 ? "修改成功" : "修改失败");
        } catch (SQLException e) {
            throw new RuntimeException(e);
        }finally {
            if (statement != null) {
                try {
                    statement.close();
                } catch (SQLException e) {
                    throw new RuntimeException(e);
                }
            }
            if (connection != null) {
                try {
                    connection.close();
                } catch (SQLException e) {
                    throw new RuntimeException(e);
                }
            }
        }
    }
}
使用反射的方式注册驱动
// 该Driver类的静态代码块中有:DriverManager.registerDriver(new Driver()),所以我们只需要使用类加载这个动作就可以使得代码块执行,从而注册驱动,因此 forName 方法的返回值不需要用。利用反射的方法注册驱动更为常用,因为这样的话驱动类型可以写在配置文件中。
Class.forName("com.mysql.cj.jdbc.Driver");
从连接数据库所需的所有信息从配置文件读取
package _JDBC;

import java.sql.*;
import java.util.ResourceBundle;

public class _01 {
    public static void main(String[] args) {
        // 使用资源绑定器绑定属性配置文件  config.properties 后缀名可以省略
        // 一定要将该 properties 文件放到 src 根目录下
        ResourceBundle bundle = ResourceBundle.getBundle("ccc");
        String driver = bundle.getString("driver");
        String url = bundle.getString("url");
        String user = bundle.getString("user");
        String password = bundle.getString("password");
        Connection connection = null;
        Statement statement = null;
        try {
            Class.forName(driver);
            connection = DriverManager.getConnection(url, user, password);
            statement = connection.createStatement();
            String sql = "insert into stu values(13, 64)";
            int count = statement.executeUpdate(sql);
            System.out.println(count == 1 ? "修改成功" : "修改失败");
        } catch (SQLException | ClassNotFoundException e) {
            throw new RuntimeException(e);
        }finally {
            if (statement != null) {
                try {
                    statement.close();
                } catch (SQLException e) {
                    throw new RuntimeException(e);
                }
            }
            if (connection != null) {
                try {
                    connection.close();
                } catch (SQLException e) {
                    throw new RuntimeException(e);
                }
            }
        }
    }
}
登录验证实例
package _JDBC;

import java.sql.*;
import java.util.HashMap;
import java.util.Map;
import java.util.ResourceBundle;
import java.util.Scanner;

public class _02 {

    // 需求: 模拟用户登录功能的实现。
    // 业务描述: 程序运行的时候,提供一个输入的入口,可以让用户输入用户名和密码。用户输入用户名和密码之后,
    //          提交信息,java程序收集到用户信息,Java程序连接数据库验证用户名和密码是否合法
    //          合法:显示登录成功   不合法:显示登录失败

    public static void main(String[] args) {
        // 初始化一个界面
        Map<String, String> info = initUI();
        // 验证用户和密码
        boolean loginSuccess = login(info);
        System.out.println(loginSuccess ? "登录成功" : "登录失败");
    }

    private static boolean login(Map<String, String> info) {
        // 使用资源绑定器绑定属性配置文件  config.properties 后缀名可以省略
        // 一定要将该 properties 文件放到 src 根目录下
        ResourceBundle bundle = ResourceBundle.getBundle("ccc");
        String driver = bundle.getString("driver");
        String url = bundle.getString("url");
        String user = bundle.getString("user");
        String password = bundle.getString("password");
        String username = info.get("username");
        String password1 = info.get("password");
        boolean flag = false;
        Connection connection = null;
        Statement statement = null;
        ResultSet resultSet = null;
        try {
            Class.forName(driver);
            connection = DriverManager.getConnection(url, user, password);
            statement = connection.createStatement();
            // sql 语句中可以用 "+变量名+" 格式插入变量,插入到原来的单引号中
            String sql = "select * from login where username = '"+username+"' and  password = '"+password1+"'";
            resultSet = statement.executeQuery(sql);
            if (resultSet.next())
                flag = true;
        } catch (SQLException | ClassNotFoundException e) {
            throw new RuntimeException(e);
        }finally {
            if (resultSet != null) {
                try {
                    resultSet.close();
                } catch (SQLException e) {
                    throw new RuntimeException(e);
                }
            }
            if (statement != null) {
                try {
                    statement.close();
                } catch (SQLException e) {
                    throw new RuntimeException(e);
                }
            }
            if (connection != null) {
                try {
                    connection.close();
                } catch (SQLException e) {
                    throw new RuntimeException(e);
                }
            }
        }
        return flag;
    }

    private static Map<String, String> initUI() {
        HashMap<String, String> map = new HashMap<>();
        Scanner scanner = new Scanner(System.in);
        System.out.println("用户名:");
        String username = scanner.nextLine();
        System.out.println("密码:");
        String password = scanner.nextLine();
        map.put("username", username);
        map.put("password", password);
        return map;
    }
}
sql 注入现象
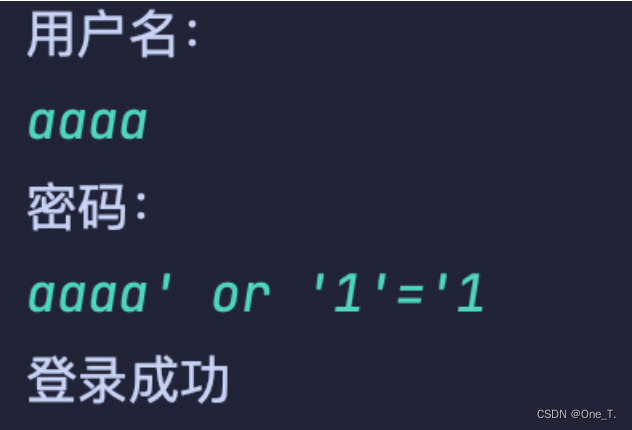
即使数据库没这个用户,居然也可以登录成功!!! 问题就出现了上面代码中的这两句:
String sql = "select * from login where username = '"+username+"' and  password = '"+password1+"'";
resultSet = statement.executeQuery(sql);
当我们输入上述用户名和密码并debug时,可以发现编译后的 sql 语句变成了:
"select * from login where username = 'aaaa' and password = 'aaaa' or '1'='1'"
将该语句在mysql中查询后可以得到该表的所有内容,相当于 where 被废弃了,这种现象就称为sql注入
sql注入根本原因是用户输入的可能包含sql语法关键字的数据参与了sql 编译,就是上述两条语句的第一句。
解决 sql 注入问题
只要用户提供的信息不参与 sql 语句的编译过程,问题就解决了。
即使用户提供的信息中含有 sqI 语句的关键字,但是没有参与编译,不起作用。要想用户信息不参与 sql 语句的编译,那么必须使用java.sql.PreparedStatement
PreparedStatement接口继承了java.sql.Statement
PreparedStatement是属于预编译的数据库操作对象。
PreparedStatement的原理是:预先对 sql 语句的框架进行编译,然后再给 sql 语句传"值”。
package _JDBC;

import java.sql.*;
import java.util.HashMap;
import java.util.Map;
import java.util.ResourceBundle;
import java.util.Scanner;

public class _02 {

    // 需求: 模拟用户登录功能的实现。
    // 业务描述: 程序运行的时候,提供一个输入的入口,可以让用户输入用户名和密码。用户输入用户名和密码之后,
    //          提交信息,java程序收集到用户信息,Java程序连接数据库验证用户名和密码是否合法
    //          合法:显示登录成功   不合法:显示登录失败

    public static void main(String[] args) {
        // 初始化一个界面
        Map<String, String> info = initUI();
        // 验证用户和密码
        boolean loginSuccess = login(info);
        System.out.println(loginSuccess ? "登录成功" : "登录失败");
    }

    private static boolean login(Map<String, String> info) {
        // 使用资源绑定器绑定属性配置文件  config.properties 后缀名可以省略
        // 一定要将该 properties 文件放到 src 根目录下
        ResourceBundle bundle = ResourceBundle.getBundle("ccc");

        String driver = bundle.getString("driver");
        String url = bundle.getString("url");
        String user = bundle.getString("user");
        String password = bundle.getString("password");

        String username = info.get("username");
        String password1 = info.get("password");

        boolean flag = false;

        Connection connection = null;
        PreparedStatement ps = null;
        ResultSet resultSet = null;
        try {
            Class.forName(driver);
            connection = DriverManager.getConnection(url, user, password);
            // 用 ? 作占位符   这就是 sql 的框架
            String sql = "select * from login where username = ? and  password = ?";
            ps = connection.prepareStatement(sql);
            // 给占位符传值   第1个 ? 的索引为1,以此类推。传什么类型的值就用对用的 setXXX
            ps.setString(1, username);
            ps.setString(2, password1);
            resultSet = ps.executeQuery();
            if (resultSet.next())
                flag = true;
        } catch (SQLException | ClassNotFoundException e) {
            throw new RuntimeException(e);
        }finally {
            if (resultSet != null) {
                try {
                    resultSet.close();
                } catch (SQLException e) {
                    throw new RuntimeException(e);
                }
            }
            if (ps != null) {
                try {
                    ps.close();
                } catch (SQLException e) {
                    throw new RuntimeException(e);
                }
            }
            if (connection != null) {
                try {
                    connection.close();
                } catch (SQLException e) {
                    throw new RuntimeException(e);
                }
            }
        }
        return flag;
    }

    private static Map<String, String> initUI() {
        HashMap<String, String> map = new HashMap<>();
        Scanner scanner = new Scanner(System.in);
        System.out.println("用户名:");
        String username = scanner.nextLine();
        System.out.println("密码:");
        String password = scanner.nextLine();
        map.put("username", username);
        map.put("password", password);
        return map;
    }
}
- Statement 是编译一次执行一次。PreparedStatement是编译一次,可执行n次,效率稍高
- PreparedStatement 在编译阶段可以做类型的安全检查
- 有时需要 sql 注入时,需要使用 Statement
JDBC 事务
JDBC 默认自动提交事务,并且是执行一条 sql 语句就自动提交,和我们的期望不符。应当在上述代码中添加3处代码
connection.setAutoCommit(false);	// 在创建完连接后紧跟着关闭自动提交
connection.commit();					// 在执行完一组 sql 语句后提交
connection.rollback();				// 在 catch 中设置回滚,一旦捕捉到异常将数据回滚到原始状态
行级锁
在查询语句后:select * from emp where job='MANAGER' for update 那么查询到的记录就会被锁住,在当前事务未提交前,这些记录是不可以被修改的


 558
558


 被折叠的 条评论
为什么被折叠?
被折叠的 条评论
为什么被折叠?
 到【灌水乐园】发言


