


一.开发目的
设计一个app的门户框架,需要实现3-4个tab切换效果;本功能要求需要的技术为:activity、xml、fragment,同时在任一tab页中实现列表效果;本功能的实现需要使用recycleview。
二.技术说明
这个应用使用了一系列Android开发技术和组件来实现上述目标。以下是一些关键的技术和组件:
-
Activity和Fragment:应用使用
Activity来承载应用的主要框架,并使用Fragment来切换不同的选项卡内容。每个选项卡都对应一个Fragment,这提供了更好的模块化和可维护性。 -
XML布局:XML布局文件用于定义应用的界面布局,包括主界面、底部导航栏和各个选项卡的内容布局。这些XML文件指定了应用的外观和布局。
-
RecyclerView:在"游戏"选项卡中,应用使用
RecyclerView来展示游戏列表。RecyclerView是一个强大的组件,用于处理大型数据集的滚动列表。 -
Adapter模式:为了在
RecyclerView中展示游戏列表,应用实现了一个自定义的GameItemAdapter,该适配器将数据绑定到RecyclerView中的每个项目。
三.开发过程与关键代码解析:
1.顶部标题和底部功能选择区域
首先设计的UI界面的顶部标题部分和底部的功能选择区域:
顶部标题部分:top.xml
<?xml version="1.0" encoding="utf-8"?>
<LinearLayout
    xmlns:android="http://schemas.android.com/apk/res/android"
    android:layout_width="match_parent"
    android:layout_height="30dp"
    android:gravity="center_vertical"
    android:orientation="vertical"
    android:background="#FFFFFF">

    <TextView
        android:layout_width="wrap_content"
        android:layout_height="wrap_content"
        android:paddingStart="40dp"
        android:text="游友"
        android:textSize="18sp"
        android:textStyle="bold" />

</LinearLayout>

这段XML布局代码定义了一个简单的线性布局(LinearLayout),用于创建一个标题栏。
底部的功能选择区域:
最外层采用linearlayout的布局,下面放四个垂直方向的linearlayout,每个选项卡都包括一个图标和一个文本标签。通过使用权重属性,它们在水平方向上平均分布,并根据选项卡的状态选择不同的图标。
四个功能选项的其中一个选项:
<!-- 第一个元素 -->
    <LinearLayout
        android:id="@+id/ll_chat"
        android:layout_width="0dp"
        android:layout_height="wrap_content"
        android:layout_weight="1"
        android:gravity="center"
        android:orientation="vertical"
        android:padding="8dp">

        <ImageView
            android:id="@+id/iv_chat"
            android:layout_width="24dp"
            android:layout_height="24dp"
            android:src="@drawable/selector_chat" /><!-- 设置图片资源 -->
        />

        <TextView
            android:id="@+id/tv_chat"
            android:layout_width="wrap_content"
            android:layout_height="wrap_content"
            android:text="消息"
            android:textSize="14sp"
            android:textStyle="bold" />
    </LinearLayout>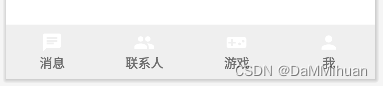
注:这里的图标显示我们用了一个选择器(Selector),定义不同状态下的视图样式,用于后续在用户点击选项卡时更改图像资源以给用户反馈。
<?xml version="1.0" encoding="utf-8"?>
<selector xmlns:android="http://schemas.android.com/apk/res/android">
<item android:state_selected="true" android:drawable="@drawable/chat_1" />
<item android:drawable="@drawable/chat_0" />
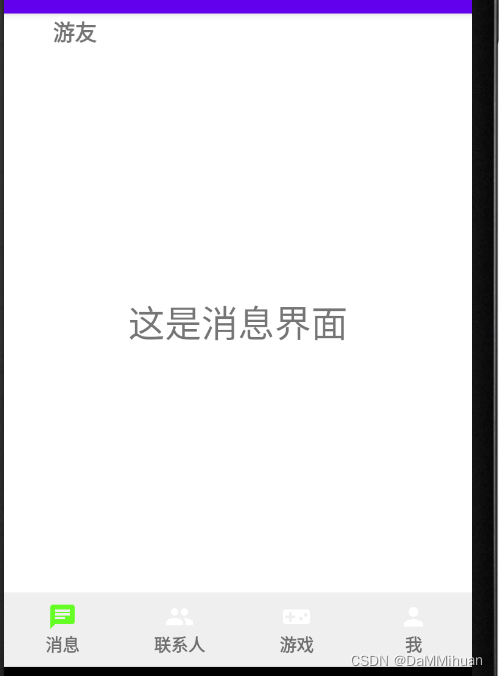
</selector>2.中间的显示区域与应用主界面
创建4个fragment对应4个选项
4个fragment中的消息界面:ChatFragment.java
public class ChatFragment extends Fragment {
    @Override
    public View onCreateView(LayoutInflater inflater, ViewGroup container, Bundle savedInstanceState) {
        // 加载布局文件
        View view = inflater.inflate(R.layout.fragment_chat, container, false);
        return view;
    }
}
它的主要功能是在 onCreateView 方法中加载与聊天相关的 XML 布局文件(R.layout.fragment_chat),将其转换为一个视图对象,然后返回该视图对象,以便将聊天页面的 UI 显示在应用中。这个 ChatFragment 可以被动态添加到应用的 UI 中。创建好了4个fragment界面后我们需要实现在底部菜单切换中间的fragment界面(在主要活动类实现)
应用的主界面布局:activity_main.xml
<?xml version="1.0" encoding="utf-8"?>
<LinearLayout xmlns:android="http://schemas.android.com/apk/res/android"
    xmlns:app="http://schemas.android.com/apk/res-auto"
    xmlns:tools="http://schemas.android.com/tools"
    android:layout_width="match_parent"
    android:layout_height="match_parent"
    tools:context=".MainActivity">


    <LinearLayout
        android:layout_width="match_parent"
        android:layout_height="match_parent"
        android:orientation="vertical">

        <include layout="@layout/top"/>
        <FrameLayout
            android:id="@+id/fl_middle"
            android:layout_width="match_parent"
            android:layout_height="0dp"
            android:layout_weight="1">
            >
        </FrameLayout>
        <include layout="@layout/botten" />
    </LinearLayout>

</LinearLayout>
这个布局文件定义了一个垂直线性布局,使用了两个 <include> 标签分别引入了 @layout/top 和 @layout/botten 这两个布局文件和一个FrameLayout来引用和添加了顶部区域、中间的内容区域(FrameLayout),以及底部功能选择区域。
主要活动类:MainActivity :
声明了一系列成员变量,如 FragmentManager、FragmentTransaction等。
    private LinearLayout llgame, llgroup, llmyself, llchat;
    private ImageView ivgame, ivgroup, ivmyself, ivchat;
    private TextView tvgame, tvgroup, tvmyself, tvchat;
loadFragment 方法用于加载不同的 Fragment,它通过 FragmentTransaction 替换一个容器内的 Fragment,并将事务添加到返回栈中,以支持后退操作。
    private void loadFragment(Fragment fragment) {
        FragmentTransaction transaction = fragmentManager.beginTransaction();
        transaction.replace(R.id.fl_middle, fragment); // R.id.fragment_container 是用于显示 Fragment 的容器
        transaction.addToBackStack(null); // 将 Fragment 添加到返回栈中
        transaction.commit();
    }
initEvent 方法初始化了界面元素、Fragment 实例以及点击事件处理逻辑
    private void initEvent(){
        fragmentManager = getSupportFragmentManager(); // 初始化 FragmentManager
        chatFragment = new ChatFragment();
        groupFragment = new GroupFragment();
        gameFragment = new GameFragment();
        myselfFragment = new MyselfFragment();
        ivchat.setSelected(true);
        loadFragment(chatFragment);
        llgame.setOnClickListener(this);
        llchat.setOnClickListener(this);
        llgroup.setOnClickListener(this);
        llmyself.setOnClickListener(this);


    }
initView 方法初始化了界面元素,如 LinearLayout、ImageView 和 TextView。
 private void initView() {
        llgame = findViewById(R.id.ll_game);
        ivgame = findViewById(R.id.iv_game);
        tvgame = findViewById(R.id.tv_game);

        llgroup = findViewById(R.id.ll_group);
        ivgroup = findViewById(R.id.iv_group);
        tvgroup = findViewById(R.id.tv_group);

        llmyself = findViewById(R.id.ll_myself);
        ivmyself = findViewById(R.id.iv_myself);
        tvmyself = findViewById(R.id.tv_myself);

        llchat = findViewById(R.id.ll_chat);
        ivchat = findViewById(R.id.iv_chat);
        tvchat = findViewById(R.id.tv_chat);


    }
onClick 方法处理用户点击事件,根据不同的点击来选择加载不同的 Fragment,并设置选中状态-选中时改变图片样式以反馈。
 public void onClick(View v) {
        int id = v.getId();
        if (id == R.id.ll_chat) {
            ivchat.setSelected(true);
            ivgroup.setSelected(false);
            ivmyself.setSelected(false);
            ivgame.setSelected(false);
            loadFragment(chatFragment);

        } else if (id == R.id.ll_group) {
            ivchat.setSelected(false);
            ivgroup.setSelected(true);
            ivmyself.setSelected(false);
            ivgame.setSelected(false);
            loadFragment(groupFragment);
        } else if (id == R.id.ll_game) {
            ivchat.setSelected(false);
            ivgroup.setSelected(false);
            ivmyself.setSelected(false);
            ivgame.setSelected(true);
            loadFragment(gameFragment);
        } else if (id == R.id.ll_myself) {
            ivchat.setSelected(false);
            ivgroup.setSelected(false);
            ivmyself.setSelected(true);
            ivgame.setSelected(false);
            loadFragment(myselfFragment);
        }
    }
}
最后onCreate 方法是活动的生命周期方法,用于初始化界面和事件处理。
@Override
protected void onCreate(Bundle savedInstanceState) {
super.onCreate(savedInstanceState);
setContentView(R.layout.activity_main);
initView();
initEvent();
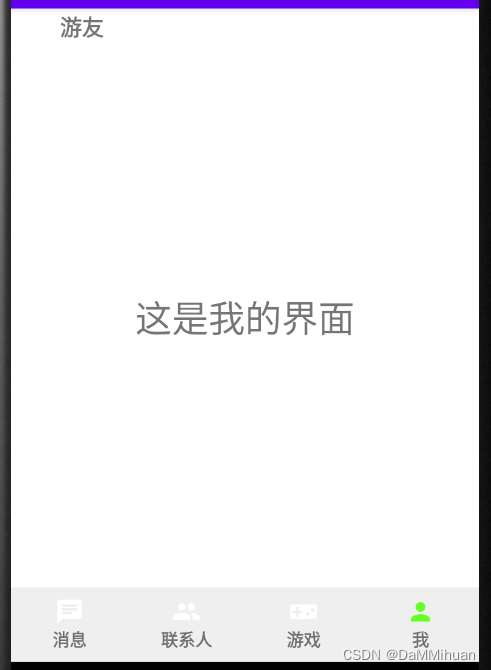
}总的来说,这段代码实现了一个底部导航菜单,用户可以通过点击不同的菜单项来切换显示不同的 Fragment,从而实现了不同界面的切换。每个 Fragment 对应一个功能区域,包括消息、群组、游戏和个人信息。
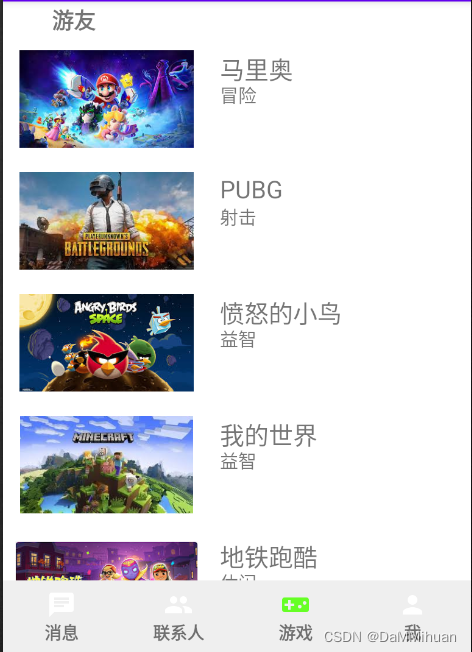
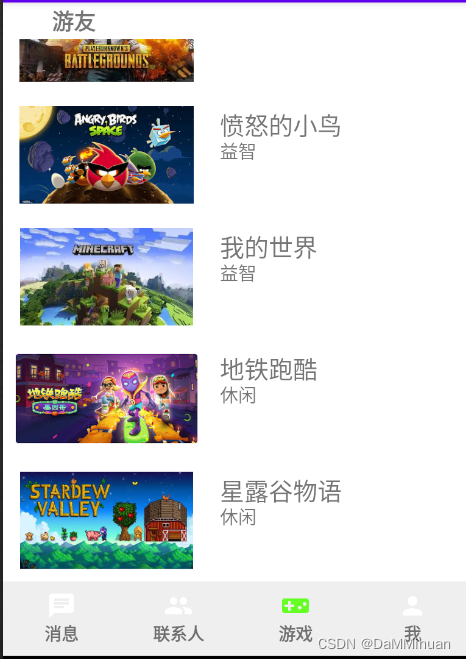
3.游戏界面实现列表效果
在你fragment_game布局文件中添加 RecyclerView:
<?xml version="1.0" encoding="utf-8"?>
<LinearLayout xmlns:android="http://schemas.android.com/apk/res/android"
    xmlns:tools="http://schemas.android.com/tools"
    android:layout_width="match_parent"
    android:layout_height="match_parent"
    tools:context="fragment.GameFragment">


    <androidx.recyclerview.widget.RecyclerView
        android:id="@+id/rcv_game"
        android:layout_width="match_parent"
        android:layout_height="match_parent" />
</LinearLayout>
RecyclerView 的布局文件:recyclerview_game_item.xml
XML布局定义了一个游戏项目的列表项,包括游戏图标、名称和类型的显示方式。
<?xml version="1.0" encoding="utf-8"?>

<FrameLayout
    xmlns:android="http://schemas.android.com/apk/res/android"
    android:layout_width="match_parent"
    android:layout_height="wrap_content"
    android:orientation="horizontal"
    android:padding="10dp">

    <ImageView
        android:id="@+id/iv_game_icon"
        android:layout_width="150dp"
        android:layout_height="80dp" />


    <TextView
        android:id="@+id/tv_game_name"
        android:layout_width="220dp"
        android:layout_height="30dp"
        android:textSize="20dp"
        android:text=""
        android:gravity="left"
        android:layout_marginLeft="168dp" />

    <TextView
        android:id="@+id/tv_game_type"
        android:layout_width="220dp"
        android:layout_height="20dp"
        android:layout_marginLeft="168dp"
        android:layout_marginTop="25dp"
        android:textSize="15dp"
        android:text=""/>


</FrameLayout>
创建游戏数据类:GameItem.java
创建一个数据类来表示游戏项目的信息,包括游戏的名称、图标等信息。
package recyclerview;

public class GameItem {
    private int iconResId;  // 游戏图标的资源 ID
    private String name;    // 游戏名称
    private String type;    // 游戏类型

    public GameItem(int iconResId, String name, String type) {
        this.iconResId = iconResId;
        this.name = name;
        this.type = type;
    }

    public int getIconResId() {
        return iconResId;
    }

    public String getName() {
        return name;
    }

    public String getType() {
        return type;
    }
}
创建 RecyclerView 的 Adapter:GameItemAdapter
这段代码是一个用于管理RecyclerView的适配器类,。它的主要作用是将游戏项目的数据与RecyclerView视图绑定在一起,以便在应用中以列表形式展示游戏项目的信息。
关键要点:
GameItemAdapter继承自RecyclerView.Adapter类,用于连接数据和视图。- 构造函数接受应用程序上下文和游戏项目数据列表作为参数。
onCreateViewHolder方法用于创建新的RecyclerView ViewHolder,即每个游戏项目的视图。onBindViewHolder方法用于将数据填充到特定的RecyclerView ViewHolder中,以展示游戏项目的图标、名称和类型。getItemCount方法返回游戏项目数据列表的大小。- 内部类
GameItemViewHolder用于表示每个游戏项目的视图元素。
通过这个适配器,游戏项目数据可以被有效地展示在应用的RecyclerView中,确保了数据与视图的正确对应和更新。
public class GameItemAdapter extends RecyclerView.Adapter<GameItemAdapter.GameItemViewHolder> {
    private Context context;
    private List<GameItem> gameItemList;

    public GameItemAdapter(Context context, List<GameItem> gameItemList) {
        this.context = context;
        this.gameItemList = gameItemList;
    }

    @NonNull
    @Override
    public GameItemViewHolder onCreateViewHolder(@NonNull ViewGroup parent, int viewType) {
        View view = LayoutInflater.from(context).inflate(R.layout.recyclerview_game_item, parent, false);
        return new GameItemViewHolder(view);
    }

    @Override
    public void onBindViewHolder(@NonNull GameItemViewHolder holder, int position) {
        GameItem gameItem = gameItemList.get(position);
        holder.ivGameIcon.setImageResource(gameItem.getIconResId());
        holder.tvGameName.setText(gameItem.getName());
        holder.tvGameType.setText(gameItem.getType());
    }

    @Override
    public int getItemCount() {
        return gameItemList.size();
    }

    public class GameItemViewHolder extends RecyclerView.ViewHolder {
        ImageView ivGameIcon;
        TextView tvGameName;
        TextView tvGameType;

        public GameItemViewHolder(@NonNull View itemView) {
            super(itemView);
            ivGameIcon = itemView.findViewById(R.id.iv_game_icon);
            tvGameName = itemView.findViewById(R.id.tv_game_name);
            tvGameType = itemView.findViewById(R.id.tv_game_type);
        }
    }
}
初始化 RecyclerView:GameFragment.java
通过 findViewById 方法获取 RecyclerView 控件的引用,该控件用于显示游戏项目的列表,创建了一个 List<GameItem> 类型的对象 gameItemList,用于存储游戏项目的信息。这里包括游戏图标、名称和类型。创建了一个 GameItemAdapter 类型的适配器对象adapter,并将其绑定到 RecyclerView 控件上。这个适配器将游戏项目数据与 RecyclerView 绑定,以便显示游戏项目的图标、名称和类型。总的来说,GameFragment 负责展示游戏项目的列表,通过 RecyclerView 和自定义的适配器来管理和显示游戏项目的信息。这样的结构允许在应用中以列表的形式展示多个游戏项目,使用户能够浏览不同的游戏信息。
public class GameFragment extends Fragment {
    private RecyclerView recyclerView;
    private List<GameItem> gameItemList;

    @Override
    public View onCreateView(LayoutInflater inflater, ViewGroup container, Bundle savedInstanceState) {
        View view = inflater.inflate(R.layout.fragment_game, container, false);

        // 初始化RecyclerView
        recyclerView = view.findViewById(R.id.rcv_game);
        recyclerView.setLayoutManager(new LinearLayoutManager(getContext()));

        // 创建游戏项目数据
        gameItemList = new ArrayList<>();
        gameItemList.add(new GameItem(R.drawable.game_image_0,"马里奥", "冒险\t"));
        gameItemList.add(new GameItem(R.drawable.game_image_1, "PUBG", "射击\t"));
        gameItemList.add(new GameItem(R.drawable.game_image_2, "愤怒的小鸟", "益智\t"));
        gameItemList.add(new GameItem(R.drawable.game_image_3, "我的世界", "益智\t"));
        gameItemList.add(new GameItem(R.drawable.game_image_4, "地铁跑酷", "休闲\t"));
        gameItemList.add(new GameItem(R.drawable.game_image_5, "星露谷物语", "休闲\t"));

        // 创建适配器并绑定数据到RecyclerView
        GameItemAdapter adapter = new GameItemAdapter(getContext(), gameItemList);
        recyclerView.setAdapter(adapter);

        return view;
    }
}
效果图:


 被折叠的 条评论
为什么被折叠?
被折叠的 条评论
为什么被折叠?
 到【灌水乐园】发言


