


1.加入项目(maven)中所需的依赖:(此时需要联网下载)
		<!-- 引入Hibernate依赖 -->
		<dependency>
			<groupId>org.hibernate</groupId>
			<artifactId>hibernate-core</artifactId>
			<version>5.2.12.Final</version>
		</dependency>

		<!-- 引入Mysql依赖 -->
		<dependency>
			<groupId>mysql</groupId>
			<artifactId>mysql-connector-java</artifactId>
			<version>5.1.43</version>
		</dependency>

		<!-- 引入Spring依赖 -->
		<dependency>
			<groupId>org.springframework</groupId>
			<artifactId>spring-context</artifactId>
			<version>4.3.10.RELEASE</version>
		</dependency>

		<!-- 引入c3p0数据库连接池 -->
		<dependency>
			<groupId>com.mchange</groupId>
			<artifactId>c3p0</artifactId>
			<version>0.9.5.1</version>
		</dependency>

		<!-- 引入Hibernate整合Spring -->
		<dependency>
			<groupId>org.springframework</groupId>
			<artifactId>spring-orm</artifactId>
			<version>4.3.10.RELEASE</version>
		</dependency>

		<!-- 引入spring-aspects:解析事务的表达式 -->
		<dependency>
			<groupId>org.springframework</groupId>
			<artifactId>spring-aspects</artifactId>
			<version>4.3.10.RELEASE</version>
		</dependency>

		<!-- 引入Struts2依赖 -->
		<dependency>
			<groupId>org.apache.struts</groupId>
			<artifactId>struts2-core</artifactId>
			<version>2.3.33</version>
		</dependency>

		<!-- struts2整合Spring的 插件包 -->
		<dependency>
			<groupId>org.apache.struts</groupId>
			<artifactId>struts2-spring-plugin</artifactId>
			<version>2.5.12</version>
		</dependency>
2.配置hibernate框架:(hibernate里面的连接MySQL的代码交给spring去管理了,所以我的连接代码已注释,
注:表创建好后记得把建表的代码给注释掉!Teacher.hbm.xml该文件是实体类的映射文件)
<!DOCTYPE hibernate-configuration PUBLIC "-//Hibernate/Hibernate Configuration DTD 3.0//EN" "http://www.hibernate.org/dtd/hibernate-configuration-3.0.dtd"> <hibernate-configuration> <session-factory> <!-- <property name="hibernate.connection.driver_class">com.mysql.jdbc.Driver</property> --> <!-- <property name="hibernate.connection.password">zy123</property> --> <!-- <property name="hibernate.connection.url">jdbc:mysql://localhost:3306/test</property> --> <!-- <property name="hibernate.connection.username">root</property> --> <!-- 显示sql语句 --> <property name="show_sql">true</property> <!--格式化sql语句 --> <property name="format_sql">true</property> <!-- 建表 --> <property name="hbm2ddl.auto">create</property> <mapping resource="com/entity/Teacher.hbm.xml" /> </session-factory> </hibernate-configuration>
3.spring框架的整合:在resource根目录下创建applicationContext-public.xml文件(public为核心文件)
applicationContext-public.xml文件内容:
<?xml version="1.0" encoding="UTF-8"?> <beans xmlns="http://www.springframework.org/schema/beans" xmlns:xsi="http://www.w3.org/2001/XMLSchema-instance" xmlns:aop="http://www.springframework.org/schema/aop" xmlns:c="http://www.springframework.org/schema/c" xmlns:context="http://www.springframework.org/schema/context" xmlns:tx="http://www.springframework.org/schema/tx" xsi:schemaLocation="http://www.springframework.org/schema/beans http://www.springframework.org/schema/beans/spring-beans.xsd http://www.springframework.org/schema/aop http://www.springframework.org/schema/aop/spring-aop-4.3.xsd http://www.springframework.org/schema/context http://www.springframework.org/schema/context/spring-context-4.3.xsd http://www.springframework.org/schema/tx http://www.springframework.org/schema/tx/spring-tx-4.3.xsd"> <!--引入db.properties(数据库的配置信息) --> <context:property-placeholder location="classpath:db.properties"/> <!--配置数据源:配置数据库的连接池c3p0 --> <bean id="dataSource" class="com.mchange.v2.c3p0.ComboPooledDataSource"> <property name="user" value="${uname}"></property> <property name="password" value="${upwd}"></property> <property name="jdbcUrl" value="${url}"></property> <property name="driverClass" value="${driverClass}"></property> <property name="initialPoolSize" value="${initPoolSize}"></property> <property name="maxPoolSize" value="${maxPoolSize}"></property> </bean> <!-- 配置sessionFactory 此时的class属性中需要引入Hibernate整合Spring的依赖--> <bean id="sessionFactory" class="org.springframework.orm.hibernate5.LocalSessionFactoryBean"> <!-- 引入数据上面配置的数据源 --> <property name="dataSource" ref="dataSource"></property> <!-- 加载hibernate的配置文件 --> <property name="configLocation" value="classpath:hibernate.cfg.xml"></property> <!-- 加载映射文件 --> <property name="mappingLocations" value="classpath:com/entity/Teacher.hbm.xml"></property> </bean> <!-- 配置事务管理器 --> <bean id="transactionManager" class="org.springframework.orm.hibernate5.HibernateTransactionManager"> <property name="sessionFactory" ref="sessionFactory"></property> </bean> <!-- 配置事务的属性 --> <tx:advice id="myAdvice" transaction-manager="transactionManager"> <tx:attributes> <tx:method name="add*" propagation="REQUIRED"/> <tx:method name="update*" propagation="REQUIRED"/> <tx:method name="delete*" propagation="REQUIRED"/> <tx:method name="*"/> </tx:attributes> </tx:advice> <!-- 配置事务的切点 --> <aop:config> <aop:pointcut expression="execution(* com.dao.*.*(..))" id="myPoint"/> <aop:advisor advice-ref="myAdvice" pointcut-ref="myPoint"/> </aop:config> </beans>db.properties该文件是数据库的配置内容:简单的MySQL连接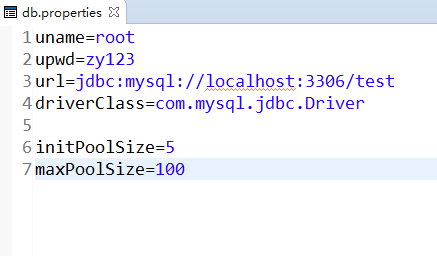

5.配置Struts文件:
6.最后配置web.xml,用于加载Struts以及spring配置的文件!


 281
281

 被折叠的 条评论
为什么被折叠?
被折叠的 条评论
为什么被折叠?
 到【灌水乐园】发言


