


1.Is there a medium weight font between -systemFontOfSize: and -boldSystemFontOfSize:?(设置中号字体)
//第一种(通用)
    UIFont *font = [UIFont fontWithName:@"HelveticaNeue-Medium" size:14.0f];
    //iOS8.2开始
[UIFont systemFontOfSize:14 weight:UIFontWeightMedium];2.Reducing the space between sections of the UITableView (减少默认tableView的sectionHeader和Footer的高度,直接设置0是无效的,最小是1.0f)
第一种
- (CGFloat)tableView:(UITableView*)tableView
           heightForHeaderInSection:(NSInteger)section {
    if (section == 0) {
        return 6.0;
    }

    return 1.0;
}

- (CGFloat)tableView:(UITableView*)tableView
           heightForFooterInSection:(NSInteger)section {
    return 5.0;
}

- (UIView*)tableView:(UITableView*)tableView
           viewForHeaderInSection:(NSInteger)section {
    return [[UIView alloc] initWithFrame:CGRectZero];
}

- (UIView*)tableView:(UITableView*)tableView
           viewForFooterInSection:(NSInteger)section {
    return [[UIView alloc] initWithFrame:CGRectZero];
}
// footer 间距
- (CGFloat)tableView:(UITableView *)tableView heightForFooterInSection:(NSInteger)section
{
//    return 1.0f;
    return CGFLOAT_MIN;
}
3.减少多余的tableView空的cell
tableView.tableFooterView = [UIViewnew];
4.change navigation bar title font and color (如何更改导航栏title文字的颜色)
[self.navigationController.navigationBar setTitleTextAttributes:
 @{NSForegroundColorAttributeName:[UIColor redColor],
NSFontAttributeName:[UIFont fontWithName:@"mplus-1c-regular" size:21]}];5.How to change navigation bar color in iOS 7 or 6? (更改导航栏颜色)
if (NSFoundationVersionNumber > NSFoundationVersionNumber_iOS_6_1) {

    // do stuff for iOS 7 and newer
    [self.navigationController.navigationBar setBarTintColor:[UIColor yellowColor]];
}
else {

    // do stuff for older versions than iOS 7
    [self.navigationController.navigationBar setTintColor:[UIColor yellowColor]];
}
6. How to detect if vc is being popped or pushed?(如何知道导航栏是pop还是push)
- (void)viewWillDisappear:(BOOL)animated
{
    [super viewWillDisappear:animated];
    if ([self isMovingFromParentViewController])
    {
        NSLog(@"View controller was popped");
    }
    else
    {
        NSLog(@"New view controller was pushed");
    }
}
7. 如何手动取消UIDispalaySearchController的取消搜索状态
#pragma mark - 点击搜索,能够取消搜索状态
#pragma mark UISearchDisplayDelegate
- (void)searchDisplayControllerDidBeginSearch:(UISearchDisplayController *)controller
{
    for (UIView *view in controller.searchBar.subviews)
    {
         NSLog(@"%d__|---%@",__LINE__,view);
        for (UIView *subView in view.subviews)
        {
             NSLog(@"%d__|!!!%@",__LINE__,subView);
            //  获取"取消"按钮
            if([subView isKindOfClass:[UIButton class]])
            {
                UIButton *cancelButton = (UIButton *)subView;
                //  获取点击"取消"按钮的响应事件(actionsForTarget 这个方法返回的是一个数组)
                self.cancelSearchSELString = [[cancelButton actionsForTarget:controller.searchBar forControlEvent:UIControlEventTouchUpInside] objectAtIndex:0];
                //  响应通知,执行方法直接用上面获得的响应事件方法,转换一下(这是个知识点,可以扩展下)
                [[NSNotificationCenter defaultCenter] addObserver:controller.searchBar selector:NSSelectorFromString(self.cancelSearchSELString) name:@"cancelSearch" object:nil];
            }
        }
    }
}

#pragma mark UISearchBarDelegate------点击搜索按钮
- (void)searchBarSearchButtonClicked:(UISearchBar *)searchBar{

    //  获取你想搜索的最终完整关键字(一般可以用来做搜索历史展示)
    NSLog(@"%s__%d__|%@",__FUNCTION__,__LINE__,searchBar.text);
    //  点击按钮时,发布取消搜索状态通知
    [[NSNotificationCenter defaultCenter] postNotificationName:@"cancelSearch" object:nil];
    //  发布---响应---取消通知
    [[NSNotificationCenter defaultCenter] removeObserver:searchBar name:@"cancelSearch" object:nil];
} 8.Receive Tap Gesture only on part of a view (如何只让手势响应指定区域)
    UITapGestureRecognizer *tap = [[UITapGestureRecognizer alloc] initWithTarget:self action:@selector(clickView:)];
    tap.delegate = self;
    [self.view addGestureRecognizer:tap];

//    [self.picker addTarget:self action:@selector(changeDate:) forControlEvents:UIControlEventValueChanged];
}


// 该方法让只点击上方mask的时候才能响应手势,拦截手势响应的区域,只有上方才有效
- (BOOL)gestureRecognizer:(UIGestureRecognizer *)gestureRecognizer shouldReceiveTouch:(UITouch *)touch
{
    CGPoint touchPoint = [touch locationInView:self.view];
    // touchPoint的点是否在self.contentView区域以内,是的话就取反,不接受手势,不是的话就响应手势,关闭界面
    BOOL isContainsPoint = CGRectContainsPoint(self.backView.frame, touchPoint);
    return !isContainsPoint;
}9.UIImage的渲染模式 imageWithRenderingMode
UIImage新增了一个只读属性:renderingMode,对应的还有一个新增方法:imageWithRenderingMode:,它使用UIImageRenderingMode枚举值来设置图片的renderingMode属性。该枚举中包含下列值:
UIImageRenderingModeAutomatic // 根据图片的使用环境和所处的绘图上下文自动调整渲染模式。
UIImageRenderingModeAlwaysOriginal // 始终绘制图片原始状态,不使用Tint Color。
UIImageRenderingModeAlwaysTemplate // 始终根据Tint Color绘制图片,忽略图片的颜色信息
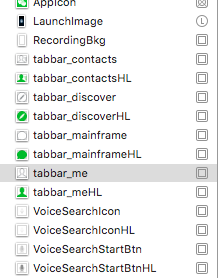
[barItem setImage:[UIImage imageNamed:obj[kImageKey]]];
        [barItem setSelectedImage:[UIImage imageNamed:obj[kSelectedImageKey]]];
普通做法: 颜色被修改了 系统的默认貌似都是蓝色
[barItem setImage:[UIImage imageNamed:obj[kImageKey]]];
[barItem setSelectedImage:[UIImage imageNamed:obj[kSelectedImageKey]]]; [barItem setImage:[[UIImage imageNamed:obj[kImageKey]] imageWithRenderingMode:UIImageRenderingModeAlwaysOriginal]];
[barItem setSelectedImage:[[UIImage imageNamed:obj[kSelectedImageKey]] imageWithRenderingMode:UIImageRenderingModeAlwaysOriginal]];
修改渲染属性: 使用的是图片原始的颜色
[barItem setImage:[[UIImage imageNamed:obj[kImageKey]] imageWithRenderingMode:UIImageRenderingModeAlwaysOriginal]];
[barItem setSelectedImage:[[UIImage imageNamed:obj[kSelectedImageKey]] imageWithRenderingMode:UIImageRenderingModeAlwaysOriginal]];10.How to change UILabel Text Margin (如何更改UILabel内部文字的边距)
- (void)drawTextInRect:(CGRect)rect {
    UIEdgeInsets insets = {0, 5, 0, 5};
    [super drawTextInRect:UIEdgeInsetsInsetRect(rect, insets)];
}
11.当tableView右侧有index引索的时候,如何修改引索View的背景颜色
- (UITableViewCell *)tableView:(UITableView *)tv cellForRowAtIndexPath:(NSIndexPath *)indexPath {

  for(UIView *view in [tv subviews])
  {
    if([[[view class] description] isEqualToString:@"UITableViewIndex"])
    {

      [view setBackgroundColor:[UIColor whiteColor]];
      [view setFont:[UIFont systemFontOfSize:14]];
    }
  }

  //rest of cellForRow handling...

}
12.iOS 6 和 7中UITableViewCell的获取方法
<UITableViewCell>
   | <UITableViewCellContentView>
   |    | <UILabel>
UITableViewCell *clickedCell = (UITableViewCell *)[[sender superview] superview];
NSIndexPath *clickedButtonPath = [book_table indexPathForCell:clickedCell];
NSLog(@"index=%@",clickedButtonPath);<UITableViewCell>
| <UITableViewCellScrollView>
| | <UITableViewCellContentView>
| | | <UILabel>UITableViewCell *clickedCell = (UITableViewCell *)[[[sender superview] superview]superview];
NSIndexPath *clickedButtonPath = [book_table indexPathForCell:clickedCell];
NSLog(@"index=%ld",(long)clickedButtonPath.item);13.几个常用的C计算函数
ceil(x)返回不小于x的最小整数值(然后转换为double型)。
floor(x)返回不大于x的最大整数值。
round(x)返回x的四舍五入整数值。
14.例如视频播放等需求,单击手势和双击手势冲突,如何只响应双击的时候不响应单击
// 单击的 Recognizer
                    singleTap = [[UITapGestureRecognizer alloc] initWithTarget:self action:@selector(handleSingleTap:)];
                    singleTap.numberOfTapsRequired = 1; // 单击
                    singleTap.numberOfTouchesRequired = 1;
                    [self addGestureRecognizer:singleTap];
                    // 双击的 Recognizer
                    UITapGestureRecognizer* doubleTap = [[UITapGestureRecognizer alloc] initWithTarget:self action:@selector(handleDoubleTap:)];
                    doubleTap.numberOfTapsRequired = 2; // 双击
                    [singleTap requireGestureRecognizerToFail:doubleTap];//如果双击成立,则取消单击手势(双击的时候不回走单击事件)
                    [self addGestureRecognizer:doubleTap];
15.获取视频首帧缩略图
**4、获取视频缩略图**
获取首帧视频截图的方法如下:
```objc
        AVAssetImageGenerator  *imageGen = [[AVAssetImageGenerator alloc] initWithAsset:self.source];
        if (imageGen) {
            imageGen.appliesPreferredTrackTransform = YES;
            CMTime actualTime;
            CGImageRef cgImage = [imageGen copyCGImageAtTime:CMTimeMakeWithSeconds(0, 30) actualTime:&actualTime error:NULL];
            if (cgImage) {
                UIImage *image = [UIImage imageWithCGImage:cgImage];
                CGImageRelease(cgImage);
                return image;
            }
        }
16.如何给Xcode增加个模拟器
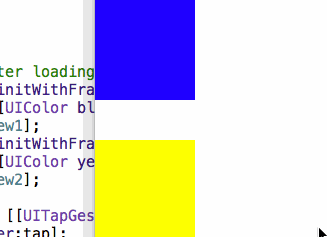
17.理解下removeFromSuperView到底是什么鬼??!!
removeFromSuperview就是一个视图节点删除的操作,执行这个方法,就等于在树形结构中找到该节点,从树型数
据结构中删除该节点及其子节点,而并非只是删除该节点自己。同时,另一个操作就是把该对象从响应者链中移除。
执行removeFromSuperview方法,只是该视图不在屏幕中显示,并没有将该视图从内存中移除。所以我们如果需要
使用该视图,不需要再次创建,而是直接addSubview就可以了。
但是如果你执行这句代码之后,再执行obj = nil,那么直接就把他释放了,看Deme
View1和View2对比,View1remove之后直接置nil,view2不置nil
- (void)viewDidLoad {
    [super viewDidLoad];
    // Do any additional setup after loading the view, typically from a nib.
    self.view1 = [[UIView alloc] initWithFrame:CGRectMake(0, 80, 100, 100)];
    self.view1.backgroundColor = [UIColor blueColor];
    [self.view addSubview:self.view1];
    self.view2 = [[UIView alloc] initWithFrame:CGRectMake(0, 220, 100, 100)];
    self.view2.backgroundColor = [UIColor yellowColor];
    [self.view addSubview:self.view2];

    UITapGestureRecognizer *tap = [[UITapGestureRecognizer alloc] initWithTarget:self action:@selector(click:)];
    [self.view addGestureRecognizer:tap];
}

- (void)click:(UITapGestureRecognizer *)tap
{
    if (!self.isHidden)
    {
        [self.view1 removeFromSuperview];
        [self.view2 removeFromSuperview];
        if (self.view1) {
            self.view1 = nil;
        }
    }
    else
    {
        [[UIApplication sharedApplication].keyWindow addSubview:self.view1];
        [[UIApplication sharedApplication].keyWindow addSubview:self.view2];
    }
    self.isHidden = !self.isHidden;
}
18.习惯Xib布局的,UIButton一定要修改其属性

[UIButton buttonWithType:UIButtonTypeSystem]; 第二种我们可以在inspector第一栏里面修改为Custom,默认是System的
19.代替宏的全局静态只读常量
// 开发中常用static修饰全局变量,只改变作用域

// 为什么要改变全局变量作用域,防止重复声明全局变量。

// 开发中声明的全局变量,有些不希望外界改动,只允许读取。

// 比如一个基本数据类型不希望别人改动

// 声明一个静态的全局只读常量
static const int a = 20;

// staic和const联合的作用:声明一个静态的全局只读常量

// iOS中staic和const常用使用场景,是用来代替宏,把一个经常使用的字符串常量,定义成静态全局只读变量.

// 开发中经常拿到key修改值,因此用const修饰key,表示key只读,不允许修改。
static  NSString * const key = @"name";

// 如果 const修饰 *key1,表示*key1只读,key1还是能改变。

static  NSString const *key1 = @"name";
20.四舍五入 进位 摸位的计算函数
float numberToRound;
    int result;

    numberToRound = 5.61;
    result = (int)roundf(numberToRound);
    NSLog(@"roundf(%.2f) = %d", numberToRound, result);
    //输出 roundf(5.61) = 6


    numberToRound = 5.41;

    result = (int)roundf(numberToRound);

    NSLog(@"roundf(%.2f) = %d", numberToRound, result);

    //输出 roundf(5.41) = 5
进位
 float numberToRound;
    int result;

    numberToRound = 5.61;
    result = (int)ceilf(numberToRound);

    NSLog(@"ceilf(%.2f) = %d", numberToRound, result);

    //输出 ceilf(5.61) = 6


    numberToRound = 5.41;

    result = (int)ceilf(numberToRound);

    NSLog(@"ceilf(%.2f) = %d", numberToRound, result);

    //输出 ceilf(5.41) = 6
摸位
float numberToRound;
    int result;

    numberToRound = 5.61;
    result = (int)floorf(numberToRound);

    NSLog(@"floorf(%.2f) = %d", numberToRound, result);

    //输出 floorf(5.61) = 5


    numberToRound = 5.41;

    result = (int)floorf(numberToRound);

    NSLog(@"floorf(%.2f) = %d", numberToRound, result);

    //输出 floorf(5.41) = 5
21.如何修改UISearchBar Cancel title & textAttribute
[self.searchController.searchBar setValue:@"我擦" forKey:@"_cancelButtonText"];
    [[UIBarButtonItem appearanceWhenContainedIn:[UISearchBar class], nil] setTitleTextAttributes:@{NSFontAttributeName : [UIFont boldSystemFontOfSize:14],NSForegroundColorAttributeName : RGBA(51, 51, 51, 1)} forState:UIControlStateNormal];
22.iOS 8上下字体的不同方法区分
cell.textLabel.font = [TWTFontWeight systemFontOfSize:15 forWeight:Medium];+(UIFont*)systemFontOfSize:(CGFloat)size forWeight:(NSString*)weight
{
NSDictionary * fontWeightMap1 = @{
@"UltraLight":@"HelveticaNeue-UltraLight",
@"Thin":@"HelveticaNeue-Thin",
@"Light":@"HelveticaNeue-Light",
@"Regular":@"HelveticaNeue",
@"Medium":@"HelveticaNeue-Medium",
@"Semibold":@"Helvetica-Bold",
@"Bold":@"HelveticaNeue-Bold",
@"Heavy":@"HelveticaNeue-CondensedBold",
@"Black":@"HelveticaNeue-CondensedBlack"
};
if (size<1)
{
size = 14;
}
CGFloat value =[[[UIDevice currentDevice] systemVersion] floatValue];
if (value>8.1)
{
NSDictionary * fontWeightMap2 = @{
@"UltraLight":@(UIFontWeightUltraLight),
@"Thin":@(UIFontWeightThin),
@"Light":@(UIFontWeightLight),
@"Regular":@(UIFontWeightRegular),
@"Medium":@(UIFontWeightMedium),
@"Semibold":@(UIFontWeightSemibold),
@"Bold":@(UIFontWeightBold),
@"Heavy":@(UIFontWeightHeavy),
@"Black":@(UIFontWeightBlack),
};
CGFloat weightName = [[fontWeightMap2 valueForKey:weight]floatValue];
return [UIFont systemFontOfSize:size weight:weightName];
}
else
{
NSString* weightName = [fontWeightMap1 valueForKey:weight];
return [UIFont fontWithName:weightName size:size];
}
}23.iOS应用跳转到App Store的两种方式
// 这个方法是用SK框架打开直接下载页面  要导入#import <StoreKit/StoreKit.h>
                SKStoreProductViewController *storeProductViewContorller = [[SKStoreProductViewController alloc] init];
                //设置代理请求为当前控制器本身
                storeProductViewContorller.delegate = self;
                //加载一个新的视图展示
                [storeProductViewContorller loadProductWithParameters:
                 //appId唯一的
                 @{SKStoreProductParameterITunesItemIdentifier : @"1048352304"} completionBlock:^(BOOL result, NSError *error) {
                     //block回调
                     if(error){
                         NSLog(@"error %@ with userInfo %@",error,[error userInfo]);
                     }else{
                         //模态弹出appstore
                         [self presentViewController:storeProductViewContorller animated:YES completion:^{

                         }
                          ];
                     }
                 }];
                // 直接打开方法
                [[UIApplication sharedApplication] openURL:[NSURL URLWithString:@"https://itunes.apple.com/app/tao-wai-tao-fa-xian-guo-wai/id1048352304?l=zh&mt=8"]];
24.Mac系统下面删除.svn文件,然后重新checkOut
MAC系统下,.svn文件是隐藏的。
如果项目是非export导出的,那么项目中会有很多的.svn文件。
如果项目的体积非常庞大,我们如何快速的批量删除.svn文件呢?下面是操作方法:
打开终端,cd ...命令进入到.svn所在的文件夹。
输入:find . -type d -name ".svn"|xargs rm -rf
回车,这样.svn文件已经全部删除了。
25.截屏效果
- (UIImage *)snapshot:(UIView *)view

{

    UIGraphicsBeginImageContextWithOptions(view.bounds.size,YES,0);

    [view drawHierarchyInRect:view.bounds afterScreenUpdates:YES];

    UIImage *image = UIGraphicsGetImageFromCurrentImageContext();

    UIGraphicsEndImageContext();

    return image;

}
26.如何删除.git文件,避免重复包含
find . -name ".git" | xargs rm -Rf
然后再一套连招,就可以正常push到github了
27.如何判断字符串有中文
- (BOOL)containChineseWord:(NSString *)string
{
    for (NSInteger index = 0; index < string.length; index++)
    {
        unichar indexChar = [string characterAtIndex:index];
        if (indexChar > 0xE0)
        {
            return YES;
        }
    }
    return NO;
}
28.如何让TestField输入只有英文,中文和字符
+ (BOOL)isValidatePassword:(NSString *)password
{
    // 合法字符
    NSString *psw = @"ABCDEFGHIJKLMNOPQRSTUVWXYZabcdefghijklmnopqrstuvwxyz0123456789~`!@#$%^&*()_-+={}[]|;:,<>.?/";
    // 取反
    NSCharacterSet *cs = [[NSCharacterSet characterSetWithCharactersInString:psw] invertedSet];
    // 取反字符分割组合
    NSString *filtered = [[password componentsSeparatedByCharactersInSet:cs] componentsJoinedByString:@""];
    // 分割不到,相同,代表合法 返回YES,分割到了,不同,代表不合法字符存在,返回NO
    return [password isEqualToString:filtered];
}
29.如何修改例如聊天气泡Image的颜色
- (UIImage *)jsq_imageMaskedWithColor:(UIColor *)maskColor
{
    NSParameterAssert(maskColor != nil);

    CGRect imageRect = CGRectMake(0.0f, 0.0f, self.size.width, self.size.height);
    UIImage *newImage = nil;

    UIGraphicsBeginImageContextWithOptions(imageRect.size, NO, self.scale);
    {
        CGContextRef context = UIGraphicsGetCurrentContext();

        CGContextScaleCTM(context, 1.0f, -1.0f);
        CGContextTranslateCTM(context, 0.0f, -(imageRect.size.height));

        CGContextClipToMask(context, imageRect, self.CGImage);
        CGContextSetFillColorWithColor(context, maskColor.CGColor);
        CGContextFillRect(context, imageRect);

        newImage = UIGraphicsGetImageFromCurrentImageContext();
    }
    UIGraphicsEndImageContext();

    return newImage;
}


 1594
1594

 被折叠的 条评论
为什么被折叠?
被折叠的 条评论
为什么被折叠?
 到【灌水乐园】发言


