在C#中,获取或者设置图片像素点的颜色,一般用Bitmap对象的GetPixel方法和SetPixel方法来获取像素点和设置像素点,但这两个方法都很慢。
可以使用BitmapData类来加快速度。
Bitmap类
Bitmap对象封装了GDI+中的一个位图,此位图由图形图像及其属性的像素数据组成。该类的主要方法和属性如下:
    GetPixel方法和SetPixel方法:获取和设置一个图像的指定像素的颜色
    PixelFormat属性:返回图像的像素格式
    Palette属性:获取和设置图像所使用的颜色调色板
    Heigh和Width属性:返回图像的高度和宽度
    LockBits方法和UnlockBits方法:分别锁定和解锁系统内存中的位图像素。在基于像素点的图像处理方法中使用LockBits和UnlockBits是一个很好的方式,这两种方法可以使我们指定像素的范围来控制位图的任意一部分,从而消除了通过循环对位图的像素逐个进行处理,每调用LockBits之后都应该调用一次UnlockBits.
BitmapData类
BitmapData对象指定了位图的属性:
Height属性:被锁定位图的高度
Width属性:被锁定位图的高度
PixelFormat属性:数据的实际像素格式
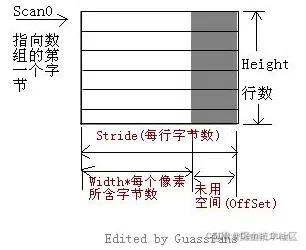
Scan0属性:被锁定数组的首字节地址,如果整个图像被锁定,则是图像的第一个字节地址
Stride属性:步幅,也称为扫描宽度

如上图所示,数组的长度并不一定等于图像像素数组的长度,还有一部分未用区域,这涉及到位图的数据结构,系统要保证每行的字节数必须为4的倍数。
bpp 像素深度
像素深度是指存储每个像素所用的位数,也用它来度量图像的分辨率。像素深度决定彩色图像的每个像素可能有的颜色数,或者确定灰度图像的每个像素可能有的灰度级数。
例如,一幅彩色图像的每个像素用R,G,B三个分量表示,若每个分量用8位,那么一个像素共用24位表示,就说像素的深度为24,每个像素可以是16 777 216(2的24次方)种颜色中的一种。在这个意义上,往往把像素深度说成是图像深度。表示一个像素的位数越多,它能表达的颜色数目就越多,而它的深度就越深。
LockBitmap类
结合Bitmap类和BitmapData类新建一个LockBitmap类,用来方便获取或者设置图片像素点的颜色
public class LockBitmap
{
private readonly Bitmap _source = null;
IntPtr _iptr = IntPtr.Zero;
BitmapData _bitmapData = null;
public byte[] Pixels { get; set; }
public int Depth { get; private set; }
public int Width { get; private set; }
public int Height { get; private set; }

public LockBitmap(Bitmap source)
{
    this._source = source;
}

/// <summary>
/// 锁定位图数据
/// </summary>
public void LockBits()
{
    try
    {
        // 获取位图的宽和高
        Width = _source.Width;
        Height = _source.Height;

        // 获取锁定像素点的总数
        int pixelCount = Width * Height;

        // 创建锁定的范围
        Rectangle rect = new Rectangle(0, 0, Width, Height);

        // 获取像素格式大小
        Depth = Image.GetPixelFormatSize(_source.PixelFormat);

        // 检查像素格式
        if (Depth != 8 && Depth != 24 && Depth != 32)
        {
            throw new ArgumentException("仅支持8,24和32像素位数的图像");
        }

        // 锁定位图并返回位图数据
        _bitmapData = _source.LockBits(rect, ImageLockMode.ReadWrite, _source.PixelFormat);

        // 创建字节数组以复制像素值
        int step = Depth / 8;
        Pixels = new byte[pixelCount * step];
        _iptr = _bitmapData.Scan0;

        // 将数据从指针复制到数组
        Marshal.Copy(_iptr, Pixels, 0, Pixels.Length);
    }
    catch (Exception ex)
    {
        throw ex;
    }
}

/// <summary>
/// 解锁位图数据
/// </summary>
public void UnlockBits()
{
    try
    {
        // 将数据从字节数组复制到指针
        Marshal.Copy(Pixels, 0, _iptr, Pixels.Length);

        // 解锁位图数据
        _source.UnlockBits(_bitmapData);
    }
    catch (Exception ex)
    {
        throw ex;
    }
}

/// <summary>
/// 获取像素点的颜色
/// </summary>
/// <param name="x"></param>
/// <param name="y"></param>
/// <returns></returns>
public Color GetPixel(int x, int y)
{
    Color clr = Color.Empty;

    // 获取颜色组成数量
    int cCount = Depth / 8;

    // 获取指定像素的起始索引
    int i = ((y * Width) + x) * cCount;

    if (i > Pixels.Length - cCount)
        throw new IndexOutOfRangeException();

    if (Depth == 32) // 获得32 bpp红色,绿色,蓝色和Alpha
    {
        byte b = Pixels[i];
        byte g = Pixels[i + 1];
        byte r = Pixels[i + 2];
        byte a = Pixels[i + 3]; // a
        clr = Color.FromArgb(a, r, g, b);
    }

    if (Depth == 24) // 获得24 bpp红色,绿色和蓝色
    {
        byte b = Pixels[i];
        byte g = Pixels[i + 1];
        byte r = Pixels[i + 2];
        clr = Color.FromArgb(r, g, b);
    }

    if (Depth == 8) // 获得8 bpp
    {
        byte c = Pixels[i];
        clr = Color.FromArgb(c, c, c);
    }
    return clr;
}

/// <summary>
/// 设置像素点颜色
/// </summary>
/// <param name="x"></param>
/// <param name="y"></param>
/// <param name="color"></param>
public void SetPixel(int x, int y, Color color)
{
    // 获取颜色组成数量
    int cCount = Depth / 8;

    // 获取指定像素的起始索引
    int i = ((y * Width) + x) * cCount;

    if (Depth == 32)
    {
        Pixels[i] = color.B;
        Pixels[i + 1] = color.G;
        Pixels[i + 2] = color.R;
        Pixels[i + 3] = color.A;
    }
    if (Depth == 24)
    {
        Pixels[i] = color.B;
        Pixels[i + 1] = color.G;
        Pixels[i + 2] = color.R;
    }
    if (Depth == 8)
    {
        Pixels[i] = color.B;
    }
}
}
实例
using (Image img = Image.FromFile(“ImagePath”))
{
using (Bitmap bmp = new Bitmap(img))
{
int totalX = bmp.Width;
int totalY = bmp.Height;
    var lockBitmap = new LockBitmap(bmp);
    lockBitmap.LockBits();

    var pixelColor = lockBitmap.GetPixel(0, 50);

    lockBitmap.UnlockBits();
}
}
转载自:
作者:Zw_Geek
链接:https://juejin.cn/post/6844903784456388622
来源:稀土掘金


 951
951

 被折叠的 条评论
为什么被折叠?


