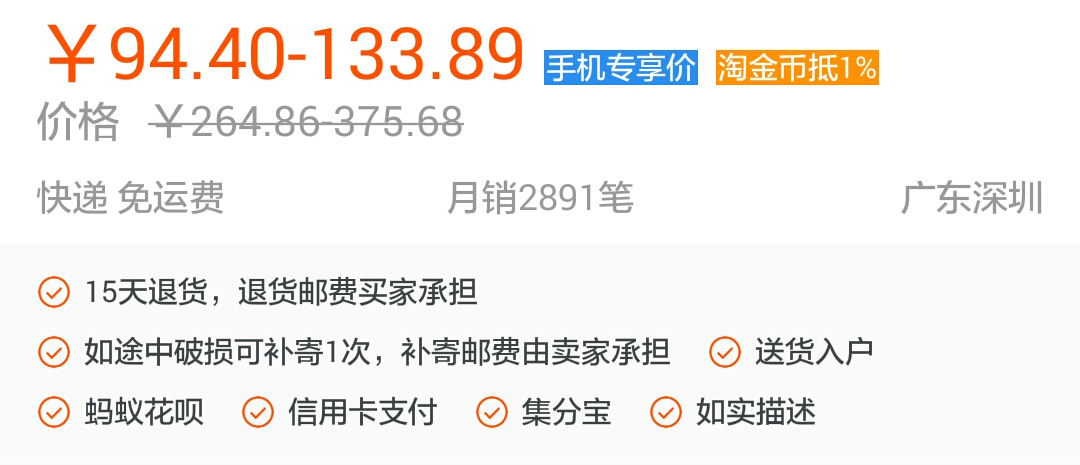
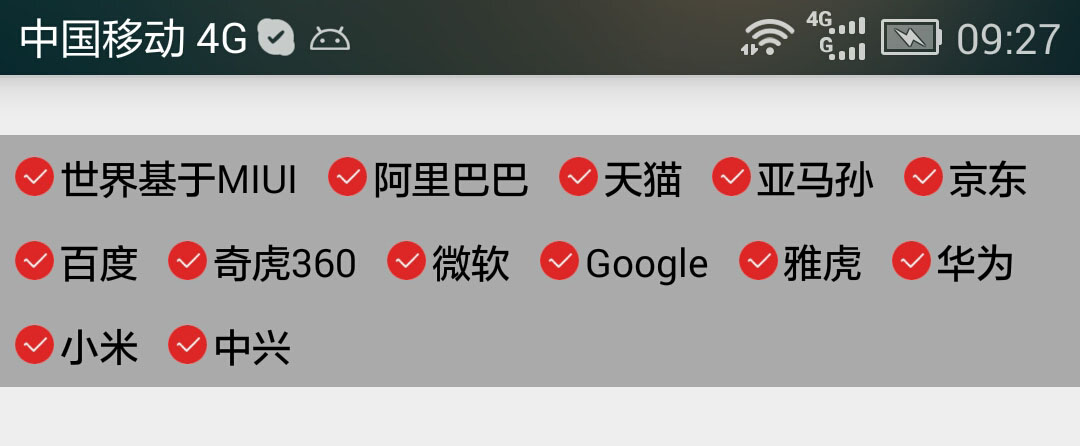
先来一张淘宝的效果图和自定义实现的效果图对比
淘宝图
自定义效果
效果实现的原理很简单,继承自ViewGroup来实现一个自定义的布局容器,主要逻辑在onMeasure和onLayout当中进行处理。
onMeasure: 对所有子控件的宽度和高度进行测量,并且根据子控件的个数,来设置布局本身的高度。
@Override
	protected void onMeasure(int widthMeasureSpec, int heightMeasureSpec) {
		// 测量出所有的childView的宽和高
		measureChildren(widthMeasureSpec, heightMeasureSpec);

		// 按全部控件的大小测量出实际的控件高度
		int height = getWrapHeight(widthMeasureSpec, heightMeasureSpec);

		setMeasuredDimension(MeasureSpec.getSize(widthMeasureSpec), height);
	}

	/**
	 * 返回计算的包含内容的布局高度
	 *
	 * @return
	 */
	private int getWrapHeight(int widthMeasureSpec, int heightMeasureSpec) {
		WrapLayoutParams parmas = null;
		int row = 1; // 总行数(默认是一行)
		int maxWidth = MeasureSpec.getSize(widthMeasureSpec); // 当前容器所拥有的最大宽度

		int hlength = 0;// 当前行的水平已占宽度
		int vlength = 0; // 当前控件的高度(返回结果)

		for (int i = 0; i < getChildCount(); i++) {
			View child = getChildAt(i);
			parmas = (WrapLayoutParams) child.getLayoutParams();
			int childWidth = child.getMeasuredWidth() + parmas.leftMargin
					+ parmas.rightMargin; // 子控件的左右边距加上宽度

			int childHeight = child.getMeasuredHeight() + parmas.topMargin
					+ parmas.bottomMargin;// 子控件的上下边距加上高度

			hlength += childWidth;// 水平轴上已经使用的宽度
			if (hlength > maxWidth) { // 换行了行数就自增加1
				row++;
				hlength = childWidth; // 当前控件被分配到下一行,从新计算
			}
			// ((上边距+下边距) + 子控件的高度 )* 总行数
			vlength = row * childHeight;
		}

		return vlength;
}自定义ViewGroup的时候,想要子控件的Margin属性生效,需要重写下面这个方法:
@Override
	public LayoutParams generateLayoutParams(AttributeSet attrs) {
		// TODO Auto-generated method stub
		return new WrapLayoutParams(getContext(), attrs);
	}

	/**
	 *
	 * @ClassName: WrapLayoutParams
	 * @Description: TODO 布局参数对象
	 * @date 2015-9-8 下午4:18:30
	 *
	 */
	public class WrapLayoutParams extends ViewGroup.MarginLayoutParams {

		public WrapLayoutParams(Context ctxt, AttributeSet attrs) {
			super(ctxt, attrs);
		}

	}
ViewGroup和LayoutParams之间的关系
当在LinearLayout中写childView的时候,可以写layout_gravity,layout_weight属性;在RelativeLayout中的childView有layout_centerInParent属性,却没有layout_gravity,layout_weight,这是为什么呢?
这是因为每个ViewGroup需要指定一个LayoutParams,用于确定支持childView支持哪些属性,比如LinearLayout指定LinearLayout.LayoutParams等。如果大家去看LinearLayout的源码,会发现其内部定义了LinearLayout.LayoutParams,在此类中,你可以发现weight和gravity的身影。
onLayout: 对所包含的所有子控件进行定位,指定子控件在哪个位置绘制自己。
	@Override
	protected void onLayout(boolean changed, int l, int t, int r, int b) {
		Log.d("---onLayout---", "l:" + l + "t:" + t + "r:" + r + "b:" + b);

		// TODO Auto-generated method stub
		WrapLayoutParams params = null;
		int row = 0; // 总行数
		int hlength = l; // 当前行的水平已占宽度
		int vlength = t; // 当前垂直布局已占用的高度

		for (int i = 0; i < getChildCount(); i++) {
			View child = getChildAt(i);
			params = (WrapLayoutParams) child.getLayoutParams();

			// 计算一个控件的有效宽度和高度
			int childWidth = child.getMeasuredWidth() + params.leftMargin
					+ params.rightMargin;
			int childHeight = child.getMeasuredHeight() + params.topMargin
					+ params.bottomMargin;

			// 定位水平光标位置
			if (hlength + childWidth > r) {// 换行了行数就自增加1
				hlength = l; // 当前控件被分配到下一行,从新计算
				row++;
			}

			// 定位垂直光标位置
			vlength = row * childHeight;

			// 先把控件布局到光标位置
			child.layout(hlength + params.leftMargin, vlength, hlength
					+ childWidth, vlength + childHeight);
			// 然后从新定位光标位置
			hlength += childWidth;
		}
	}
代码注释也已经写的很详细,主要就是检测当前所放置的行是否还可以放置当前子控件,超出宽度范围,则换行放置。
下面给出完整源码:
/**
 *
 * @ClassName: WrapLayout
 * @Description: TODO 自动换行的Layout
 * @date 2015-9-6 上午11:23:47
 *
 */
public class WrapLayout extends ViewGroup {

	public WrapLayout(Context context) {
		super(context);
	}

	public WrapLayout(Context context, AttributeSet attrs) {
		super(context, attrs);
	}

	public WrapLayout(Context context, AttributeSet attrs, int defStyleAttr) {
		super(context, attrs, defStyleAttr);
	}

	@SuppressLint("NewApi")
	public WrapLayout(Context context, AttributeSet attrs, int defStyleAttr,
			int defStyleRes) {
		super(context, attrs, defStyleAttr, defStyleRes);
	}

	@Override
	protected void onMeasure(int widthMeasureSpec, int heightMeasureSpec) {
		// 测量出所有的childView的宽和高
		measureChildren(widthMeasureSpec, heightMeasureSpec);

		// 按全部控件的大小测量出实际的控件高度
		int height = getWrapHeight(widthMeasureSpec, heightMeasureSpec);

		setMeasuredDimension(MeasureSpec.getSize(widthMeasureSpec), height);
	}

	/**
	 * 返回计算的包含内容的布局高度
	 *
	 * @return
	 */
	private int getWrapHeight(int widthMeasureSpec, int heightMeasureSpec) {
		WrapLayoutParams parmas = null;
		int row = 1; // 总行数(默认是一行)
		int maxWidth = MeasureSpec.getSize(widthMeasureSpec); // 当前控件所拥有的最大宽度

		int hlength = 0;// 当前行的水平已占宽度
		int vlength = 0; // 当前控件的高度(返回结果)

		for (int i = 0; i < getChildCount(); i++) {
			View child = getChildAt(i);
			parmas = (WrapLayoutParams) child.getLayoutParams();
			int childWidth = child.getMeasuredWidth() + parmas.leftMargin
					+ parmas.rightMargin; // 子控件的左右边距加上宽度

			int childHeight = child.getMeasuredHeight() + parmas.topMargin
					+ parmas.bottomMargin;// 子控件的上下边距加上高度

			hlength += childWidth;// 水平轴上已经使用的宽度
			if (hlength > maxWidth) { // 换行了行数就自增加1
				row++;
				hlength = childWidth; // 当前控件被分配到下一行,从新计算
			}
			// ((上边距+下边距) + 子控件的高度 )* 总行数
			vlength = row * childHeight;
		}

		return vlength;
	}

	@Override
	protected void onLayout(boolean changed, int l, int t, int r, int b) {
		Log.d("---onLayout---", "l:" + l + "t:" + t + "r:" + r + "b:" + b);

		// TODO Auto-generated method stub
		WrapLayoutParams params = null;
		int row = 0; // 总行数
		int hlength = l; // 当前行的水平已占宽度
		int vlength = t; // 当前垂直布局已占用的高度

		for (int i = 0; i < getChildCount(); i++) {
			View child = getChildAt(i);
			params = (WrapLayoutParams) child.getLayoutParams();

			// 计算一个控件的有效宽度和高度
			int childWidth = child.getMeasuredWidth() + params.leftMargin
					+ params.rightMargin;
			int childHeight = child.getMeasuredHeight() + params.topMargin
					+ params.bottomMargin;

			// 定位水平光标位置
			if (hlength + childWidth > r) {// 换行了行数就自增加1
				hlength = l; // 当前控件被分配到下一行,从新计算
				row++;
			}

			// 定位垂直光标位置
			vlength = row * childHeight;

			// 先把控件布局到光标位置
			child.layout(hlength + params.leftMargin, vlength, hlength
					+ childWidth, vlength + childHeight);
			// 然后从新定位光标位置
			hlength += childWidth;
		}
	}

	@Override
	public LayoutParams generateLayoutParams(AttributeSet attrs) {
		// TODO Auto-generated method stub
		return new WrapLayoutParams(getContext(), attrs);
	}

	/**
	 *
	 * @ClassName: WrapLayoutParams
	 * @Description: TODO 布局参数对象
	 * @date 2015-9-8 下午4:18:30
	 *
	 */
	public class WrapLayoutParams extends ViewGroup.MarginLayoutParams {

		public WrapLayoutParams(Context ctxt, AttributeSet attrs) {
			super(ctxt, attrs);
		}

	}
}
测试界面
public class MainActivity extends Activity {

	@Override
	protected void onCreate(Bundle savedInstanceState) {
		super.onCreate(savedInstanceState);
		setContentView(R.layout.activity_main);
		String strs[] = { "世界基于MIUI", "阿里巴巴", "天猫", "亚马孙", "京东", "百度", "奇虎360",
				"微软", "Google", "雅虎", "华为", "小米", "中兴" };
		WrapLayout layout = (WrapLayout) findViewById(R.id.wlayout);

		LayoutInflater inflater = LayoutInflater.from(this);
		for (int i = 0; i < strs.length; i++) {
			LinearLayout item = (LinearLayout) inflater.inflate(
					R.layout.item_taobao, layout, false);
			TextView tValue = (TextView) item.findViewById(R.id.tv_value);
			tValue.setText(strs[i]);
			layout.addView(item);
		}
	}

}
测试主布局界面 activity_main:
<LinearLayout xmlns:android="http://schemas.android.com/apk/res/android"
    xmlns:tools="http://schemas.android.com/tools"
    android:layout_width="match_parent"
    android:layout_height="match_parent"
    android:orientation="vertical" >

    <widgets.WrapLayout
        android:id="@+id/wlayout"
        android:layout_width="match_parent"
        android:layout_height="wrap_content"
        android:layout_marginTop="20dp"
        android:background="@android:color/darker_gray" >
    </widgets.WrapLayout>

</LinearLayout>
子布局项 item_taobao:
<?xml version="1.0" encoding="utf-8"?>
<LinearLayout xmlns:android="http://schemas.android.com/apk/res/android"
    android:layout_width="wrap_content"
    android:layout_height="wrap_content"
    android:gravity="center_vertical"
    android:layout_margin="5dp"
    android:orientation="horizontal" >

    <ImageView
        android:id="@+id/iv_icon"
        android:layout_width="13dp"
        android:layout_height="13dp"
        android:scaleType="fitXY"
        android:src="@drawable/fav_item_icon_selected" />

    <TextView
        android:layout_marginLeft="2dp"
        android:id="@+id/tv_value"
        android:layout_width="wrap_content"
        android:layout_height="wrap_content"
        android:text="集分宝"
        android:textColor="@android:color/black"
        android:textSize="13sp" />

</LinearLayout>
OK,到此结束,有问题欢迎交流指正。


 1019
1019


 被折叠的 条评论
为什么被折叠?


