


Vue3.0从一年前就开始预热,在前几天终于正式发布了。
我相信很多小伙伴在很早前就开始关注了3.0的一些改变和新特性,喜欢尝鲜的小伙伴也肯定早就尝过了,在几个月前我也写过一篇关于vue3.0的文章,简单讲了一些新的特性【vue3.0有哪些改变】。
虽然3.0已经正式发布了,你也可以开始尝试在新的项目中使用3.0进行开发,但是如果你想对之前的2.x项目升级到3.0的话,我不建议去做升级,我觉得这个没有太大的必要的。
但是后面使用3.0开发必然是一个趋势,所以从现在开始去学习3.0的改变是很有必要的,由于内容比较多,为了让大家可以更加详细完整的了解Vue3.0,我计划分为2期或者3期进行讲解。那么现在就开始吧!
v-if与v-for的优先级(更新)
原则上,在vue中应该避免在同一元素上使用 v-if 与 v-for 的。
- 2.x:
v-for的优先级高于v-if - 3.x:
v-if的优先级高于v-for
v-bind的合并策略(更新)
在同一个元素上,对某个属性同时使用单属性和使用v-bind同时定义,就像下面这样:
<!-- 情况1 -->
<div id="abc" v-bind="{ id: 'def' }"></div>
<!-- 情况2 -->
<div v-bind="{ id: 'def' }" id="abc"></div>
在2.x中上面两种情况都会会被编译成下面的结果:
<div id="abc"></div>
单个属性的值优先级更好,会覆盖掉使用 v-bind 所定义的属性,但是在3.x中,修改了合并策略,上面两种情况分别对应两种不同结果:
<!-- 情况1 -->
<div id="def"></div>
<!-- 情况2 -->
<div id="abc"></div>
key的变化(更新)
(1)条件语句中
在2.x中,当我们使用 v-if 、v-else 、 v-else-if 时,必须要在分支上定义 key 属性,这是因为vue在处理虚拟dom相关运算时,需要通过 key 来跟踪节点,以至于知道该如何处理某个节点。
<div v-if="condition" key="yes">Yes</div>
<div v-else key="no">No</div>
在3.x中,我们不再需要手动的对 v-if 、v-else 、 v-else-if 添加 key ,因为 key 会在有条件语句的地方自动生成,不需要手动提供。当然你也可以加上 key ,但这是没必要的,如果要手动提供的话,你必须要保证每个分支的 key 是惟一的。
<div v-if="condition">Yes</div>
<div v-else>No</div>
(2)< template >中
在2.x中,< template > 上不可以设置 key ,只可以设置在它的子元素上:
<template v-for="item in list">
  <div :key="item.id">...</div>
  <span :key="item.id">...</span>
</template>
在Vue 3.x中,key应该将放在<template>标签上:
<template v-for="item in list" :key="item.id">
  <div>...</div>
  <span>...</span>
</template>
keyCodes(更新)
在2.X中,为一些元素绑定键盘事件的方式是只用 keyCodes 来标识不同的按键,keyCodes 作为修改 v-on 的一种方式:
<!-- keyCode version -->
<input v-on:keyup.13="submit" />

<!-- alias version -->
<input v-on:keyup.enter="submit" />
还可以通过全局配置来定义一些常用按键的别名:
Vue.config.keyCodes = {
  f1: 112
}
<!-- keyCode version -->
<input v-on:keyup.112="showHelpText" />

<!-- custom alias version -->
<input v-on:keyup.f1="showHelpText" />
在3.x中,由于 keyboardEvent.keyCode 已弃用,因此不在支持此功能,取而代之的是将 kebab-case 名称作为修饰符:
<input v-on:keyup.delete="confirmDelete" />
<input v-on:keyup.c="confirmC" />
我个人觉得这更加的方便了,不用每次还要去查某个按键的 keyCode
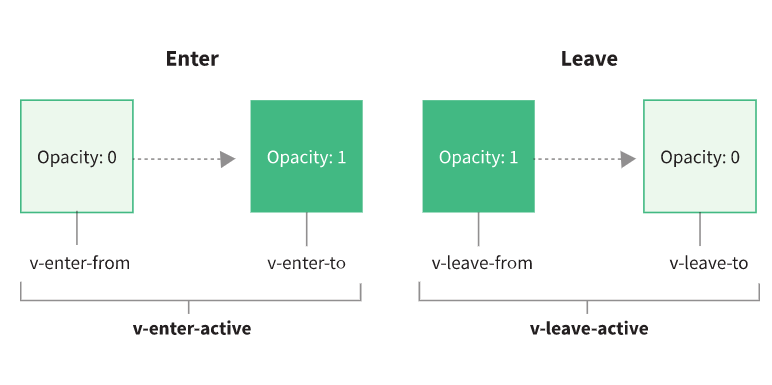
transition动画类名(更新)
vue的 transition 组件为我们只做过渡动画提供了极大的方便,动画可分为两个阶段和两种状态,进入阶段与离开阶段、初始状态与激活状态;我们可以通过4个类名来定义不同阶段以及状态的变化。
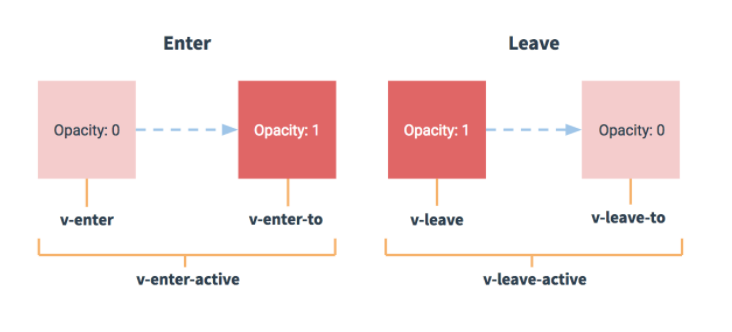
在3.x中,为了使状态更加明确与可读性,对初始状态的类名进行了变更
过滤器【filters】(移除)
在2.x中,我们常常使用 filters 来处理成一些我们所需要的合适内容,在更早的版本中,vue自带了一些内置的过滤器,后来移除了所有内置过滤器。到现在的3.x中,已经彻底移除了过滤器,不再受支持。
<template>
  <h1>Bank Account Balance</h1>
  <p>{{ accountBalance | currencyUSD }}</p>
</template>

<script>
  export default {
    props: {
      accountBalance: {
        type: Number,
        required: true
      }
    },
    filters: {
      currencyUSD(value) {
        return '$' + value
      }
    }
  }
</script>
这里主要有两点原因:
- 改语法打破了在花括号内只能存在
JavaScript的设想 - 增加了初学者的学习成本
没有了过滤器,可以使用方法调用或者计算属性的方法代替。
<template>
  <h1>Bank Account Balance</h1>
  <p>{{ accountInUSD }}</p>
</template>

<script>
  export default {
    props: {
      accountBalance: {
        type: Number,
        required: true
      }
    },
    computed: {
      accountInUSD() {
        return '$' + this.accountBalance
      }
    }
  }
</script>
支持多个根节点(新增)
在2.x中,组件内必须只有一个根节点,每次开发前的第一件事就是先在最外面写个 <div></div> ,然后再开发里面的内容:
<template>
  <div>
    <header>...</header>
    <main>...</main>
    <footer>...</footer>
  </div>
</template>
在3.x中,组件可以具有多个根节点:
<template>
  <header>...</header>
  <main v-bind="$attrs">...</main>
  <footer>...</footer>
</template>
自定义指令(更新)
我们经常需要进行某个操作时,可以将这个操作过程开发成一个自定义指令。如输入框自动获取焦点:
// 注册一个全局自定义指令 `v-focus`
Vue.directive('focus', {
  // 当被绑定的元素插入到 DOM 中时……
  inserted: function (el) {
    // 聚焦元素
    el.focus()
  }
})
在2.x中,一个自定义指令对象可以提供如下几个钩子函数 (均为可选):
-
bind:只调用一次,指令第一次绑定到元素时调用。在这里可以进行一次性的初始化设置。 -
inserted:被绑定元素插入父节点时调用 (仅保证父节点存在,但不一定已被插入文档中)。 -
update:所在组件的 VNode 更新时调用,但是可能发生在其子 VNode 更新之前。 -
componentUpdated:指令所在组件的 VNode 及其子 VNode 全部更新后调用。 -
unbind:只调用一次,指令与元素解绑时调用。
在3.x中,为自定义指令创建了一套更加紧密的API,尽管它看起来很像组件的生命周期,但是是有很大不同的:
bind=>beforeMountinserted=>mountedbeforeUpdate(新增): 像组件生命周期hook一样,在组件更新前调用。update(移除)componentUpdated(更新):更新后beforeUnmount(新增):卸载元素之前调用unbind=>unmounted
<p v-highlight="yellow">Highlight this text bright yellow</p>
const app = Vue.createApp({})

app.directive('highlight', {
  beforeMount(el, binding, vnode) {
    el.style.background = binding.value
  }
})
v-for中的Refs(更新)
在2.x中,当在 v-for 中使用 ref 时,将使用 ref 数组去填充 $refs 属性。当存在多个 v-for 嵌套时,这样的做法会使得效率变得很低。
<div v-for="item in list" :ref="setItemRef"></div>
export default {
  data() {
    return {
      itemRefs: []
    }
  },
  methods: {
    setItemRef(el) {
      this.itemRefs.push(el)
    }
  },
  beforeUpdate() {
    this.itemRefs = []
  },
  updated() {
    console.log(this.itemRefs)
  }
}
在3.x中,将不再自动的在 refs 中创建一个数组,将从单个绑定中检索多个引用。这里的 itemRefs 可以不是一个数组,也可以是一个通过迭代器设置的对象;如果有需要的话,你也可以为 itemRefs 设置 reactive 和 watch 。
import { ref, onBeforeUpdate, onUpdated } from 'vue'

export default {
  setup() {
    let itemRefs = []
    const setItemRef = el => {
      itemRefs.push(el)
    }
    onBeforeUpdate(() => {
      itemRefs = []
    })
    onUpdated(() => {
      console.log(itemRefs)
    })
    return {
      itemRefs,
      setItemRef
    }
  }
}
异步组件(新增)
在2.x中,想要实现某个组件的异步加载,通常通过返回一个 promise 来实现
const asyncPage = () => import('./NextPage.vue')
或者使用带有设置项的更高级的组件用法
const asyncPage = {
  component: () => import('./NextPage.vue'),
  delay: 200,
  timeout: 3000,
  error: ErrorComponent,
  loading: LoadingComponent
}
在3.x中,由于功能组件被定义为一个纯函数,异步组件需要通过 defineAsyncComponent 进行包装。
import { defineAsyncComponent } from 'vue'
import ErrorComponent from './components/ErrorComponent.vue'
import LoadingComponent from './components/LoadingComponent.vue'

// Async component without options
const asyncPage = defineAsyncComponent(() => import('./NextPage.vue'))

``// Async component with options
const asyncPageWithOptions = defineAsyncComponent({
  loader: () => import('./NextPage.vue'),
  delay: 200,
  timeout: 3000,
  errorComponent: ErrorComponent,
  loadingComponent: LoadingComponent
})
值得注意的还有一点更新,component 改名为 loader ,
加载函数不再提供 resolve 和 reject 参数,并且总是返回一个 Promise 。
// 2.x version
const oldAsyncComponent = (resolve, reject) => {
  /* ... */
}

// 3.x version
const asyncComponent = defineAsyncComponent(
  () =>
    new Promise((resolve, reject) => {
      /* ... */
    })
)
属性行为(更新)
在2.x中,如果是布尔值 true 则会强制转为字符串 'true' ,如果是 false 则会删除该属性。
| Binding expression | foo normal | draggable enumerated |
|---|---|---|
:attr="null" | / | draggable="false" |
:attr="undefined" | / | / |
:attr="true" | foo="true" | draggable="true" |
:attr="false" | / | draggable="false" |
:attr="0" | foo="0" | draggable="true" |
attr="" | foo="" | draggable="true" |
attr="foo" | foo="foo" | draggable="true" |
attr | foo="" | draggable="true" |
在3.x中,放弃了 枚举属性 的概念,并将其视为普通的非布尔HTML属性。
| Attribute | v-bind value 2.x | v-bind value 3.x | HTML output |
|---|---|---|---|
2.x “Enumerated attrs” i.e. contenteditable, draggable and spellcheck. | undefined, false | undefined, null | removed |
true, 'true', '', 1, 'foo' | true, 'true' | "true" | |
null, 'false' | false, 'false' | "false" | |
Other non-boolean attrs eg. aria-checked, tabindex, alt, etc. | undefined, null, false | undefined, null | removed |
'false' | false, 'false' | "false" |
自定义元素(更新)
如果想要添加一个在VUE之外定义的自定义元素,我们需要通过VUE将其指定为一个自定义元素
<plastic-button></plastic-button>
在2.x中,通过 Vue.config.ignoredElements 指定
Vue.config.ignoredElements = ['plastic-button']
在3.x中,会在模板的编译期间进行检查,编译器会把 <plastic-button> 看作为一个自定义元素。
- 如果使用构建步骤,将
isCustomElement传给模板编译器。如果使用了vue-loader,可以在vue-loader中的compilerOptions选项中进行配置:
rules: [
  {
    test: /\.vue$/,
    use: 'vue-loader',
    options: {
      compilerOptions: {
        isCustomElement: tag => tag === 'plastic-button'
      }
    }
  }
  // ...
]
- 如果使用
on-the-fly模板编译,可以通过app.config.isCustomElement来设置
const app = Vue.createApp({})
app.config.isCustomElement = tag => tag === 'plastic-button'
定制的内置元素
自定义元素规范提供了一种方式,通过向内置元素添加 is 属性,可以将自定义元素当做自定义内置元素来使用。
<button is="plastic-button">Click Me!</button>
在2.x中,is 被解释为名为 plastic-button 的Vue组件,这会阻止3.x中自定义元素的用法。因此,在3.x中,限制了 is 只可以在 <comonent> 上使用。
- 在
<comonent>上使用时与2.x的行为相同 - 在普通组件上使用时
<foo is="bar" />
呈现 foo 组件并传递 is
- 在普通元素上使用时
<button is="plastic-button">Click Me!</button>
通过调用呈现一个动态按钮
document.createElement('button', { is: 'plastic-button' })
由于 is 在2.x与3.x中有着不同的行为,因此在3.x中引入了一个新的指令来解决这个问题 v-is 。
<table>
  <tr v-is="'blog-post-row'"></tr>
</table>
v-is 功能类似于动态的2.x中的 :is , 因此如果要通过名称来呈现组件的话,其值应该为一个字符串:
<!-- Incorrect, nothing will be rendered -->
<tr v-is="blog-post-row"></tr>

<!-- Correct -->
<tr v-is="'blog-post-row'"></tr>
data选项(更新)
在2.x中,可以使用 object 或者一个 function 来定义 data ,这对根实例在共享状态上提供了便利,但是很容易被混淆,因为它只在根实例上可以用。
<script>
  const app = new Vue({
    data: {
      apiKey: 'a1b2c3'
    }
  })
</script>

<!-- Function Declaration -->
<script>
  const app = new Vue({
    data() {
      return {
        apiKey: 'a1b2c3'
      }
    }
  })
</script>
在3.x中,data 选项被标准化为只可以接受 function ,该 function 返回一个 object
<script>
  import { createApp } from 'vue'

  createApp({
    data() {
      return {
        apiKey: 'a1b2c3'
      }
    }
  }).mount('#app')
</script>
Mixin 合并行为(更新)
当我们在 mixin 中也定义了一些 data 数据时,会对 mixin 中的 data 与组件的 data 进行合并。
const Mixin = {
  data() {
    return {
      user: {
        name: 'Jack',
        id: 1
      }
    }
  }
}

const CompA = {
  mixins: [Mixin],
  data() {
    return {
      user: {
        id: 2
      }
    }
  }
}
在2.x中,合并后的结果如下:
{
  user: {
    id: 2,
    name: 'Jack'
  }
}
在3.x中,浅化了合并行为:
{
  user: {
    id: 2
  }
}
Events API(移除)
在2.x中,Vue实例可以被用作为一个事件中心,用来创建成全局事件侦听器。常常用来处理一些非兄弟或子孙组件间的传值或事件触发。
// eventHub.js
const eventHub = new Vue()

export default eventHub
// ChildComponent.vue
import eventHub from './eventHub'

export default {
  mounted() {
    // adding eventHub listener
    eventHub.$on('custom-event', () => {
      console.log('Custom event triggered!')
    })
  },
  beforeDestroy() {
    // removing eventHub listener
    eventHub.$off('custom-event')
  }
}
// ParentComponent.vue
import eventHub from './eventHub'

export default {
  methods: {
    callGlobalCustomEvent() {
      eventHub.$emit('custom-event') // if ChildComponent is mounted, we will have a message in the console
    }
  }
}
在3.x中,在所有的实例中移除了 $on 、$off 、$once 方法。$emit 被保留 ,因为它还要用来处理父子组件间的事件处理。
继续学习:【vue3.0迁移指南(下)】
欢迎访问我的网站:www.dengzhanyong.com
个人公众号:【前端筱园】
如果觉得我的文章对你有所帮助的话,要记得关注哦!每篇文章在公众号中首发,不错过我的每一篇推送!


 1026
1026


 被折叠的 条评论
为什么被折叠?
被折叠的 条评论
为什么被折叠?
 到【灌水乐园】发言


