


顺序表与单链表
一,顺序表
1,顺序表的简单介绍
1,顺序表的实质就是数组,但要求数据必须是连续存放的。
2,顺序表的物理结构与逻辑结构是统一的,简单地说,就是逻辑上连续的两个数据,
他们在物理空间上也是连续的,也就是内存空间是连续的。
内存开辟如下图所示:
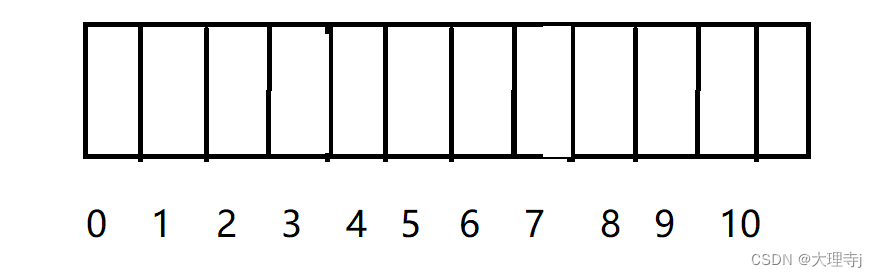
下面我们主要介绍一下动态的顺序表,因为静态的顺序表不太灵活,一旦开辟好空间就不太好调整。
#pragma once
#include<stdio.h>
#include<stdlib.h>
#include<assert.h>

typedef int SLDateType;

typedef struct SeqList
{
	SLDateType* a;
	int size;
	int capcity;
}SeqList;
//初始化顺序表
void SLInit(SeqList* ps);
//销毁顺序表
void SLDestory(SeqList* ps);
//打印顺序表
void SLPrint(SeqList* ps);
//检查空间
void SLCheckCapcity(SeqList* ps);
//尾插 尾删
void SLPushBack(SeqList* ps, SLDateType x);
void SLPopBack(SeqList* ps);
//头插 头删
void SLPushFront(SeqList* ps, SLDateType x);
void SLPopFront(SeqList* ps);
//任意位置插入 删除
void SLInsert(SeqList* ps, int pos, SLDateType x);
void SLErase(SeqList* ps, int pos);
//查找
int SLFind(SeqList* ps, SLDateType x, int begin);
2,相关函数接口的实现
(1)初始化顺序表
void SLInit(SeqList* ps)
{
	assert(ps);
	ps->a = NULL;
	ps->capcity = 0;
	ps->size = 0;
}
我在初始化的时候没有给顺序表开辟空间,当然你可以为其开辟一部分空间。
将其capcity赋值为0;
size(数据个数)赋值为0;
(2)销毁顺序表
void SLDestory(SeqList* ps)
{
	assert(ps);
	free(ps->a);
	ps->a = NULL;
	ps->capcity = 0;
	ps->size = 0;
}
将开辟的空间释放掉。
(3)打印顺序表
void SLPrint(SeqList* ps)
{
	assert(ps);
	for (int i = 0; i < ps->size; i++)
	{
		printf("%d ", ps->a[i]);
	}
	printf("\n");
}
(4)检查空间
我们在插入数据之前都要先判断一下表是否还有空间,以防越界错误。
void SLCheckCapcity(SeqList* ps)
{
	assert(ps);
	if (ps->size == ps->capcity)
	{
		int newcapcity = ps->a == NULL ? 4 : 2 * ps->capcity;
		SLDateType* tmp = realloc(ps->a, newcapcity * sizeof(SLDateType));
		if (tmp == NULL)
		{
			perror("malloc fail");
			exit(-1);
		}
		ps->a = tmp;
		ps->capcity = newcapcity;
	}
}
(5)尾插
void SLPushBack(SeqList* ps, SLDateType x)
{
	assert(ps);
	SLCheckCapcity(ps);
	ps->a[ps->size] = x;
	ps->size++;
}
插入之前先检查顺序表是否有多余空间。
(6)尾删
void SLPopBack(SeqList* ps)
{
	assert(ps);
	assert(ps->size > 0);
	ps->size--;
}
(7)头插
void SLPushFront(SeqList* ps, SLDateType x)
{
	assert(ps);
	SLCheckCapcity(ps);
	int end = ps->size - 1;
	while (end >= 0)
	{
		ps->a[end + 1] = ps->a[end];
		end--;
	}
	ps->a[0] = x;
	ps->size++;
}
(8)头删
void SLPopFront(SeqList* ps)
{
	assert(ps);
	assert(ps->size > 0);
	int begin = 1;
	while (begin < ps->size)
	{
		ps->a[begin - 1] = ps->a[begin];
		begin++;
	}
	ps->size--;
}
(9)任意位置插入
void SLInsert(SeqList* ps, int pos, SLDateType x)
{
	assert(ps);
	assert(pos >= 0 && pos <= ps->size);
	SLCheckCapcity(ps);
	int end = ps->size - 1;
	while (end >= pos)
	{
		ps->a[end + 1] = ps->a[end];
		end--;
	}
	ps->a[pos] = x;
	ps->size++;
}
我们发现任意位置的插入包括了头插与尾插,所以可以改变一下之前的代码
头插
void SLPushFront(SeqList* ps, SLDateType x)
{
	/*assert(ps);
	SLCheckCapcity(ps);
	int end = ps->size - 1;
	while (end >= 0)
	{
		ps->a[end + 1] = ps->a[end];
		end--;
	}
	ps->a[0] = x;
	ps->size++;*/
	SLInsert(ps, 0, x);
}
尾插
void SLPushBack(SeqList* ps, SLDateType x)
{
	/*assert(ps);
	SLCheckCapcity(ps);
	ps->a[ps->size] = x;
	ps->size++;*/
	SLInsert(ps, ps->size, x);
}
(10)任意位置删除
void SLErase(SeqList* ps, int pos)
{
	assert(ps);
	assert(pos >= 0 && pos < ps->size);
	assert(ps->size > 0);
	int begin = pos + 1;
	while (begin < ps->size)
	{
		ps->a[begin - 1] = ps->a[begin];
		begin++;
	}
	ps->size--;
}
同样之前头删,尾删的代码就可以更改:
头删
void SLPopFront(SeqList* ps)
{
	/*assert(ps);
	assert(ps->size > 0);
	int begin = 1;
	while (begin < ps->size)
	{
		ps->a[begin - 1] = ps->a[begin];
		begin++;
	}
	ps->size--;*/
	SLErase(ps, 0);
}
尾删
void SLPopBack(SeqList* ps)
{
	/*assert(ps);
	assert(ps->size > 0);
	ps->size--;*/
	SLErase(ps, ps->size - 1);
}
(11)查找
int SLFind(SeqList* ps, SLDateType x, int begin)
{
	assert(ps);
	assert(begin >= 0);
	for (int i = begin; i < ps->size; i++)
	{
		if (ps->a[i] == x)
		{
			return i;
		}
	}
	return -1;
}
二,单链表
1,单链表的简单介绍
链表与上述的顺序表有3个巨大的不同:
1,链表的逻辑结构与物理结构不统一(相邻数据的内存空间并不连续)
2,不存在空间满了的情况,插入新的数据就新开辟一个结点连接到链表上
3,插入删除数据不用数据,只是改变结点的连接方式即可
一般我们通常这样理解:
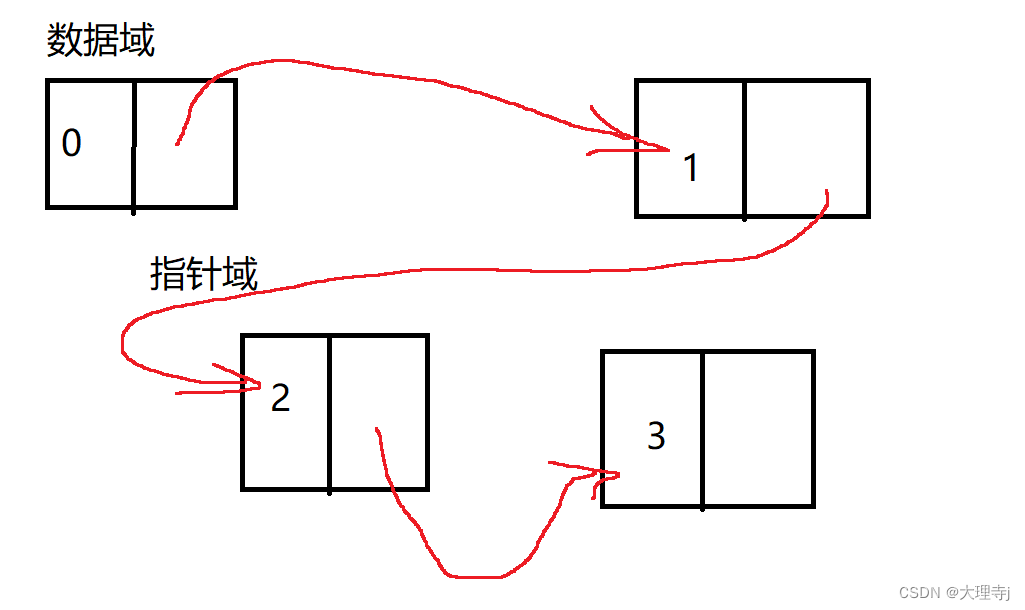
但实际的结构是这样的:
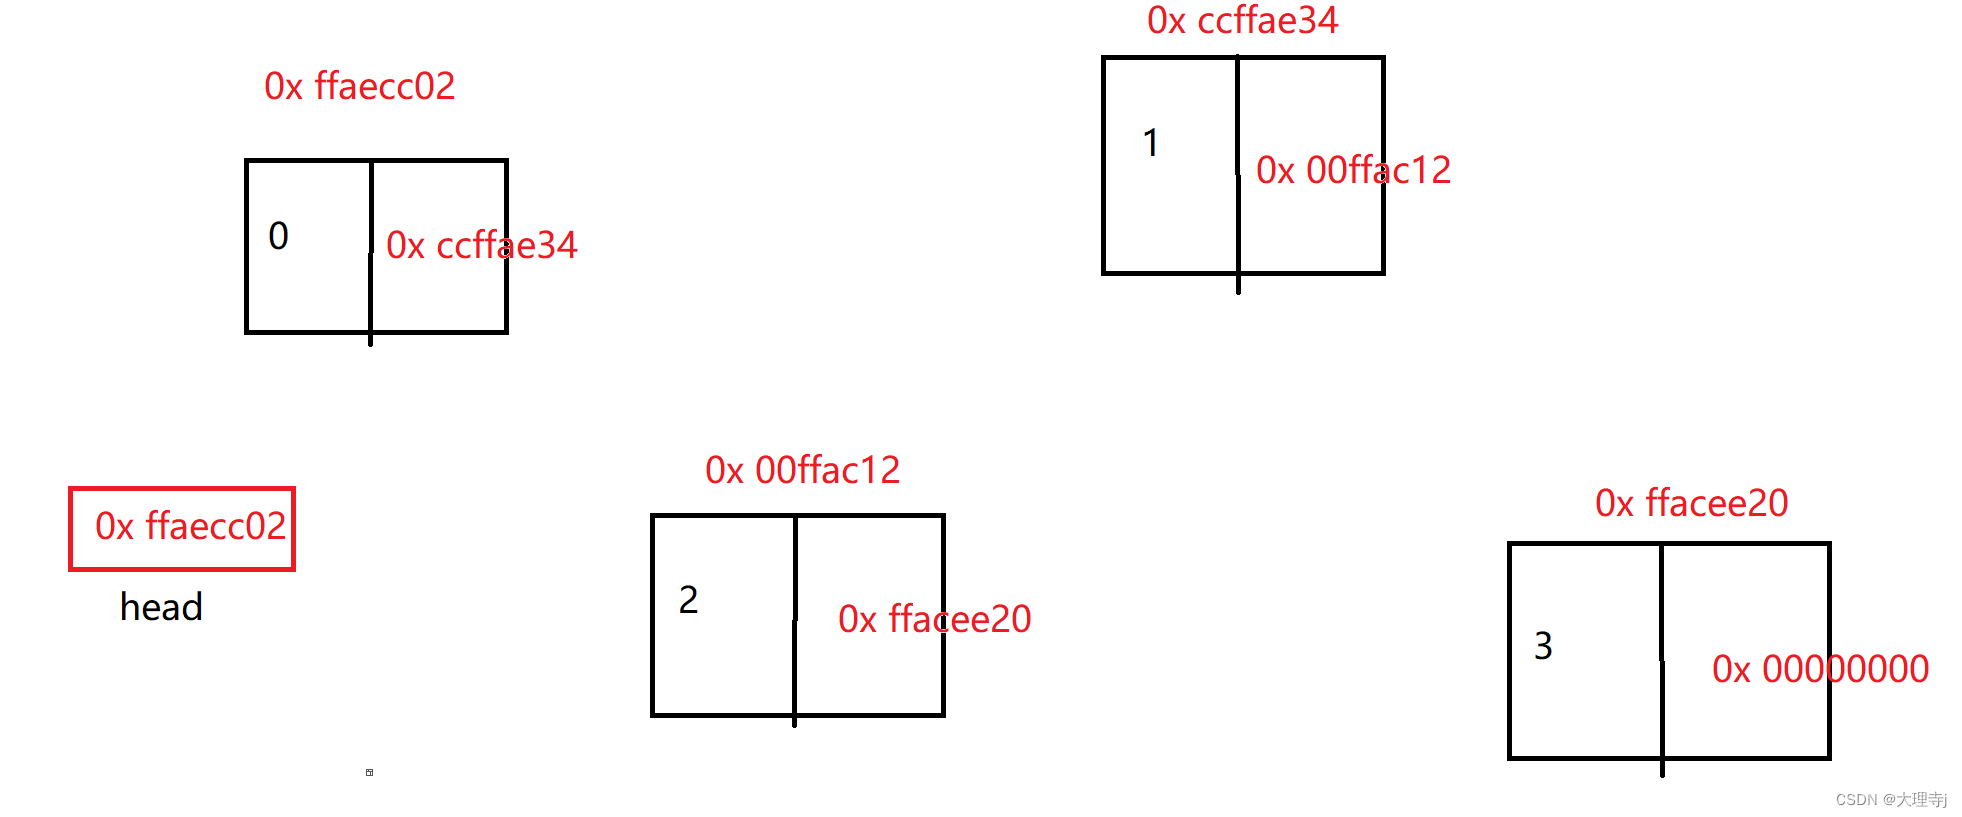
上一个结点的指针域存放着下一结点的地址,在内存中是上图那样存储的。
typedef int SLTDateType;

typedef struct SListNode
{
	SLTDateType data;
	struct SListNode* next;
}SListNode;
//创建一个结点
SListNode* BuySListNode(SLTDateType x);
//打印链表
void SLTPrint(SListNode* phead);
//销毁链表
void SLTDestory(SListNode** pphead);
//尾插 尾删
void SLTPushBack(SListNode** pphead, SLTDateType x);
void SLTPopBack(SListNode** pphead);
//头插 头删
void SLTPushFront(SListNode** pphead, SLTDateType x);
void SLTPopFront(SListNode** pphead);
//查找
SListNode* SLTFind(SListNode* phead, SLTDateType x);

void SLTInsertAfter(SListNode* pos, SLTDateType x);
void SLTEraseAfter(SListNode* pos);

void SLTInsert(SListNode** pphead, SListNode* pos, SLTDateType x);
void SLTErase(SListNode** pphead, SListNode* pos);
2,相关函数接口的实现
(1)创建一个结点
SListNode* BuySListNode(SLTDateType x)
{
	SListNode* newnode = (SListNode*)malloc(sizeof(SListNode));
	if (newnode == NULL)
	{
		perror("malloc fail");
		exit(-1);
	}
	newnode->data = x;
	newnode->next = NULL;
	return newnode;
}
(2)销毁链表
void SLTDestory(SListNode** pphead)
{
	assert(*pphead);
	SListNode* cur = *pphead;
	SListNode* next = NULL;
	while (cur)
	{
		next = cur->next;
		free(cur);
		cur = next;
	}
	*pphead = NULL;
}
(3)打印链表
void SLTPrint(SListNode* phead)
{
	SListNode* cur = phead;
	while (phead)
	{
		printf("%d->", cur->data);
		cur = cur->next;
	}
	printf("NULL");
}
(4)尾插
void SLTPushBack(SListNode** pphead, SLTDateType x)
{
	SListNode* newnode = BuySListNode(x);
	if (*pphead == NULL)
	{
		*pphead = newnode;
	}
	else
	{
		SListNode* ptail = *pphead;
		while (ptail->next)
		{
			ptail = ptail->next;
		}
		ptail->next = newnode;
	}
}
(5)尾删
void SLTPopBack(SListNode** pphead)
{
	assert(*pphead);
	if ((*pphead)->next == NULL)
	{
		free(*pphead);
		*pphead = NULL;
	}
	else
	{
		SListNode* cur = *pphead;
		while (cur->next->next)
		{
			cur = cur->next;
		}
		cur->next = NULL;
	}
}
(6)头插
void SLTPushFront(SListNode** pphead, SLTDateType x)
{
	SListNode* newnode = BuySListNode(x);
	newnode->next = (*pphead)->next;
	*pphead = newnode;
}
(7)头删
void SLTPopFront(SListNode** pphead)
{
	assert(*pphead);
	SListNode* next = (*pphead)->next;
	free(*pphead);
	*pphead = next;
}
(8)在pos位置之后插入结点
void SLTInsertAfter(SListNode* pos, SLTDateType x)
{
	assert(pos);
	SListNode* newnode = BuySListNode(x);
	newnode->next = pos->next;
	pos->next = newnode;
}
(9)删除pos后的结点
void SLTEraseAfter(SListNode* pos)
{
	assert(pos);
	if (pos->next != NULL)
	{
		SListNode* next = pos->next->next;
		free(pos->next);
		pos->next = next;
	}
}
(10)查找
SListNode* SLTFind(SListNode* phead, SLTDateType x)
{
	SListNode* cur = phead;
	while (cur)
	{
		if (cur->data == x)
		{
			return cur;
		}
		cur = cur->next;
	}
	return NULL;
}
(11)在pos位置之前插入节点
void SLTInsert(SListNode** pphead, SListNode* pos, SLTDateType x)
{
    assert(pos);
	SListNode* newnode = BuySListNode(x);
	if (pos == *pphead)
	{
		newnode->next = (*pphead)->next;
		*pphead = newnode;
	}
	else
	{
		SListNode* cur = *pphead;
		while (cur->next != pos)
		{
			cur = cur->next;
		}
		newnode->next = pos;
		cur->next = newnode;
	}
}
(12)删除pos位置的结点
void SLTErase(SListNode** pphead, SListNode* pos)
{
    assert(pos);
	if (pos == *pphead)
	{
		free(pos);
		*pphead = NULL;
	}
	else
	{
		SListNode* cur = *pphead;
		while (cur->next != pos)
		{
			cur = cur->next;
		}
		SListNode* next = pos->next;
		free(pos);
		cur->next = next;
	}
}
三,带头双向循环链表
1,简单介绍
带头双向顺换链表似乎是一个完美的链表,它既可以向前也可以向后,就是说任何一个结点都能找到它的前驱与后继。

2,相关函数接口实现
#pragma once
#include<stdio.h>
#include<stdlib.h>
#include<assert.h>
#include<stdbool.h>

typedef int LTDateType;

typedef struct ListNode
{
	struct ListNode* prev;
	struct ListNode* next;
	LTDateType data;
}LTNode;

//创建一个结点
LTNode* BuyListNode(LTDateType x);
//初始化链表
LTNode* LTInit();
//打印
void LTPrint(LTNode* phead);
//尾插 尾删
void LTPushBack(LTNode* phead,LTDateType x);
void LTPopBack(LTNode* phead);
//头插 头删
void LTPushFront(LTNode* phead, LTDateType x);
void LTPopFront(LTNode* phead);
//任意位置插入 删除
void LTInsert(LTNode* pos, LTDateType x);
void LTErase(LTNode* pos);
//查找
LTNode* LTFind(LTNode* phead, LTDateType x);
//判空
bool LTEnpty(LTNode* phead);
//长度
size_t LTLength(LTNode* phead);
//销毁
void LTDestroy(LTNode* phead);
(1)创建一个结点
LTNode* BuyListNode(LTDateType x)
{
	LTNode* newnode = (LTNode*)malloc(sizeof(LTNode));
	if (!newnode)
	{
		perror("malloc fail");
		exit(-1);
	}
	newnode->next = NULL;
	newnode->prev = NULL;
	newnode->data = x;
	return newnode;
}
(2)初始化链表
LTNode* LTInit()
{
	LTNode* newnode = BuyListNode(-1);
	newnode->next = newnode;
	newnode->prev = newnode;
	return newnode;
}
单链表是不需要初始化的,因为单链表的头指针指向空,这就已经初始化了。
而,这个链表是带有头节点的,所以要对头节点进行初始化,使其前驱,后继指针都指向自己。
(3)打印链表
void LTPrint(LTNode* phead)
{
	assert(phead);
	LTNode* cur = phead->next;
	while (cur != phead)
	{
		printf("%d->", cur->data);
		cur = cur->next;
	}
	printf("NULL");
	printf("\n");
}
双向带头循环链表的循环截至条件是cur指针不等于指向头节点的指针,与单链表不同。
(4)尾插
void LTPushBack(LTNode* phead, LTDateType x)
{
	assert(phead);
	LTNode* newnode = BuyListNode(x);
	LTNode* tail = phead->prev;
	tail->next = newnode;
	newnode->prev = tail;
	phead->prev = newnode;
	newnode->next = phead;
}
(5)尾删
void LTPopBack(LTNode* phead)
{
	assert(phead->next != phead);
	assert(phead);
	LTNode* tail = phead->prev;
	LTNode* prev = tail->prev;
	free(tail);
	phead->prev = prev;
	prev->next = phead;
}
(6)头插
void LTPushFront(LTNode* phead, LTDateType x)
{
	assert(phead);
	LTNode* newnode = BuyListNode(x);
	LTNode* first = phead->next;
	phead->next = newnode;
	newnode->prev = phead;
	newnode->next = first;
	first->prev = newnode;
}
(7)头删
void LTPopFront(LTNode* phead)
{
	assert(phead->next != phead);
	assert(phead);
	LTNode* first = phead->next;
	LTNode* second = first->next;
	free(first);
	phead->next = second;
	second->prev = phead;
}
(8)任意位置之前插入
void LTInsert(LTNode* pos, LTDateType x)
{
	assert(pos);
	LTNode* newnode = BuyListNode(x);
	LTNode* prev = pos->prev;
	prev->next = newnode;
	newnode->prev = prev;
	newnode->next = pos;
	pos->prev = newnode;
}
实现这个功能后我们的头插,尾插就可以复用这个功能。
void LTPushFront(LTNode* phead, LTDateType x)
{
    assert(phead);
	/*
	LTNode* newnode = BuyListNode(x);
	LTNode* first = phead->next;
	phead->next = newnode;
	newnode->prev = phead;
	newnode->next = first;
	first->prev = newnode;*/
	LTInsert(phead->next, x);
}
void LTPushBack(LTNode* phead, LTDateType x)
{
    assert(phead);
	/*
	LTNode* newnode = BuyListNode(x);
	LTNode* tail = phead->prev;
	tail->next = newnode;
	newnode->prev = tail;
	phead->prev = newnode;
	newnode->next = phead;*/
	LTInsert(phead, x);
}
(9)任意位置删除
void LTErase(LTNode* pos)
{
	assert(pos);
	LTNode* prev = pos->prev;
	LTNode* next = pos->next;
	free(pos);
	prev->next = next;
	next->prev = prev;
}
同样实现这个功能后,头删与尾删也能服用这个功能。
但在使用时应注意,不能传参时传指向头节点的指针。
void LTPopFront(LTNode* phead)
{
    assert(phead);
	assert(phead->next != phead);
	/*

	LTNode* first = phead->next;
	LTNode* second = first->next;
	free(first);
	phead->next = second;
	second->prev = phead;*/
	LTErase(phead->next);
}
void LTPopBack(LTNode* phead)
{
    assert(phead);
	assert(phead->next != phead);
	/*

	LTNode* tail = phead->prev;
	LTNode* prev = tail->prev;
	free(tail);
	phead->prev = prev;
	prev->next = phead;*/
	LTErase(phead->prev);
}
(10)查找
LTNode* LTFind(LTNode* phead, LTDateType x)
{
	assert(phead);
	LTNode* cur = phead->next;
	while (cur != phead)
	{
		if (cur->data ==x)
		{
			return cur;
		}
		cur = cur->next;
	}
	return NULL;
}
(11)判空
bool LTEmpty(LTNode* phead)
{
	assert(phead);
	return phead->next != phead;
}
(12)链表长度
size_t LTLength(LTNode* phead)
{
	assert(phead);
	int count = 0;
	LTNode* cur = phead->next;
	while (cur != phead)
	{
		count++;
		cur = cur->next;
	}
	return count;
}
(13)销毁
void LTDestroy(LTNode* phead)
{
	assert(phead);
	LTNode* cur = phead->next;
	LTNode* next = NULL;
	while (cur != phead)
	{
		next = cur->next;
		free(cur);
		cur = next;
	}
	free(phead);
}
四,顺序表与链表的比较
链表在存储空间上是不连续的,顺序表在存储空间上是连续的。
1,顺序表优点:尾插,尾删方便,下标的随机访问快。缓存利用率高。
2,顺序表缺点:空间不足时需要扩容(扩容要付出相应代价),插入删除数据需要挪动数据。
3,链表优点:插入删除方便,按需申请释放小块结点内存。
4,链表缺点:不能下标的随机访问。缓存利用率低。


 1047
1047


 被折叠的 条评论
为什么被折叠?
被折叠的 条评论
为什么被折叠?
 到【灌水乐园】发言


