


 本文详细介绍了如何使用PyUSB和PyQt5在Windows环境下开发一款能够实时通讯并动态插拔USB设备的调试工具。文章涵盖了从环境搭建、界面设计到核心功能实现的全过程,特别关注了在设备动态插拔场景下的数据交互处理。
刚好有时间就记录下项目中的问题,因为技术很菜,所以,各位请见谅。欢迎探讨。
公司要求做一个windows下的工具用来跟产品通讯调试校准,产品是用的tpye-c接口,emmm,我原本是搞嵌入式的,第一次接到这种需求也是很懵,没办法,只能硬着头皮做了。
因为要做GUI,所以,选择了pyqt,python及pyqt安装教程,可以参考下:python及pyqt5安装。
还需要安装pycharm,具体安装和破解自己百度,安装完后,需要设置qtdesigner和pyuic,pycharm添加qtdesigner及pyuic
然后使用qtdesigner设计界面,有点懒打字了,如下图,拖动需要的组件进行设计就好,随便做个演示下吧,主要是后面pyusb的调试: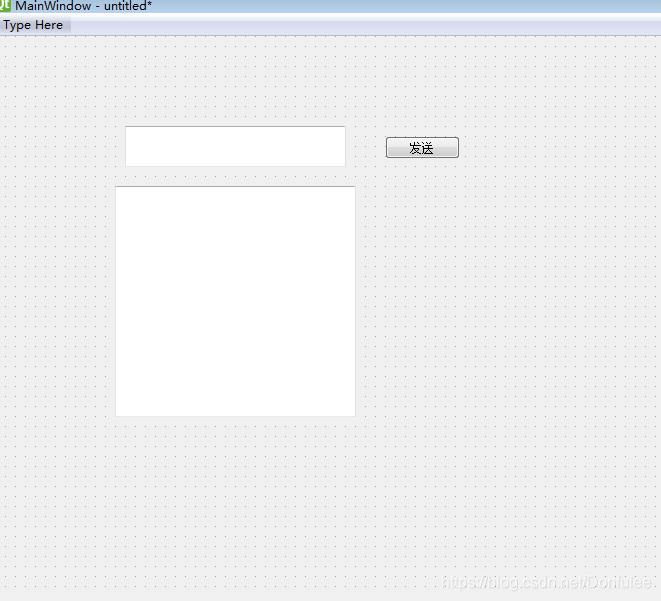
然后生成.py文件:
python -m PyQt5.uic.pyuic usb.ui -o usbTest.py
usbTest.py代码如下,pyuic自动生成的:
# -*- coding: utf-8 -*-

# Form implementation generated from reading ui file 'untitled.ui'
#
# Created by: PyQt5 UI code generator 5.15.0
#
# WARNING: Any manual changes made to this file will be lost when pyuic5 is
# run again.  Do not edit this file unless you know what you are doing.


from PyQt5 import QtCore, QtGui, QtWidgets


class Ui_MainWindow(object):
    def setupUi(self, MainWindow):
        MainWindow.setObjectName("MainWindow")
        MainWindow.resize(800, 600)
        self.centralwidget = QtWidgets.QWidget(MainWindow)
        self.centralwidget.setObjectName("centralwidget")
        self.textEdit = QtWidgets.QTextEdit(self.centralwidget)
        self.textEdit.setGeometry(QtCore.QRect(130, 90, 221, 41))
        self.textEdit.setObjectName("textEdit")
        self.pushButton = QtWidgets.QPushButton(self.centralwidget)
        self.pushButton.setGeometry(QtCore.QRect(390, 100, 75, 23))
        self.pushButton.setObjectName("pushButton")
        self.textEdit_2 = QtWidgets.QTextEdit(self.centralwidget)
        self.textEdit_2.setGeometry(QtCore.QRect(120, 150, 241, 231))
        self.textEdit_2.setObjectName("textEdit_2")
        MainWindow.setCentralWidget(self.centralwidget)
        self.menubar = QtWidgets.QMenuBar(MainWindow)
        self.menubar.setGeometry(QtCore.QRect(0, 0, 800, 23))
        self.menubar.setObjectName("menubar")
        MainWindow.setMenuBar(self.menubar)
        self.statusbar = QtWidgets.QStatusBar(MainWindow)
        self.statusbar.setObjectName("statusbar")
        MainWindow.setStatusBar(self.statusbar)

        self.retranslateUi(MainWindow)
        QtCore.QMetaObject.connectSlotsByName(MainWindow)

    def retranslateUi(self, MainWindow):
        _translate = QtCore.QCoreApplication.translate
        MainWindow.setWindowTitle(_translate("MainWindow", "MainWindow"))
        self.pushButton.setText(_translate("MainWindow", "发送"))
usbDeal.py代码如下:
from PyQt5 import QtCore
from usbTest import Ui_MainWindow
from PyQt5 import QtWidgets
from PyQt5.QtCore import Qt, QTimer, pyqtSignal, QObject, QEvent, QThread
from PyQt5.QtGui import QPainter, QPixmap, QMovie
from PyQt5.QtWidgets import QMainWindow, QApplication
import configparser, usb
import numpy as np
USB_VID = 0x1212
USB_PID = 0x3434
WRITE_BUF = [0]*9
READ_BUF = [0]*9
"""
注释掉是因为获取设备放在了每次启动发送数据都获取一次设备列表,这样可以实现动态插拔读写usb设备。
因为项目要实现插入设备能正常读写跟设备调试,一开始我是把获取设备列表放在这里的但是,只有把设备插
入后,然后重启应用才能正确读写usb设备,GitHub上看了pyusb的项目说是libusb不支持windows热插拔通知,
这个问题困扰了我几天,试过重载动态库、释放设备资源接口等但都没有用,后来想到把放在这行放在每次发送
前再获取,处理完数据后再释放点usb设备资源...然后就可以了....插入设备能正常读写,拔出设备再插入设备
也能正常读写....不知道这样做有什么影响,反正能实现需求了...有时间再深入了解吧...
"""
#device_list = list(usb.core.find(find_all=True, idVendor=USB_VID, idProduct=USB_PID))
device_list = list()
def printInHex(str,bytes):
l = [hex(int(i)) for i in bytes]
print(str," ".join(l))
# usb数据处理
class USBDealWindow(QMainWindow):
signal_ui_exec = pyqtSignal(str, QObject, QEvent, list)
def __init__(self,parent=None):
super(USBDealWindow, self).__init__(parent)
self.ui = Ui_MainWindow() # UI,usbTest的class
self.ui.setupUi(self)
self.sendThread = SendThread() # 发送线程
self.slot_init() # 槽初始化
def slot_init(self): # 信号连接到函数,信号槽初始化
self.sendThread.singalSendInfo.connect(self.update_info)
def update_info(self, string): # 更新文本框信息
self.ui.textEdit_2.append(string) # usbTest.py中的文本框对象textEdit_2
@QtCore.pyqtSlot()
def on_pushButton_clicked(self): # 按钮触发
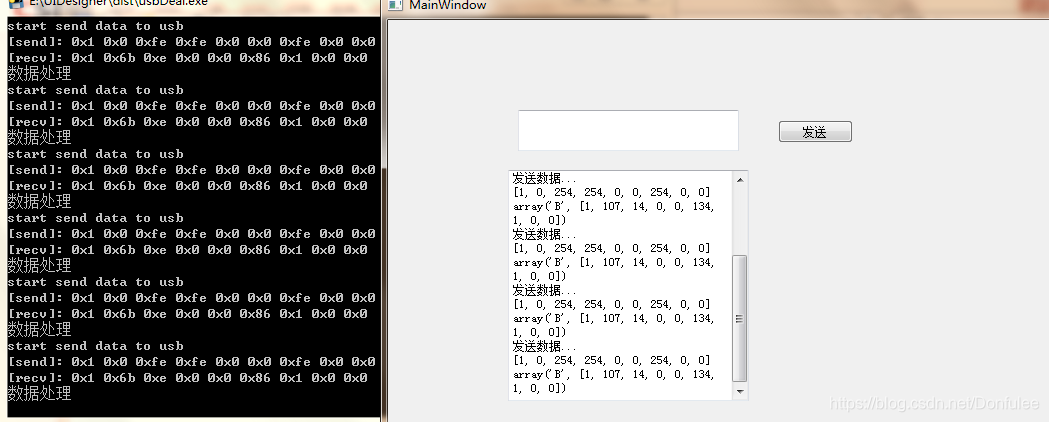
print("start send data to usb")
self.sendThread.stop() # 先停止之前的
self.sendThread.start() # 再启动
class SendThread(QThread):
singalSendInfo = pyqtSignal(str)
def __init__(self, parent=None):
super(SendThread, self).__init__(parent)
self.working = False
self.dev = None
self.read_ep = None
self.write_ep = None
def __del__(self):
self.working = False
self.wait()
def update_device(self, device):
self.dev = device
cfg = self.dev.get_active_configuration()
intf = cfg[(0,0)]
usb.util.claim_interface(self.dev,intf)
# 获取写endpoint
self.write_ep = usb.util.find_descriptor(
intf,
# match the first OUT endpoint
custom_match = \
lambda e: \
usb.util.endpoint_direction(e.bEndpointAddress) == \
usb.util.ENDPOINT_OUT
)
# 获取读endpoint
self.read_ep = usb.util.find_descriptor(
intf,
# match the first IN endpoint
custom_match = \
lambda e: \
usb.util.endpoint_direction(e.bEndpointAddress) == \
usb.util.ENDPOINT_IN
)
def send_usbData(self):
if self.dev:
# 只是为了记录下,所以发固定的数据测试下,当然界面上的文本框的数据可以获取,懒得写了
WRITE_BUF[0] = 0x01
WRITE_BUF[1], WRITE_BUF[2] = 0x00, 0xFE
WRITE_BUF[3], WRITE_BUF[4] = 0xFE, 0x00
WRITE_BUF[5], WRITE_BUF[6] = 0x00, 0xFE
WRITE_BUF[7], WRITE_BUF[8] = 0x00, 0x00
printInHex("[send]:",WRITE_BUF)
self.singalSendInfo.emit(str(WRITE_BUF))
self.write_ep.write(WRITE_BUF)
# 如果usb设备有返回的话可以加上读取
READ_BUF = self.read_ep.read(9, timeout=8*1000)
printInHex("[recv]:",READ_BUF)
# 再加上读取的数据处理....
if len(READ_BUF)==9 and READ_BUF[0]==0x01:
print("数据处理")
self.singalSendInfo.emit(str(READ_BUF))
else:
self.singalSendInfo.emit("校准失败")
usb.util.dispose_resources(self.dev)
usb.util.release_interface(self.dev,0)
def run(self):
self.working = True
device_list = list(usb.core.find(find_all=True, idVendor=USB_VID, idProduct=USB_PID))
if len(device_list) == 0:
self.singalSendInfo.emit("没有设备连接")
for dev in device_list:
self.update_device(dev)
self.singalSendInfo.emit("发送数据...")
self.send_usbData()
self.dev = None
self.working = False
def stop(self):
self.working = False
self.wait()
import sys
if __name__ == '__main__':
app = QApplication(sys.argv)
form = USBDealWindow()
form.setWindowOpacity(1) #设置窗口透明度
form.show()
sys.exit(app.exec_())
然后创建个bat文本,用pyinstaller生成EXE文件,936和6501好像都可以,不太懂,刚接触python:
chcp 936
pyinstaller -F -w usbDeal.py
pause
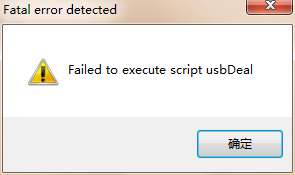
当然生成EXE文件也有坑,比如说,执行文件失败,Fail to execute script XXX,可以在用pyinstaller生成EXE的时候去掉-w 选项,会有cmd窗口,然后执行的时候会提示错误原因:
打包之后可能会抛出异常“No backend available”,这是因为pyinstaller在打包的时候没有把usb通信相关的dll文件打包进来 ,修改项目同目录下的usbDeal.spec文件:
# -*- mode: python ; coding: utf-8 -*-

block_cipher = None
binaries = [
   ('C:\\Windows\\System32\\libusb0.dll', '.'),
]

a = Analysis(['usbDeal.py'],
             pathex=['E:\\UIDesigner'],
             binaries=binaries,
             datas=[],
             hiddenimports=[],
             hookspath=[],
             runtime_hooks=[],
             excludes=[],
             win_no_prefer_redirects=False,
             win_private_assemblies=False,
             cipher=block_cipher,
             noarchive=False)
pyz = PYZ(a.pure, a.zipped_data,
             cipher=block_cipher)
exe = EXE(pyz,
          a.scripts,
          a.binaries,
          a.zipfiles,
          a.datas,
          [],
          name='usbDeal',
          debug=False,
          bootloader_ignore_signals=False,
          strip=False,
          upx=True,
          upx_exclude=[],
          runtime_tmpdir=None,
          console=True )
然后再修改create_exe.bat脚本,使用.spec文件生成EXE而不是.py文件:
chcp 936
pyinstaller -F usbDeal.spec
pause
最后在dist目录下生成文件EXE。
不想写了…


 3543
3543

 被折叠的 条评论
为什么被折叠?
被折叠的 条评论
为什么被折叠?
 到【灌水乐园】发言


