


一、Centos7 LNMP环境搭建
原文连接https://segmentfault.com/a/1190000013842789
1、安装Nginx最新源
yum localinstall http://nginx.org/packages/centos/7/noarch/RPMS/nginx-release-centos-7-0.el7.ngx.noarch.rpm
yum repolist enabled | grep "nginx*"
yum -y install nginx

//启动Nginx
service nginx start

//设置nginx服务器开机自启动
systemctl enable nginx.service

//检查开机自动是否设置成功
systemctl list-dependencies | grep nginx
2、安装mysql5.7
yum -y localinstall  http://dev.mysql.com/get/mysql57-community-release-el7-7.noarch.rpm
yum repolist enabled | grep "mysql.*-community.*"
yum -y install mysql-community-server install mysql-community-devel

//启动mysql
service mysqld start

//检查mysql启动是否正常
service mysqld status

//设置mysqld服务开机自启动
systemctl enable mysqld.service

//检查mysqld开机自启动是否设置成功
systemctl list-dependencies | grep mysqld

//查看mysql的随机密码
grep 'temporary password' /var/log/mysqld.log

//使用得到的随机密码,更改mysql密码
mysql -u root -p
ALTER USER 'root'@'localhost' IDENTIFIED BY 'Yourpassword';

//设置mysql远程连接
GRANT ALL PRIVILEGES ON *.* TO 'root'@'%' IDENTIFIED BY 'Yourpassword' WITH GRANT OPTION;
FLUSH  PRIVILEGES;
3、安装php7.1
rpm -Uvh https://dl.fedoraproject.org/pub/epel/epel-release-latest-7.noarch.rpm
rpm -Uvh https://mirror.webtatic.com/yum/el7/webtatic-release.rpm

//检查源是否安装成功
yum repolist enabled | grep "webtatic*"

//安装php扩展源
yum -y install php71w php71w-fpm
yum -y install php71w-mbstring php71w-common php71w-gd php71w-mcrypt --skip-broken
yum -y install php71w-mysql php71w-xml php71w-cli php71w-devel
yum -y install php71w-pecl-memcached php71w-pecl-redis php71w-opcache

//验证php是否安装成功
php -v

//验证对应的扩展是否安装成功
php -m

//启动php-fpm
service php-fpm start

//检查启动是否成功
service php-fpm status

//设置开机自启动
systemctl enable php-fpm.service

//检查开机自启动是否设置成功
systemctl list-dependencies | grep php-fpm
ps -ef | grep php-fpm
4、PHP添加Nginx支持
//修改php.ini
vi /etc/php.ini

//按 i 在结尾的“;Local Variables:”之前添加如下内容
cgi.fix_pathinfo = 1

//按esc, 按shift + : 接着输入wq
5、Nginx配置文件
#配置文件在 /etc/nginx/conf.d 文件夹里,当需要添加多一个网站时,可以添加一个配置文件名字可以自定义,配置如下
server{
    listen       80;
    server_name  youserver;
    index index.html index.php;
    root /home/public;
    #charset koi8-r;
    #access_log  logs/host.access.log  main;
    location / {
        index  index.html index.htm index.php;
        try_files $uri $uri/ /index.php?$query_string;
     }
    error_page  404              /404.html;
    # redirect server error pages to the static page /50x.html
    #
    error_page   500 502 503 504  /50x.html;
    location = /50x.html {
        root   html;
    }
    # proxy the PHP scripts to Apache listening on 127.0.0.1:80
    #
    #location ~ .php$ {
    #    proxy_pass   http://127.0.0.1;
    #}
    # pass the PHP scripts to FastCGI server listening on 127.0.0.1:9000
    #
    location ~ .php$ {
        root           /home/public;
        fastcgi_pass   127.0.0.1:9000;
        fastcgi_index  index.php;
        fastcgi_param  SCRIPT_FILENAME  /home/public$fastcgi_script_name;
        include        fastcgi_params;
}
    # deny access to .htaccess files, if Apache's document root
    # concurs with nginx's one
    #
    location ~ /.ht {
        deny  all;
    }
}
二、安装Redis
//安装redis之前先安装
yum install gcc-c++
yum -y install wget

//安装redis到指定的目录下,这里安装到的/etc
wget http://download.redis.io/releases/redis-5.0.3.tar.gz
tar xzf redis-5.0.3.tar.gz -C /etc
cd /etc/redis-5.0.3
make

//修改redis配置允许后台运行daemonize on 改为 yes
vi redis.conf
//找到daemonize on 改为 yes

//测试redis是否安装成功
src/redis-server  redis.conf &

//如果上面运行后 没有回到命令行输入 按ctrl + c
//启动redis客户端
src/redis-cli
//测试redis
set test success
//输出ok
get test
//输出success 到此redis安装成功

//关闭redis服务
redis-cli   -h 127.0.0.1 -p 6379 shutdown

//添加redis到系统服务
cd src
make install

//将redis_init_script拷贝到/etc/init.d目录下并重命名为 redis
cp /etc/redis-5.0.3/utils/redis_init_script  /etc/init.d/redis

//修改/etc/init.d/redis 中的参数 CONF="/etc/redis/${REDISPORT}.conf" 为 CONF="/etc/redis-5.0.3/redis.conf"
cd /etc/init.d
vi redis
//修改完 按esc ,然后按shift + : 输入wq

//添加redis服务
chkconfig  --add redis
chkconfig

//重启服务器 查看reids服务是否启动
reboot
//至此redis服务全部安装完成

//查看 redis-server 进程
ps -ef | grep redis

//关闭 redis 服务
service redis stop

//redis的常用配置,修改/etc/redis-5.0.3/redis.conf;
//开启远程服务 注释掉配置文件中的bind 127.0.0.1;将protected-mode 给为no
三、Gitee自动部署
1、安装git + composer
//安装git
sudo yum install git

安装composer
curl -sS https://getcomposer.org/installer | php
mv composer.phar /usr/local/bin/composer
2、添加系统用户
//此用户主要是用来自动部署的时候使用的,你也可以使用已存在的nginx,或者apache用户,这里我重新添加一个账户

//添加用户
adduser www

//设置密码
passwd www
3、更改nginx、php 脚本执行用户
//修改 /etc/php-fpm.d/www.conf
user = apache 改为 user = www
group= apache 改为 group= www
//重启php-fpm
service php-fpm restart

//修改 /etc/nginx/nginx.conf
user = nginx改为 user = www
//重启nginx
service nginx restart
4、Gitee自动化部署
a、在服务器拉取项目代码
//切换到www用户
su www

//生成gitee公钥  需要操作时按回车直到生成公钥
ssh-keygen -t rsa -C "xxxxxxxx@163.com"

//查看公钥 并将公钥添加到你的项目公钥
cat ~/.ssh/id_rsa.pub

//验证是否添加成功
ssh -T git@gitee.com

//切换到用户同名目录
cd /home/www

//新建一个文件夹用来存放项目代码
mkdir admin
git clone git@gitee.com:xxxxxx.git admin
b、创建webhooksAPI
//在/home/www目录下新建一个webhooks文件夹
mkdir webhooks

//添加文件
cd webhooks
touch admin.php

//admin.php文件代码如下
<?php

//git webhook 自动部署脚本
$savePath = "/home/www/admin";//项目存放物理路径,
$token    = 'www';//gitee设置webhooks的值

$requestBody = file_get_contents("php://input");
if (empty($requestBody)) {
	die('send fail');
}

//解析Git服务器通知过来的JSON信息
$content = json_decode($requestBody, true);
//若是主分支且提交数大于0
if ($content['ref'] == 'refs/heads/master' && $content['total_commits_count'] > 0 && $content['password'] == $token) {

	$res = PHP_EOL."pull start --------".PHP_EOL;
	$res .= shell_exec("cd {$savePath} && git pull 2>&1");//拉去代码
	$res_log = '-------------------------'.PHP_EOL;
	$res_log .= $content['user_name'] . ' 在' . date('Y-m-d H:i:s') . '向' . $content['repository']['name'] . '项目的' . $content['ref'] . '分支push了' . $content['total_commits_count'] . '个commit:';
	$res_log .= $res.PHP_EOL;
	$res_log .= "pull end --------".PHP_EOL;
	file_put_contents("git-webhook_log.txt", $res_log, FILE_APPEND);//写入日志到log文件中
}
C、Nginx添加网站
//切换到root账户 并添加nginx网站配置文件
su
cd cd /etc/nginx/conf.d

//添加两个配置文件,一个指向webhooks 一个指向admin
touch webhooks.conf
touch admin.conf

//webhooks.conf配置文件如下
server{
    listen       80;
    server_name  webhooks.xxxx.com;
    index index.html index.php;
    root /home/www/webhooks;
    #charset koi8-r;
    #access_log  logs/host.access.log  main;
    location / {
        index  index.html index.htm index.php;
        try_files $uri $uri/ /index.php?$query_string;
     }
    error_page  404              /404.html;
    # redirect server error pages to the static page /50x.html
    #
    error_page   500 502 503 504  /50x.html;
    location = /50x.html {
        root   html;
    }
    # proxy the PHP scripts to Apache listening on 127.0.0.1:80
    #
    #location ~ .php$ {
    #    proxy_pass   http://127.0.0.1;
    #}
    # pass the PHP scripts to FastCGI server listening on 127.0.0.1:9000
    #
    location ~ .php$ {
        root           /home/www/webhooks;
        fastcgi_pass   127.0.0.1:9000;
        fastcgi_index  index.php;
        fastcgi_param  SCRIPT_FILENAME  /home/www/webhooks$fastcgi_script_name;
        include        fastcgi_params;
}
    # deny access to .htaccess files, if Apache's document root
    # concurs with nginx's one
    #
    location ~ /.ht {
        deny  all;
    }
}

//修改nginx配置文件  需要重启nginx
//admin.conf 配置参考webhooks.conf
D、Gitee项目添加webhooks
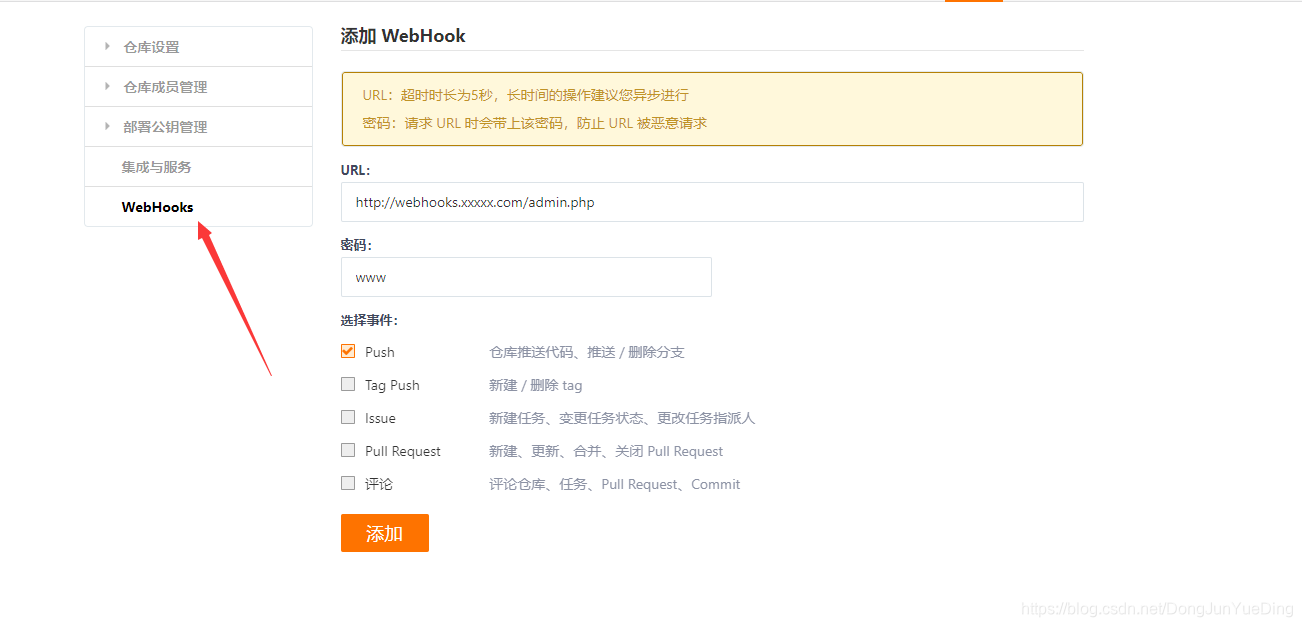
至此gitee自动部署 完成


 971
971


 被折叠的 条评论
为什么被折叠?
被折叠的 条评论
为什么被折叠?
 到【灌水乐园】发言


