


smarty下载地址
安装Smarty发行版在解压后的libs目录里的库文件
引入和创建smarty实例
<span style="font-size:14px;">require('Smarty.class.php');
$smarty = new Smarty;</span>
如果脚本运行出现没有找到Smarty.class.php文件时就引入其绝对路径
设置其他有关smarty目录:
smarty要求的四个目录,默认下命名为:tempalates,templates_c,configs andcache。
每个目录都可以自己定义的:$template_dir , $compile_dir,$config_dir , $cache_dir
<span style="font-size:14px;">$smarty->template_dir = "tpl";
$smarty->compile_dir = 'template_c';
$smarty->cache_dir = "cache";
$smarty->config_dir = "configs";</span>
设置标记分割符(默认是"{","}")
<span style="font-size:14px;">$smart->left_delimiter = "{";
$smart->right_delimiter = "}";</span>
目录结构
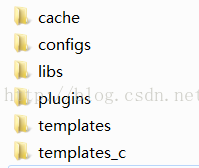
cache:缓存文件
configs:配置文件
libs:smarty库文件
plugins:插件,自定义函数库
templates:模板文件
templates_c:编译缓存文件
当输出的页面时,smarty会检测页面和cache的模板有没变化,如果没有,就直接输出缓存文件夹的模板;如果有变化,smarty会检测哪一个子模板发生了改变,然后将其重新编译,没有变化的模板则不会再编译,这就是smarty模板引擎缓存机制的优点,可以高效的提升编译速度,浏览舒畅。一般display时有templates里的模板文件,有dubug模板文件和配置项文件。这些编译文件保存在编译缓存文件中,然后再整合到一个文件中,就是缓存文件夹里的文件了。


 436
436

 被折叠的 条评论
为什么被折叠?
被折叠的 条评论
为什么被折叠?
 到【灌水乐园】发言


