


1.javaconfig理论
什么是 javaconfig
以java代码的方式管理bean
为什么学习javaconfig
boot底层原理就是它
Java 的 bean 配置(JavaConfig)出现历史
spring1.x :xml配置
spring2.x :注解配置
spring3.x-4.x :javaconfig&springboot
spring5.x
javaconfig的操作
spring测试
new:ClassPathXmlApplicationContext
注入:RunWith ContextConfigration
IOC-xml
<?xml version="1.0" encoding="UTF-8"?>
<beans xmlns="http://www.springframework.org/schema/beans" xmlns:xsi="http://www.w3.org/2001/XMLSchema-instance"
       xmlns:context="http://www.springframework.org/schema/context"
       xsi:schemaLocation="http://www.springframework.org/schema/beans
       http://www.springframework.org/schema/beans/spring-beans.xsd
       http://www.springframework.org/schema/context
       http://www.springframework.org/schema/context/spring-context.xsd
      ">
    <bean id="myDate" class="java.util.Date">
  scope="singleton" lazy-init="true" init-method="" destroy-method="" >
        <property name="name" value="zs"></property>
        <property name="otherBean" ref=""

</bean>
</beans>

测试注入 MyBean OtherBean
Ioc-注解
扫描注解
<?xml version="1.0" encoding="UTF-8"?>

<beans xmlns="http://www.springframework.org/schema/beans"

        xmlns:xsi="http://www.w3.org/2001/XMLSchema-instance"
        xmlns:context="http://www.springframework.org/schema/context"
        xsi:schemaLocation="
        http://www.springframework.org/schema/beans http://www.springframework.org/schema/beans/spring-beans-2.5.xsd
        http://www.springframework.org/schema/context  http://www.springframework.org/schema/context/spring-context-2.5.xsd
">

    <context:component-scan base-package="cn.itsource._03iocanno_">

    </context:component-scan>
</beans>


配置注解
package cn.itsource._03iocanno_;

import org.springframework.beans.factory.annotation.Autowired;
import org.springframework.stereotype.Component;

//controller service repository componet
@Component
public class MyBean {
    private String name;

    public String getName() {
        return name;
    }

    public void setName(String name) {
        this.name = name;
    }

    @Autowired
    private OtherBean otherBean;

    public OtherBean getOtherBean() {
        return otherBean;
    }

    public void setOtherBean(OtherBean otherBean) {
        this.otherBean = otherBean;
    }
}
2.Spring javaconfig-IOC
基本
导入xml
<?xml version="1.0" encoding="UTF-8"?>
<project xmlns="http://maven.apache.org/POM/4.0.0"
         xmlns:xsi="http://www.w3.org/2001/XMLSchema-instance"
         xsi:schemaLocation="http://maven.apache.org/POM/4.0.0 http://maven.apache.org/xsd/maven-4.0.0.xsd">
<modelVersion>4.0.0</modelVersion>

<groupId>cn.itsource</groupId>
<artifactId>javaconfig</artifactId>
<version>1.0-SNAPSHOT</version>
<dependencies>
    <dependency>
        <groupId>org.springframework</groupId>
        <artifactId>spring-context</artifactId>
        <version>4.3.12.RELEASE</version>
    </dependency>
    <dependency>
        <groupId>org.springframework</groupId>
        <artifactId>spring-test</artifactId>
        <version>4.3.12.RELEASE</version>
    </dependency>
    <dependency>
        <groupId>junit</groupId>
        <artifactId>junit</artifactId>
        <version>4.12</version>
        <scope>compile</scope>
    </dependency>
</dependencies>


</project>
配置类
@Configuration:加了这个注解的类就相当于传统的一个applicationContext-xxx.xml
@Bean:在标注了@Configuration的类里面的方式上面打上@bean就相当于在applicationContext-xxx.xml配置的一个
Dao的名字默认就是方法名,如果想改方法名使用@Bean(“beanName”)
bean扫描@ComponentScan/ComponentScans)
单包,多包,排除或包含
package cn.itsource._05componentScan;

import org.springframework.context.annotation.ComponentScan;
import org.springframework.context.annotation.ComponentScans;
import org.springframework.context.annotation.Configuration;
import org.springframework.context.annotation.FilterType;
import org.springframework.stereotype.Service;

@Configuration //相当于原来的applicationContext,xml
//1 基础语法
//@ComponentScan("cn.itsource._05componentScan")
//2.配置多个包
//2.1加多个@componscan
//@ComponentScan("cn.itsource._05componentScan_.controller")
//@ComponentScan("cn.itsource._05componentScan_.service")
//2.2 @ComponentScans
/*@ComponentScans(value = {
        @ComponentScan("cn.itsource._05componentScan_.controller"),
        @ComponentScan("cn.itsource._05componentScan_.service")
})*/

//3 排除包里面某些类的bean,只包含某类注解的bean 其他的三个注解本身也是一个@Component
@ComponentScans( value = {
        //测试的是在一个包下面那些不要
  //      @ComponentScan(value = "cn.itsource._05componentScan",excludeFilters = {
                //排除加了Component注解的bean
       //         @ComponentScan.Filter(type = FilterType.ANNOTATION,classes = {Controller.class})
      //  })


//只要改包下面的那些
@ComponentScan(
        value = "cn.itsource._05componentScan",
        includeFilters = {
                //排除加了Component注解的bean
                @ComponentScan.Filter(type = FilterType.ANNOTATION,classes = {Service.class})
        }
        ,useDefaultFilters = false //关闭默认全部扫描includeFilters才生效
)
})
public class IocConfig {

}
bean详情
1)@Scope单例测试

2)@Lazy懒加载
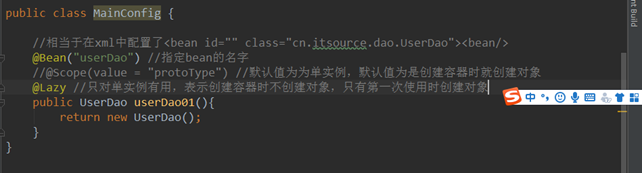
注入的四种方式
package cn.itsource._06bean;

import org.springframework.beans.factory.annotation.Autowired;
import org.springframework.context.annotation.Bean;
import org.springframework.context.annotation.Configuration;

@Configuration
public class MainConfig {
    @Autowired
    private OtherBean otherBean;

    //1 bean 名称  <bean id="" scope>
    //默认以方法名作为名称
    //@Bean("myBean") //配置名称
    //@Scope("singleton") //singleton单例(默认值) prototype多例
    //@Lazy //懒加载(默认),用到的时候才去创建对象,并且只对单例模式有效,因为多例是你要的时候才给你创建
    public MyBean yj() {
        // 方式1:创建对象直接设置值,没有在spring中,不较注入
//        OtherBean otherBean = new OtherBean();
//        MyBean myBean = new MyBean();
//        myBean.setOtherBean(otherBean);
// 方式2:直接调用方法
//        MyBean myBean = new MyBean();
       // 智能发现如果已经通过该方法注册了bean,直接注入就ok,不会再新创建一个了。
//        myBean.setOtherBean(otherBean());

        //方式3:对注入的bean进行设置值
        MyBean myBean = new MyBean();
        myBean.setOtherBean(otherBean);
        return myBean;
    }
    //方式4 通过构造函数进行注入 推荐使用

    @Bean
    public MyBean zzz(OtherBean otherBean){
        return  new MyBean(otherBean);

    }
    @Bean
    public  OtherBean otherBean(){
        return  new OtherBean();
    }
}
condition
@Conditional(value = LinuxCondition.class) //放到类上面下面所有方法都生效,但是如果方法上加了优先级更高****
import
类名
选择器
注册器
package cn.itsource._08import;

import org.springframework.context.annotation.Bean;
import org.springframework.context.annotation.Configuration;
import org.springframework.context.annotation.Import;

// 通过import导入
// 1 导入特定类的对象
// 2 通过ImportSelector
// 3 ImportBeanDefinitionRegistra
@Configuration
@Import({YellowColor.class,GreenColor.class,WhiteColor.class,BlackColor.class,MyImportSelector.class,MyImportBeanDefinitionRegistrar.class})
public class MainConfig {

    //直接通过bean名称获取的是Factorybean所创建的对象而不是PersonFactoryBean
    //如果想要获取PersonFactoryBean,通过&name
    @Bean
    public PersonFactoryBean person() {
        return new PersonFactoryBean();

    }
}
Bean生命周期
Bean生命周期:创建----初始化----销毁
3. springboot入门
理论
包的导入
<?xml version="1.0" encoding="UTF-8"?>
<project xmlns="http://maven.apache.org/POM/4.0.0"
         xmlns:xsi="http://www.w3.org/2001/XMLSchema-instance"
         xsi:schemaLocation="http://maven.apache.org/POM/4.0.0 http://maven.apache.org/xsd/maven-4.0.0.xsd">
    <modelVersion>4.0.0</modelVersion>

    <groupId>cn.itsource</groupId>
    <artifactId>sprinboot-hello</artifactId>
    <version>1.0-SNAPSHOT</version>

    <parent>
        <groupId>org.springframework.boot</groupId>
        <artifactId>spring-boot-starter-parent</artifactId>
        <version>2.0.5.RELEASE</version>
    </parent>

    <dependencies>
        <dependency>
            <groupId>org.springframework.boot</groupId>
            <artifactId>spring-boot-starter-web</artifactId>
        </dependency>
    </dependencies>

    <build>
        <plugins>
            <plugin>
                <groupId>org.springframework.boot</groupId>
                <artifactId>spring-boot-maven-plugin</artifactId>
            </plugin>
        </plugins>
    </build>

</project>
什么是Spring Boot
springBoot是Spring项目中的一个子工程,与我们所熟知的Spring-framework 同属于spring的产品:
. Spring Boot特点
Spring Boot 主要目标是:
- 为所有 Spring 的开发者提供一个非常快速的、广泛接受的入门体验
- 开箱即用(启动器starter-其实就是SpringBoot提供的一个jar包),但通过自己设置参数(.properties),即可快速摆脱这种方式。
- 提供了一些大型项目中常见的非功能性特性,如内嵌服务器、安全、指标,健康检测、外部化配置等
- 绝对没有代码生成,也无需 XML 配置。
入门
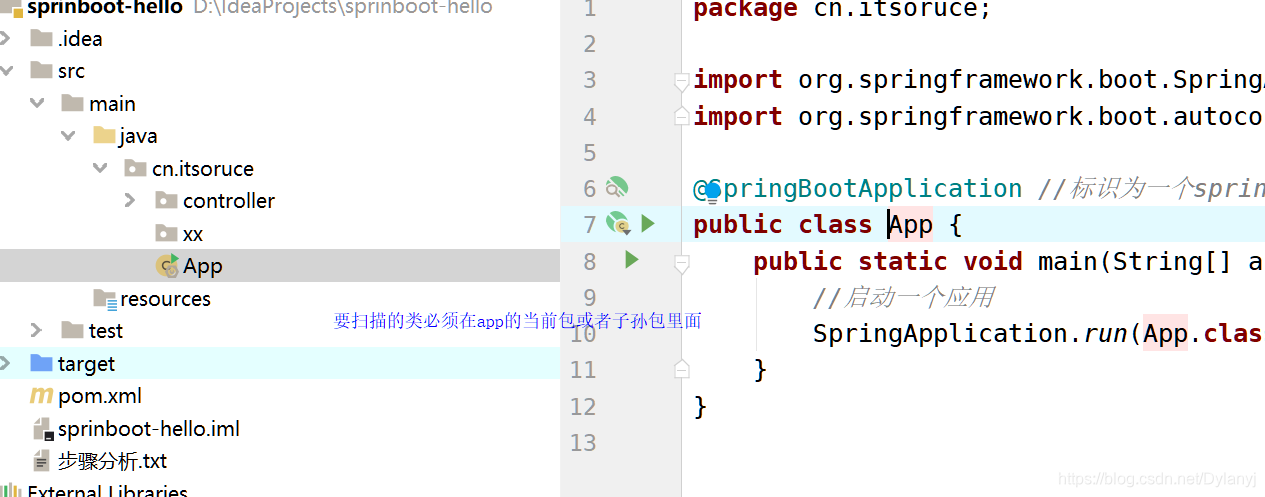
一 创建项目
parent
dependency
二 创建springboot项目并且启动
1)任意类加上@SpringBootApplication
2)Main函数启动springboot的应用
package cn.itsource;

import org.springframework.boot.SpringApplication;
import org.springframework.boot.autoconfigure.SpringBootApplication;

@SpringBootApplication //标识一个为springboot的 项目
public class App {
    public  static  void main(String[] args){
        //启动应用
        SpringApplication.run(App.class,args);
    }
}
三 写一个Contorller来测试
HelloConroller
package cn.itsource.controller;

import org.springframework.stereotype.Controller;
import org.springframework.web.bind.annotation.RequestMapping;
import org.springframework.web.bind.annotation.ResponseBody;

@Controller
public class HelloController {
    @RequestMapping("/hello")
    @ResponseBody
    public  String hello(){
        return  "hello";
    }
}
打包运行、
添加插件
<build>
        <plugins>
            <plugin>
                <groupId>org.springframework.boot</groupId>
                <artifactId>spring-boot-maven-plugin</artifactId>
            </plugin>
        </plugins>
    </build>
j进行打包
窗口运行:java -jar xxx.jar
后台运行: nohup java -jar XXX.jar & 只linux
注意事项


 50
50


 被折叠的 条评论
为什么被折叠?
被折叠的 条评论
为什么被折叠?
 到【灌水乐园】发言


