


Excel批注常用于为个别的单元格添加注释,读者能够从注释中获取额外的信息。批注可隐藏,只会在单元格右上方显示红色三角,添加后不会对单元格的内容喧宾夺主。在日常编程处理Excel中,为个别单元格添加备注信息,也有必要。这篇博文主要介绍使用免费版的Spire.XLS在C#中为单元格添加备注,并设置位置,大小,富文本及文本对齐方式。
想尝试的朋友可以从以下三个地址下载Free Spire.XLS: E-iceblue官网下载;Nuget;CSDN下载。下载之后,请将bin 文件夹里的.dll添加为VS的引用。
步骤一: 创建一个新的工作薄和表单。
            Workbook workbook = new Workbook();
Worksheet sheet = workbook.Worksheets[0];步骤二:启用类ExcelFont添加设置字体,在设置comment文本时会用到。
            ExcelFont font1 = workbook.CreateFont();
            font1.FontName = "仿宋";
            font1.Color = Color.Red;
            font1.IsBold = true;
            font1.Size = 12;
            ExcelFont font2 = workbook.CreateFont();
            font2.FontName = "仿宋";
            font2.Color = Color.Blue;
            font2.Size = 12;
            font2.IsBold = true;
            ExcelFont font3 = workbook.CreateFont();
            font3.FontName = "Calibri";
            font3.Color = Color.Blue;
            font3.Size = 12;
            font3.IsBold = true;
步骤三:为单元格F5添加批注1,设置其大小,位置,文本,文本对齐方式。
            ExcelComment Comment1 = sheet.Range["F5"].Comment;
            Comment1.IsVisible = true;
            //设置批注高度和宽度
            Comment1.Height = 150;
            Comment1.Width = 300;
            //设置批注位置
            Comment1.Top = 20;
            Comment1.Left = 40;
            //设置文本内容,对齐方式,文本旋转
            Comment1.RichText.Text = "为了防止人类齐心协力开发出人工智能,上帝给了程序员不同的开发语言。但哪种语言才是最好的呢?";
            Comment1.RichText.SetFont(0, 32, font2);
            Comment1.RichText.SetFont(33, 44, font1);
            Comment1.TextRotation = TextRotationType.LeftToRight;
            Comment1.VAlignment = CommentVAlignType.Center;
Comment1.HAlignment = CommentHAlignType.Justified;步骤四:添加批注2作为对照。
            ExcelComment Comment2= sheet.Range["F14"].Comment;
            Comment2.IsVisible = true;
            Comment2.Height = 150;
            Comment2.Width = 300;
            Comment2.RichText.Text = "About E-iceblue: \nE-iceblue focuses on providing excellent office components for developers to operate Word, Excel, PDF, and PowerPoint documents.";
            Comment2.TextRotation = TextRotationType.LeftToRight;
            Comment2.RichText.SetFont(0, 16, font2);
            Comment2.Top = 170;
            Comment2.Left = 450;
            Comment2.VAlignment = CommentVAlignType.Top;
Comment2.HAlignment = CommentHAlignType.Justified;步骤五:保存文档,并启动查看效果。
            workbook.SaveToFile("S3.xlsx", ExcelVersion.Version2010);
            System.Diagnostics.Process.Start("S3.xlsx");
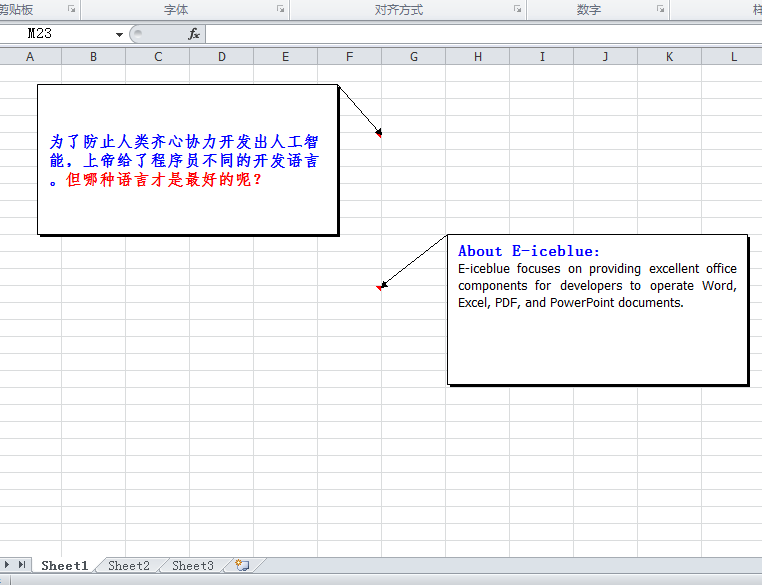
效果图:
全部代码:
using System;
using System.Collections.Generic;
using System.Linq;
using System.Text;
using Spire.Xls;
using System.Drawing;

namespace How_to_set_Excel_margin_to_print
{
    class Program
    {
        static void Main(string[] args)
        {
            Workbook workbook = new Workbook();
            Worksheet sheet = workbook.Worksheets[0];

            ExcelFont font1 = workbook.CreateFont();
            font1.FontName = "仿宋";
            font1.Color = Color.Red;
            font1.IsBold = true;
            font1.Size = 12;
            ExcelFont font2 = workbook.CreateFont();
            font2.FontName = "仿宋";
            font2.Color = Color.Blue;
            font2.Size = 12;
            font2.IsBold = true;
            ExcelFont font3 = workbook.CreateFont();
            font3.FontName = "Calibri";
            font3.Color = Color.Blue;
            font3.Size = 12;
            font3.IsBold = true;

            ExcelComment Comment1 = sheet.Range["F5"].Comment;
            Comment1.IsVisible = true;
            Comment1.Height = 150;
            Comment1.Width = 300;
            Comment1.Top = 20;
            Comment1.Left = 40;
            Comment1.RichText.Text = "为了防止人类齐心协力开发出人工智能,上帝给了程序员不同的开发语言。但哪种语言才是最好的呢?";
            Comment1.RichText.SetFont(0, 32, font2);
            Comment1.RichText.SetFont(33, 44, font1);
            Comment1.TextRotation = TextRotationType.LeftToRight;
            Comment1.VAlignment = CommentVAlignType.Center;
            Comment1.HAlignment = CommentHAlignType.Justified;

            ExcelComment Comment2= sheet.Range["F14"].Comment;
            Comment2.IsVisible = true;
            Comment2.Height = 150;
            Comment2.Width = 300;
            Comment2.RichText.Text = "About E-iceblue: \nE-iceblue focuses on providing excellent office components for developers to operate Word, Excel, PDF, and PowerPoint documents.";
            Comment2.TextRotation = TextRotationType.LeftToRight;
            Comment2.RichText.SetFont(0, 16, font2);
            Comment2.Top = 170;
            Comment2.Left = 450;
            Comment2.VAlignment = CommentVAlignType.Top;
            Comment2.HAlignment = CommentHAlignType.Justified;

            workbook.SaveToFile("S3.xlsx", ExcelVersion.Version2010);
            System.Diagnostics.Process.Start("S3.xlsx");
        }
    }
}
为方便大家参考阅读使用,博主将陆续汉化E-iceblue控件的使用教程。感兴趣的朋友请关注收藏此博客。


 266
266

 被折叠的 条评论
为什么被折叠?
被折叠的 条评论
为什么被折叠?
 到【灌水乐园】发言


