


1、下载源码
- download and install GitHub
- create local directory to store source files , for example d:\spring4
- execute following commands:
cd d:\spring4
git clone git://github.com/SpringSouce/Spring-framework.git
cd d:\spring4-security
git clone git://github.com/SpringSouce/Spring-security.git
其他版本的下载地址:https://github.com/spring-projects/spring-framework/tags
2、准备eclipse项目(必须以管理员身份运行命令行)
cd d:\spring4
import-into-eclipse
3、错误处理
- can not resolve services.gradle.org ... download failed....
edit C:\Windows\System32\drivers\etc\hosts , add following configuration to the tail:
207.223.250.8services.gradle.org
- Could not GET 'https://repo.spring.io/...
u can copy file to gradle local cache
the gradle local cache directory is :C:\Users\%USERNAME%\.gradle\caches
for example , if the error is
Could not resolve all dependencies for configuration ':spring-context:compile'.
> Could not download artifact 'jruby-core.jar (org.jruby:jruby-core:1.7.19)'
> Could not GET 'https://repo.spring.io/libs-release/org/jruby/jruby-core/1.7
.19/jruby-core-1.7.19.jar'.
> d29vzk4ow07wi7.cloudfront.net
u can copy the url to browser : https://repo.spring.io/libs-release/org/jruby/jruby-core/1.7.19/jruby-core-1.7.19.jar
u will find the redirect url in thunder :
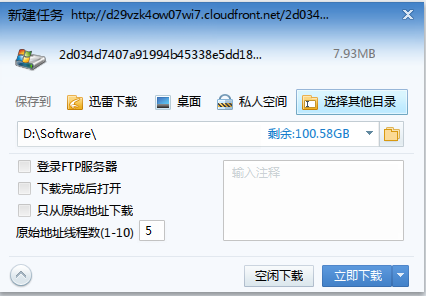
u should copy the file name 2d034d7407a91994b45338e5dd1821faea534e84
make the dir in cache as follows :
C:\Users\%USERNAME%\.gradle\caches\modules-2\files-2.1\org.jruby\jruby-core\1.7.19\2d034d7407a91994b45338e5dd1821faea534e84
copy the downloaded file (jruby-core-1.7.19.jar)
re-execute the command : import-into-eclipse
4、我的日志
Could not resolve all dependencies for configuration ':spring-context:compile'.
> Could not download artifact 'jruby-core.jar (org.jruby:jruby-core:1.7.19)'
> Could not GET 'https://repo.spring.io/libs-release/org/jruby/jruby-core/1.7
.19/jruby-core-1.7.19.jar'.
> d29vzk4ow07wi7.cloudfront.net
2d034d7407a91994b45338e5dd1821faea534e84
> Could not resolve all dependencies for configuration ':spring-context-support:
compile'.
> Could not download artifact 'quartz.jar (org.quartz-scheduler:quartz:2.2.1)
'
> Could not GET 'https://repo.spring.io/libs-release/org/quartz-scheduler/quartz/2.2.1/quartz-2.2.1.jar'.
> Software caused connection abort: recv failed
2bd17ec0c66d0370a932e225f52c23f3dc7cc4ce
> Could not resolve all dependencies for configuration ':spring-orm:compile'.
> Could not download artifact 'javax.persistence.jar (org.eclipse.persistence
:javax.persistence:2.0.5)'
> Could not GET 'https://repo.spring.io/libs-release/org/eclipse/persistence/javax.persistence/2.0.5/javax.persistence-2.0.5.jar'.
> d29vzk4ow07wi7.cloudfront.net
e28c710137a7e6eba12ba95217c5ea0db5e71b83
5、执行完毕的提示信息
BUILD SUCCESSFUL
Total time: 32 mins 14.36 secs
-----------------------------------------------------------------------
STEP 2: Import subprojects into Eclipse/STS
Within Eclipse/STS, do the following:
File > Import... > Existing Projects into Workspace
> When prompted for the 'root directory', provide D:\Work\research\open_sou
rce\spring\Spring-framework\
> Press enter. You will see the modules show up under "Projects"
> All projects should be selected/checked. Click Finish.
> When the project import is complete, you should have no errors.


 3027
3027

 被折叠的 条评论
为什么被折叠?
被折叠的 条评论
为什么被折叠?
 到【灌水乐园】发言


