


MVC模式:
Model 模型
View 视图
Control 控制器
传统MVC开发缺陷:
在实现页面跳转的时候跳转的代码写死了,不够灵活。
在传统的MVC开发中Servlet的使用和配置太过于频繁
下面我们就使用登陆的案例来简单演示一波MVC的优化
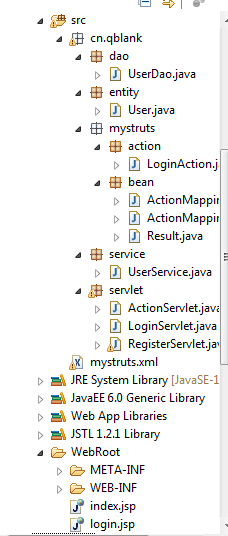
文件结构图如下:
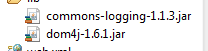
同时需要引入dom4j的jar包
首先,我们建立一个User的实体类
public class User implements Serializable{
private String userName;
private String pwd;
public String getUserName() {
return userName;
}
public void setUserName(String userName) {
this.userName = userName;
}
public String getPwd() {
return pwd;
}
public void setPwd(String pwd) {
this.pwd = pwd;
}
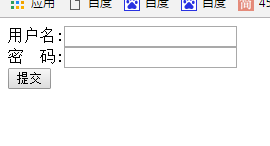
}接下来我们开始写登陆的界面login.jsp
<%@ page language="java" import="java.util.*" pageEncoding="UTF-8"%>
<%
String path = request.getContextPath();
String basePath = request.getScheme()+"://"+request.getServerName()+":"+request.getServerPort()+path+"/";
%>
<!DOCTYPE HTML PUBLIC "-//W3C//DTD HTML 4.01 Transitional//EN">
<html>
  <head>
    <base href="<%=basePath%>">
    <title>登陆界面</title>
	<meta http-equiv="pragma" content="no-cache">
	<meta http-equiv="cache-control" content="no-cache">
	<meta http-equiv="expires" content="0">
	<meta http-equiv="keywords" content="keyword1,keyword2,keyword3">
	<meta http-equiv="description" content="This is my page">
  </head>
  <body>
  		<form action="${pageContext.request.contextPath}/login.action" name="login_from" method="post">
			  用户名:<input type="text" name="username"/><br/>
			  密 码:<input type="password" name="pwd"/><br/>
			 <input type="submit" value="提交" />
  		</form>
  </body>
</html>
主页
<%@ page language="java" import="java.util.*" pageEncoding="UTF-8"%>
<%
String path = request.getContextPath();
String basePath = request.getScheme()+"://"+request.getServerName()+":"+request.getServerPort()+path+"/";
%>
<!DOCTYPE HTML PUBLIC "-//W3C//DTD HTML 4.01 Transitional//EN">
<html>
<head>
<base href="<%=basePath%>">
<title>首页</title>
<meta http-equiv="pragma" content="no-cache">
<meta http-equiv="cache-control" content="no-cache">
<meta http-equiv="expires" content="0">
<meta http-equiv="keywords" content="keyword1,keyword2,keyword3">
<meta http-equiv="description" content="This is my page">
</head>
<body>
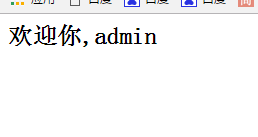
<h2>欢迎你,${sessionScope.userInfo.userName}</h2>
</body>
</html>
然后写一个UserDao对传入的参数进行处理,然后将处理的结果以对象的形式进行返回
package cn.qblank.dao;

import cn.qblank.entity.User;

public class UserDao {
	//模拟登陆
	public User login(User user){
		//判断是否登陆成功
		if ("admin".equals(user.getUserName()) && "123".equals(user.getPwd())) {
			return user;
		}
		//登陆失败
		return null;
	}
}
然后再写一个LoginAction.java处理登陆的请求,然后以字符串的形式返回一个结果集
package cn.qblank.mystruts.action;

import java.io.IOException;

import javax.servlet.ServletException;
import javax.servlet.http.HttpServletRequest;
import javax.servlet.http.HttpServletResponse;

import cn.qblank.entity.User;
import cn.qblank.service.UserService;

public class LoginAction {

	public Object execute(HttpServletRequest req, HttpServletResponse resp)
			throws ServletException, IOException {
		return null;
	}

	/**
	 * 处理登陆的请求数据
	 * @param req
	 * @param resp
	 * @throws ServletException
	 * @throws IOException
	 */
	public Object login(HttpServletRequest req, HttpServletResponse resp)
			throws ServletException, IOException {
		Object uri = null;
		//获取参数
		String username = req.getParameter("username");
		String pwd = req.getParameter("pwd");
		//封转到对象中
		User user = new User();
		user.setUserName(username);
		user.setPwd(pwd);
		System.out.println(user.getUserName());
		//然后处理事件
		UserService userService = new UserService();
		User userInfo = userService.login(user);
		if (userInfo == null) {
			System.out.println("登陆失败");
			uri = "loginFiled";
		}else{
			System.out.println("登陆成功");
			req.getSession().setAttribute("userInfo", userInfo);
			uri = "loginSuccess";
		}
		return uri;
	}
}
由于不能把配置页面写死,于是我们可以将需要配置的文件写到mystruts.xml文件中,然后对其进行读取,然后再进行跳转
<?xml version="1.0" encoding="UTF-8"?>
<mystruts>
	<package>
		<!-- name表示路径  class表示是从传入参数的类的全名   method 表示传入参数的方法名-->
		<action name="login" class="cn.qblank.mystruts.action.LoginAction" method="login">
			<!-- 存储结果集  跳转 和(默认)重定向 -->
			<result name="loginSuccess" type="redirect">/index.jsp</result>
			<result name="loginFiled">/login.jsp</result>
		</action>
	</package>
</mystruts>
Result.java
package cn.qblank.mystruts.bean;
/**
 * 封转结果视图
 * @author Administrator
 *<result name="success" type="redirect">/index.jsp</result>
 */
public class Result {
	//跳转结果标记
	private String name;
	//跳转类型 默认为转发  "redirect"为跳转
	private String type;
	//跳转页面
	private String page;
	public String getName() {
		return name;
	}
	public void setName(String name) {
		this.name = name;
	}
	public String getType() {
		return type;
	}
	public void setType(String type) {
		this.type = type;
	}
	public String getPage() {
		return page;
	}
	public void setPage(String page) {
		this.page = page;
	}


}
ActionMapping.java
package cn.qblank.mystruts.bean;

import java.util.Map;

/**
 * 封转action结点
 * <action name="login" class="cn.itcast.framework.action.LoginAction" method="login">
		<result name="success" type="redirect">/index.jsp</result>
		<result name="loginFaild">/login.jsp</result>
	</action>
 * @author Administrator
 *
 */
public class ActionMapping {
	//请求路径的名字
	private String name;
	//处理Action类的全名
	private String className;
	//处理方法
	private String method;
	//结果视图集合
	private Map<String, Result> results;
	public String getName() {
		return name;
	}
	public void setName(String name) {
		this.name = name;
	}
	public String getClassName() {
		return className;
	}
	public void setClassName(String className) {
		this.className = className;
	}
	public String getMethod() {
		return method;
	}
	public void setMethod(String method) {
		this.method = method;
	}
	public Map<String, Result> getResults() {
		return results;
	}
	public void setResults(Map<String, Result> results) {
		this.results = results;
	}

}
读取xml中的数据,并封装到对象ActionMapping和Result对象中
package cn.qblank.mystruts.bean;

import java.io.InputStream;
import java.util.HashMap;
import java.util.Iterator;
import java.util.List;
import java.util.Map;

import org.dom4j.Document;
import org.dom4j.Element;
import org.dom4j.io.SAXReader;

/**
 * 加载整个mystruts.xml文件
 * 并将其封转到对象中
 * @author Administrator
 *
 */
public class ActionMappingManager {
	private Map<String, ActionMapping> actions;

	public ActionMappingManager(){
		actions = new HashMap<String, ActionMapping>();
		//初始化
		init();
	}
	/**
	 * 根据请求路径名称,返回Action的映射对象
	 * 通过名字获取对应的ActionMapping
	 * @param actionName   当前请求路径
	 * @return 返回配置文件中代表action节点的AcitonMapping对象
	 */
	public ActionMapping getActionMapping(String actionName){
		if (actionName == null) {
			throw new RuntimeException("传入参数有误,请查看struts.xml配置的路径。");
		}
		ActionMapping actionMapping = actions.get(actionName);
		if (actionMapping == null) {
			throw new RuntimeException("路径在struts.xml中找不到,请检查");
		}
		return actionMapping;
	}

	/**
	 * 初始化集合
	 * 将mystruts.xml的数据封装到对象中
	 */
	@SuppressWarnings("unchecked")
	public void init(){
		try {
			//得到解析器
			SAXReader reader = new SAXReader();
			//得到文件流
			InputStream in = this.getClass().getResourceAsStream("/mystruts.xml");
			//加载文件
			Document doc = reader.read(in);
			//获取根结点
			Element rootElem = doc.getRootElement();
			//得到package结点
			Element ele_package = rootElem.element("package");
			//获取action结点
			List<Element> listAction = ele_package.elements("action");
			//遍历  封装
			for (Element action : listAction) {
				ActionMapping actionMapping = new ActionMapping();
				actionMapping.setName(action.attributeValue("name"));
				actionMapping.setClassName(action.attributeValue("class"));
				actionMapping.setMethod(action.attributeValue("method"));
				//封转结果集
				Map<String,Result> results = new HashMap<>();
				//封装结果视图
				Iterator<Element> it = action.elementIterator();
				while(it.hasNext()){
					Element ele_result = it.next();
					//封装到对象中
					Result result = new Result();
					result.setName(ele_result.attributeValue("name"));
					result.setType(ele_result.attributeValue("type"));
					result.setPage(ele_result.getTextTrim());
					System.out.println(result.getName());
					//添加到Result集合中
					results.put(result.getName(), result);
				}
				//将结果集存入ActionMapping对象中
				actionMapping.setResults(results);
				//将actionMapping添加到集合中
				actions.put(actionMapping.getName(), actionMapping);
			}

		} catch (Exception e) {
			throw new RuntimeException("启动初始化错误",e);
		}
	}
}
然后写一个业务逻辑层(这里暂时不处理)
package cn.qblank.service;

import cn.qblank.dao.UserDao;
import cn.qblank.entity.User;

public class UserService {
	private UserDao userDao = new UserDao();
	/**
	 * 登陆
	 * @param user
	 * @return
	 */
	public User login(User user){
		return userDao.login(user);
	}
}
下面我们就开始写对其进行调度
传统的MVC我们使用Servlet来接收提交的参数,这次我们只用一个总Servlet来控制,其他的用action来操作
我们可以使用一个过滤器对所有的.action为后缀进行拦截,在web.xml中进行配置
<!-- 总的Servlet  总控制器 -->
<servlet>
  <servlet-name>ActionServlet</servlet-name>
  <servlet-class>cn.qblank.servlet.ActionServlet</servlet-class>
  <load-on-startup>1</load-on-startup>
</servlet>

<!-- 总控制器 -->
<servlet-mapping>
  <servlet-name>ActionServlet</servlet-name>
  <url-pattern>*.action</url-pattern>
</servlet-mapping>
然后对应的写一个ActionServlet对各个请求进行相应跳转处理
public class ActionServlet extends HttpServlet {
	private ActionMappingManager actionMappingManager;
	@Override
	public void init() throws ServletException {
		//创建一个管理类对象,获取封装的xml数据
		actionMappingManager = new ActionMappingManager();
	}
	@Override
	protected void doGet(HttpServletRequest req, HttpServletResponse resp)
			throws ServletException, IOException {
		//http://localhost:8080/mystruts/login.action
		try {
			//获取请求的Uri
			String uri = req.getRequestURI();
			//得到login
			String actionName = uri.substring(uri.lastIndexOf("/") + 1, uri.lastIndexOf(".action"));
			//根据action名字获得对应的action
			ActionMapping actionMapping = actionMappingManager.getActionMapping(actionName);
			String className = actionMapping.getClassName();
			//当前请求的方法
			String method = actionMapping.getMethod();
			//通过反射获取   反射: 创建对象,调用方法; 获取方法返回的标记
			Class<?> clazz = Class.forName(className);
			//构建对象
			Object obj = clazz.newInstance();
			Method m = clazz.getDeclaredMethod(method, HttpServletRequest.class,HttpServletResponse.class);
			//调用方法 拿到标记
			String flag = (String) m.invoke(obj, req,resp);
			//测试
			System.out.println(flag);
			//通过标记拿到result
			Result result = actionMapping.getResults().get(flag);
			//测试
			//然后通过result获取对应的跳转类型(type) 跳转页面(page)
			String type = result.getType();
			//获取跳转页面
			String page = result.getPage();
			//跳转
			if ("redirect".equals(type)) {
				resp.sendRedirect(req.getContextPath()+page);
			}else{
				req.getRequestDispatcher(page).forward(req, resp);
			}
		} catch (Exception e) {
			e.printStackTrace();
		}
	}
	@Override
	protected void doPost(HttpServletRequest req, HttpServletResponse resp)
			throws ServletException, IOException {
		doGet(req, resp);
	}
}
下面我们就来运行一波
当登陆成功时,直接跳到index.jsp
失败则继续跳回登陆页面


 2859
2859

 被折叠的 条评论
为什么被折叠?
被折叠的 条评论
为什么被折叠?
 到【灌水乐园】发言


