


一、思路

二、代码
1、引入PageHelper:引入依赖
        <dependency>
            <groupId>com.github.pagehelper</groupId>
            <artifactId>pagehelper</artifactId>
        </dependency>
2、引入PageHelper:在mybatis的配置文件中的sqlSessionFactoryBean中配置插件
        <!--配置插件-->
        <property name="plugins">
            <array>
                <!--配置pageHelper插件-->
                <bean class="com.github.pagehelper.PageHelper">
                    <property name="properties">
                        <props>
                            <!--配置数据库方言,高数pageHelper使用的数据库-->
                            <prop key="dialect">mysql</prop>
                            <!--配置页码的合理化修正,在1~总页码之间-->
                            <prop key="reasonable">true</prop>
                        </props>
                    </property>
                </bean>
            </array>
        </property>
3、在AdminMapper中编写SQL语句
<select id="selectAdminByKeyword" resultMap="BaseResultMap">
    select
    <include refid="Base_Column_List" />
    from t_admin
    where login_acct like concat("%",#{keyword},"%")
       or user_name like concat("%",#{keyword},"%")
       or email like concat("%",#{keyword},"%")
</select>
4、AdminMapper接口中声明方法
List<Admin> selectAdminByKeyword(String keyword);5、AdminService、AdminServiceImpl方法
PageInfo<Admin> getPageInfo(String keyword,Integer pageNum,Integer pageSize);


    @Override
    public PageInfo<Admin> getPageInfo(String keyword, Integer pageNum, Integer pageSize) {
        // 1、调用PageHelper的静态方法开启分页功能
        // 充分体现PageHelper的"非侵入式"设计:原本要做的查询不必有任何修改。不需要分页就不加这句
        PageHelper.startPage(pageNum,pageSize);

        // 2、执行查询
        List<Admin> list = adminMapper.selectAdminByKeyword(keyword);

        // 3、封装到PageInfo对象中
        return new PageInfo<>(list);
    }
6、Controller方法
    @RequestMapping("/admin/get/page.html")
    public String getPageInfo(
            // 使用@RequestParam注解中的defaultValue属性,在请求中没有携带参数时使用默认值
            @RequestParam(value = "keyword",defaultValue = "") String keyword,
            @RequestParam(value = "pageNum",defaultValue = "1") Integer pageNum,
            @RequestParam(value = "pageSize",defaultValue = "5") Integer pageSize,
            ModelMap modelMap
    ){
        // 调用service获取PageInfo对象
        PageInfo<Admin> pageInfo = adminService.getPageInfo(keyword, pageNum, pageSize);
        // 将pageInfo存入到模型中
        modelMap.addAttribute(CrowdConstant.ATTR_NAME_PAGE_INFO,pageInfo);
        return "admin-page";
    }
7、页面显示
<tbody>
                                <c:if test="${empty requestScope.pageInfo.list}">
                                    <tr>
                                       <td colspan="6" align="center">抱歉,没有查询到你要的数据!</td>
                                    </tr>
                                </c:if>
                                <c:if test="${!empty requestScope.pageInfo.list}">
                                    <c:forEach items="${requestScope.pageInfo.list}" var="admin" varStatus="myStatus">
                                        <tr>
                                            <td>${myStatus.count}</td>
                                            <td><input type="checkbox"></td>
                                            <td>${admin.loginAcct}</td>
                                            <td>${admin.userName}</td>
                                            <td>${admin.email}</td>
                                            <td>
                                                <button type="button" class="btn btn-success btn-xs"><i
                                                        class=" glyphicon glyphicon-check"></i></button>
                                                <button type="button" class="btn btn-primary btn-xs"><i
                                                        class=" glyphicon glyphicon-pencil"></i></button>
                                                <button type="button" class="btn btn-danger btn-xs"><i
                                                        class=" glyphicon glyphicon-remove"></i></button>
                                            </td>
                                        </tr>
                                    </c:forEach>

                                </c:if>
                            </tbody>
8、分页显示:使用jQuery的Pagination插件
<script type="text/javascript">
$(function (){
// 调用后面声明函数,对页码导航条
initPagination();
});
// 声明页码导航条的函数
function initPagination(){
// 获取总记录数
var totalRecord = ${requestScope.pageInfo.total};
// 声明一个json对象存储Pagination要设置的属性
var properties = {
// 边缘页数
num_edge_entries: 3,
// 主体页数
num_display_entries: 5,
// 指定用户点击翻页的按钮时跳转页面的回掉函数
callback: pageSelectCallback,
// 每页要显示的数据的数量
items_per_page: ${requestScope.pageInfo.pageSize},
// Pagination内部使用pageIndex来管理页码,pageIndex从0开始,pageNum从1开始。
current_page: ${requestScope.pageInfo.pageNum - 1},
prev_text:"上一页",
next_text:"下一页",
}
// 生成页码导航条
$("#Pagination").pagination(totalRecord, properties);
}
// 回调函数:声明出来以后不是自己调用而是交给系统或框架调用
// 用户点击1、2、3这样的页码数时,调用这个函数进行跳转
// pageIndex是Pagination传给我们从0开始的页码
function pageSelectCallback(pageIndex,jQuery){
// 得到pageNum
var pageNum = pageIndex + 1;
// 跳转到页面
window.location.href="admin/get/page.html?pageNum="+pageNum;
// 由于每一个页面按钮都是超链接,所以在函数最后取消超链接的默认行为
return false;
}
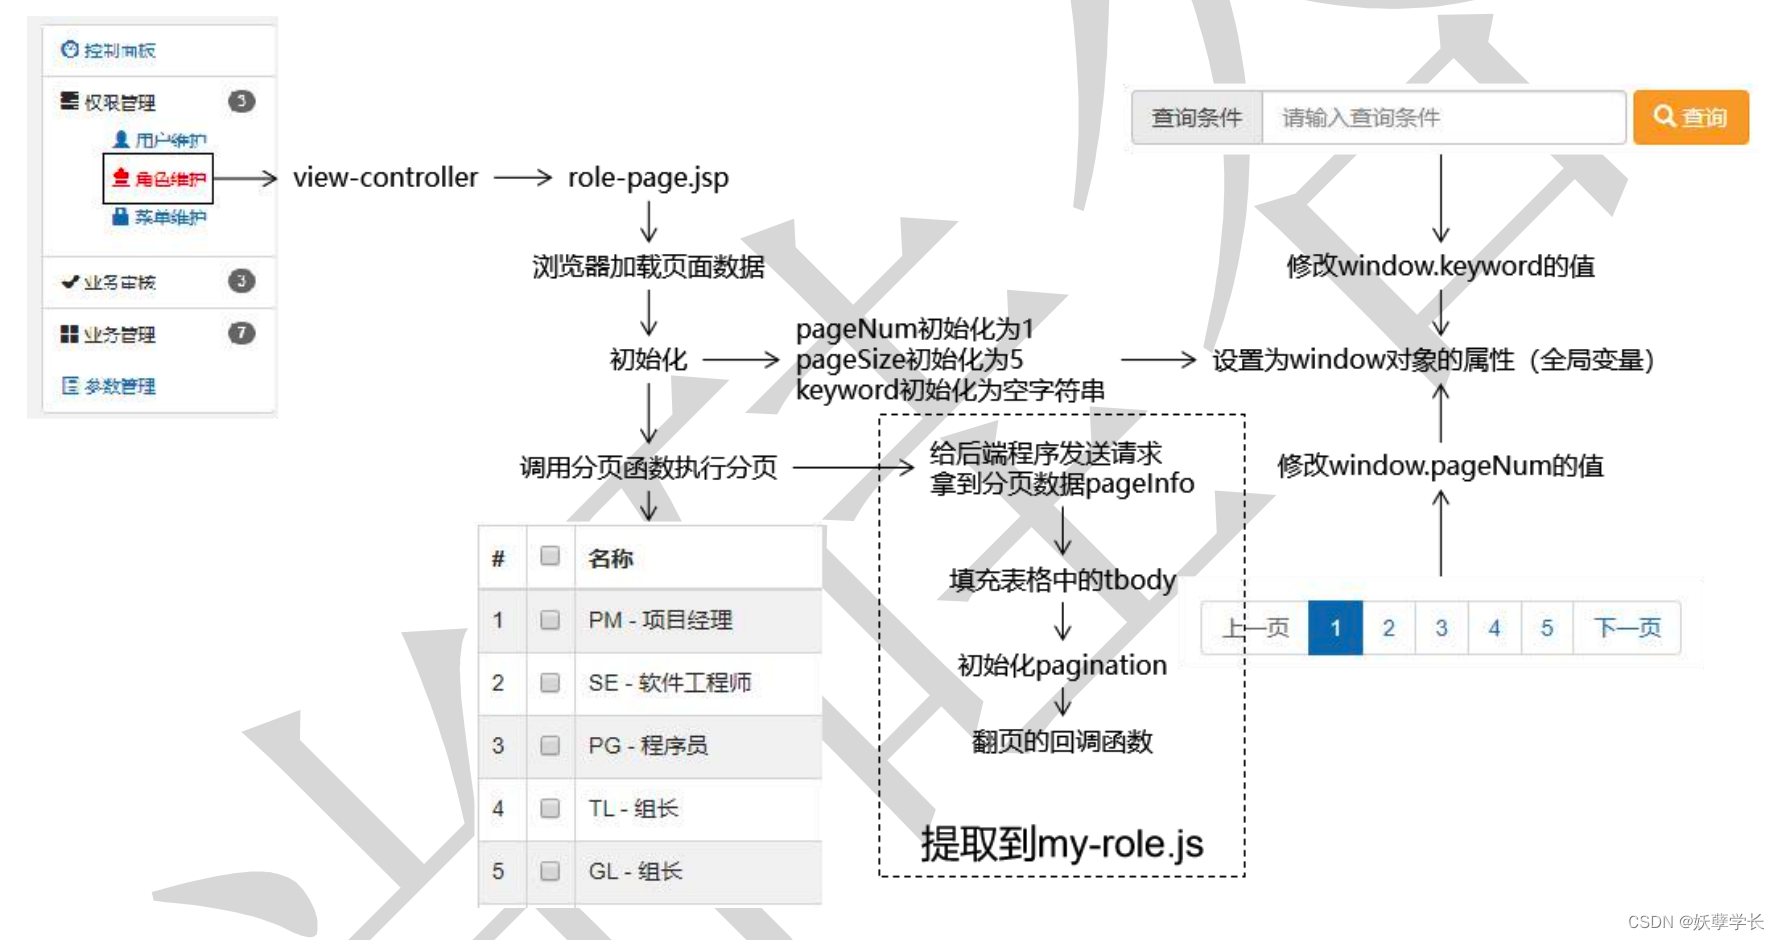
</script>三、通过Json数据的方式传递、显示
1、Handler:
1⃣️映射地址是json结尾:/role/get/page/info.json
2⃣️返回的数据类型是ResultEntity<PageInfo<Role>>,而不是string
3⃣️不需要将分页数据放入到modleMap中,再跳转地址了。
    @ResponseBody
    @RequestMapping("/role/get/page/info.json")
    public ResultEntity<PageInfo<Role>> getPageInfo(
            @RequestParam(value = "keyword",defaultValue = "") String keyword,
            @RequestParam(value = "pageNum",defaultValue = "1") Integer pageNum,
            @RequestParam(value = "pageSize",defaultValue = "5") Integer pageSize
    ){
        // 调用Service方法获取分页数据
        PageInfo<Role> pageInfo = roleService.getPageInfo(keyword,pageNum,pageSize);

        // try {
        //     pageInfo = roleService.getPageInfo(keyword,pageNum,pageSize);
        //     return ResultEntity.successWithData(pageInfo);
        // }catch (Exception e){
        //     e.printStackTrace();
        //     return ResultEntity.failed(e.getMessage());
        // }

        // 封装到ResultEntity返回
        return ResultEntity.successWithData(pageInfo);
    }
2、前端工作
1⃣️view-controller直接配置跳转地址,不是经过上面的controller跳转了
<mvc:view-controller path="/role/to/page.html" view-name="role-page"/>2⃣️创建外部 JavaScript 文件并在在 role-page.jsp 引入。
<script type="text/javascript" src="crowd/my-role.js"></script>// 执行分页,生成页面效果,调用这个函数都会重新加载页面
function generatePage() {
// 1、获取分页数据
var pageInfo = getPageInfoRemote();
// 2、填充表格
fillTableBody(pageInfo);
}
// 远程访问服务器端程序获取pageInfo数据
function getPageInfoRemote() {
var ajaxResult = $.ajax({
"url":"role/get/page/info.json",
"type":"post",
"data":{
"pageNum":window.pageNum,
"pageSize":window.pageSize,
"keyword":window.keyword
},
"async":false,
"dataType":"json"
});
console.log(ajaxResult);
// 判断当前响应状态码是否为 200
var statusCode = ajaxResult.status;
// 如果当前响应状态码不是 200,说明发生了错误或其他意外情况,显示提示消息,让 当前函数停止执行
if(statusCode != 200) {
layer.msg("失败!响应状态码="+statusCode+" 说明信息="+ajaxResult.statusText);
return null;
}
// 如果响应状态码是 200,说明请求处理成功,获取 pageInfo
var resultEntity = ajaxResult.responseJSON;
// 从 resultEntity 中获取 result 属性
var result = resultEntity.result;
// 判断 result 是否成功
if(result == "FAILED") {
layer.msg(resultEntity.message);
return null;
}
// 确认 result 为成功后获取 pageInfo
var pageInfo = resultEntity.data;
// 返回 pageInfo
return pageInfo;
}
// 填充表格
function fillTableBody(pageInfo) {
// 清除旧数据内容
$("#rolePageBody").empty();
$("#Pagination").empty();
// 判断pageInfo是否有效
if (pageInfo == null || pageInfo == undefined || pageInfo.list == null || pageInfo.list.length == 0){
$("#rolePageBody").append("<tr><td colspan='4' align='center'>抱歉,没有查询到你搜索的数据!</td></tr>");
return;
}
// 使用pageInfo的list属性填充tbody
for (var i = 0; i < pageInfo.list.length; i++) {
var role = pageInfo.list[i];
var roleId = role.id;
var roleName = role.name;
var numberTd = "<td>"+(i+1)+"</td>";
var checkboxTd = "<td><input id='"+roleId+"' class='itemBox' type='checkbox'></td>";
var roleNameTd = "<td>"+roleName+"</td>";
var checkBtn = "<button type='button' class='btn btn-success btn-xs'><i class=' glyphicon glyphicon-check'></i></button>";
var pencilBtn = "<button id='"+roleId+"' type='button' class='btn btn-primary btn-xs pencilBtn'><i class=' glyphicon glyphicon-pencil'></i></button>";
var removeBtn = "<button id='"+roleId+"' type='button' class='btn btn-danger btn-xs removeBtn'><i class=' glyphicon glyphicon-remove'></i></button>";
var buttonTd = "<td>"+checkBtn+" "+pencilBtn+" "+removeBtn+"</td>";
var tr = "<tr>"+numberTd+checkboxTd+roleNameTd+buttonTd+"</tr>";
$("#rolePageBody").append(tr);
}
var checkedBoxCount = $(".itemBox:checked").length;
var allBoxCount = $(".itemBox").length;
$("#summaryBox").prop("checked",checkedBoxCount == allBoxCount);
// 生成分页导航条
generateNavigator(pageInfo);
}
// 生成分页页码导航条
function generateNavigator(pageInfo) {
// 获取总记录数
var totalRecord = pageInfo.total;
// 声明其他相关属性
var properties = {
// 边缘页数
num_edge_entries: 3,
// 主体页数
num_display_entries: 5,
// 指定用户点击翻页的按钮时跳转页面的回掉函数
callback: pageSelectCallback,
// 每页要显示的数据的数量
items_per_page: pageInfo.pageSize,
// Pagination内部使用pageIndex来管理页码,pageIndex从0开始,pageNum从1开始。
current_page: pageInfo.pageNum - 1,
prev_text:"上一页",
next_text:"下一页",
}
// 调用pagination()初始化函数
$("#Pagination").pagination(totalRecord,properties);
}
// 翻页时的函数
function pageSelectCallback(pageIndex,jQuery) {
// 修改window对象的属性
window.pageNum = pageIndex + 1;
generatePage();
// 取消页码超链接的默认行为
return false;
}3⃣️初始化数据
<script type="text/javascript">
    $(function (){
        // 1、为分页操作准备初始化数据
        window.pageNum = 1;
        window.pageSize = 5;
        window.keyword = "";

        // 2、调用执行分页的函数
        generatePage();
</script>


 401
401


 被折叠的 条评论
为什么被折叠?
被折叠的 条评论
为什么被折叠?
 到【灌水乐园】发言


