


是不是受够了千篇一律的透明度变化的启动页动画,快来试试使用路径动画和属性动画构建一个特别的启动页动画吧.
最近在网上看到一个路径动画的例子,感觉效果很不错,仿照着例子写了一个路径动画的库,并且上传到jcenter,方便AS玩家通过依赖使用.
github地址:https://github.com/sunflowerseat/PathAnim
先上效果图,让图说话:
接下来,我讲讲怎么通过这个路径动画库来完成一个简洁优雅的启动页动画
首先在module中添加依赖
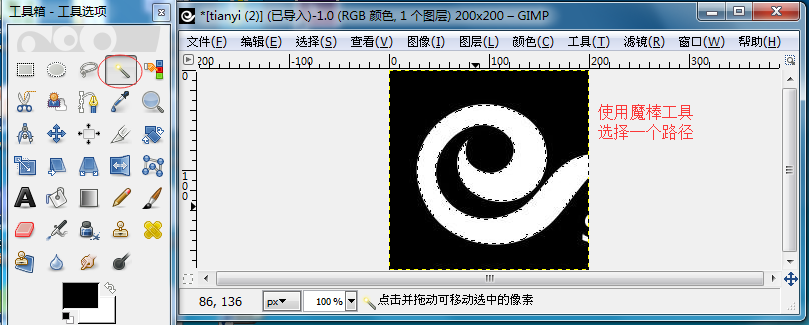
compile 'com.fancy.library:pathanim:1.0.1'首先要完成路径动画,我们必须要先有一个路径.
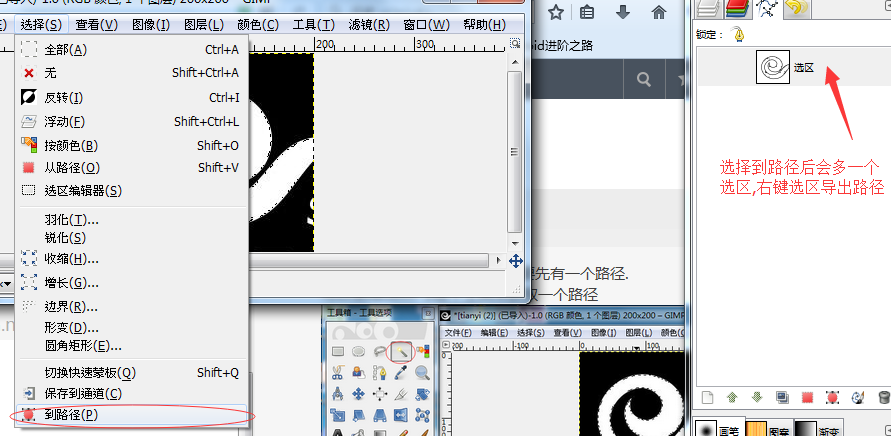
可以使用GIMP 2这个工具来获取一个路径
导出路径:
得到一个路径之后,我们开始写布局文件
简单写一个logo背景,启动页显示的文字和一个版本号
布局文件参考:
<RelativeLayout xmlns:android="http://schemas.android.com/apk/res/android"
    xmlns:tools="http://schemas.android.com/tools"
    xmlns:oak="http://schemas.android.com/apk/res-auto"
    android:layout_width="match_parent"
    android:layout_height="match_parent"
    android:orientation="vertical"
    >
    <RelativeLayout
        android:layout_width="wrap_content"
        android:layout_height="wrap_content"
        android:layout_centerInParent="true"
        android:id="@+id/big_background"
        >

    <RelativeLayout
        android:layout_width="match_parent"
        android:layout_height="match_parent"
        android:background="@drawable/cpb_background"
        android:id="@+id/rl_background"
        android:layout_centerInParent="true"
        >
        <com.fancy.path_anim_lib.AnimatedSvgView
            android:id="@+id/animated_svg_view"
            android:layout_width="200dp"
            android:layout_height="200dp"
            android:layout_centerInParent="true"
            oak:oakSvgFillStart="500"
            oak:oakSvgFillTime="100"
            oak:oakSvgImageSizeX="200"
            oak:oakSvgImageSizeY="200"
            oak:oakSvgTraceTime="2000"
            oak:oakSvgTraceTimePerGlyph="1000" />

    </RelativeLayout>
    <TextView
        android:layout_width="wrap_content"
        android:layout_height="wrap_content"
        android:text="启动页动画"
        android:textSize="30sp"
        android:layout_below="@+id/rl_background"
        android:textStyle="bold"
        android:layout_centerHorizontal="true"
        android:layout_marginTop="40dp"
        android:textColor="@color/startpage_blue"
        android:id="@+id/name"
        />

    </RelativeLayout>
    <TextView
        android:layout_width="wrap_content"
        android:layout_height="wrap_content"
        android:text="8.1.3"
        android:layout_centerHorizontal="true"
        android:layout_alignParentBottom="true"
        android:layout_marginBottom="10dp"
        android:textSize="20sp"
        android:textColor="@color/startpage_blue"
        android:id="@+id/versionCode"
        />
</RelativeLayout>
解释一下AnimatedSvgView中一些重要参数的作用:
oakSvgFillTime路径动画填充时间
oakSvgImageSizeX 原图x所占像素
oakSvgImageSizeY 原图y所占像素
oakSvgTraceTimePerGlyph 路径绘制时间
Activity完成动画参考:
public class MainActivity extends AppCompatActivity {

    private AnimatedSvgView mAnimatedSvgView;
    private RelativeLayout rl_background;
    private RelativeLayout big_background;
    private TextView versionCode;
    private TextView name;


    @Override
    protected void onCreate(Bundle savedInstanceState) {
        super.onCreate(savedInstanceState);
        setContentView(R.layout.activity_svg);
        //路径动画的View
        mAnimatedSvgView = (AnimatedSvgView) findViewById(R.id.animated_svg_view);
        //需要整体上移的RelativeLayout
        rl_background = (RelativeLayout) findViewById(R.id.rl_background);
        //需要变换形状的RelativeLayout
        big_background = (RelativeLayout) findViewById(R.id.big_background);
        //版本号文字
        versionCode = (TextView) findViewById(R.id.versionCode);
        versionCode.setAlpha(0);
        //logo下方文字
        name = (TextView) findViewById(R.id.name);
        name.setAlpha(0);
        preAnim(rl_background);
        mAnimatedSvgView.getLayoutParams().width = getScreenWidth(this) / 2;
        mAnimatedSvgView.getLayoutParams().height = getScreenWidth(this) / 2;


        //路径传入,把GIMP2工具导出的path部分作为String传递给该方法.
        mAnimatedSvgView.setGlyphStrings(AnimPath.ANIM_PATH);
        //Path填充颜色
        mAnimatedSvgView.setFillPaints(255,255,255,255);
        //设置跑动光线的颜色
        mAnimatedSvgView.setTraceColors(255,255,255,255);
        //设置轮廓颜色
        mAnimatedSvgView.setTraceResidueColors(255,255,255,255);

        mAnimatedSvgView.setOnStateChangeListener(new AnimatedSvgView.OnStateChangeListener() {
            @Override
            public void onStateChange(int state) {
                if (state == AnimatedSvgView.STATE_FILL_STARTED) {

                    AnimatorSet set = new AnimatorSet();
                    Interpolator interpolator = new DecelerateInterpolator();
                    ObjectAnimator a1 = ObjectAnimator.ofFloat(mAnimatedSvgView, "translationY", 0);
                    a1.setInterpolator(interpolator);
                    set.playTogether(a1);
                    set.start();
                }
            }
        });
    }

    public void preAnim(final View v) {
        GradientDrawable drawable = (GradientDrawable) v.getBackground();
        drawable.setCornerRadius(0);
        ObjectAnimator anim = ObjectAnimator.ofFloat(v, "scaleX", new float[]{1f,1f});
        anim.setDuration(1);
        anim.addListener(new AnimatorListenerAdapter() {
            @Override
            public void onAnimationEnd(Animator animation) {
                super.onAnimationEnd(animation);
                start(v,700);
            }
        });
        anim.start();
    }

    public void endAnim() {
        AnimatorSet set = new AnimatorSet();
        ObjectAnimator a2 = ObjectAnimator.ofFloat(big_background, "y", big_background.getY(),big_background.getY()/8);
        ObjectAnimator a3 = ObjectAnimator.ofFloat(versionCode, "alpha", 0f,1f);
        ObjectAnimator a4 = ObjectAnimator.ofFloat(name, "alpha", 0f,1f);
        set.playTogether(a2, a3, a4);
        set.setDuration(700);
        set.start();
        mAnimatedSvgView.start();
    }

    /**
     * 矩形变圆角动画
     */
    public void start(final View v,long duration) {
        //需要的参数 drawable对象
        ObjectAnimator cornerAnimation = ObjectAnimator.ofFloat(v.getBackground(), "cornerRadius", new float[]{0, v.getWidth() / 2});
        cornerAnimation.setDuration(duration);
        final ObjectAnimator heightAnimation = ObjectAnimator.ofInt(v, "xxx", new int[]{v.getHeight(), v.getWidth() / 2});
        heightAnimation.setDuration(duration);
        heightAnimation.addUpdateListener(new com.nineoldandroids.animation.ValueAnimator.AnimatorUpdateListener() {
            @Override
            public void onAnimationUpdate(com.nineoldandroids.animation.ValueAnimator valueAnimator) {
                v.getLayoutParams().height = (int) heightAnimation.getAnimatedValue();
                v.requestLayout();
            }
        });
        ObjectAnimator animator = ObjectAnimator.ofInt(v, "xx", v.getWidth(), v.getWidth() / 2).setDuration(duration);
        animator.addUpdateListener(new ObjectAnimator.AnimatorUpdateListener() {
            @Override
            public void onAnimationUpdate(com.nineoldandroids.animation.ValueAnimator valueAnimator) {
                int value = (int) valueAnimator.getAnimatedValue();
                v.getLayoutParams().width = value;
                v.requestLayout();
            }
        });

        AnimatorSet animatorSet = new AnimatorSet();
        animatorSet.play(cornerAnimation).with(heightAnimation).with(animator);
        animator.addListener(new AnimatorListenerAdapter() {
            @Override
            public void onAnimationEnd(Animator animation) {
                super.onAnimationEnd(animation);
                endAnim();
            }
        });
        animatorSet.start();
    }

    public int getScreenWidth(Context context) {
        WindowManager manager = (WindowManager) context
                .getSystemService(Context.WINDOW_SERVICE);
        Display display = manager.getDefaultDisplay();
        return display.getWidth();
    }
}
好了,经过以上步骤就能完成一个简洁大方的启动页动画了.
最后有几点补充:
关于demo中的矩形变圆的属性动画,需要启动该动画的view背景必须是drawable文件,如下形式:
<shape xmlns:android="http://schemas.android.com/apk/res/android"
    android:shape="rectangle">
    <corners android:radius="0dp" />
    <solid android:color="@color/startpage_blue"/>
</shape>
否则在使用启动属性动画是会报错,当然你也可以不使用这个属性动画,用自己的动画替代.
源码已上传到github
快动手写一个属于你的独特的启动页动画吧.
有任何问题欢迎加群讨论:283272067
希望大家多聊技术,多分享代码.


 1425
1425

 被折叠的 条评论
为什么被折叠?
被折叠的 条评论
为什么被折叠?
 到【灌水乐园】发言


