


公司最近做要在Android6.0原生日历基础上 定制自己的功能,也就是希望可以在月视图上加一个左右滑动的功能,经过本人几天的研究,终于搞出了这个功能。
实现步骤
1.自定义mothview 部分代码
继承view 绘制自己的monthview
在onDraw写的代码
protected void onDraw(Canvas canvas) {
        if (mRedrawScreen) {
            if (mCanvas == null) {
                drawingCalc(getWidth(), getHeight());
            }

            // If we are zero-sized, the canvas will remain null so check again
            if (mCanvas != null) {
                // Clear the background
                final Canvas bitmapCanvas = mCanvas;
                bitmapCanvas.drawColor(0, PorterDuff.Mode.CLEAR);
                doDraw(bitmapCanvas);
                mRedrawScreen = false;
            }
        }

        // If we are zero-sized, the bitmap will be null so guard against this
        if (mBitmap != null) {
            canvas.drawBitmap(mBitmap, mBitmapRect, mBitmapRect, null);
        }

       // sendAccessibilityEvents();
    }
private void doDraw(Canvas canvas) {
    boolean isLandscape = getResources().getConfiguration().orientation
            == Configuration.ORIENTATION_LANDSCAPE;

    Paint p = new Paint();
    Rect r = mRect;
    int columnDay1 = mCursor.getColumnOf(1);

    // Get the Julian day for the date at row 0, column 0.
    int day = mFirstJulianDay - columnDay1;

    int weekNum = 0;
    Calendar calendar = null;
    if (mShowWeekNumbers) {
        calendar = Calendar.getInstance();
        boolean noPrevMonth = (columnDay1 == 0);

        // Compute the week number for the first row.
        weekNum = getWeekOfYear(0, 0, noPrevMonth, calendar);
    }

    for (int row = 0; row < 6; row++) {
        for (int column = 0; column < 7; column++) {
            drawBox(day, weekNum, row, column, canvas, p, r, isLandscape);
            day += 1;
        }

        if (mShowWeekNumbers) {
            weekNum += 1;
            if (weekNum >= 53) {
                boolean inCurrentMonth = (day - mFirstJulianDay < 31);
                weekNum = getWeekOfYear(row + 1, 0, inCurrentMonth, calendar);
            }
        }
    }

    drawGrid(canvas, p);
}
2.用fragment 显示monthview 部分代码
public View onCreateView(LayoutInflater inflater, ViewGroup container,
Bundle savedInstanceState) {
View view = inflater.inflate(R.layout.month_activity, container, false);
TextView title = (TextView) view.findViewById(R.id.title);
title.setText(Utils.formatMonthYear(getActivity(), mTime));
mEventLoader = new EventLoader(getActivity());
mProgressBar = (ProgressBar) view.findViewById(R.id.progress_circular);
// Get first day of week based on locale and populate the day headers
mStartDay = Calendar.getInstance().getFirstDayOfWeek();
int diff = mStartDay - Calendar.SUNDAY - 1;
final int startDay = Utils.getFirstDayOfWeek(getActivity());
final int sundayColor = getResources().getColor(R.color.sunday_text_color);
final int saturdayColor = getResources().getColor(R.color.saturday_text_color);
for (int day = 0; day < 7; day++) {
final String dayString = DateUtils.getDayOfWeekString(
(DAY_OF_WEEK_KINDS[day] + diff) % 7 + 1, DateUtils.LENGTH_MEDIUM);
final TextView label = (TextView) view.findViewById(DAY_OF_WEEK_LABEL_IDS[day]);
label.setText(dayString);
if (Utils.isSunday(day, startDay)) {
label.setTextColor(sundayColor);
} else if (Utils.isSaturday(day, startDay)) {
label.setTextColor(saturdayColor);
}
}
mSwitcher = (ViewSwitcher) view.findViewById(R.id.switcher);
mSwitcher.setFactory(this);
mSwitcher.getCurrentView().requestFocus();
mInAnimationPast.setAnimationListener(this);
mInAnimationFuture.setAnimationListener(this);
return view;
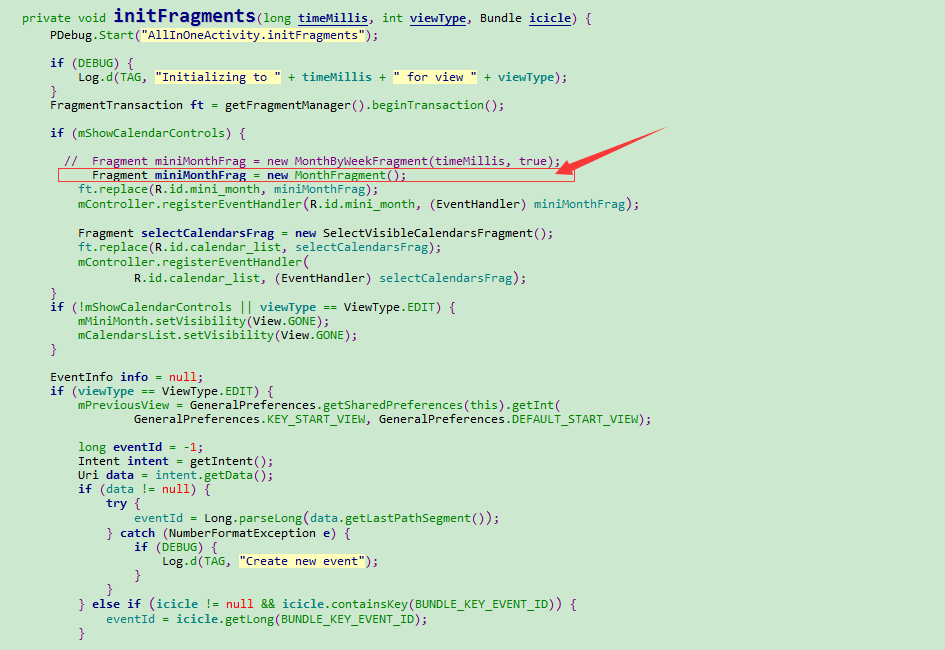
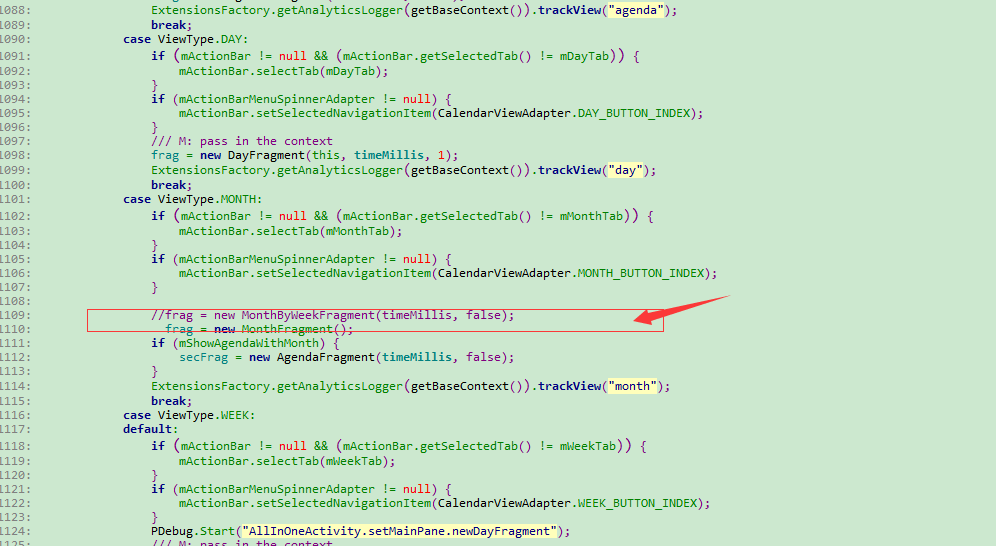
}3.点击月视图tab跳转到我自己写的fragment 。
1.
2.


 1585
1585

 被折叠的 条评论
为什么被折叠?
被折叠的 条评论
为什么被折叠?
 到【灌水乐园】发言


