


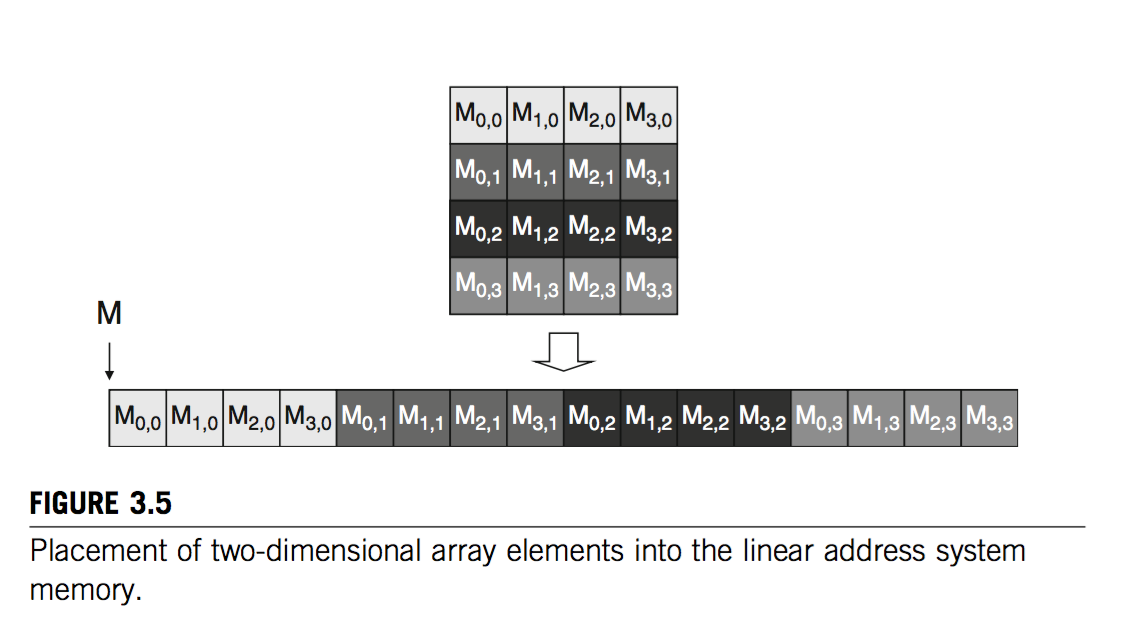
Global memory storage pattern:
The storage pattern of global memory in GPU is row first pattern because there is not two dimension array in GPU. Use a matrix as an example[1]:
Knowledge of warp in CUDA[1]:
Thread blocks are partitioned into warps based on thread indices. If a thread block is organised into a one-dimensional array (i.e., only threadIdx.x is used), then the partition is straightforward. The threadIdx.x values within a warp are consecutive and increasing. For a warp size of 32, warp 0 starts with thread 0 and ends with thread 31, warp 1 starts with thread 32 and ends with thread 63. In general, warp n starts with thread 32*n and ends with thread 32(n + 1) – 1. For a block whose size is not a multiple of 32, the last warp will be padded with extra threads to fill up the 32 threads; for example, if a block has 48 threads, it will be partitioned into 2 warps, and its warp 1 will be padded with 16 extra threads. (Padding is not a good thing in CUDA programming).
If the threadIdx has two dimensions, then a warp consists of the consecutive threadId.x first. If there is more space, then use the consecutive threadId.y.
Global memory coalescing (good for matrix_multiplication, which represents the cases that loading data is one dimension):
When you are considering to communicate with the global memory, you need to consider the memory coalescing to increase the efficiency. Because the global memory access pattern always be a trunk of 32B/64B/128B. Once you want to load data from global memory, if the data you require is less than 32B, it will waste some bandwidth of the global memory.
The only way to make use of this feature is to let the consecutive threadIdx.x's threads (threads within a warp specific speaking) to load consecutive address of global memory. Then computer will achieve memory coalescing.
Physically speaking, the actual policy of CUDA is half-warp policy. Every schedule of GPU is half-warp which consists of 16 threads. Therefore, we only need to guarantee 16 threads are reading a consecutive address of global memory.
Matrix Multiplication Example:
Technically speaking, in order to achieve the global memory coalescing, we only need to get the data from global memory in a way of 1 thread per column of the same row. However, when we perform matrix multiplication, we must access the data from global memory in an inefficient way (when we loading a column of matrix, different threads load different rows). We cannot avoid this, however we can use blocking to use shared memory to make up for this. Shared memory doesn't need to consider the memory coalescing because the delay and bandwidth are good enough for shared memory. As we use blocking, we can assure the efficient access to global memory when we load the data from global memory to shared memory. Once the data is loaded into shared memory, we don't need to consider memory coalescing any more.
/*------matrix mul----------*/

__global__ void MatrixMulKernal(float * d_M, float* d_N, float* d_R, int width){
	// create the shared memory (like the cudaMalloc step)
	__shared__ float ms[tile_Width][tile_Width];
	__shared__ float ns[tile_Width][tile_Width];

	// get the intrinsic varible of thread
	int blockX = blockIdx.x;
	int blockY = blockIdx.y;
	int threadX = threadIdx.x;
	int threadY = threadIdx.y;

	/*-----transfer the data from global memory to shared memory-----*/

	// d_M need to use blockId/threadId to calculate the row
	int row = blockY * tile_Width + threadY;
	// d_N need to use blockId/threadId to calculate the conlumn
    int conlumn = blockX * tile_Width + threadX;

    // fill each shared memory of each block

    for (int i=0; i<width/tile_Width; i++){
    	ms[threadY][threadX] = d_M[row*width+i*tile_Width+threadX];
    	ns[threadY][threadX] = d_N[(i*tile_Width+threadY)*width+conlumn];
    	__synchthreads();
    }
    // create a register varibale
    float rValue = 0;

    for (int k=0; k<tile_Width; k++){
    	rValue += ms[threadY][k] * ns[k][threadX];
    	__synchthreads();
    }

    d_R[row*width+conlumn] = rValue;


}
In general speaking [2]:
代码理解:如同不分块的矩阵乘法,int row是目标矩阵的元素的行坐标,int column是目标矩阵的元素的列坐标。而填充共享内存的时候,参照矩阵乘法,M矩阵在同一行的不同列,所以不同列是threadIdx.x。而N矩阵是同一列的不同行,所以threadIdx.y在行坐标。
Since every warp firstly contains the same threadIdx.x. Therefore, no matter in the access of d_M or d_N, it will satisfy the global memory coalescing.
Global memory storage SOA vs AOS schema (good for kmeans, which represents the cases that the loading data is two dimension):
These two schemas have their own benefits. It depends on the situation of application.
Like the example of calculating euclidean distance:
When we are calculating a big set of points to the original point distance, it usually better to choose the SOA(structure of array). It means that the same kind of coordinate should be stored in consecutive address of global memory. Like this[2]:

Because it can utilise the number of threads available to calculate different points in parallel. At one schedule, take the x coordinates in the same time. Then, in the next time, take the y coordinates in the same time.
However, if we only calculate a few points of a big set, it will be better that we use the AOS(array of struct) [2]:
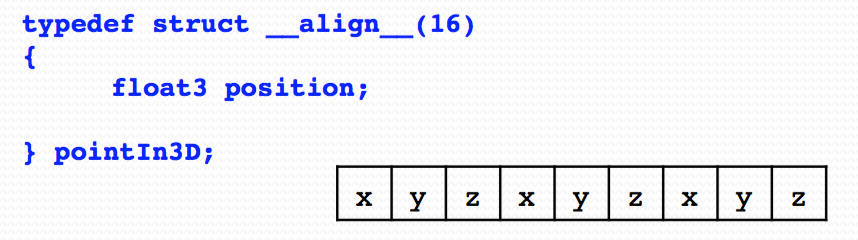
Because in this way, it doesn't need to go over as many variables that are un-necessary as SOA.
Global memory pre-fetching (Double buffering)
When we look deeper in the matrix_mul code, you can see the transfer from global memory to shared memory was done by this sentence:
ms[threadY][threadX] = d_M[row*width+i*tile_Width+threadX];Actually, it contains two machine command. First, copy the value of d_M(row*width+i*tile_Width+threadX) to register. Then load the value from register to shared memory. There is not other instructions between them. Notice that there is also a barrier synchronisation in the next sentence:
__synchthreads();Therefore, every block must wait until all its threads done the transfer. The block that loads its current tile will need to wait a long time before it can compute their current tile. It will be a waste of the floating-points computation unit.
Therefore, here introduce a way called pre-fetch or double buffering. This mean use double amount of register and shared memory; however, it does solve the overhead problem I mentioned above[1].

Notice that it breaks the transfer part into two actual steps. And threads don't need to wait their companions of one warp to finish loading data from global memory to register. They can directly go to compute current tile once they finish their own transfer.
And it is very fast to deposit the data from register to shared memory. However, this mean's overhead is it uses double amount of register and shared memory. Using additional registers can reduce the number of blocks that can run on an SM; however, this technique can still win if it significantly reduces the amount of time each thread waits for its global memory load data[1].
Reference:
[1] Programming.Massively.Parallel.Processors.A.Hands-on.Approach Kirk,.Hwu
[2] CMU 18645 How to write fast code Jike Chong and Ian Lane


 269
269

 被折叠的 条评论
为什么被折叠?
被折叠的 条评论
为什么被折叠?
 到【灌水乐园】发言


