


一. NIO 基础
non-blocking io 非阻塞 IO
1. 三大组件
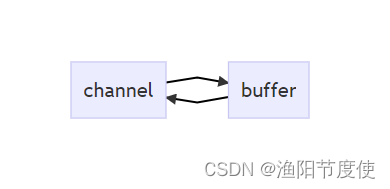
1.1 Channel & Buffer
channel 有一点类似于 stream,它就是读写数据的双向通道,可以从 channel 将数据读入 buffer,也可以将 buffer 的数据写入 channel,而之前的 stream 要么是输入,要么是输出,channel 比 stream 更为底层
常见的 Channel 有
- FileChannel
- DatagramChannel
- SocketChannel
- ServerSocketChannel
buffer 则用来缓冲读写数据,常见的 buffer 有
- ByteBuffer
- MappedByteBuffer
- DirectByteBuffer
- HeapByteBuffer
- ShortBuffer
- IntBuffer
- LongBuffer
- FloatBuffer
- DoubleBuffer
- CharBuffer
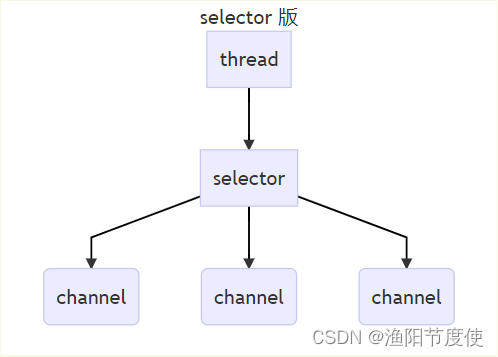
1.2 Selector
多线程版设计
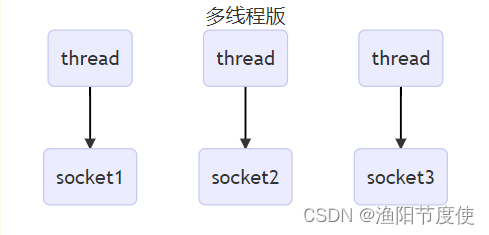
⚠️ 多线程版缺点
- 内存占用高
- 线程上下文切换成本高
- 只适合连接数少的场景
线程池版设计
⚠️ 线程池版缺点
- 阻塞模式下,线程仅能处理一个 socket 连接
- 仅适合短连接场景
selector 版设计
selector 的作用就是配合一个线程来管理多个 channel,获取这些 channel 上发生的事件,这些 channel 工作在非阻塞模式下,不会让线程吊死在一个 channel 上。适合连接数特别多,但流量低的场景(low traffic)
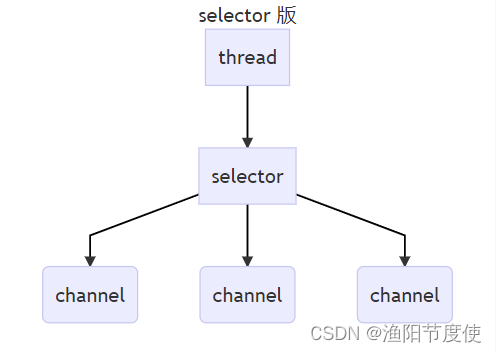
调用 selector 的 select() 会阻塞直到 channel 发生了读写就绪事件,这些事件发生,select 方法就会返回这些事件交给 thread 来处理
2. ByteBuffer
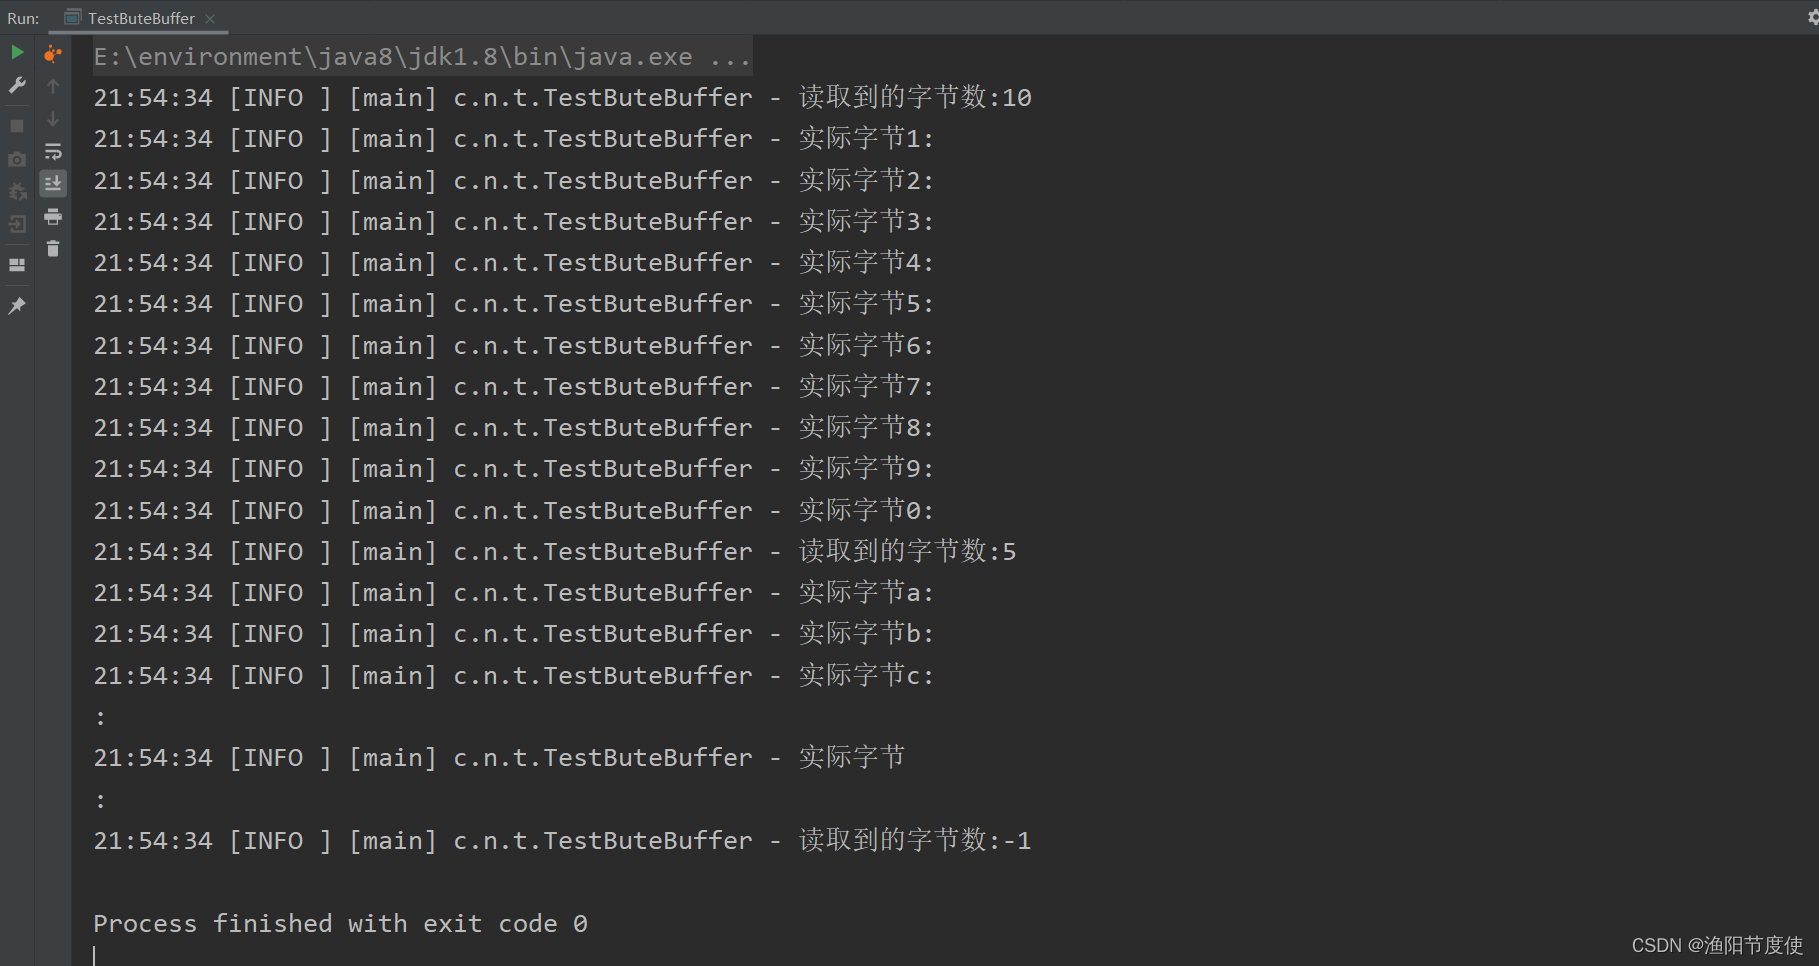
有一普通文本文件 data.txt,内容为
1234567890abcd
使用 FileChannel 来读取文件内容
@Slf4j
public class TestButeBuffer {
    public static void main(String[] args) {
        try {
            //FileChannel
            //1.输入输出流   2.RandomAccessFile
            FileChannel fileChannel = new FileInputStream("data.txt").getChannel();
            //准备缓冲流
            ByteBuffer byteBuffer = ByteBuffer.allocate(10);
            while (true) {
                //从channel读取数据,向buffer写入
                int read = fileChannel.read(byteBuffer);
                log.info("读取到的字节数:{}",read);
                if (read<0){//没有内容了   -1
                    break;
                }
                //打印byteBuffer的内容
                byteBuffer.flip();//切换读模式
                while (byteBuffer.hasRemaining()) {//是否还有剩余未读数据
                    byte b = byteBuffer.get();
                    log.info("实际字节{}:",(char) b);
                }
                byteBuffer.clear();//切换写模式
            }
        } catch (Exception e) {
            e.printStackTrace();
        }
    }
}
2.1 ByteBuffer 正确使用姿势
- 向 buffer 写入数据,例如调用 channel.read(buffer)
- 调用 flip() 切换至读模式
- 从 buffer 读取数据,例如调用 buffer.get()
- 调用 clear() 或 compact() 切换至写模式
- 重复 1~4 步骤
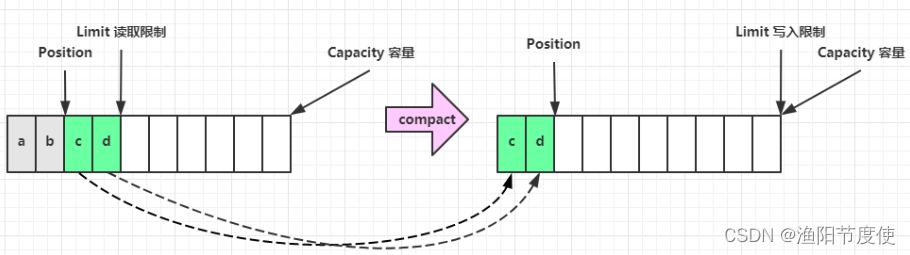
2.2 ByteBuffer 结构
ByteBuffer 有以下重要属性
- capacity
- position
- limit
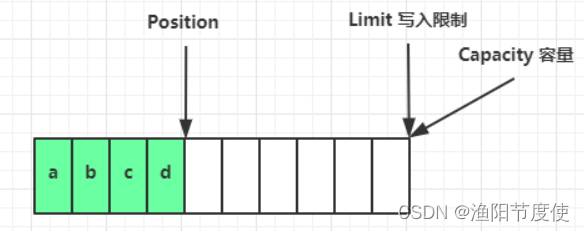
一开始
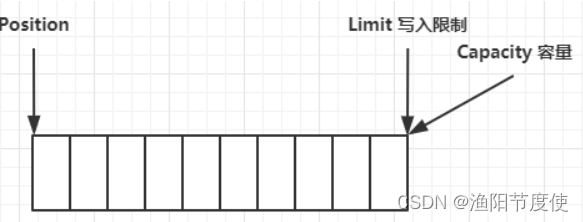
写模式下,position 是写入位置,limit 等于容量,下图表示写入了 4 个字节后的状态
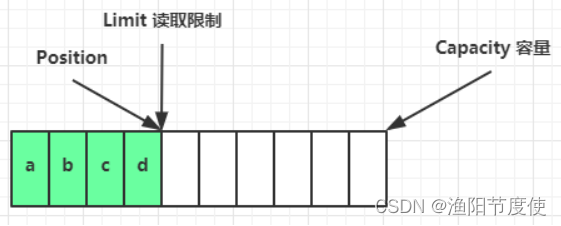
flip 动作发生后,position 切换为读取位置,limit 切换为读取限制

读取 4 个字节后,状态
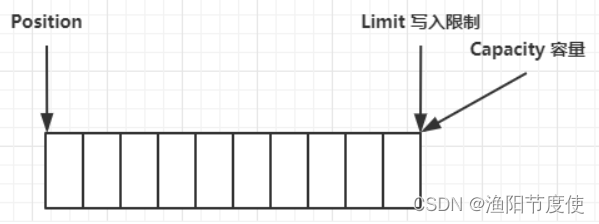
clear 动作发生后,状态
compact 方法,是把未读完的部分向前压缩,然后切换至写模式
💡 调试工具类
	<dependencies>
        <dependency>
            <groupId>io.netty</groupId>
            <artifactId>netty-all</artifactId>
            <version>4.1.39.Final</version>
        </dependency>
        <dependency>
            <groupId>org.projectlombok</groupId>
            <artifactId>lombok</artifactId>
            <version>1.16.18</version>
        </dependency>
        <dependency>
            <groupId>com.google.code.gson</groupId>
            <artifactId>gson</artifactId>
            <version>2.8.5</version>
        </dependency>
        <dependency>
            <groupId>com.google.guava</groupId>
            <artifactId>guava</artifactId>
            <version>19.0</version>
        </dependency>
        <dependency>
            <groupId>ch.qos.logback</groupId>
            <artifactId>logback-classic</artifactId>
            <version>1.2.3</version>
        </dependency>
        <dependency>
            <groupId>com.google.protobuf</groupId>
            <artifactId>protobuf-java</artifactId>
            <version>3.11.3</version>
        </dependency>
    </dependencies>
import io.netty.util.internal.StringUtil;

import java.nio.ByteBuffer;

import static io.netty.util.internal.MathUtil.isOutOfBounds;
import static io.netty.util.internal.StringUtil.NEWLINE;

public class ByteBufferUtil {
    private static final char[] BYTE2CHAR = new char[256];
    private static final char[] HEXDUMP_TABLE = new char[256 * 4];
    private static final String[] HEXPADDING = new String[16];
    private static final String[] HEXDUMP_ROWPREFIXES = new String[65536 >>> 4];
    private static final String[] BYTE2HEX = new String[256];
    private static final String[] BYTEPADDING = new String[16];

    static {
        final char[] DIGITS = "0123456789abcdef".toCharArray();
        for (int i = 0; i < 256; i++) {
            HEXDUMP_TABLE[i << 1] = DIGITS[i >>> 4 & 0x0F];
            HEXDUMP_TABLE[(i << 1) + 1] = DIGITS[i & 0x0F];
        }

        int i;

        // Generate the lookup table for hex dump paddings
        for (i = 0; i < HEXPADDING.length; i++) {
            int padding = HEXPADDING.length - i;
            StringBuilder buf = new StringBuilder(padding * 3);
            for (int j = 0; j < padding; j++) {
                buf.append("   ");
            }
            HEXPADDING[i] = buf.toString();
        }

        // Generate the lookup table for the start-offset header in each row (up to 64KiB).
        for (i = 0; i < HEXDUMP_ROWPREFIXES.length; i++) {
            StringBuilder buf = new StringBuilder(12);
            buf.append(NEWLINE);
            buf.append(Long.toHexString(i << 4 & 0xFFFFFFFFL | 0x100000000L));
            buf.setCharAt(buf.length() - 9, '|');
            buf.append('|');
            HEXDUMP_ROWPREFIXES[i] = buf.toString();
        }

        // Generate the lookup table for byte-to-hex-dump conversion
        for (i = 0; i < BYTE2HEX.length; i++) {
            BYTE2HEX[i] = ' ' + StringUtil.byteToHexStringPadded(i);
        }

        // Generate the lookup table for byte dump paddings
        for (i = 0; i < BYTEPADDING.length; i++) {
            int padding = BYTEPADDING.length - i;
            StringBuilder buf = new StringBuilder(padding);
            for (int j = 0; j < padding; j++) {
                buf.append(' ');
            }
            BYTEPADDING[i] = buf.toString();
        }

        // Generate the lookup table for byte-to-char conversion
        for (i = 0; i < BYTE2CHAR.length; i++) {
            if (i <= 0x1f || i >= 0x7f) {
                BYTE2CHAR[i] = '.';
            } else {
                BYTE2CHAR[i] = (char) i;
            }
        }
    }

    /**
     * 打印所有内容
     * @param buffer
     */
    public static void debugAll(ByteBuffer buffer) {
        int oldlimit = buffer.limit();
        buffer.limit(buffer.capacity());
        StringBuilder origin = new StringBuilder(256);
        appendPrettyHexDump(origin, buffer, 0, buffer.capacity());
        System.out.println("+--------+-------------------- all ------------------------+----------------+");
        System.out.printf("position: [%d], limit: [%d]\n", buffer.position(), oldlimit);
        System.out.println(origin);
        buffer.limit(oldlimit);
    }

    /**
     * 打印可读取内容
     * @param buffer
     */
    public static void debugRead(ByteBuffer buffer) {
        StringBuilder builder = new StringBuilder(256);
        appendPrettyHexDump(builder, buffer, buffer.position(), buffer.limit() - buffer.position());
        System.out.println("+--------+-------------------- read -----------------------+----------------+");
        System.out.printf("position: [%d], limit: [%d]\n", buffer.position(), buffer.limit());
        System.out.println(builder);
    }

    private static void appendPrettyHexDump(StringBuilder dump, ByteBuffer buf, int offset, int length) {
        if (isOutOfBounds(offset, length, buf.capacity())) {
            throw new IndexOutOfBoundsException(
                    "expected: " + "0 <= offset(" + offset + ") <= offset + length(" + length
                            + ") <= " + "buf.capacity(" + buf.capacity() + ')');
        }
        if (length == 0) {
            return;
        }
        dump.append(
                "         +-------------------------------------------------+" +
                        NEWLINE + "         |  0  1  2  3  4  5  6  7  8  9  a  b  c  d  e  f |" +
                        NEWLINE + "+--------+-------------------------------------------------+----------------+");

        final int startIndex = offset;
        final int fullRows = length >>> 4;
        final int remainder = length & 0xF;

        // Dump the rows which have 16 bytes.
        for (int row = 0; row < fullRows; row++) {
            int rowStartIndex = (row << 4) + startIndex;

            // Per-row prefix.
            appendHexDumpRowPrefix(dump, row, rowStartIndex);

            // Hex dump
            int rowEndIndex = rowStartIndex + 16;
            for (int j = rowStartIndex; j < rowEndIndex; j++) {
                dump.append(BYTE2HEX[getUnsignedByte(buf, j)]);
            }
            dump.append(" |");

            // ASCII dump
            for (int j = rowStartIndex; j < rowEndIndex; j++) {
                dump.append(BYTE2CHAR[getUnsignedByte(buf, j)]);
            }
            dump.append('|');
        }

        // Dump the last row which has less than 16 bytes.
        if (remainder != 0) {
            int rowStartIndex = (fullRows << 4) + startIndex;
            appendHexDumpRowPrefix(dump, fullRows, rowStartIndex);

            // Hex dump
            int rowEndIndex = rowStartIndex + remainder;
            for (int j = rowStartIndex; j < rowEndIndex; j++) {
                dump.append(BYTE2HEX[getUnsignedByte(buf, j)]);
            }
            dump.append(HEXPADDING[remainder]);
            dump.append(" |");

            // Ascii dump
            for (int j = rowStartIndex; j < rowEndIndex; j++) {
                dump.append(BYTE2CHAR[getUnsignedByte(buf, j)]);
            }
            dump.append(BYTEPADDING[remainder]);
            dump.append('|');
        }

        dump.append(NEWLINE +
                "+--------+-------------------------------------------------+----------------+");
    }

    private static void appendHexDumpRowPrefix(StringBuilder dump, int row, int rowStartIndex) {
        if (row < HEXDUMP_ROWPREFIXES.length) {
            dump.append(HEXDUMP_ROWPREFIXES[row]);
        } else {
            dump.append(NEWLINE);
            dump.append(Long.toHexString(rowStartIndex & 0xFFFFFFFFL | 0x100000000L));
            dump.setCharAt(dump.length() - 9, '|');
            dump.append('|');
        }
    }

    public static short getUnsignedByte(ByteBuffer buffer, int index) {
        return (short) (buffer.get(index) & 0xFF);
    }
}
2.3 ByteBuffer 常见方法
分配空间
可以使用 allocate 方法为 ByteBuffer 分配空间,其它 buffer 类也有该方法
System.out.println(ByteBuffer.allocate(1024).getClass());
//java堆内存    读写效率低
System.out.println(ByteBuffer.allocateDirect(1024).getClass());
//直接内存       读写效率高(少一次cpu拷贝)  不会收到gc的影响   分配效率低   可能会造成内存泄漏
向 buffer 写入数据
有两种办法
- 调用 channel 的 read 方法
- 调用 buffer 自己的 put 方法
int readBytes = channel.read(buf);
和
buf.put((byte)127);
从 buffer 读取数据
同样有两种办法
- 调用 channel 的 write 方法
- 调用 buffer 自己的 get 方法
int writeBytes = channel.write(buf);
和
byte b = buf.get();
get 方法会让 position 读指针向后走,如果想重复读取数据
- 可以调用 rewind 方法将 position 重新置为 0
- 或者调用 get(int i) 方法获取索引 i 的内容,它不会移动读指针
mark 和 reset
mark 是在读取时,做一个标记,即使 position 改变,只要调用 reset 就能回到 mark 的位置
注意
rewind 和 flip 都会清除 mark 位置
字符串与 ByteBuffer 互转
//字符串专为ByteBuffer
ByteBuffer byteBuffer = ByteBuffer.allocate(16);
byteBuffer.put("hello".getBytes(StandardCharsets.UTF_8));

//Charset
ByteBuffer buffer1 = StandardCharsets.UTF_8.encode("你好");
ByteBuffer buffer2 = Charset.forName("utf-8").encode("你好");

debug(buffer1);
debug(buffer2);
//bytebuffer转为字符串
CharBuffer buffer3 = StandardCharsets.UTF_8.decode(buffer1);
System.out.println(buffer3.getClass());
System.out.println(buffer3.toString());
//wrap
ByteBuffer wrap = ByteBuffer.wrap("hello".getBytes(StandardCharsets.UTF_8));
debugAll(wrap);
输出
⚠️ Buffer 的线程安全
Buffer 是非线程安全的
2.4 Scattering Reads
分散读取,有一个文本文件 3parts.txt
onetwothree
使用如下方式读取,可以将数据填充至多个 buffer
public class TestScatteringReads {
    public static void main(String[] args) {
        try {
            FileChannel fileChannel = new RandomAccessFile("3parts.txt","r").getChannel();
            ByteBuffer buffer1 = ByteBuffer.allocate(3);
            ByteBuffer buffer2 = ByteBuffer.allocate(3);
            ByteBuffer buffer3 = ByteBuffer.allocate(5);

            long read = fileChannel.read(new ByteBuffer[]{buffer1, buffer2, buffer3});
            buffer1.flip();
            buffer2.flip();
            buffer3.flip();
            debugAll(buffer1);
            debugAll(buffer2);
            debugAll(buffer3);
        } catch (Exception e) {
            e.printStackTrace();
        }
    }
}
2.5 Gathering Writes
使用如下方式写入,可以将多个 buffer 的数据填充至 channel
public class TestScatteringWrites {
    public static void main(String[] args) {
        try {
            FileChannel fileChannel = new RandomAccessFile("words2.txt","rw").getChannel();
            ByteBuffer buffer1 = StandardCharsets.UTF_8.encode("hello");
            ByteBuffer buffer2 = StandardCharsets.UTF_8.encode("world");
            ByteBuffer buffer3 = StandardCharsets.UTF_8.encode("你好!");

            long write = fileChannel.write(new ByteBuffer[]{buffer1, buffer2, buffer3});

            debugAll(buffer1);
            debugAll(buffer2);
            debugAll(buffer3);
        } catch (Exception e) {
            e.printStackTrace();
        }
    }
}
文件内容
onetwothreefourfive
2.6 练习
网络上有多条数据发送给服务端,数据之间使用 \n 进行分隔
但由于某种原因这些数据在接收时,被进行了重新组合,例如原始数据有3条为
- Hello,world\n
- I’m zhangsan\n
- How are you?\n
变成了下面的两个 byteBuffer (黏包,半包)
- Hello,world\nI’m zhangsan\nHo
- w are you?\n
现在要求你编写程序,将错乱的数据恢复成原始的按 \n 分隔的数据
public class TestByteBufferExam {
    public static void main(String[] args) {
        ByteBuffer source = ByteBuffer.allocate(32);
        //                     11            24
        source.put("Hello,world\nI'm zhangsan\nHo".getBytes());
        split(source);

        source.put("w are you?\nhaha!\n".getBytes());
        split(source);
    }

    private static void split(ByteBuffer buffer) {
        buffer.flip();
        for (int i = 0; i < buffer.limit(); i++) {
            //找到一条完整的消息
            if (buffer.get(i)=='\n') {
                int length = i+ 1 -buffer.position();
                //把消息存入新的bytebuffer
                ByteBuffer newBuffer = ByteBuffer.allocate(length);
                // 从source 读,向 target 写
                for (int j = 0; j < length; j++) {
                    newBuffer.put(buffer.get());
                }
            }
        }
        buffer.compact();
    }
}
3. 文件编程
3.1 FileChannel
⚠️ FileChannel 工作模式
FileChannel 只能工作在阻塞模式下
获取
不能直接打开 FileChannel,必须通过 FileInputStream、FileOutputStream 或者 RandomAccessFile 来获取 FileChannel,它们都有 getChannel 方法
- 通过 FileInputStream 获取的 channel 只能读
- 通过 FileOutputStream 获取的 channel 只能写
- 通过 RandomAccessFile 是否能读写根据构造 RandomAccessFile 时的读写模式决定
读取
会从 channel 读取数据填充 ByteBuffer,返回值表示读到了多少字节,-1 表示到达了文件的末尾
int readBytes = channel.read(buffer);
写入
写入的正确姿势如下, SocketChannel
ByteBuffer buffer = ...;
buffer.put(...); // 存入数据
buffer.flip();   // 切换读模式

while(buffer.hasRemaining()) {
    channel.write(buffer);
}
在 while 中调用 channel.write 是因为 write 方法并不能保证一次将 buffer 中的内容全部写入 channel
关闭
channel 必须关闭,不过调用了 FileInputStream、FileOutputStream 或者 RandomAccessFile 的 close 方法会间接地调用 channel 的 close 方法
位置
获取当前位置
long pos = channel.position();
设置当前位置
long newPos = ...;
channel.position(newPos);
设置当前位置时,如果设置为文件的末尾
- 这时读取会返回 -1
- 这时写入,会追加内容,但要注意如果 position 超过了文件末尾,再写入时在新内容和原末尾之间会有空洞(00)
大小
使用 size 方法获取文件的大小
强制写入
操作系统出于性能的考虑,会将数据缓存,不是立刻写入磁盘。可以调用 force(true) 方法将文件内容和元数据(文件的权限等信息)立刻写入磁盘
3.2 两个 Channel 传输数据
public static void main(String[] args) {
		long start = System.nanoTime();
        try {
            FileChannel from = new FileInputStream("data.txt").getChannel();
            FileChannel to = new FileOutputStream("to.txt").getChannel();
            //效率高,底层会利用操作系统的零拷贝进行优化
            from.transferTo(0,from.size(),to);
        } catch (Exception e) {
            e.printStackTrace();
        }
        long end = System.nanoTime();
		System.out.println("transferTo 用时:" + (end - start) / 1000_000.0);
    }
输出
transferTo 用时:8.2011
超过 2g 大小的文件传输
	public static void main(String[] args) {
        try {
            FileChannel from = new FileInputStream("data.txt").getChannel();
            FileChannel to = new FileOutputStream("to.txt").getChannel();
            long size = from.size();
            long left = size;
            while (left > 0) {
                left-=from.transferTo((size-left),left,to);
            }
        } catch (Exception e) {
            e.printStackTrace();
        }
    }
实际传输一个超大文件
position:0 left:7769948160
position:2147483647 left:5622464513
position:4294967294 left:3474980866
position:6442450941 left:1327497219
3.3 Path
jdk7 引入了 Path 和 Paths 类
- Path 用来表示文件路径
- Paths 是工具类,用来获取 Path 实例
Path source = Paths.get("1.txt"); // 相对路径 使用 user.dir 环境变量来定位 1.txt

Path source = Paths.get("d:\\1.txt"); // 绝对路径 代表了  d:\1.txt

Path source = Paths.get("d:/1.txt"); // 绝对路径 同样代表了  d:\1.txt

Path projects = Paths.get("d:\\data", "projects"); // 代表了  d:\data\projects
.代表了当前路径..代表了上一级路径
例如目录结构如下
d:
	|- data
		|- projects
			|- a
			|- b
代码
Path path = Paths.get("d:\\data\\projects\\a\\..\\b");
System.out.println(path);
System.out.println(path.normalize()); // 正常化路径
会输出
d:\data\projects\a\..\b
d:\data\projects\b
3.4 Files
检查文件是否存在
Path path = Paths.get("helloword/data.txt");
System.out.println(Files.exists(path));
创建一级目录
Path path = Paths.get("helloword/d1");
Files.createDirectory(path);
- 如果目录已存在,会抛异常 FileAlreadyExistsException
- 不能一次创建多级目录,否则会抛异常 NoSuchFileException
创建多级目录用
Path path = Paths.get("helloword/d1/d2");
Files.createDirectories(path);
拷贝文件
Path source = Paths.get("helloword/data.txt");
Path target = Paths.get("helloword/target.txt");

Files.copy(source, target);
- 如果文件已存在,会抛异常 FileAlreadyExistsException
如果希望用 source 覆盖掉 target,需要用 StandardCopyOption 来控制
Files.copy(source, target, StandardCopyOption.REPLACE_EXISTING);
移动文件
Path source = Paths.get("helloword/data.txt");
Path target = Paths.get("helloword/data.txt");

Files.move(source, target, StandardCopyOption.ATOMIC_MOVE);
- StandardCopyOption.ATOMIC_MOVE 保证文件移动的原子性
删除文件
Path target = Paths.get("helloword/target.txt");

Files.delete(target);
- 如果文件不存在,会抛异常 NoSuchFileException
删除目录
Path target = Paths.get("helloword/d1");

Files.delete(target);
- 如果目录还有内容,会抛异常 DirectoryNotEmptyException
遍历目录文件
	public static void main(String[] args) {
        try {
            FileChannel from = new FileInputStream("data.txt").getChannel();
            FileChannel to = new FileOutputStream("to.txt").getChannel();
            long size = from.size();
            long left = size;
            while (left > 0) {
                left-=from.transferTo((size-left),left,to);
            }
        } catch (Exception e) {
            e.printStackTrace();
        }
    }
统计 jar 的数目
public static void main(String[] args) throws IOException {
        AtomicInteger fileCount = new AtomicInteger();
        Files.walkFileTree(Paths.get("E:\\tmp"),new SimpleFileVisitor<Path>(){
            @Override
            public FileVisitResult visitFile(Path file, BasicFileAttributes attrs) throws IOException {
                if (file.toString().endsWith(".jar")) {
                    System.out.println(file);
                    fileCount.incrementAndGet();
                }
                return super.visitFile(file, attrs);
            }
        });
        System.out.println("fileCount = " + fileCount);
    }
删除多级目录
    public static void main(String[] args) throws IOException {
    //        Files.delete("E:\\tmp\\rocketmq-console\\data");  //只能删除空的文件夹

		Files.walkFileTree(Paths.get("E:\\tmp\\rocketmq-console\\data"),new SimpleFileVisitor<Path>(){

            @Override
            public FileVisitResult visitFile(Path file, BasicFileAttributes attrs) throws IOException {
                Files.delete(file);
                return super.visitFile(file, attrs);
            }

            @Override
            public FileVisitResult postVisitDirectory(Path dir, IOException exc) throws IOException {
                Files.delete(dir);
                return super.postVisitDirectory(dir, exc);
            }
        });
   	}
⚠️ 删除很危险
删除是危险操作,确保要递归删除的文件夹没有重要内容
拷贝多级目录
		public static void main(String[] args) throws IOException {
            String source = "E:\\tmp";
            String target = "E:\\test\\A";
            Files.walk(Paths.get(source)).forEach(path->{
                try {
                    String targetName = path.toString().replace(source, target);
                    if (Files.isDirectory(path)) { // 是目录
                        Files.createDirectories(Paths.get(targetName));
                    }else if (Files.isRegularFile(path)){// 是普通文件
                        Files.copy(path,Paths.get(targetName));
                    }
                } catch (Exception e) {
                    e.printStackTrace();
                }
            });
    	}
4. 网络编程
4.1 非阻塞 vs 阻塞
阻塞
- 阻塞模式下,相关方法都会导致线程暂停
- ServerSocketChannel.accept 会在没有连接建立时让线程暂停
- SocketChannel.read 会在没有数据可读时让线程暂停
- 阻塞的表现其实就是线程暂停了,暂停期间不会占用 cpu,但线程相当于闲置
- 单线程下,阻塞方法之间相互影响,几乎不能正常工作,需要多线程支持
- 但多线程下,有新的问题,体现在以下方面
- 32 位 jvm 一个线程 320k,64 位 jvm 一个线程 1024k,如果连接数过多,必然导致 OOM,并且线程太多,反而会因为频繁上下文切换导致性能降低
- 可以采用线程池技术来减少线程数和线程上下文切换,但治标不治本,如果有很多连接建立,但长时间 inactive,会阻塞线程池中所有线程,因此不适合长连接,只适合短连接
服务器端
@Slf4j
public class Server {
    public static void main(String[] args) {
        try {
            //使用nio 来理解阻塞模式
            ByteBuffer buffer = ByteBuffer.allocate(1024);
            //1.创建服务器
            ServerSocketChannel serverSocketChannel = ServerSocketChannel.open();
            //2.绑定监听端口
            serverSocketChannel.bind(new InetSocketAddress(9999));
            //3.连接集合
            ArrayList<SocketChannel> channels = new ArrayList<>();

            while (true) {
                //4.accept 建立与客户端连接,SocketChannel用来与客户端之间通信
                log.info("connecting...");
                SocketChannel socketChannel = serverSocketChannel.accept();
                log.info("connected... {}", socketChannel);
                channels.add(socketChannel);
                //5.接受客户端发送的数据
                for (SocketChannel channel : channels) {
                    channel.read(buffer);// 阻塞方法,线程停止运行
                    buffer.flip();
                    debugRead(buffer);
                    buffer.clear();
                    log.info("after read...{}", channel);
                }
            }
        } catch (IOException e) {
            e.printStackTrace();
        }
    }
}
客户端
public class Client {
    public static void main(String[] args) {
        try {
            SocketChannel socketChannel = SocketChannel.open();
            socketChannel.connect(new InetSocketAddress("127.0.0.1",9999));
            System.out.println("waitting");
        } catch (IOException e) {
            e.printStackTrace();
        }
    }
}
非阻塞
- 非阻塞模式下,相关方法都会不会让线程暂停
- 在 ServerSocketChannel.accept 在没有连接建立时,会返回 null,继续运行
- SocketChannel.read 在没有数据可读时,会返回 0,但线程不必阻塞,可以去执行其它 SocketChannel 的 read 或是去执行 ServerSocketChannel.accept
- 写数据时,线程只是等待数据写入 Channel 即可,无需等 Channel 通过网络把数据发送出去
- 但非阻塞模式下,即使没有连接建立,和可读数据,线程仍然在不断运行,白白浪费了 cpu
- 数据复制过程中,线程实际还是阻塞的(AIO 改进的地方)
服务器端,客户端代码不变
@Slf4j
public class Server {
    public static void main(String[] args) {
        try {
            //使用nio 来理解阻塞模式
            ByteBuffer buffer = ByteBuffer.allocate(1024);
            //1.创建服务器
            ServerSocketChannel serverSocketChannel = ServerSocketChannel.open();
            serverSocketChannel.configureBlocking(false);// 非阻塞模式
            //2.绑定监听端口
            serverSocketChannel.bind(new InetSocketAddress(9999));
            //3.连接集合
            ArrayList<SocketChannel> channels = new ArrayList<>();
            while (true) {
                //4.accept 建立与客户端连接,SocketChannel用来与客户端之间通信
                log.info("connecting...");
                SocketChannel socketChannel = serverSocketChannel.accept();// 非阻塞,线程还会继续运行,如果没有连接建立,但sc是null
                if (socketChannel != null) {
                    log.info("connected... {}", socketChannel);
                    socketChannel.configureBlocking(false);
                    channels.add(socketChannel);
                }
                //5.接受客户端发送的数据
                for (SocketChannel channel : channels) {
                    int read = channel.read(buffer);// 阻塞方法,线程停止运行
                    if (read>0) {
                        buffer.flip();
                        debugRead(buffer);
                        buffer.clear();
                        log.info("after read...{}", channel);
                    }
                }
            }
        } catch (IOException e) {
            e.printStackTrace();
        }
    }
}
多路复用
单线程可以配合 Selector 完成对多个 Channel 可读写事件的监控,这称之为多路复用
- 多路复用仅针对网络 IO、普通文件 IO 没法利用多路复用
- 如果不用 Selector 的非阻塞模式,线程大部分时间都在做无用功,而 Selector 能够保证
- 有可连接事件时才去连接
- 有可读事件才去读取
- 有可写事件才去写入
- 限于网络传输能力,Channel 未必时时可写,一旦 Channel 可写,会触发 Selector 的可写事件
4.2 Selector
好处
- 一个线程配合 selector 就可以监控多个 channel 的事件,事件发生线程才去处理。避免非阻塞模式下所做无用功
- 让这个线程能够被充分利用
- 节约了线程的数量
- 减少了线程上下文切换
创建
Selector selector = Selector.open();
绑定 Channel 事件
也称之为注册事件,绑定的事件 selector 才会关心
channel.configureBlocking(false);
SelectionKey key = channel.register(selector, 绑定事件);
- channel 必须工作在非阻塞模式
- FileChannel 没有非阻塞模式,因此不能配合 selector 一起使用
- 绑定的事件类型可以有
- connect - 客户端连接成功时触发
- accept - 服务器端成功接受连接时触发
- read - 数据可读入时触发,有因为接收能力弱,数据暂不能读入的情况
- write - 数据可写出时触发,有因为发送能力弱,数据暂不能写出的情况
在这里插入代码片
监听 Channel 事件
可以通过下面三种方法来监听是否有事件发生,方法的返回值代表有多少 channel 发生了事件
方法1,阻塞直到绑定事件发生
int count = selector.select();
方法2,阻塞直到绑定事件发生,或是超时(时间单位为 ms)
int count = selector.select(long timeout);
方法3,不会阻塞,也就是不管有没有事件,立刻返回,自己根据返回值检查是否有事件
int count = selector.selectNow();
💡 select 何时不阻塞
- 事件发生时
- 客户端发起连接请求,会触发 accept 事件
- 客户端发送数据过来,客户端正常、异常关闭时,都会触发 read 事件,另外如果发送的数据大于 buffer 缓冲区,会触发多次读取事件
- channel 可写,会触发 write 事件
- 在 linux 下 nio bug 发生时
- 调用 selector.wakeup()
- 调用 selector.close()
- selector 所在线程 interrupt
4.3 处理 accept 事件
客户端代码为
在这里插入代码片
服务器端代码为
在这里插入代码片
💡 事件发生后能否不处理
事件发生后,要么处理,要么取消(cancel),不能什么都不做,否则下次该事件仍会触发,这是因为 nio 底层使用的是水平触发
4.4 处理 read 事件
@Slf4j
public class Server {
    public static void main(String[] args) {
        try {
            //1.创建selector,管理多个 Channel
            Selector selector = Selector.open();

            ServerSocketChannel serverSocketChannel = ServerSocketChannel.open();
            serverSocketChannel.configureBlocking(false);// 非阻塞模式
            //2.建立selector和Channel的联系(注册)
            SelectionKey selectionKey = serverSocketChannel.register(selector, 0, null);
            //关注事件(selectionKey只关注accept事件)
            selectionKey.interestOps(SelectionKey.OP_ACCEPT);
            log.info("register key:{}",selectionKey);
            serverSocketChannel.bind(new InetSocketAddress(9999));
            while (true) {
                //3.select方法,没有事件发生,线程阻塞,有事件,线程才会恢复运行
                selector.select();
                //要在集合遍历时删除元素用迭代器遍历
                //4.处理事件,SelectionKey内容包含了所有发生的事件
                Iterator<SelectionKey> iterator = selector.selectedKeys().iterator();
                while (iterator.hasNext()) {
                    SelectionKey next = iterator.next();
                    log.info("key:{}",next);
                    //5.区分事件类型
                    if (next.isAcceptable()) {//接受事件
                        ServerSocketChannel channel = (ServerSocketChannel) next.channel();
                        SocketChannel socketChannel = channel .accept();
                        socketChannel.configureBlocking(false);
                        SelectionKey key = socketChannel.register(selector, 0, null);
                        key.interestOps(SelectionKey.OP_READ);
                        log.info("{}",socketChannel);
                    }else if (next.isReadable()){//读事件
                        SocketChannel socketChannel = (SocketChannel) next.channel();
                        socketChannel.configureBlocking(false);
                        ByteBuffer buffer = ByteBuffer.allocate(1024);
                        int read = socketChannel.read(buffer);
                        if (read== -1){
                            next.cancel();
                            socketChannel.close();
                        }else {
                            buffer.flip();
                            debugAll(buffer);
                            log.info("{}:",buffer.get());
                        }
                    }
                    iterator.remove();
                }
            }
        } catch (IOException e) {
            e.printStackTrace();
        }
    }
}
💡 为何要 iter.remove()
因为 select 在事件发生后,就会将相关的 key 放入 selectedKeys 集合,但不会在处理完后从 selectedKeys 集合中移除,需要我们自己编码删除。例如
- 第一次触发了 ssckey 上的 accept 事件,没有移除 ssckey
- 第二次触发了 sckey 上的 read 事件,但这时 selectedKeys 中还有上次的 ssckey ,在处理时因为没有真正的 serverSocket 连上了,就会导致空指针异常
💡 cancel 的作用
cancel 会取消注册在 selector 上的 channel,并从 keys 集合中删除 key 后续不会再监听事件
⚠️ 不处理边界的问题
以前有这样的代码,思考注释中两个问题,以 bio 为例,其实 nio 道理是一样的
public class Server {
    public static void main(String[] args) throws IOException {
        ServerSocket ss=new ServerSocket(9000);
        while (true) {
            Socket s = ss.accept();
            InputStream in = s.getInputStream();
            // 这里这么写,有没有问题
            byte[] arr = new byte[4];
            while(true) {
                int read = in.read(arr);
                // 这里这么写,有没有问题
                if(read == -1) {
                    break;
                }
                System.out.println(new String(arr, 0, read));
            }
        }
    }
}
客户端
public class Client {
    public static void main(String[] args) throws IOException {
        Socket max = new Socket("localhost", 9000);
        OutputStream out = max.getOutputStream();
        out.write("hello".getBytes());
        out.write("world".getBytes());
        out.write("你好".getBytes());
        max.close();
    }
}
输出
hell
owor
ld�
�好
为什么?
处理消息的边界
- 一种思路是固定消息长度,数据包大小一样,服务器按预定长度读取,缺点是浪费带宽
- 另一种思路是按分隔符拆分,缺点是效率低
- TLV 格式,即 Type 类型、Length 长度、Value 数据,类型和长度已知的情况下,就可以方便获取消息大小,分配合适的 buffer,缺点是 buffer 需要提前分配,如果内容过大,则影响 server 吞吐量
- Http 1.1 是 TLV 格式
- Http 2.0 是 LTV 格式
服务器端
@Slf4j
public class Server {
    public static void main(String[] args) {
        try {
            //1.创建selector,管理多个 Channel
            Selector selector = Selector.open();
            ServerSocketChannel serverSocketChannel = ServerSocketChannel.open();
            serverSocketChannel.configureBlocking(false);// 非阻塞模式
            //2.建立selector和Channel的联系(注册)
            SelectionKey selectionKey = serverSocketChannel.register(selector, 0, null);
            //关注事件(selectionKey只关注accept事件)
            selectionKey.interestOps(SelectionKey.OP_ACCEPT);
            log.info("register key:{}",selectionKey);
            serverSocketChannel.bind(new InetSocketAddress(9999));
            while (true) {
                //3.select方法,没有事件发生,线程阻塞,有事件,线程才会恢复运行
                selector.select();
                //要在集合遍历时删除元素用迭代器遍历
                //4.处理事件,SelectionKey内容包含了所有发生的事件
                Iterator<SelectionKey> iterator = selector.selectedKeys().iterator();
                while (iterator.hasNext()) {
                    SelectionKey next = iterator.next();
                    log.info("key:{}",next);
                    //5.区分事件类型
                    if (next.isAcceptable()) {//接受事件
                        ServerSocketChannel socketChannel = (ServerSocketChannel) next.channel();
                        SocketChannel channel = socketChannel.accept();
                        channel.configureBlocking(false);
                        ByteBuffer buffer = ByteBuffer.allocate(16);
                        SelectionKey key = socketChannel.register(selector, 0, buffer);
                        key.interestOps(SelectionKey.OP_READ);
                        log.info("{}",socketChannel);
                    }else if (next.isReadable()){//读事件
                        SocketChannel socketChannel = (SocketChannel) next.channel();
                        socketChannel.configureBlocking(false);
                        //获取SelectionKey 上关联的附件
                        ByteBuffer buffer = (ByteBuffer) next.attachment();
                        int read = socketChannel.read(buffer);
                        if (read<0){
                            next.cancel();
                            socketChannel.close();
                        }else {
                            split(buffer);
                            if (buffer.position()==buffer.limit()) {
                                ByteBuffer newByteBuffer = ByteBuffer.allocate(buffer.capacity() * 2);
                                buffer.flip();
                                newByteBuffer.put(buffer);
                                next.attach(newByteBuffer);
                            }
                        }
                    }
                    iterator.remove();
                }
            }
        } catch (Exception e) {
            e.printStackTrace();
        }
    }

	private static void split(ByteBuffer source) {
	    source.flip();
	    for (int i = 0; i < source.limit(); i++) {
	        // 找到一条完整消息
	        if (source.get(i) == '\n') {
	            int length = i + 1 - source.position();
	            // 把这条完整消息存入新的 ByteBuffer
	            ByteBuffer target = ByteBuffer.allocate(length);
	            // 从 source 读,向 target 写
	            for (int j = 0; j < length; j++) {
	                target.put(source.get());
	            }
	            debugAll(target);
	        }
	    }
	    source.compact(); // 0123456789abcdef  position 16 limit 16
	}
}
客户端
SocketChannel sc = SocketChannel.open();
sc.connect(new InetSocketAddress("localhost", 8080));
SocketAddress address = sc.getLocalAddress();
// sc.write(Charset.defaultCharset().encode("hello\nworld\n"));
sc.write(Charset.defaultCharset().encode("0123\n456789abcdef"));
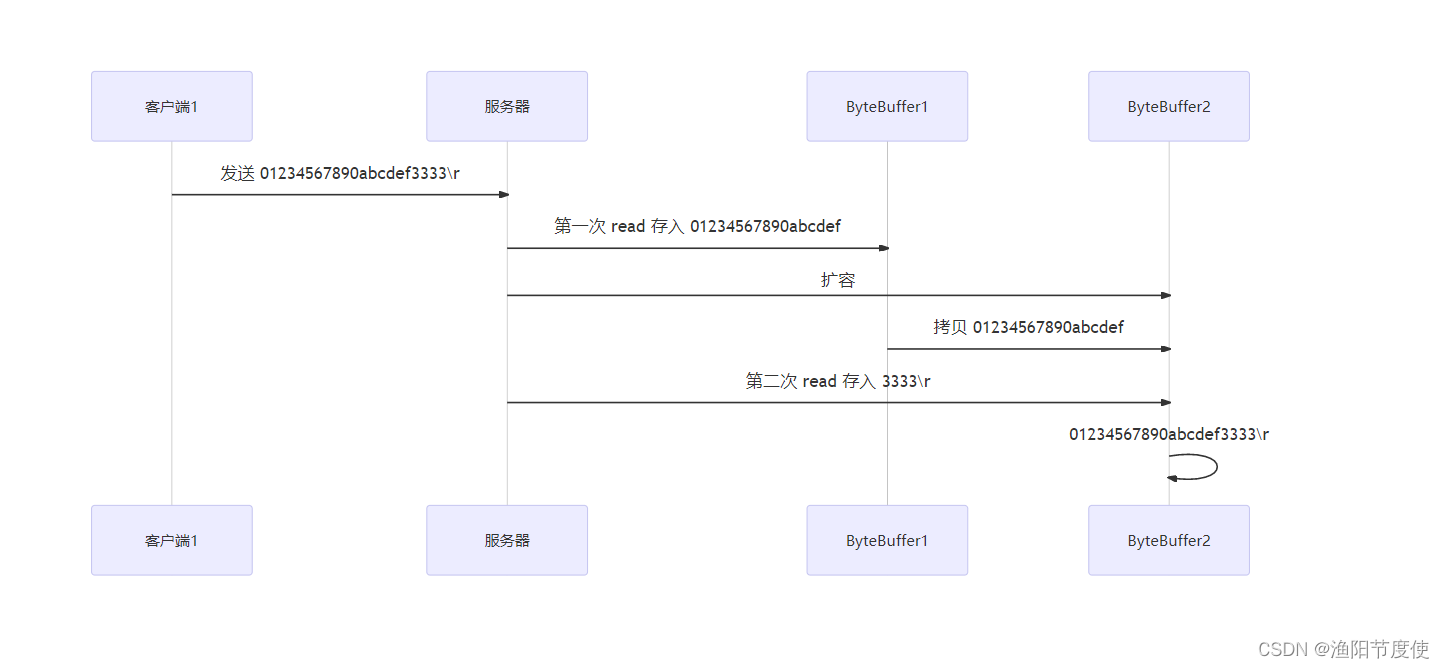
sc.write(Charset.defaultCharset().encode("0123456789abcdef3333\n"));
System.in.read();
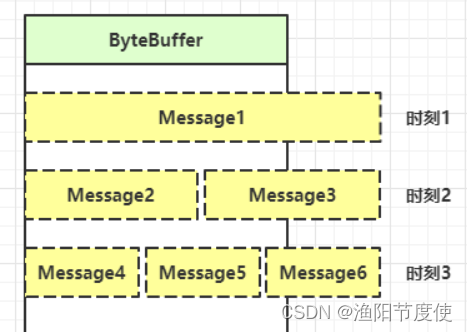
ByteBuffer 大小分配
- 每个 channel 都需要记录可能被切分的消息,因为 ByteBuffer 不能被多个 channel 共同使用,因此需要为每个 channel 维护一个独立的 ByteBuffer
- ByteBuffer 不能太大,比如一个 ByteBuffer 1Mb 的话,要支持百万连接就要 1Tb 内存,因此需要设计大小可变的 ByteBuffer
- 一种思路是首先分配一个较小的 buffer,例如 4k,如果发现数据不够,再分配 8k 的 buffer,将 4k buffer 内容拷贝至 8k buffer,优点是消息连续容易处理,缺点是数据拷贝耗费性能,参考实现 http://tutorials.jenkov.com/java-performance/resizable-array.html
- 另一种思路是用多个数组组成 buffer,一个数组不够,把多出来的内容写入新的数组,与前面的区别是消息存储不连续解析复杂,优点是避免了拷贝引起的性能损耗
4.5 处理 write 事件
一次无法写完例子
- 非阻塞模式下,无法保证把 buffer 中所有数据都写入 channel,因此需要追踪 write 方法的返回值(代表实际写入字节数)
- 用 selector 监听所有 channel 的可写事件,每个 channel 都需要一个 key 来跟踪 buffer,但这样又会导致占用内存过多,就有两阶段策略
- 当消息处理器第一次写入消息时,才将 channel 注册到 selector 上
- selector 检查 channel 上的可写事件,如果所有的数据写完了,就取消 channel 的注册
- 如果不取消,会每次可写均会触发 write 事件
@Slf4j
public class WriteServer {
    public static void main(String[] args) {
        try {
            Selector selector = Selector.open();
            ServerSocketChannel serverSocketChannel = ServerSocketChannel.open();
            serverSocketChannel.configureBlocking(false);
            serverSocketChannel.bind(new InetSocketAddress(8888));
            serverSocketChannel.register(selector,SelectionKey.OP_ACCEPT);
            while (true) {
                selector.select();
                Iterator<SelectionKey> iterator = selector.selectedKeys().iterator();
                while (iterator.hasNext()) {
                    SelectionKey key = iterator.next();
                    if (key.isAcceptable()) {
                        SocketChannel socketChannel = serverSocketChannel.accept();
                        socketChannel.configureBlocking(false);
                        SelectionKey selectionKey = socketChannel.register(selector, 0, null);

                        //1.向客户端发送大量数据
                        StringBuilder stringBuilder = new StringBuilder();
                        for (int i = 0; i < 2000000; i++) {
                            stringBuilder.append("a");
                        }
                        ByteBuffer byteBuffer = Charset.defaultCharset().encode(stringBuilder.toString());
                        //2.返回值代表实际写入的字节数
                        int write = socketChannel.write(byteBuffer);
                        log.info("write:{}",write);
                        //3.判断是否有剩余内容
                        if (byteBuffer.hasRemaining()) {
                            //4.关注可写事件
                            selectionKey.interestOps(selectionKey.interestOps()+SelectionKey.OP_WRITE);
                            //5.把未写完的事件挂载selectionKey上
                            selectionKey.attach(byteBuffer);
                        }
                    }else if (key.isWritable()){
                        ByteBuffer byteBuffer = (ByteBuffer) key.attachment();
                        SocketChannel socketChannel = (SocketChannel) key.channel();
                        int write = socketChannel.write(byteBuffer);
                        log.info("write:{}",write);
                        if (!byteBuffer.hasRemaining()) { // 写完了
                            key.interestOps(key.interestOps()-SelectionKey.OP_WRITE);
                            key.attach(null);
                        }
                    }
                    iterator.remove();
                }
            }
        } catch (Exception e) {
            e.printStackTrace();
        }
    }
}
客户端
@Slf4j
public class WriteClient {
    public static void main(String[] args) {
        try {
            Selector selector = Selector.open();
            SocketChannel socketChannel = SocketChannel.open();
            socketChannel.configureBlocking(false);
            socketChannel.register(selector,SelectionKey.OP_CONNECT|SelectionKey.OP_READ);
            socketChannel.connect(new InetSocketAddress("127.0.0.1",8888));
            int count = 0;
            while (true) {
                selector.select();
                Iterator<SelectionKey> iterator = selector.selectedKeys().iterator();
                while (iterator.hasNext()) {
                    SelectionKey key = iterator.next();
                    if (key.isConnectable()) {
                        log.info("{}",socketChannel.finishConnect());
                    }else if (key.isReadable()){
                        ByteBuffer byteBuffer = ByteBuffer.allocate(1024);
                        count+=socketChannel.read(byteBuffer);
                        log.info("count:{}",count);
                        byteBuffer.clear();
                    }
                    iterator.remove();
                }
            }
        } catch (IOException e) {
            e.printStackTrace();
        }
    }
}
💡 write 为何要取消
只要向 channel 发送数据时,socket 缓冲可写,这个事件会频繁触发,因此应当只在 socket 缓冲区写不下时再关注可写事件,数据写完之后再取消关注
4.6 更进一步
💡 利用多线程优化
现在都是多核 cpu,设计时要充分考虑别让 cpu 的力量被白白浪费
前面的代码只有一个选择器,没有充分利用多核 cpu,如何改进呢?
分两组选择器
- 单线程配一个选择器,专门处理 accept 事件
- 创建 cpu 核心数的线程,每个线程配一个选择器,轮流处理 read 事件
public class ChannelDemo7 {
    public static void main(String[] args) throws IOException {
        new BossEventLoop().register();
    }


    @Slf4j
    static class BossEventLoop implements Runnable {
        private Selector boss;
        private WorkerEventLoop[] workers;
        private volatile boolean start = false;
        AtomicInteger index = new AtomicInteger();

        public void register() throws IOException {
            if (!start) {
                ServerSocketChannel ssc = ServerSocketChannel.open();
                ssc.bind(new InetSocketAddress(8080));
                ssc.configureBlocking(false);
                boss = Selector.open();
                SelectionKey ssckey = ssc.register(boss, 0, null);
                ssckey.interestOps(SelectionKey.OP_ACCEPT);
                workers = initEventLoops();
                new Thread(this, "boss").start();
                log.debug("boss start...");
                start = true;
            }
        }

        public WorkerEventLoop[] initEventLoops() {
//        EventLoop[] eventLoops = new EventLoop[Runtime.getRuntime().availableProcessors()];
            WorkerEventLoop[] workerEventLoops = new WorkerEventLoop[2];
            for (int i = 0; i < workerEventLoops.length; i++) {
                workerEventLoops[i] = new WorkerEventLoop(i);
            }
            return workerEventLoops;
        }

        @Override
        public void run() {
            while (true) {
                try {
                    boss.select();
                    Iterator<SelectionKey> iter = boss.selectedKeys().iterator();
                    while (iter.hasNext()) {
                        SelectionKey key = iter.next();
                        iter.remove();
                        if (key.isAcceptable()) {
                            ServerSocketChannel c = (ServerSocketChannel) key.channel();
                            SocketChannel sc = c.accept();
                            sc.configureBlocking(false);
                            log.debug("{} connected", sc.getRemoteAddress());
                            workers[index.getAndIncrement() % workers.length].register(sc);
                        }
                    }
                } catch (IOException e) {
                    e.printStackTrace();
                }
            }
        }
    }

    @Slf4j
    static class WorkerEventLoop implements Runnable {
        private Selector worker;
        private volatile boolean start = false;
        private int index;

        private final ConcurrentLinkedQueue<Runnable> tasks = new ConcurrentLinkedQueue<>();

        public WorkerEventLoop(int index) {
            this.index = index;
        }

        public void register(SocketChannel sc) throws IOException {
            if (!start) {
                worker = Selector.open();
                new Thread(this, "worker-" + index).start();
                start = true;
            }
            tasks.add(() -> {
                try {
                    SelectionKey sckey = sc.register(worker, 0, null);
                    sckey.interestOps(SelectionKey.OP_READ);
                    worker.selectNow();
                } catch (IOException e) {
                    e.printStackTrace();
                }
            });
            worker.wakeup();
        }

        @Override
        public void run() {
            while (true) {
                try {
                    worker.select();
                    Runnable task = tasks.poll();
                    if (task != null) {
                        task.run();
                    }
                    Set<SelectionKey> keys = worker.selectedKeys();
                    Iterator<SelectionKey> iter = keys.iterator();
                    while (iter.hasNext()) {
                        SelectionKey key = iter.next();
                        if (key.isReadable()) {
                            SocketChannel sc = (SocketChannel) key.channel();
                            ByteBuffer buffer = ByteBuffer.allocate(128);
                            try {
                                int read = sc.read(buffer);
                                if (read == -1) {
                                    key.cancel();
                                    sc.close();
                                } else {
                                    buffer.flip();
                                    log.debug("{} message:", sc.getRemoteAddress());
                                    debugAll(buffer);
                                }
                            } catch (IOException e) {
                                e.printStackTrace();
                                key.cancel();
                                sc.close();
                            }
                        }
                        iter.remove();
                    }
                } catch (IOException e) {
                    e.printStackTrace();
                }
            }
        }
    }
}
💡 如何拿到 cpu 个数
- Runtime.getRuntime().availableProcessors()
如果工作在 docker 容器下,因为容器不是物理隔离的,会拿到物理 cpu 个数,而不是容器申请时的个数- 这个问题直到 jdk 10 才修复,使用 jvm 参数 UseContainerSupport 配置, 默认开启
4.7 UDP
- UDP 是无连接的,client 发送数据不会管 server 是否开启
- server 这边的 receive 方法会将接收到的数据存入 byte buffer,但如果数据报文超过 buffer 大小,多出来的数据会被默默抛弃
首先启动服务器端
public class UdpServer {
    public static void main(String[] args) {
        try (DatagramChannel channel = DatagramChannel.open()) {
            channel.socket().bind(new InetSocketAddress(9999));
            System.out.println("waiting...");
            ByteBuffer buffer = ByteBuffer.allocate(32);
            channel.receive(buffer);
            buffer.flip();
            debug(buffer);
        } catch (IOException e) {
            e.printStackTrace();
        }
    }
}
输出
waiting...
运行客户端
public class UdpClient {
    public static void main(String[] args) {
        try (DatagramChannel channel = DatagramChannel.open()) {
            ByteBuffer buffer = StandardCharsets.UTF_8.encode("hello");
            InetSocketAddress address = new InetSocketAddress("localhost", 9999);
            channel.send(buffer, address);
        } catch (Exception e) {
            e.printStackTrace();
        }
    }
}
接下来服务器端输出
         +-------------------------------------------------+
         |  0  1  2  3  4  5  6  7  8  9  a  b  c  d  e  f |
+--------+-------------------------------------------------+----------------+
|00000000| 68 65 6c 6c 6f                                  |hello           |
+--------+-------------------------------------------------+----------------+
5. NIO vs BIO
5.2 IO 模型
同步阻塞、同步非阻塞、同步多路复用、异步阻塞(没有此情况)、异步非阻塞
- 同步:线程自己去获取结果(一个线程)
- 异步:线程自己不去获取结果,而是由其它线程送结果(至少两个线程)
当调用一次 channel.read 或 stream.read 后,会切换至操作系统内核态来完成真正数据读取,而读取又分为两个阶段,分别为:
-
等待数据阶段
-
复制数据阶段

-
阻塞 IO

-
非阻塞 IO

-
多路复用

-
信号驱动
-
异步 IO

-
阻塞 IO vs 多路复用


5.3 零拷贝
传统 IO 问题
传统的 IO 将一个文件通过 socket 写出
File f = new File("helloword/data.txt");
RandomAccessFile file = new RandomAccessFile(file, "r");

byte[] buf = new byte[(int)f.length()];
file.read(buf);

Socket socket = ...;
socket.getOutputStream().write(buf);
内部工作流程是这样的:

- java 本身并不具备 IO 读写能力,因此 read 方法调用后,要从 java 程序的用户态切换至内核态,去调用操作系统(Kernel)的读能力,将数据读入内核缓冲区。这期间用户线程阻塞,操作系统使用 DMA(Direct Memory Access)来实现文件读,其间也不会使用 cpu
DMA 也可以理解为硬件单元,用来解放 cpu 完成文件 IO
-
从内核态切换回用户态,将数据从内核缓冲区读入用户缓冲区(即 byte[] buf),这期间 cpu 会参与拷贝,无法利用 DMA
-
调用 write 方法,这时将数据从用户缓冲区(byte[] buf)写入 socket 缓冲区,cpu 会参与拷贝
-
接下来要向网卡写数据,这项能力 java 又不具备,因此又得从用户态切换至内核态,调用操作系统的写能力,使用 DMA 将 socket 缓冲区的数据写入网卡,不会使用 cpu
可以看到中间环节较多,java 的 IO 实际不是物理设备级别的读写,而是缓存的复制,底层的真正读写是操作系统来完成的
- 用户态与内核态的切换发生了 3 次,这个操作比较重量级
- 数据拷贝了共 4 次
NIO 优化
通过 DirectByteBuf
-
ByteBuffer.allocate(10) HeapByteBuffer 使用的还是 java 内存
-
ByteBuffer.allocateDirect(10) DirectByteBuffer 使用的是操作系统内存

大部分步骤与优化前相同,不再赘述。唯有一点:java 可以使用 DirectByteBuf 将堆外内存映射到 jvm 内存中来直接访问使用 -
这块内存不受 jvm 垃圾回收的影响,因此内存地址固定,有助于 IO 读写
-
java 中的 DirectByteBuf 对象仅维护了此内存的虚引用,内存回收分成两步
- DirectByteBuf 对象被垃圾回收,将虚引用加入引用队列
- 通过专门线程访问引用队列,根据虚引用释放堆外内存
-
减少了一次数据拷贝,用户态与内核态的切换次数没有减少
进一步优化(底层采用了 linux 2.1 后提供的 sendFile 方法),java 中对应着两个 channel 调用 transferTo/transferFrom 方法拷贝数据

- java 调用 transferTo 方法后,要从 java 程序的用户态切换至内核态,使用 DMA将数据读入内核缓冲区,不会使用 cpu
- 数据从内核缓冲区传输到 socket 缓冲区,cpu 会参与拷贝
- 最后使用 DMA 将 socket 缓冲区的数据写入网卡,不会使用 cpu
可以看到
- 只发生了一次用户态与内核态的切换
- 数据拷贝了 3 次
进一步优化(linux 2.4)

- java 调用 transferTo 方法后,要从 java 程序的用户态切换至内核态,使用 DMA将数据读入内核缓冲区,不会使用 cpu
- 只会将一些 offset 和 length 信息拷入 socket 缓冲区,几乎无消耗
- 使用 DMA 将 内核缓冲区的数据写入网卡,不会使用 cpu
整个过程仅只发生了一次用户态与内核态的切换,数据拷贝了 2 次。所谓的【零拷贝】,并不是真正无拷贝,而是在不会拷贝重复数据到 jvm 内存中,零拷贝的优点有
- 更少的用户态与内核态的切换
- 不利用 cpu 计算,减少 cpu 缓存伪共享
- 零拷贝适合小文件传输
5.3 AIO
AIO 用来解决数据复制阶段的阻塞问题
- 同步意味着,在进行读写操作时,线程需要等待结果,还是相当于闲置
- 异步意味着,在进行读写操作时,线程不必等待结果,而是将来由操作系统来通过回调方式由另外的线程来获得结果
异步模型需要底层操作系统(Kernel)提供支持
- Windows 系统通过 IOCP 实现了真正的异步 IO
- Linux 系统异步 IO 在 2.6 版本引入,但其底层实现还是用多路复用模拟了异步 IO,性能没有优势
文件 AIO
先来看看 AsynchronousFileChannel
@Slf4j
public class AioDemo1 {
    public static void main(String[] args) throws IOException {
        try{
            AsynchronousFileChannel s =
                AsynchronousFileChannel.open(
                	Paths.get("1.txt"), StandardOpenOption.READ);
            ByteBuffer buffer = ByteBuffer.allocate(2);
            log.debug("begin...");
            s.read(buffer, 0, null, new CompletionHandler<Integer, ByteBuffer>() {
                @Override
                public void completed(Integer result, ByteBuffer attachment) {
                    log.debug("read completed...{}", result);
                    buffer.flip();
                    debug(buffer);
                }

                @Override
                public void failed(Throwable exc, ByteBuffer attachment) {
                    log.debug("read failed...");
                }
            });

        } catch (IOException e) {
            e.printStackTrace();
        }
        log.debug("do other things...");
        System.in.read();
    }
}
输出
13:44:56 [DEBUG] [main] c.i.aio.AioDemo1 - begin...
13:44:56 [DEBUG] [main] c.i.aio.AioDemo1 - do other things...
13:44:56 [DEBUG] [Thread-5] c.i.aio.AioDemo1 - read completed...2
         +-------------------------------------------------+
         |  0  1  2  3  4  5  6  7  8  9  a  b  c  d  e  f |
+--------+-------------------------------------------------+----------------+
|00000000| 61 0d                                           |a.              |
+--------+-------------------------------------------------+----------------+
可以看到
- 响应文件读取成功的是另一个线程 Thread-5
- 主线程并没有 IO 操作阻塞
💡 守护线程
默认文件 AIO 使用的线程都是守护线程,所以最后要执行 System.in.read() 以避免守护线程意外结束
网络 AIO
public class AioServer {
    public static void main(String[] args) throws IOException {
        AsynchronousServerSocketChannel ssc = AsynchronousServerSocketChannel.open();
        ssc.bind(new InetSocketAddress(8080));
        ssc.accept(null, new AcceptHandler(ssc));
        System.in.read();
    }

    private static void closeChannel(AsynchronousSocketChannel sc) {
        try {
            System.out.printf("[%s] %s close\n", Thread.currentThread().getName(), sc.getRemoteAddress());
            sc.close();
        } catch (IOException e) {
            e.printStackTrace();
        }
    }

    private static class ReadHandler implements CompletionHandler<Integer, ByteBuffer> {
        private final AsynchronousSocketChannel sc;

        public ReadHandler(AsynchronousSocketChannel sc) {
            this.sc = sc;
        }

        @Override
        public void completed(Integer result, ByteBuffer attachment) {
            try {
                if (result == -1) {
                    closeChannel(sc);
                    return;
                }
                System.out.printf("[%s] %s read\n", Thread.currentThread().getName(), sc.getRemoteAddress());
                attachment.flip();
                System.out.println(Charset.defaultCharset().decode(attachment));
                attachment.clear();
                // 处理完第一个 read 时,需要再次调用 read 方法来处理下一个 read 事件
                sc.read(attachment, attachment, this);
            } catch (IOException e) {
                e.printStackTrace();
            }
        }

        @Override
        public void failed(Throwable exc, ByteBuffer attachment) {
            closeChannel(sc);
            exc.printStackTrace();
        }
    }

    private static class WriteHandler implements CompletionHandler<Integer, ByteBuffer> {
        private final AsynchronousSocketChannel sc;

        private WriteHandler(AsynchronousSocketChannel sc) {
            this.sc = sc;
        }

        @Override
        public void completed(Integer result, ByteBuffer attachment) {
            // 如果作为附件的 buffer 还有内容,需要再次 write 写出剩余内容
            if (attachment.hasRemaining()) {
                sc.write(attachment);
            }
        }

        @Override
        public void failed(Throwable exc, ByteBuffer attachment) {
            exc.printStackTrace();
            closeChannel(sc);
        }
    }

    private static class AcceptHandler implements CompletionHandler<AsynchronousSocketChannel, Object> {
        private final AsynchronousServerSocketChannel ssc;

        public AcceptHandler(AsynchronousServerSocketChannel ssc) {
            this.ssc = ssc;
        }

        @Override
        public void completed(AsynchronousSocketChannel sc, Object attachment) {
            try {
                System.out.printf("[%s] %s connected\n", Thread.currentThread().getName(), sc.getRemoteAddress());
            } catch (IOException e) {
                e.printStackTrace();
            }
            ByteBuffer buffer = ByteBuffer.allocate(16);
            // 读事件由 ReadHandler 处理
            sc.read(buffer, buffer, new ReadHandler(sc));
            // 写事件由 WriteHandler 处理
            sc.write(Charset.defaultCharset().encode("server hello!"), ByteBuffer.allocate(16), new WriteHandler(sc));
            // 处理完第一个 accpet 时,需要再次调用 accept 方法来处理下一个 accept 事件
            ssc.accept(null, this);
        }

        @Override
        public void failed(Throwable exc, Object attachment) {
            exc.printStackTrace();
        }
    }
}
二. Netty 入门
1. 概述
1.1 Netty 是什么?
Netty is an asynchronous event-driven network application framework
for rapid development of maintainable high performance protocol servers & clients.
Netty 是一个异步的、基于事件驱动的网络应用框架,用于快速开发可维护、高性能的网络服务器和客户端
1.2 Netty 的作者

1.3 Netty 的地位
Netty 在 Java 网络应用框架中的地位就好比:Spring 框架在 JavaEE 开发中的地位
以下的框架都使用了 Netty,因为它们有网络通信需求!
- Cassandra - nosql 数据库
- Spark - 大数据分布式计算框架
- Hadoop - 大数据分布式存储框架
- RocketMQ - ali 开源的消息队列
- ElasticSearch - 搜索引擎
- gRPC - rpc 框架
- Dubbo - rpc 框架
- Spring 5.x - flux api 完全抛弃了 tomcat ,使用 netty 作为服务器端
- Zookeeper - 分布式协调框架
1.4 Netty 的优势
- Netty vs NIO,NIO 工作量大,bug 多
- 需要自己构建协议
- 解决 TCP 传输问题,如粘包、半包
- epoll 空轮询导致 CPU 100%
- 对 API 进行增强,使之更易用,如 FastThreadLocal => ThreadLocal,ByteBuf => ByteBuffer
- Netty vs 其它网络应用框架
- Mina 由 apache 维护,将来 3.x 版本可能会有较大重构,破坏 API 向下兼容性,Netty 的开发迭代更迅速,API 更简洁、文档更优秀
- 久经考验,16年,Netty 版本
- 2.x 2004
- 3.x 2008
- 4.x 2013
- 5.x 已废弃(没有明显的性能提升,维护成本高)
2. Hello World
2.1 目标
开发一个简单的服务器端和客户端
- 客户端向服务器端发送 hello, world
- 服务器仅接收,不返回
加入依赖
<dependency>
    <groupId>io.netty</groupId>
    <artifactId>netty-all</artifactId>
    <version>4.1.39.Final</version>
</dependency>
2.2 服务器端
public class HelloServer {
    public static void main(String[] args) {
        //1.启动器,负责组装netty组件,协调组件之间的工作。启动服务器
        new ServerBootstrap()
                //2.BossEventLoop WorkerEventLoop(selector,thread)
                //作用:包含selector,检测io事件(可连接,可读,可写事件)
                // 一个线程加上一个 selector就是一个EventLoop
                .group(new NioEventLoopGroup())
                //3.选择服务器ServerSocketChannel实现
                .channel(NioServerSocketChannel.class)//OIO  BIO   Epoll
                //4.boss负责处理连接  worker(child)负责处理读写事件
                //决定了worker(child)能执行哪些操作(handler)
                .childHandler(
                        //5.Channel  代表了客户端数据读写的通道   Initializer  初始化 负责添加别的handler
                        new ChannelInitializer<NioSocketChannel>() {
                    @Override
                    protected void initChannel(NioSocketChannel nioSocketChannel) throws Exception {
                        //6.添加具体的handler
                        nioSocketChannel.pipeline().addLast(new StringDecoder());//将byteBuf转为字符串
                        nioSocketChannel.pipeline().addLast(new ChannelInboundHandlerAdapter(){//自定义的业务处理类(handler)
                            @Override  //读事件
                            public void channelRead(ChannelHandlerContext ctx, Object msg) throws Exception {
                                //打印上一步转换的字符串
                                log.info("msg:{}",msg);
                                System.out.println(msg.toString());
                            }
                        });
                    }
                })
                .bind(8888);//7.绑定的监听端口
    }
}

代码解读
-
1 处,创建 NioEventLoopGroup,可以简单理解为
线程池 + Selector后面会详细展开 -
2 处,选择服务 Scoket 实现类,其中 NioServerSocketChannel 表示基于 NIO 的服务器端实现,其它实现还有

-
3 处,为啥方法叫 childHandler,是接下来添加的处理器都是给 SocketChannel 用的,而不是给 ServerSocketChannel。ChannelInitializer 处理器(仅执行一次),它的作用是待客户端 SocketChannel 建立连接后,执行 initChannel 以便添加更多的处理器
-
4 处,ServerSocketChannel 绑定的监听端口
-
5 处,SocketChannel 的处理器,解码 ByteBuf => String
-
6 处,SocketChannel 的业务处理器,使用上一个处理器的处理结果
2.3 客户端
public class HelloClient {
    public static void main(String[] args) throws InterruptedException {
        //1.启动类
        new Bootstrap()
                //2.添加 EventLoop
                .group(new NioEventLoopGroup())
                //3.选择客户端 channel 实现
                .channel(NioSocketChannel.class)
                //4.添加处理器
                .handler(new ChannelInitializer<NioSocketChannel>() {
                    @Override  //在连接建立后
                    protected void initChannel(NioSocketChannel nioSocketChannel) throws Exception {
                        nioSocketChannel.pipeline().addLast(new StringEncoder());
                    }
                })
                //5.连接服务器
                .connect(new InetSocketAddress("127.0.0.1",8888))
                .sync()
                .channel()
                //6.向服务器发送数据
                .writeAndFlush("hello world");
    }
}

代码解读
-
1 处,创建 NioEventLoopGroup,同 Server
-
2 处,选择客户 Socket 实现类,NioSocketChannel 表示基于 NIO 的客户端实现,其它实现还有
-
3 处,添加 SocketChannel 的处理器,ChannelInitializer 处理器(仅执行一次),它的作用是待客户端 SocketChannel 建立连接后,执行 initChannel 以便添加更多的处理器
-
4 处,指定要连接的服务器和端口
-
5 处,Netty 中很多方法都是异步的,如 connect,这时需要使用 sync 方法等待 connect 建立连接完毕
-
6 处,获取 channel 对象,它即为通道抽象,可以进行数据读写操作
-
7 处,写入消息并清空缓冲区
-
8 处,消息会经过通道 handler 处理,这里是将 String => ByteBuf 发出
-
数据经过网络传输,到达服务器端,服务器端 5 和 6 处的 handler 先后被触发,走完一个流程
效果


2.4 流程梳理


💡 提示
一开始需要树立正确的观念
- 把 channel 理解为数据的通道
- 把 msg 理解为流动的数据,最开始输入是 ByteBuf,但经过 pipeline 的加工,会变成其它类型对象,最后输出又变成 ByteBuf
- 把 handler 理解为数据的处理工序
- 工序有多道,合在一起就是 pipeline,pipeline 负责发布事件(读、读取完成…)传播给每个 handler, handler 对自己感兴趣的事件进行处理(重写了相应事件处理方法)
- handler 分 Inbound (入站)和 Outbound(出站) 两类
- 把 eventLoop 理解为处理数据的工人
- 工人可以管理多个 channel 的 io 操作,并且一旦工人负责了某个 channel,就要负责到底(绑定)
- 工人既可以执行 io 操作,也可以进行任务处理,每位工人有任务队列,队列里可以堆放多个 channel 的待处理任务,任务分为普通任务、定时任务
- 工人按照 pipeline 顺序,依次按照 handler 的规划(代码)处理数据,可以为每道工序指定不同的工人
3. 组件
3.1 EventLoop
事件循环对象
EventLoop 本质是一个单线程执行器(一个线程同时维护了一个 Selector),里面有 run 方法处理 Channel 上源源不断的 io 事件。
它的继承关系比较复杂
- 一条线是继承自 j.u.c.ScheduledExecutorService 因此包含了线程池中所有的方法
- 另一条线是继承自 netty 自己的 OrderedEventExecutor,
- 提供了 boolean inEventLoop(Thread thread) 方法判断一个线程是否属于此 EventLoop
- 提供了 parent 方法来看看自己属于哪个 EventLoopGroup
事件循环组
EventLoopGroup 是一组 EventLoop,Channel 一般会调用 EventLoopGroup 的 register 方法来绑定其中一个 EventLoop,后续这个 Channel 上的 io 事件都由此 EventLoop 来处理(保证了 io 事件处理时的线程安全)
- 继承自 netty 自己的 EventExecutorGroup
- 实现了 Iterable 接口提供遍历 EventLoop 的能力
- 另有 next 方法获取集合中下一个 EventLoop
以一个简单的实现为例:
@Slf4j
public class TestEventLoop {
    public static void main(String[] args) {
        //1. 创建事件循环组
        EventLoopGroup group = new NioEventLoopGroup();// io事件,普通任务,定时任务
//        EventLoopGroup eventExecutors = new DefaultEventLoopGroup();//普通任务,定时任务
        //2.获取下一个事件循环对象
//        System.out.println(group.next());
//        System.out.println(group.next());
//        System.out.println(group.next());

        //3.执行普通任务
        group.next().submit(()->{    //execute()也可以
            try {
                Thread.sleep(1000);
            } catch (InterruptedException e) {
                e.printStackTrace();
            }
            log.info("yes");
        });

        //4.执行定时任务
        group.next().scheduleAtFixedRate(()->{
            log.info("ok");
        },1,1, TimeUnit.SECONDS);

        log.info("main");
    }
}
💡 优雅关闭
优雅关闭 shutdownGracefully 方法。该方法会首先切换 EventLoopGroup 到关闭状态从而拒绝新的任务的加入,然后在任务队列的任务都处理完成后,停止线程的运行。从而确保整体应用是在正常有序的状态下退出的
演示 NioEventLoop 处理 io 事件
public class EventLoopServer {
    public static void main(String[] args) {
        new ServerBootstrap()
                .group(new NioEventLoopGroup())
                .channel(NioServerSocketChannel.class)
                .childHandler(new ChannelInitializer<NioSocketChannel>() {
                    //连接建立后被调用
                    @Override
                    protected void initChannel(NioSocketChannel nioSocketChannel) throws Exception {
                        nioSocketChannel.pipeline().addLast(new ChannelInboundHandlerAdapter(){
                            @Override
                            public void channelRead(ChannelHandlerContext ctx, Object msg) throws Exception {
                                ByteBuf buf = (ByteBuf) msg;
                                System.out.println(buf.toString(Charset.defaultCharset()));

                            }
                        });

                    }
                }).bind(8888);
    }
}
public class EventLoopClient {
    public static void main(String[] args) throws InterruptedException {
        //1.启动类
        Channel channel = new Bootstrap()
                //2.添加 EventLoop
                .group(new NioEventLoopGroup())
                //3.选择客户端 channel 实现
                .channel(NioSocketChannel.class)
                //4.添加处理器
                .handler(new ChannelInitializer<NioSocketChannel>() {
                    @Override  //在连接建立后
                    protected void initChannel(NioSocketChannel nioSocketChannel) throws Exception {
                        nioSocketChannel.pipeline().addLast(new StringEncoder());
                    }
                })
                //5.连接服务器
                .connect(new InetSocketAddress("127.0.0.1", 8888))
                .sync()
                .channel();

                //6.向服务器发送数据
        System.out.println(channel);
        System.out.println("");
        channel.writeAndFlush("hello world");
        channel.writeAndFlush("hello world");
    }
}
改进后
服务器端两个 nio worker 工人
public class EventLoopServer {
    public static void main(String[] args) {
        //细分2:创建一个独立的EventLoopGroup
        EventLoopGroup group = new DefaultEventLoopGroup();

        new ServerBootstrap()
                //boss 和 worker
                //细节1: boss  只负责  ServerSocketChannel上 accept 事件
                .group(new NioEventLoopGroup(),new NioEventLoopGroup(2))
                .channel(NioServerSocketChannel.class)
                .childHandler(new ChannelInitializer<NioSocketChannel>() {
                    //连接建立后被调用
                    @Override
                    protected void initChannel(NioSocketChannel nioSocketChannel) throws Exception {
                        nioSocketChannel.pipeline().addLast("handler-1",new ChannelInboundHandlerAdapter(){
                            @Override
                            public void channelRead(ChannelHandlerContext ctx, Object msg) throws Exception {
                                ByteBuf buf = (ByteBuf) msg;
                                System.out.println(buf.toString(Charset.defaultCharset()));
                                ctx.fireChannelRead(msg);//将消息传递给下一个handler
                            }
                        }).addLast(group,"handler-2",new ChannelInboundHandlerAdapter(){
                            @Override
                            public void channelRead(ChannelHandlerContext ctx, Object msg) throws Exception {
                                ByteBuf buf = (ByteBuf) msg;
                                System.out.println(buf.toString(Charset.defaultCharset()));
                            }
                        })
                        ;

                    }
                }).bind(8888);
    }
}
最后输出

可以看到,nio 工人和 非 nio 工人也分别绑定了 channel(LoggingHandler 由 nio 工人执行,而我们自己的 handler 由非 nio 工人执行)

💡 handler 执行中如何换人?
关键代码 io.netty.channel.AbstractChannelHandlerContext#invokeChannelRead()

static void invokeChannelRead(final AbstractChannelHandlerContext next, Object msg) {
    final Object m = next.pipeline.touch(ObjectUtil.checkNotNull(msg, "msg"), next);
    // 下一个 handler 的事件循环是否与当前的事件循环是同一个线程
    EventExecutor executor = next.executor();

    // 是,直接调用
    if (executor.inEventLoop()) {
        next.invokeChannelRead(m);
    }
    // 不是,将要执行的代码作为任务提交给下一个事件循环处理(换人)
    else {
        executor.execute(new Runnable() {
            @Override
            public void run() {
                next.invokeChannelRead(m);
            }
        });
    }
}
- 如果两个 handler 绑定的是同一个线程,那么就直接调用
- 否则,把要调用的代码封装为一个任务对象,由下一个 handler 的线程来调用
3.2 Channel
channel 的主要作用
- close() 可以用来关闭 channel
- closeFuture() 用来处理 channel 的关闭
- sync 方法作用是同步等待 channel 关闭
- 而 addListener 方法是异步等待 channel 关闭
- pipeline() 方法添加处理器
- write() 方法将数据写入
- writeAndFlush() 方法将数据写入并刷出
ChannelFuture
这时刚才的客户端代码
new Bootstrap()
    .group(new NioEventLoopGroup())
    .channel(NioSocketChannel.class)
    .handler(new ChannelInitializer<Channel>() {
        @Override
        protected void initChannel(Channel ch) {
            ch.pipeline().addLast(new StringEncoder());
        }
    })
    .connect("127.0.0.1", 8080)
    .sync()
    .channel()
    .writeAndFlush(new Date() + ": hello world!");
现在把它拆开来看
ChannelFuture channelFuture = new Bootstrap()
    .group(new NioEventLoopGroup())
    .channel(NioSocketChannel.class)
    .handler(new ChannelInitializer<Channel>() {
        @Override
        protected void initChannel(Channel ch) {
            ch.pipeline().addLast(new StringEncoder());
        }
    })
    .connect("127.0.0.1", 8080); // 1

channelFuture.sync().channel().writeAndFlush(new Date() + ": hello world!");
- 1 处返回的是 ChannelFuture 对象,它的作用是利用 channel() 方法来获取 Channel 对象
注意 connect 方法是异步的,意味着不等连接建立,方法执行就返回了。因此 channelFuture 对象中不能【立刻】获得到正确的 Channel 对象
实验如下:
ChannelFuture channelFuture = new Bootstrap()
    .group(new NioEventLoopGroup())
    .channel(NioSocketChannel.class)
    .handler(new ChannelInitializer<Channel>() {
        @Override
        protected void initChannel(Channel ch) {
            ch.pipeline().addLast(new StringEncoder());
        }
    })
    .connect("127.0.0.1", 8080);

System.out.println(channelFuture.channel()); // 1
channelFuture.sync(); // 2
System.out.println(channelFuture.channel()); // 3
- 执行到 1 时,连接未建立,打印
[id: 0x2e1884dd] - 执行到 2 时,sync 方法是同步等待连接建立完成
- 执行到 3 时,连接肯定建立了,打印
[id: 0x2e1884dd, L:/127.0.0.1:57191 - R:/127.0.0.1:8080]
除了用 sync 方法可以让异步操作同步以外,还可以使用回调的方式:
ChannelFuture channelFuture = new Bootstrap()
    .group(new NioEventLoopGroup())
    .channel(NioSocketChannel.class)
    .handler(new ChannelInitializer<Channel>() {
        @Override
        protected void initChannel(Channel ch) {
            ch.pipeline().addLast(new StringEncoder());
        }
    })
    .connect("127.0.0.1", 8080);
	System.out.println(channelFuture.channel()); // 1

		//使用addListener(回调对象)方法异步处理结果
        channelFuture.addListener(new ChannelFutureListener() {
            @Override
            //在nio线程连接建立好之后,会调用operationComplete
            public void operationComplete(ChannelFuture channelFuture) throws Exception {
                Channel channel = channelFuture.channel();
                channel.writeAndFlush("hello,world");
            }
        });
- 执行到 1 时,连接未建立,打印
[id: 0x749124ba] - ChannelFutureListener 会在连接建立时被调用(其中 operationComplete 方法),因此执行到 2 时,连接肯定建立了,打印
[id: 0x749124ba, L:/127.0.0.1:57351 - R:/127.0.0.1:8080]
CloseFuture
@Slf4j
public class CloseFutureClient {
    public static void main(String[] args) throws InterruptedException {
        NioEventLoopGroup group = new NioEventLoopGroup(1);
        ChannelFuture channelFuture = new Bootstrap()
                .group(group)
                .channel(NioSocketChannel.class)
                .handler(new ChannelInitializer<NioSocketChannel>() {
                    @Override
                    protected void initChannel(NioSocketChannel nioSocketChannel) throws Exception {
                        nioSocketChannel.pipeline().addLast(new StringEncoder());
                    }
                })
                .connect(new InetSocketAddress("127.0.0.1", 8888));
        Channel channel = channelFuture.sync().channel();

        log.info("{}",channel);

        new Thread(()->{
            Scanner scanner = new Scanner(System.in);
            while (true) {
                log.info("请输入");
                String line = scanner.nextLine();
                if (line.equals("quit")) {
                    channel.close();
                    break;
                }
                channel.writeAndFlush(line);
            }
        }).start();

        ChannelFuture closeFuture = channel.closeFuture();
        // 获取 CloseFuture 对象, 1) 同步处理关闭, 2) 异步处理关闭
        //处理关闭方式1
//        System.out.println("waiting close...");
//        closeFuture.sync();
//        log.info("处理关闭之后的操作");

        //处理关闭方式2
        closeFuture.addListener(new ChannelFutureListener() {
            @Override
            public void operationComplete(ChannelFuture channelFuture) throws Exception {
                log.info("处理关闭之后的操作");
                group.shutdownGracefully();
            }
        });
    }
}
💡 异步提升的是什么
-
有些同学看到这里会有疑问:为什么不在一个线程中去执行建立连接、去执行关闭 channel,那样不是也可以吗?非要用这么复杂的异步方式:比如一个线程发起建立连接,另一个线程去真正建立连接
-
还有同学会笼统地回答,因为 netty 异步方式用了多线程、多线程就效率高。其实这些认识都比较片面,多线程和异步所提升的效率并不是所认为的
思考下面的场景,4 个医生给人看病,每个病人花费 20 分钟,而且医生看病的过程中是以病人为单位的,一个病人看完了,才能看下一个病人。假设病人源源不断地来,可以计算一下 4 个医生一天工作 8 小时,处理的病人总数是:4 * 8 * 3 = 96

经研究发现,看病可以细分为四个步骤,经拆分后每个步骤需要 5 分钟,如下

因此可以做如下优化,只有一开始,医生 2、3、4 分别要等待 5、10、15 分钟才能执行工作,但只要后续病人源源不断地来,他们就能够满负荷工作,并且处理病人的能力提高到了 4 * 8 * 12 效率几乎是原来的四倍

要点
- 单线程没法异步提高效率,必须配合多线程、多核 cpu 才能发挥异步的优势
- 异步并没有缩短响应时间,反而有所增加
- 合理进行任务拆分,也是利用异步的关键
3.3 Future & Promise
在异步处理时,经常用到这两个接口
首先要说明 netty 中的 Future 与 jdk 中的 Future 同名,但是是两个接口,netty 的 Future 继承自 jdk 的 Future,而 Promise 又对 netty Future 进行了扩展
- jdk Future 只能同步等待任务结束(或成功、或失败)才能得到结果
- netty Future 可以同步等待任务结束得到结果,也可以异步方式得到结果,但都是要等任务结束
- netty Promise 不仅有 netty Future 的功能,而且脱离了任务独立存在,只作为两个线程间传递结果的容器
| 功能/名称 | jdk Future | netty Future | Promise |
|---|---|---|---|
| cancel | 取消任务 | - | - |
| isCanceled | 任务是否取消 | - | - |
| isDone | 任务是否完成,不能区分成功失败 | - | - |
| get | 获取任务结果,阻塞等待 | - | - |
| getNow | - | 获取任务结果,非阻塞,还未产生结果时返回 null | - |
| await | - | 等待任务结束,如果任务失败,不会抛异常,而是通过 isSuccess 判断 | - |
| sync | - | 等待任务结束,如果任务失败,抛出异常 | - |
| isSuccess | - | 判断任务是否成功 | - |
| cause | - | 获取失败信息,非阻塞,如果没有失败,返回null | - |
| addLinstener | - | 添加回调,异步接收结果 | - |
| setSuccess | - | - | 设置成功结果 |
| setFailure | - | - | 设置失败结果 |
例1
JDKFuture
public class TestJdkFuture {
    public static void main(String[] args) throws ExecutionException, InterruptedException {
        ExecutorService service = Executors.newFixedThreadPool(2);
        Future<Integer> future = service.submit(new Callable<Integer>() {
            @Override
            public Integer call() throws Exception {
                Thread.sleep(1000);
                return 50;
            }
        });
        System.out.println("结果是:"+future.get());
    }
}
NettyFuture
public class TestNettyFuture {
    public static void main(String[] args) throws ExecutionException, InterruptedException {
        NioEventLoopGroup group = new NioEventLoopGroup();
        EventLoop eventLoop = group.next();
        Future<Integer> future = eventLoop.submit(new Callable<Integer>() {
            @Override
            public Integer call() throws Exception {
                return 100;
            }
        });
        //同步获取结果
        System.out.println("结果是:"+future.get());
        //异步获取结果
        future.addListener(new GenericFutureListener<Future<? super Integer>>() {
            @Override
            public void operationComplete(Future<? super Integer> future) throws Exception {
                System.out.println("接收结果:"+future.getNow());
                System.out.println("接收结果:"+future.get());
            }
        });
    }
}
Promise
public class TestNettyPromise {
    public static void main(String[] args) throws Exception {
        //1.准备EventLoop 对象
        EventLoop group = new NioEventLoopGroup().next();
        //2.可以主动创建promise,结果容器
        DefaultPromise<Integer> promise = new DefaultPromise<>(group);

        new Thread(()->{
            //3.任意一个线程执行计算,计算完毕后向promise填充结果
            System.out.println("开始计算...");
            try {
                Thread.sleep(1000);
//                int i = 1/0;
                promise.setSuccess(200);// 任务成功
            } catch (InterruptedException e) {
                promise.setFailure(e);
            }
        }).start();
        System.out.println("等待结果...");
        System.out.println("结果是" + promise.get());
    }
}
3.4 Handler & Pipeline
ChannelHandler 用来处理 Channel 上的各种事件,分为入站、出站两种。所有 ChannelHandler 被连成一串,就是 Pipeline
- 入站处理器通常是 ChannelInboundHandlerAdapter 的子类,主要用来读取客户端数据,写回结果
- 出站处理器通常是 ChannelOutboundHandlerAdapter 的子类,主要对写回结果进行加工
打个比喻,每个 Channel 是一个产品的加工车间,Pipeline 是车间中的流水线,ChannelHandler 就是流水线上的各道工序,而后面要讲的 ByteBuf 是原材料,经过很多工序的加工:先经过一道道入站工序,再经过一道道出站工序最终变成产品
先搞清楚顺序,服务端
public static void main(String[] args) {
        new ServerBootstrap()
                .group(new NioEventLoopGroup())
                .channel(NioServerSocketChannel.class)
                .childHandler(new ChannelInitializer<NioSocketChannel>() {
                    @Override
                    protected void initChannel(NioSocketChannel nioSocketChannel) throws Exception {
                        //1.通过channel拿到pipeline
                        ChannelPipeline pipeline = nioSocketChannel.pipeline();
                        //2.添加处理器
                        //head ---> handler1 ---> handler2 ---> handler3 ---> handler4 ---> handler5 ---> handler6 ---> tail
                        pipeline.addLast("handler1",new ChannelInboundHandlerAdapter(){
                            @Override
                            public void channelRead(ChannelHandlerContext ctx, Object msg) throws Exception {
                                System.out.println("1");
                                ByteBuf byteBuf = (ByteBuf) msg;
                                String str = byteBuf.toString(Charset.defaultCharset());
                                super.channelRead(ctx, str);  //从handler1中传递到 handler2 的msg中 作为入参,以此类推
                            }
                        });
                        pipeline.addLast("handler2",new ChannelInboundHandlerAdapter(){
                            @Override
                            public void channelRead(ChannelHandlerContext ctx, Object msg) throws Exception {
                                System.out.println("2");
                                Student student = new Student(msg.toString());
                                //super.channelRead(ctx, student+":No:100");  //将数据传输给下一个handler,不调用调用链会断开
                                ctx.fireChannelRead(student+":No:100");//super.channelRead 底层的实现方式
                            }
                        });
                        pipeline.addLast("handler3",new ChannelInboundHandlerAdapter(){
                            @Override
                            public void channelRead(ChannelHandlerContext ctx, Object msg) throws Exception {
                                System.out.println("3");
                                System.out.println(msg);
                                System.out.println(msg.getClass());
                                super.channelRead(ctx, msg);
                                nioSocketChannel.writeAndFlush(ctx.alloc().buffer().writeBytes("server...".getBytes(StandardCharsets.UTF_8)));
                            }
                        });
                        pipeline.addLast("handler4",new ChannelOutboundHandlerAdapter(){
                            @Override
                            public void write(ChannelHandlerContext ctx, Object msg, ChannelPromise promise) throws Exception {
                                System.out.println("4");
                                super.write(ctx, msg, promise);
                            }
                        });
                        pipeline.addLast("handler5",new ChannelOutboundHandlerAdapter(){
                            @Override
                            public void write(ChannelHandlerContext ctx, Object msg, ChannelPromise promise) throws Exception {
                                System.out.println("5");
                                super.write(ctx, msg, promise);
                            }
                        });
                        pipeline.addLast("handler6",new ChannelOutboundHandlerAdapter(){
                            @Override
                            public void write(ChannelHandlerContext ctx, Object msg, ChannelPromise promise) throws Exception {
                                System.out.println("6");
                                super.write(ctx, msg, promise);
                            }
                        });

                    }
                }).bind(8888);

    }

    static class Student{
        private String name;

        public Student(String name) {
            this.name = name;
        }

        public String getName() {
            return name;
        }

        public void setName(String name) {
            this.name = name;
        }

        @Override
        public String toString() {
            return "Student{" +
                    "name='" + name + '\'' +
                    '}';
        }
    }
客户端
public static void main(String[] args) throws InterruptedException {
        NioEventLoopGroup group = new NioEventLoopGroup(1);
        ChannelFuture channelFuture = new Bootstrap()
                .group(group)
                .channel(NioSocketChannel.class)
                .handler(new ChannelInitializer<NioSocketChannel>() {
                    @Override
                    protected void initChannel(NioSocketChannel nioSocketChannel) throws Exception {
                        nioSocketChannel.pipeline().addLast(new StringEncoder());
                    }
                })
                .connect(new InetSocketAddress("127.0.0.1", 8888));
        Channel channel = channelFuture.sync().channel();

        log.info("{}",channel);

        new Thread(()->{
            Scanner scanner = new Scanner(System.in);
            while (true) {
                log.info("请输入");
                System.out.println("请输入");
                String line = scanner.nextLine();
                if (line.equals("quit")) {
                    channel.close();
                    break;
                }
                channel.writeAndFlush(line);
            }
        }).start();

        ChannelFuture closeFuture = channel.closeFuture();
        // 获取 CloseFuture 对象, 1) 同步处理关闭, 2) 异步处理关闭
        //处理关闭方式1
//        System.out.println("waiting close...");
//        closeFuture.sync();
//        log.info("处理关闭之后的操作");

        //处理关闭方式2
        closeFuture.addListener(new ChannelFutureListener() {
            @Override
            public void operationComplete(ChannelFuture channelFuture) throws Exception {
                log.info("处理关闭之后的操作");
                group.shutdownGracefully();
            }
        });
    }
服务器端打印:
1
2
3
6
5
4
可以看到,ChannelInboundHandlerAdapter 是按照 addLast 的顺序执行的,而 ChannelOutboundHandlerAdapter 是按照 addLast 的逆序执行的。ChannelPipeline 的实现是一个 ChannelHandlerContext(包装了 ChannelHandler) 组成的双向链表
可以看到,ChannelInboundHandlerAdapter 是按照 addLast 的顺序执行的,而 ChannelOutboundHandlerAdapter 是按照 addLast 的逆序执行的。ChannelPipeline 的实现是一个 ChannelHandlerContext(包装了 ChannelHandler) 组成的双向链表

- 入站处理器中,ctx.fireChannelRead(msg) 是 调用下一个入站处理器
- 如果注释掉 1 处代码,则仅会打印 1
- 如果注释掉 2 处代码,则仅会打印 1 2
- 3 处的 ctx.channel().write(msg) 会 从尾部开始触发 后续出站处理器的执行
- 如果注释掉 3 处代码,则仅会打印 1 2 3
- 类似的,出站处理器中,ctx.write(msg, promise) 的调用也会 触发上一个出站处理器
- 如果注释掉 6 处代码,则仅会打印 1 2 3 6
- ctx.channel().write(msg) vs ctx.write(msg)
- 都是触发出站处理器的执行
- ctx.channel().write(msg) 从尾部开始查找出站处理器
- ctx.write(msg) 是从当前节点找上一个出站处理器
- 3 处的 ctx.channel().write(msg) 如果改为 ctx.write(msg) 仅会打印 1 2 3,因为节点3 之前没有其它出站处理器了
- 6 处的 ctx.write(msg, promise) 如果改为 ctx.channel().write(msg) 会打印 1 2 3 6 6 6… 因为 ctx.channel().write() 是从尾部开始查找,结果又是节点6 自己
图1 - 服务端 pipeline 触发的原始流程,图中数字代表了处理步骤的先后次序

3.5 ByteBuf
是对字节数据的封装
1)创建
ByteBuf buffer = ByteBufAllocator.DEFAULT.buffer(10);
log(buffer);
上面代码创建了一个默认的 ByteBuf(池化基于直接内存的 ByteBuf),初始容量是 10
输出
read index:0 write index:0 capacity:10
其中 log 方法参考如下
private static void log(ByteBuf buffer) {
    int length = buffer.readableBytes();
    int rows = length / 16 + (length % 15 == 0 ? 0 : 1) + 4;
    StringBuilder buf = new StringBuilder(rows * 80 * 2)
        .append("read index:").append(buffer.readerIndex())
        .append(" write index:").append(buffer.writerIndex())
        .append(" capacity:").append(buffer.capacity())
        .append(NEWLINE);
    appendPrettyHexDump(buf, buffer);
    System.out.println(buf.toString());
}
2)直接内存 vs 堆内存
可以使用下面的代码来创建池化基于堆的 ByteBuf
ByteBuf buffer = ByteBufAllocator.DEFAULT.heapBuffer(10);
也可以使用下面的代码来创建池化基于直接内存的 ByteBuf
ByteBuf buffer = ByteBufAllocator.DEFAULT.directBuffer(10);
- 直接内存创建和销毁的代价昂贵,但读写性能高(少一次内存复制),适合配合池化功能一起用
- 直接内存对 GC 压力小,因为这部分内存不受 JVM 垃圾回收的管理,但也要注意及时主动释放
3)池化 vs 非池化
池化的最大意义在于可以重用 ByteBuf,优点有
- 没有池化,则每次都得创建新的 ByteBuf 实例,这个操作对直接内存代价昂贵,就算是堆内存,也会增加 GC 压力
- 有了池化,则可以重用池中 ByteBuf 实例,并且采用了与 jemalloc 类似的内存分配算法提升分配效率
- 高并发时,池化功能更节约内存,减少内存溢出的可能
池化功能是否开启,可以通过下面的系统环境变量来设置
-Dio.netty.allocator.type=pooled   //开启池化功能
-Dio.netty.allocator.type=unpooled //禁用池化功能
- 4.1 以后,非 Android 平台默认启用池化实现,Android 平台启用非池化实现
- 4.1 之前,池化功能还不成熟,默认是非池化实现
4)组成
ByteBuf 由四部分组成

最开始读写指针都在 0 位置
5)写入
方法列表,省略一些不重要的方法
| 方法签名 | 含义 | 备注 |
|---|---|---|
| writeBoolean(boolean value) | 写入 boolean 值 | 用一字节 01|00 代表 true|false |
| writeByte(int value) | 写入 byte 值 | |
| writeShort(int value) | 写入 short 值 | |
| writeInt(int value) | 写入 int 值 | Big Endian,即 0x250,写入后 00 00 02 50 |
| writeIntLE(int value) | 写入 int 值 | Little Endian,即 0x250,写入后 50 02 00 00 |
| writeLong(long value) | 写入 long 值 | |
| writeChar(int value) | 写入 char 值 | |
| writeFloat(float value) | 写入 float 值 | |
| writeDouble(double value) | 写入 double 值 | |
| writeBytes(ByteBuf src) | 写入 netty 的 ByteBuf | |
| writeBytes(byte[] src) | 写入 byte[] | |
| writeBytes(ByteBuffer src) | 写入 nio 的 ByteBuffer | |
| int writeCharSequence(CharSequence sequence, Charset charset) | 写入字符串 |
注意
- 这些方法的未指明返回值的,其返回值都是 ByteBuf,意味着可以链式调用
- 网络传输,默认习惯是 Big Endian
先写入 4 个字节
buffer.writeBytes(new byte[]{1, 2, 3, 4});
log(buffer);
结果是
read index:0 write index:4 capacity:10
         +-------------------------------------------------+
         |  0  1  2  3  4  5  6  7  8  9  a  b  c  d  e  f |
+--------+-------------------------------------------------+----------------+
|00000000| 01 02 03 04                                     |....            |
+--------+-------------------------------------------------+----------------+
再写入一个 int 整数,也是 4 个字节
buffer.writeInt(5);
log(buffer);
结果是
read index:0 write index:8 capacity:10
         +-------------------------------------------------+
         |  0  1  2  3  4  5  6  7  8  9  a  b  c  d  e  f |
+--------+-------------------------------------------------+----------------+
|00000000| 01 02 03 04 00 00 00 05                         |........        |
+--------+-------------------------------------------------+----------------+
还有一类方法是 set 开头的一系列方法,也可以写入数据,但不会改变写指针位置
6)扩容
再写入一个 int 整数时,容量不够了(初始容量是 10),这时会引发扩容
buffer.writeInt(6);
log(buffer);
扩容规则是
- 如何写入后数据大小
未超过 512,则选择下一个 16 的整数倍,例如写入后大小为 12 ,则扩容后 capacity 是 16 - 如果写入后数据大小
超过 512,则选择下一个 2^n,例如写入后大小为 513,则扩容后 capacity 是 210=1024(29=512 已经不够了) - 扩容不能超过 max capacity 会报错
结果是
read index:0 write index:12 capacity:16
         +-------------------------------------------------+
         |  0  1  2  3  4  5  6  7  8  9  a  b  c  d  e  f |
+--------+-------------------------------------------------+----------------+
|00000000| 01 02 03 04 00 00 00 05 00 00 00 06             |............    |
+--------+-------------------------------------------------+----------------+
7)读取
例如读了 4 次,每次一个字节
System.out.println(buffer.readByte());
System.out.println(buffer.readByte());
System.out.println(buffer.readByte());
System.out.println(buffer.readByte());
log(buffer);
读过的内容,就属于废弃部分了,再读只能读那些尚未读取的部分
1
2
3
4
read index:4 write index:12 capacity:16
         +-------------------------------------------------+
         |  0  1  2  3  4  5  6  7  8  9  a  b  c  d  e  f |
+--------+-------------------------------------------------+----------------+
|00000000| 00 00 00 05 00 00 00 06                         |........        |
+--------+-------------------------------------------------+----------------+
如果需要重复读取 int 整数 5,怎么办?
可以在 read 前先做个标记 mark
buffer.markReaderIndex();
System.out.println(buffer.readInt());
log(buffer);
结果
5
read index:8 write index:12 capacity:16
         +-------------------------------------------------+
         |  0  1  2  3  4  5  6  7  8  9  a  b  c  d  e  f |
+--------+-------------------------------------------------+----------------+
|00000000| 00 00 00 06                                     |....            |
+--------+-------------------------------------------------+----------------+
这时要重复读取的话,重置到标记位置 reset
buffer.resetReaderIndex();
log(buffer);
这时
read index:4 write index:12 capacity:16
         +-------------------------------------------------+
         |  0  1  2  3  4  5  6  7  8  9  a  b  c  d  e  f |
+--------+-------------------------------------------------+----------------+
|00000000| 00 00 00 05 00 00 00 06                         |........        |
+--------+-------------------------------------------------+----------------+
还有种办法是采用 get 开头的一系列方法,这些方法不会改变 read index
8)retain & release
由于 Netty 中有堆外内存的 ByteBuf 实现,堆外内存最好是手动来释放,而不是等 GC 垃圾回收。
- UnpooledHeapByteBuf 使用的是 JVM 内存,只需等 GC 回收内存即可
- UnpooledDirectByteBuf 使用的就是直接内存了,需要特殊的方法来回收内存
- PooledByteBuf 和它的子类使用了池化机制,需要更复杂的规则来回收内存
回收内存的源码实现,请关注下面方法的不同实现
protected abstract void deallocate()
Netty 这里采用了引用计数法来控制回收内存,每个 ByteBuf 都实现了 ReferenceCounted 接口
- 每个 ByteBuf 对象的初始计数为 1
- 调用 release 方法计数减 1,如果计数为 0,ByteBuf 内存被回收
- 调用 retain 方法计数加 1,表示调用者没用完之前,其它 handler 即使调用了 release 也不会造成回收
- 当计数为 0 时,底层内存会被回收,这时即使 ByteBuf 对象还在,其各个方法均无法正常使用
谁来负责 release 呢?
不是我们想象的(一般情况下)
ByteBuf buf = ...
try {
    ...
} finally {
    buf.release();
}
请思考,因为 pipeline 的存在,一般需要将 ByteBuf 传递给下一个 ChannelHandler,如果在 finally 中 release 了,就失去了传递性(当然,如果在这个 ChannelHandler 内这个 ByteBuf 已完成了它的使命,那么便无须再传递)
基本规则是,谁是最后使用者,谁负责 release,详细分析如下
- 起点,对于 NIO 实现来讲,在 io.netty.channel.nio.AbstractNioByteChannel.NioByteUnsafe#read 方法中首次创建 ByteBuf 放入 pipeline(line 163 pipeline.fireChannelRead(byteBuf))
- 入站 ByteBuf 处理原则
- 对原始 ByteBuf 不做处理,调用 ctx.fireChannelRead(msg) 向后传递,这时无须 release
- 将原始 ByteBuf 转换为其它类型的 Java 对象,这时 ByteBuf 就没用了,必须 release
- 如果不调用 ctx.fireChannelRead(msg) 向后传递,那么也必须 release
- 注意各种异常,如果 ByteBuf 没有成功传递到下一个 ChannelHandler,必须 release
- 假设消息一直向后传,那么 TailContext 会负责释放未处理消息(原始的 ByteBuf)
- 出站 ByteBuf 处理原则
- 出站消息最终都会转为 ByteBuf 输出,一直向前传,由 HeadContext flush 后 release
- 异常处理原则
- 有时候不清楚 ByteBuf 被引用了多少次,但又必须彻底释放,可以循环调用 release 直到返回 true
TailContext 释放未处理消息逻辑
// io.netty.channel.DefaultChannelPipeline#onUnhandledInboundMessage(java.lang.Object)
protected void onUnhandledInboundMessage(Object msg) {
    try {
        logger.debug(
            "Discarded inbound message {} that reached at the tail of the pipeline. " +
            "Please check your pipeline configuration.", msg);
    } finally {
        ReferenceCountUtil.release(msg);
    }
}
具体代码
// io.netty.util.ReferenceCountUtil#release(java.lang.Object)
public static boolean release(Object msg) {
    if (msg instanceof ReferenceCounted) {
        return ((ReferenceCounted) msg).release();
    }
    return false;
}
9)slice
【零拷贝】的体现之一,对原始 ByteBuf 进行切片成多个 ByteBuf,切片后的 ByteBuf 并没有发生内存复制,还是使用原始 ByteBuf 的内存,切片后的 ByteBuf 维护独立的 read,write 指针

例,原始 ByteBuf 进行一些初始操作
ByteBuf origin = ByteBufAllocator.DEFAULT.buffer(10);
origin.writeBytes(new byte[]{1, 2, 3, 4});
origin.readByte();
System.out.println(ByteBufUtil.prettyHexDump(origin));
输出
         +-------------------------------------------------+
         |  0  1  2  3  4  5  6  7  8  9  a  b  c  d  e  f |
+--------+-------------------------------------------------+----------------+
|00000000| 02 03 04                                        |...             |
+--------+-------------------------------------------------+----------------+
这时调用 slice 进行切片,无参 slice 是从原始 ByteBuf 的 read index 到 write index 之间的内容进行切片,切片后的 max capacity 被固定为这个区间的大小,因此不能追加 write
ByteBuf slice = origin.slice();
System.out.println(ByteBufUtil.prettyHexDump(slice));
// slice.writeByte(5); 如果执行,会报 IndexOutOfBoundsException 异常
输出
         +-------------------------------------------------+
         |  0  1  2  3  4  5  6  7  8  9  a  b  c  d  e  f |
+--------+-------------------------------------------------+----------------+
|00000000| 02 03 04                                        |...             |
+--------+-------------------------------------------------+----------------+
如果原始 ByteBuf 再次读操作(又读了一个字节)
origin.readByte();
System.out.println(ByteBufUtil.prettyHexDump(origin));
输出
         +-------------------------------------------------+
         |  0  1  2  3  4  5  6  7  8  9  a  b  c  d  e  f |
+--------+-------------------------------------------------+----------------+
|00000000| 03 04                                           |..              |
+--------+-------------------------------------------------+----------------+
这时的 slice 不受影响,因为它有独立的读写指针
System.out.println(ByteBufUtil.prettyHexDump(slice));
输出
         +-------------------------------------------------+
         |  0  1  2  3  4  5  6  7  8  9  a  b  c  d  e  f |
+--------+-------------------------------------------------+----------------+
|00000000| 02 03 04                                        |...             |
+--------+-------------------------------------------------+----------------+
如果 slice 的内容发生了更改
slice.setByte(2, 5);
System.out.println(ByteBufUtil.prettyHexDump(slice));
输出
         +-------------------------------------------------+
         |  0  1  2  3  4  5  6  7  8  9  a  b  c  d  e  f |
+--------+-------------------------------------------------+----------------+
|00000000| 02 03 05                                        |...             |
+--------+-------------------------------------------------+----------------+
这时,原始 ByteBuf 也会受影响,因为底层都是同一块内存
System.out.println(ByteBufUtil.prettyHexDump(origin));
输出
         +-------------------------------------------------+
         |  0  1  2  3  4  5  6  7  8  9  a  b  c  d  e  f |
+--------+-------------------------------------------------+----------------+
|00000000| 03 05                                           |..              |
+--------+-------------------------------------------------+----------------+
10)duplicate
【零拷贝】的体现之一,就好比截取了原始 ByteBuf 所有内容,并且没有 max capacity 的限制,也是与原始 ByteBuf 使用同一块底层内存,只是读写指针是独立的

11)copy
会将底层内存数据进行深拷贝,因此无论读写,都与原始 ByteBuf 无关
12)CompositeByteBuf
【零拷贝】的体现之一,可以将多个 ByteBuf 合并为一个逻辑上的 ByteBuf,避免拷贝
有两个 ByteBuf 如下
ByteBuf buf1 = ByteBufAllocator.DEFAULT.buffer(5);
buf1.writeBytes(new byte[]{1, 2, 3, 4, 5});
ByteBuf buf2 = ByteBufAllocator.DEFAULT.buffer(5);
buf2.writeBytes(new byte[]{6, 7, 8, 9, 10});
System.out.println(ByteBufUtil.prettyHexDump(buf1));
System.out.println(ByteBufUtil.prettyHexDump(buf2));
输出
         +-------------------------------------------------+
         |  0  1  2  3  4  5  6  7  8  9  a  b  c  d  e  f |
+--------+-------------------------------------------------+----------------+
|00000000| 01 02 03 04 05                                  |.....           |
+--------+-------------------------------------------------+----------------+
         +-------------------------------------------------+
         |  0  1  2  3  4  5  6  7  8  9  a  b  c  d  e  f |
+--------+-------------------------------------------------+----------------+
|00000000| 06 07 08 09 0a                                  |.....           |
+--------+-------------------------------------------------+----------------+
现在需要一个新的 ByteBuf,内容来自于刚才的 buf1 和 buf2,如何实现?
方法1:
ByteBuf buf3 = ByteBufAllocator.DEFAULT
    .buffer(buf1.readableBytes()+buf2.readableBytes());
buf3.writeBytes(buf1);
buf3.writeBytes(buf2);
System.out.println(ByteBufUtil.prettyHexDump(buf3));
结果
         +-------------------------------------------------+
         |  0  1  2  3  4  5  6  7  8  9  a  b  c  d  e  f |
+--------+-------------------------------------------------+----------------+
|00000000| 01 02 03 04 05 06 07 08 09 0a                   |..........      |
+--------+-------------------------------------------------+----------------+
这种方法好不好?回答是不太好,因为进行了数据的内存复制操作
方法2:
CompositeByteBuf buf3 = ByteBufAllocator.DEFAULT.compositeBuffer();
// true 表示增加新的 ByteBuf 自动递增 write index, 否则 write index 会始终为 0
buf3.addComponents(true, buf1, buf2);
结果是一样的
         +-------------------------------------------------+
         |  0  1  2  3  4  5  6  7  8  9  a  b  c  d  e  f |
+--------+-------------------------------------------------+----------------+
|00000000| 01 02 03 04 05 06 07 08 09 0a                   |..........      |
+--------+-------------------------------------------------+----------------+
CompositeByteBuf 是一个组合的 ByteBuf,它内部维护了一个 Component 数组,每个 Component 管理一个 ByteBuf,记录了这个 ByteBuf 相对于整体偏移量等信息,代表着整体中某一段的数据。
- 优点,对外是一个虚拟视图,组合这些 ByteBuf 不会产生内存复制
- 缺点,复杂了很多,多次操作会带来性能的损耗
13)Unpooled
Unpooled 是一个工具类,类如其名,提供了非池化的 ByteBuf 创建、组合、复制等操作
这里仅介绍其跟【零拷贝】相关的 wrappedBuffer 方法,可以用来包装 ByteBuf
ByteBuf buf1 = ByteBufAllocator.DEFAULT.buffer(5);
buf1.writeBytes(new byte[]{1, 2, 3, 4, 5});
ByteBuf buf2 = ByteBufAllocator.DEFAULT.buffer(5);
buf2.writeBytes(new byte[]{6, 7, 8, 9, 10});

// 当包装 ByteBuf 个数超过一个时, 底层使用了 CompositeByteBuf
ByteBuf buf3 = Unpooled.wrappedBuffer(buf1, buf2);
System.out.println(ByteBufUtil.prettyHexDump(buf3));
输出
         +-------------------------------------------------+
         |  0  1  2  3  4  5  6  7  8  9  a  b  c  d  e  f |
+--------+-------------------------------------------------+----------------+
|00000000| 01 02 03 04 05 06 07 08 09 0a                   |..........      |
+--------+-------------------------------------------------+----------------+
也可以用来包装普通字节数组,底层也不会有拷贝操作
ByteBuf buf4 = Unpooled.wrappedBuffer(new byte[]{1, 2, 3}, new byte[]{4, 5, 6});
System.out.println(buf4.getClass());
System.out.println(ByteBufUtil.prettyHexDump(buf4));
输出
class io.netty.buffer.CompositeByteBuf
         +-------------------------------------------------+
         |  0  1  2  3  4  5  6  7  8  9  a  b  c  d  e  f |
+--------+-------------------------------------------------+----------------+
|00000000| 01 02 03 04 05 06                               |......          |
+--------+-------------------------------------------------+----------------+
💡 ByteBuf 优势
- 池化 - 可以重用池中 ByteBuf 实例,更节约内存,减少内存溢出的可能
- 读写指针分离,不需要像 ByteBuffer 一样切换读写模式
- 可以自动扩容
- 支持链式调用,使用更流畅
- 很多地方体现零拷贝,例如 slice、duplicate、CompositeByteBuf
三. Netty 进阶
1. 粘包与半包
TCP是一定会有粘包半包问题,UDP没有这种问题,UDP有丢包的问题
1.1 粘包现象
服务端代码
public class HelloWorldServer {
    static final Logger log = LoggerFactory.getLogger(HelloWorldServer.class);
    void start() {
        NioEventLoopGroup boss = new NioEventLoopGroup(1);
        NioEventLoopGroup worker = new NioEventLoopGroup();
        try {
            ServerBootstrap serverBootstrap = new ServerBootstrap();
            serverBootstrap.channel(NioServerSocketChannel.class);
            serverBootstrap.group(boss, worker);
            serverBootstrap.childHandler(new ChannelInitializer<SocketChannel>() {
                @Override
                protected void initChannel(SocketChannel ch) throws Exception {
                    ch.pipeline().addLast(new LoggingHandler(LogLevel.DEBUG));
                    ch.pipeline().addLast(new ChannelInboundHandlerAdapter() {
                        @Override
                        public void channelActive(ChannelHandlerContext ctx) throws Exception {
                            log.debug("connected {}", ctx.channel());
                            super.channelActive(ctx);
                        }

                        @Override
                        public void channelInactive(ChannelHandlerContext ctx) throws Exception {
                            log.debug("disconnect {}", ctx.channel());
                            super.channelInactive(ctx);
                        }
                    });
                }
            });
            ChannelFuture channelFuture = serverBootstrap.bind(8080);
            log.debug("{} binding...", channelFuture.channel());
            channelFuture.sync();
            log.debug("{} bound...", channelFuture.channel());
            channelFuture.channel().closeFuture().sync();
        } catch (InterruptedException e) {
            log.error("server error", e);
        } finally {
            boss.shutdownGracefully();
            worker.shutdownGracefully();
            log.debug("stoped");
        }
    }

    public static void main(String[] args) {
        new HelloWorldServer().start();
    }
}
客户端代码希望发送 10 个消息,每个消息是 16 字节
public class HelloWorldClient {
    static final Logger log = LoggerFactory.getLogger(HelloWorldClient.class);
    public static void main(String[] args) {
        NioEventLoopGroup worker = new NioEventLoopGroup();
        try {
            Bootstrap bootstrap = new Bootstrap();
            bootstrap.channel(NioSocketChannel.class);
            bootstrap.group(worker);
            bootstrap.handler(new ChannelInitializer<SocketChannel>() {
                @Override
                protected void initChannel(SocketChannel ch) throws Exception {
                    log.debug("connetted...");
                    ch.pipeline().addLast(new ChannelInboundHandlerAdapter() {
                        @Override
                        public void channelActive(ChannelHandlerContext ctx) throws Exception {
                            log.debug("sending...");
                            Random r = new Random();
                            char c = 'a';
                            for (int i = 0; i < 10; i++) {
                                ByteBuf buffer = ctx.alloc().buffer();
                                buffer.writeBytes(new byte[]{0, 1, 2, 3, 4, 5, 6, 7, 8, 9, 10, 11, 12, 13, 14, 15});
                                ctx.writeAndFlush(buffer);
                            }
                        }
                    });
                }
            });
            ChannelFuture channelFuture = bootstrap.connect("127.0.0.1", 8080).sync();
            channelFuture.channel().closeFuture().sync();

        } catch (InterruptedException e) {
            log.error("client error", e);
        } finally {
            worker.shutdownGracefully();
        }
    }
}
服务器端的某次输出,可以看到一次就接收了 160 个字节,而非分 10 次接收
08:24:46 [DEBUG] [main] c.i.n.HelloWorldServer - [id: 0x81e0fda5] binding...
08:24:46 [DEBUG] [main] c.i.n.HelloWorldServer - [id: 0x81e0fda5, L:/0:0:0:0:0:0:0:0:8080] bound...
08:24:55 [DEBUG] [nioEventLoopGroup-3-1] i.n.h.l.LoggingHandler - [id: 0x94132411, L:/127.0.0.1:8080 - R:/127.0.0.1:58177] REGISTERED
08:24:55 [DEBUG] [nioEventLoopGroup-3-1] i.n.h.l.LoggingHandler - [id: 0x94132411, L:/127.0.0.1:8080 - R:/127.0.0.1:58177] ACTIVE
08:24:55 [DEBUG] [nioEventLoopGroup-3-1] c.i.n.HelloWorldServer - connected [id: 0x94132411, L:/127.0.0.1:8080 - R:/127.0.0.1:58177]
08:24:55 [DEBUG] [nioEventLoopGroup-3-1] i.n.h.l.LoggingHandler - [id: 0x94132411, L:/127.0.0.1:8080 - R:/127.0.0.1:58177] READ: 160B
         +-------------------------------------------------+
         |  0  1  2  3  4  5  6  7  8  9  a  b  c  d  e  f |
+--------+-------------------------------------------------+----------------+
|00000000| 00 01 02 03 04 05 06 07 08 09 0a 0b 0c 0d 0e 0f |................|
|00000010| 00 01 02 03 04 05 06 07 08 09 0a 0b 0c 0d 0e 0f |................|
|00000020| 00 01 02 03 04 05 06 07 08 09 0a 0b 0c 0d 0e 0f |................|
|00000030| 00 01 02 03 04 05 06 07 08 09 0a 0b 0c 0d 0e 0f |................|
|00000040| 00 01 02 03 04 05 06 07 08 09 0a 0b 0c 0d 0e 0f |................|
|00000050| 00 01 02 03 04 05 06 07 08 09 0a 0b 0c 0d 0e 0f |................|
|00000060| 00 01 02 03 04 05 06 07 08 09 0a 0b 0c 0d 0e 0f |................|
|00000070| 00 01 02 03 04 05 06 07 08 09 0a 0b 0c 0d 0e 0f |................|
|00000080| 00 01 02 03 04 05 06 07 08 09 0a 0b 0c 0d 0e 0f |................|
|00000090| 00 01 02 03 04 05 06 07 08 09 0a 0b 0c 0d 0e 0f |................|
+--------+-------------------------------------------------+----------------+
08:24:55 [DEBUG] [nioEventLoopGroup-3-1] i.n.h.l.LoggingHandler - [id: 0x94132411, L:/127.0.0.1:8080 - R:/127.0.0.1:58177] READ COMPLETE
1.2 半包现象
客户端代码希望发送 1 个消息,这个消息是 160 字节,代码改为
ByteBuf buffer = ctx.alloc().buffer();
for (int i = 0; i < 10; i++) {
    buffer.writeBytes(new byte[]{0, 1, 2, 3, 4, 5, 6, 7, 8, 9, 10, 11, 12, 13, 14, 15});
}
ctx.writeAndFlush(buffer);
为现象明显,服务端修改一下接收缓冲区,其它代码不变
serverBootstrap.option(ChannelOption.SO_RCVBUF, 10);
服务器端的某次输出,可以看到接收的消息被分为两节,第一次 20 字节,第二次 140 字节
08:43:49 [DEBUG] [main] c.i.n.HelloWorldServer - [id: 0x4d6c6a84] binding...
08:43:49 [DEBUG] [main] c.i.n.HelloWorldServer - [id: 0x4d6c6a84, L:/0:0:0:0:0:0:0:0:8080] bound...
08:44:23 [DEBUG] [nioEventLoopGroup-3-1] i.n.h.l.LoggingHandler - [id: 0x1719abf7, L:/127.0.0.1:8080 - R:/127.0.0.1:59221] REGISTERED
08:44:23 [DEBUG] [nioEventLoopGroup-3-1] i.n.h.l.LoggingHandler - [id: 0x1719abf7, L:/127.0.0.1:8080 - R:/127.0.0.1:59221] ACTIVE
08:44:23 [DEBUG] [nioEventLoopGroup-3-1] c.i.n.HelloWorldServer - connected [id: 0x1719abf7, L:/127.0.0.1:8080 - R:/127.0.0.1:59221]
08:44:24 [DEBUG] [nioEventLoopGroup-3-1] i.n.h.l.LoggingHandler - [id: 0x1719abf7, L:/127.0.0.1:8080 - R:/127.0.0.1:59221] READ: 20B
         +-------------------------------------------------+
         |  0  1  2  3  4  5  6  7  8  9  a  b  c  d  e  f |
+--------+-------------------------------------------------+----------------+
|00000000| 00 01 02 03 04 05 06 07 08 09 0a 0b 0c 0d 0e 0f |................|
|00000010| 00 01 02 03                                     |....            |
+--------+-------------------------------------------------+----------------+
08:44:24 [DEBUG] [nioEventLoopGroup-3-1] i.n.h.l.LoggingHandler - [id: 0x1719abf7, L:/127.0.0.1:8080 - R:/127.0.0.1:59221] READ COMPLETE
08:44:24 [DEBUG] [nioEventLoopGroup-3-1] i.n.h.l.LoggingHandler - [id: 0x1719abf7, L:/127.0.0.1:8080 - R:/127.0.0.1:59221] READ: 140B
         +-------------------------------------------------+
         |  0  1  2  3  4  5  6  7  8  9  a  b  c  d  e  f |
+--------+-------------------------------------------------+----------------+
|00000000| 04 05 06 07 08 09 0a 0b 0c 0d 0e 0f 00 01 02 03 |................|
|00000010| 04 05 06 07 08 09 0a 0b 0c 0d 0e 0f 00 01 02 03 |................|
|00000020| 04 05 06 07 08 09 0a 0b 0c 0d 0e 0f 00 01 02 03 |................|
|00000030| 04 05 06 07 08 09 0a 0b 0c 0d 0e 0f 00 01 02 03 |................|
|00000040| 04 05 06 07 08 09 0a 0b 0c 0d 0e 0f 00 01 02 03 |................|
|00000050| 04 05 06 07 08 09 0a 0b 0c 0d 0e 0f 00 01 02 03 |................|
|00000060| 04 05 06 07 08 09 0a 0b 0c 0d 0e 0f 00 01 02 03 |................|
|00000070| 04 05 06 07 08 09 0a 0b 0c 0d 0e 0f 00 01 02 03 |................|
|00000080| 04 05 06 07 08 09 0a 0b 0c 0d 0e 0f             |............    |
+--------+-------------------------------------------------+----------------+
08:44:24 [DEBUG] [nioEventLoopGroup-3-1] i.n.h.l.LoggingHandler - [id: 0x1719abf7, L:/127.0.0.1:8080 - R:/127.0.0.1:59221] READ COMPLETE
注意
serverBootstrap.option(ChannelOption.SO_RCVBUF, 10) 影响的底层接收缓冲区(即滑动窗口)大小,仅决定了 netty 读取的最小单位,netty 实际每次读取的一般是它的整数倍
1.3 现象分析
粘包
- 现象,发送 abc def,接收 abcdef
- 原因
- 应用层:接收方 ByteBuf 设置太大(Netty 默认 1024)
- 滑动窗口:假设发送方 256 bytes 表示一个完整报文,但由于接收方处理不及时且窗口大小足够大,这 256 bytes 字节就会缓冲在接收方的滑动窗口中,当滑动窗口中缓冲了多个报文就会粘包
- Nagle 算法:会造成粘包
半包
- 现象,发送 abcdef,接收 abc def
- 原因
- 应用层:接收方 ByteBuf 小于实际发送数据量
- 滑动窗口:假设接收方的窗口只剩了 128 bytes,发送方的报文大小是 256 bytes,这时放不下了,只能先发送前 128 bytes,等待 ack 后才能发送剩余部分,这就造成了半包
- MSS 限制:当发送的数据超过 MSS 限制后,会将数据切分发送,就会造成半包
本质是因为 TCP 是流式协议,消息无边界
滑动窗口
- TCP 以一个段(segment)为单位,每发送一个段就需要进行一次确认应答(ack)处理,但如果这么做,缺点是包的往返时间越长性能就越差
- 为了解决此问题,引入了窗口概念,窗口大小即决定了无需等待应答而可以继续发送的数据最大值
- 窗口实际就起到一个缓冲区的作用,同时也能起到流量控制的作用
- 图中深色的部分即要发送的数据,高亮的部分即窗口
- 窗口内的数据才允许被发送,当应答未到达前,窗口必须停止滑动
- 如果 1001~2000 这个段的数据 ack 回来了,窗口就可以向前滑动
- 接收方也会维护一个窗口,只有落在窗口内的数据才能允许接收


MSS 限制
链路层对一次能够发送的最大数据有限制,这个限制称之为 MTU(maximum transmission unit),不同的链路设备的 MTU 值也有所不同,例如
以太网的 MTU 是 1500
FDDI(光纤分布式数据接口)的 MTU 是 4352
本地回环地址的 MTU 是 65535 - 本地测试不走网卡
MSS 是最大段长度(maximum segment size),它是 MTU 刨去 tcp 头和 ip 头后剩余能够作为数据传输的字节数
ipv4 tcp 头占用 20 bytes,ip 头占用 20 bytes,因此以太网 MSS 的值为 1500 - 40 = 1460
TCP 在传递大量数据时,会按照 MSS 大小将数据进行分割发送
MSS 的值在三次握手时通知对方自己 MSS 的值,然后在两者之间选择一个小值作为 MSS

Nagle 算法
- 即使发送一个字节,也需要加入 tcp 头和 ip 头,也就是总字节数会使用 41 bytes,非常不经济。因此为了提高网络利用率,tcp 希望尽可能发送足够大的数据,这就是 Nagle 算法产生的缘由
- 该算法是指发送端即使还有应该发送的数据,但如果这部分数据很少的话,则进行延迟发送
- 如果 SO_SNDBUF 的数据达到 MSS,则需要发送
- 如果 SO_SNDBUF 中含有 FIN(表示需要连接关闭)这时将剩余数据发送,再关闭
- 如果 TCP_NODELAY = true,则需要发送
- 已发送的数据都收到 ack 时,则需要发送
- 上述条件不满足,但发生超时(一般为 200ms)则需要发送
- 除上述情况,延迟发送
1.4 解决方案
- 短链接,发一个包建立一次连接,这样连接建立到连接断开之间就是消息的边界,缺点效率太低
- 每一条消息采用固定长度,缺点浪费空间
- 每一条消息采用分隔符,例如 \n,缺点需要转义
- 每一条消息分为 head 和 body,head 中包含 body 的长度
方法1,短链接
以解决粘包为例
public class HelloWorldClient {
    static final Logger log = LoggerFactory.getLogger(HelloWorldClient.class);

    public static void main(String[] args) {
        // 分 10 次发送
        for (int i = 0; i < 10; i++) {
            send();
        }
    }

    private static void send() {
        NioEventLoopGroup worker = new NioEventLoopGroup();
        try {
            Bootstrap bootstrap = new Bootstrap();
            bootstrap.channel(NioSocketChannel.class);
            bootstrap.group(worker);
            bootstrap.handler(new ChannelInitializer<SocketChannel>() {
                @Override
                protected void initChannel(SocketChannel ch) throws Exception {
                    log.debug("conneted...");
                    ch.pipeline().addLast(new LoggingHandler(LogLevel.DEBUG));
                    ch.pipeline().addLast(new ChannelInboundHandlerAdapter() {
                        @Override
                        public void channelActive(ChannelHandlerContext ctx) throws Exception {
                            log.debug("sending...");
                            ByteBuf buffer = ctx.alloc().buffer();
                            buffer.writeBytes(new byte[]{0, 1, 2, 3, 4, 5, 6, 7, 8, 9, 10, 11, 12, 13, 14, 15});
                            ctx.writeAndFlush(buffer);
                            // 发完即关
                            ctx.close();
                        }
                    });
                }
            });
            ChannelFuture channelFuture = bootstrap.connect("localhost", 8080).sync();
            channelFuture.channel().closeFuture().sync();

        } catch (InterruptedException e) {
            log.error("client error", e);
        } finally {
            worker.shutdownGracefully();
        }
    }
}
输出,略
半包用这种办法还是不好解决,因为接收方的缓冲区大小是有限的
方法2,固定长度
让所有数据包长度固定(假设长度为 8 字节),服务器端加入
@Slf4j
public class Server2 {
    void start() {
        NioEventLoopGroup boss = new NioEventLoopGroup();
        NioEventLoopGroup worker = new NioEventLoopGroup();
        try {
            ServerBootstrap serverBootstrap = new ServerBootstrap();
            serverBootstrap.channel(NioServerSocketChannel.class);
            // 调整系统的接收缓冲区(滑动窗口)
//            serverBootstrap.option(ChannelOption.SO_RCVBUF, 10);
            // 调整 netty 的接收缓冲区(byteBuf)
            serverBootstrap.childOption(ChannelOption.RCVBUF_ALLOCATOR, new AdaptiveRecvByteBufAllocator(16, 16, 16));
            serverBootstrap.group(boss, worker);
            serverBootstrap.childHandler(new ChannelInitializer<SocketChannel>() {
                @Override
                protected void initChannel(SocketChannel ch) throws Exception {
                    ch.pipeline().addLast(new FixedLengthFrameDecoder(10));
                    ch.pipeline().addLast(new LoggingHandler(LogLevel.DEBUG));
                }
            });
            ChannelFuture channelFuture = serverBootstrap.bind(8080).sync();
            channelFuture.channel().closeFuture().sync();
        } catch (InterruptedException e) {
            log.error("server error", e);
        } finally {
            boss.shutdownGracefully();
            worker.shutdownGracefully();
        }
    }

    public static void main(String[] args) {
        new Server2().start();
    }
}
客户端测试代码,注意, 采用这种方法后,客户端什么时候 flush 都可以
public class HelloWorldClient {
    static final Logger log = LoggerFactory.getLogger(HelloWorldClient.class);
    public static void main(String[] args) {
        NioEventLoopGroup worker = new NioEventLoopGroup();
        try {
            Bootstrap bootstrap = new Bootstrap();
            bootstrap.channel(NioSocketChannel.class);
            bootstrap.group(worker);
            bootstrap.handler(new ChannelInitializer<SocketChannel>() {
                @Override
                protected void initChannel(SocketChannel ch) throws Exception {
                    log.debug("connetted...");
                    ch.pipeline().addLast(new LoggingHandler(LogLevel.DEBUG));
                    ch.pipeline().addLast(new ChannelInboundHandlerAdapter() {
                        @Override
                        public void channelActive(ChannelHandlerContext ctx) throws Exception {
                            log.debug("sending...");
                            // 发送内容随机的数据包
                            Random r = new Random();
                            char c = 'a';
                            ByteBuf buffer = ctx.alloc().buffer();
                            for (int i = 0; i < 10; i++) {
                                byte[] bytes = new byte[8];
                                for (int j = 0; j < r.nextInt(8); j++) {
                                    bytes[j] = (byte) c;
                                }
                                c++;
                                buffer.writeBytes(bytes);
                            }
                            ctx.writeAndFlush(buffer);
                        }
                    });
                }
            });
            ChannelFuture channelFuture = bootstrap.connect("192.168.0.103", 9090).sync();
            channelFuture.channel().closeFuture().sync();

        } catch (InterruptedException e) {
            log.error("client error", e);
        } finally {
            worker.shutdownGracefully();
        }
    }
}
缺点 ,数据包的大小不好把握
- 长度定的太大,浪费
- 长度定的太小,对某些数据包又显得不够
方法3,固定分隔符
服务端加入,默认以 \n 或 \r\n 作为分隔符,如果超出指定长度仍未出现分隔符,则抛出异常
@Slf4j
public class Server3 {
    void start() {
        NioEventLoopGroup boss = new NioEventLoopGroup();
        NioEventLoopGroup worker = new NioEventLoopGroup();
        try {
            ServerBootstrap serverBootstrap = new ServerBootstrap();
            serverBootstrap.channel(NioServerSocketChannel.class);
            // 调整系统的接收缓冲区(滑动窗口)
//            serverBootstrap.option(ChannelOption.SO_RCVBUF, 10);
            // 调整 netty 的接收缓冲区(byteBuf)
            serverBootstrap.childOption(ChannelOption.RCVBUF_ALLOCATOR, new AdaptiveRecvByteBufAllocator(16, 16, 16));
            serverBootstrap.group(boss, worker);
            serverBootstrap.childHandler(new ChannelInitializer<SocketChannel>() {
                @Override
                protected void initChannel(SocketChannel ch) throws Exception {
                    ch.pipeline().addLast(new LineBasedFrameDecoder(1024));
                    ch.pipeline().addLast(new LoggingHandler(LogLevel.DEBUG));
                }
            });
            ChannelFuture channelFuture = serverBootstrap.bind(8080).sync();
            channelFuture.channel().closeFuture().sync();
        } catch (InterruptedException e) {
            log.error("server error", e);
        } finally {
            boss.shutdownGracefully();
            worker.shutdownGracefully();
        }
    }

    public static void main(String[] args) {
        new Server3().start();
    }
}
客户端在每条消息之后,加入 \n 分隔符
public class Client3 {
    static final Logger log = LoggerFactory.getLogger(Client1.class);

    public static void main(String[] args) {
        send();
        System.out.println("finish");
    }

    public static StringBuilder makeString(char c, int len) {
        StringBuilder sb = new StringBuilder(len + 2);
        for (int i = 0; i < len; i++) {
            sb.append(c);
        }
        sb.append("\n");
        return sb;
    }

    private static void send() {
        NioEventLoopGroup worker = new NioEventLoopGroup();
        try {
            Bootstrap bootstrap = new Bootstrap();
            bootstrap.channel(NioSocketChannel.class);
            bootstrap.group(worker);
            bootstrap.handler(new ChannelInitializer<SocketChannel>() {
                @Override
                protected void initChannel(SocketChannel ch) {
                    ch.pipeline().addLast(new LoggingHandler(LogLevel.DEBUG));
                    ch.pipeline().addLast(new ChannelInboundHandlerAdapter() {
                        // 会在连接 channel 建立成功后,会触发 active 事件
                        @Override
                        public void channelActive(ChannelHandlerContext ctx) {
                            ByteBuf buf = ctx.alloc().buffer();
                            char c = '0';
                            Random r = new Random();
                            for (int i = 0; i < 10; i++) {
                                StringBuilder sb = makeString(c, r.nextInt(256) + 1);
                                c++;
                                buf.writeBytes(sb.toString().getBytes());
                            }
                            ctx.writeAndFlush(buf);
                        }
                    });
                }
            });
            ChannelFuture channelFuture = bootstrap.connect("127.0.0.1", 8080).sync();
            channelFuture.channel().closeFuture().sync();
        } catch (InterruptedException e) {
            log.error("client error", e);
        } finally {
            worker.shutdownGracefully();
        }
    }
}
缺点,处理字符数据比较合适,但如果内容本身包含了分隔符(字节数据常常会有此情况),那么就会解析错误
方法4,预设长度
在发送消息前,先约定用定长字节表示接下来数据的长度
// 最大长度,长度偏移,长度占用字节,长度调整,剥离字节数
ch.pipeline().addLast(new LengthFieldBasedFrameDecoder(1024, 0, 1, 0, 1));
public class TestLengthFieldDecoder {
    public static void main(String[] args) {
        EmbeddedChannel channel = new EmbeddedChannel(
                new LengthFieldBasedFrameDecoder(
                        1024, 0, 4, 1,4),
                new LoggingHandler(LogLevel.DEBUG)
        );

        //  4 个字节的内容长度, 实际内容
        ByteBuf buffer = ByteBufAllocator.DEFAULT.buffer();
        send(buffer, "Hello, world");
        send(buffer, "Hi!");
        channel.writeInbound(buffer);
    }

    private static void send(ByteBuf buffer, String content) {
        byte[] bytes = content.getBytes(); // 实际内容
        int length = bytes.length; // 实际内容长度
        buffer.writeInt(length);
        buffer.writeByte(1);
        buffer.writeBytes(bytes);
    }
}
2. 协议设计与解析
2.1 为什么需要协议?
TCP/IP 中消息传输基于流的方式,没有边界。
协议的目的就是划定消息的边界,制定通信双方要共同遵守的通信规则
例如:在网络上传输
下雨天留客天留我不留
是中文一句著名的无标点符号句子,在没有标点符号情况下,这句话有数种拆解方式,而意思却是完全不同,所以常被用作讲述标点符号的重要性
一种解读
下雨天留客,天留,我不留
另一种解读
下雨天,留客天,留我不?留
如何设计协议呢?其实就是给网络传输的信息加上“标点符号”。但通过分隔符来断句不是很好,因为分隔符本身如果用于传输,那么必须加以区分。因此,下面一种协议较为常用
定长字节表示内容长度 + 实际内容
例如,假设一个中文字符长度为 3,按照上述协议的规则,发送信息方式如下,就不会被接收方弄错意思了
0f下雨天留客06天留09我不留
小故事
很久很久以前,一位私塾先生到一家任教。双方签订了一纸协议:“无鸡鸭亦可无鱼肉亦可白菜豆腐不可少不得束修金”。此后,私塾先生虽然认真教课,但主人家则总是给私塾先生以白菜豆腐为菜,丝毫未见鸡鸭鱼肉的款待。私塾先生先是很不解,可是后来也就想通了:主人把鸡鸭鱼肉的钱都会换为束修金的,也罢。至此双方相安无事。
年关将至,一个学年段亦告结束。私塾先生临行时,也不见主人家为他交付束修金,遂与主家理论。然主家亦振振有词:“有协议为证——无鸡鸭亦可,无鱼肉亦可,白菜豆腐不可少,不得束修金。这白纸黑字明摆着的,你有什么要说的呢?”
私塾先生据理力争:“协议是这样的——无鸡,鸭亦可;无鱼,肉亦可;白菜豆腐不可,少不得束修金。”
双方唇枪舌战,你来我往,真个是不亦乐乎!
这里的束修金,也作“束脩”,应当是泛指教师应当得到的报酬
2.2 redis 协议举例
NioEventLoopGroup worker = new NioEventLoopGroup();
byte[] LINE = {13, 10};
try {
    Bootstrap bootstrap = new Bootstrap();
    bootstrap.channel(NioSocketChannel.class);
    bootstrap.group(worker);
    bootstrap.handler(new ChannelInitializer<SocketChannel>() {
        @Override
        protected void initChannel(SocketChannel ch) {
            ch.pipeline().addLast(new LoggingHandler());
            ch.pipeline().addLast(new ChannelInboundHandlerAdapter() {
                // 会在连接 channel 建立成功后,会触发 active 事件
                @Override
                public void channelActive(ChannelHandlerContext ctx) {
                    set(ctx);
                    get(ctx);
                }
                private void get(ChannelHandlerContext ctx) {
                    ByteBuf buf = ctx.alloc().buffer();
                    buf.writeBytes("*2".getBytes());
                    buf.writeBytes(LINE);
                    buf.writeBytes("$3".getBytes());
                    buf.writeBytes(LINE);
                    buf.writeBytes("get".getBytes());
                    buf.writeBytes(LINE);
                    buf.writeBytes("$3".getBytes());
                    buf.writeBytes(LINE);
                    buf.writeBytes("aaa".getBytes());
                    buf.writeBytes(LINE);
                    ctx.writeAndFlush(buf);
                }
                private void set(ChannelHandlerContext ctx) {
                    ByteBuf buf = ctx.alloc().buffer();
                    buf.writeBytes("*3".getBytes());
                    buf.writeBytes(LINE);
                    buf.writeBytes("$3".getBytes());
                    buf.writeBytes(LINE);
                    buf.writeBytes("set".getBytes());
                    buf.writeBytes(LINE);
                    buf.writeBytes("$3".getBytes());
                    buf.writeBytes(LINE);
                    buf.writeBytes("aaa".getBytes());
                    buf.writeBytes(LINE);
                    buf.writeBytes("$3".getBytes());
                    buf.writeBytes(LINE);
                    buf.writeBytes("bbb".getBytes());
                    buf.writeBytes(LINE);
                    ctx.writeAndFlush(buf);
                }

                @Override
                public void channelRead(ChannelHandlerContext ctx, Object msg) throws Exception {
                    ByteBuf buf = (ByteBuf) msg;
                    System.out.println(buf.toString(Charset.defaultCharset()));
                }
            });
        }
    });
    ChannelFuture channelFuture = bootstrap.connect("localhost", 6379).sync();
    channelFuture.channel().closeFuture().sync();
} catch (InterruptedException e) {
    log.error("client error", e);
} finally {
    worker.shutdownGracefully();
}
2.3 http 协议举例
NioEventLoopGroup boss = new NioEventLoopGroup();
NioEventLoopGroup worker = new NioEventLoopGroup();
try {
    ServerBootstrap serverBootstrap = new ServerBootstrap();
    serverBootstrap.channel(NioServerSocketChannel.class);
    serverBootstrap.group(boss, worker);
    serverBootstrap.childHandler(new ChannelInitializer<SocketChannel>() {
        @Override
        protected void initChannel(SocketChannel ch) throws Exception {
            ch.pipeline().addLast(new LoggingHandler(LogLevel.DEBUG));
            ch.pipeline().addLast(new HttpServerCodec());
            ch.pipeline().addLast(new SimpleChannelInboundHandler<HttpRequest>() {
                @Override
                protected void channelRead0(ChannelHandlerContext ctx, HttpRequest msg) throws Exception {
                    // 获取请求
                    log.debug(msg.uri());

                    // 返回响应
                    DefaultFullHttpResponse response =
                            new DefaultFullHttpResponse(msg.protocolVersion(), HttpResponseStatus.OK);

                    byte[] bytes = "<h1>Hello, world!</h1>".getBytes();

                    response.headers().setInt(CONTENT_LENGTH, bytes.length);
                    response.content().writeBytes(bytes);

                    // 写回响应
                    ctx.writeAndFlush(response);
                }
            });
            /*ch.pipeline().addLast(new ChannelInboundHandlerAdapter() {
                @Override
                public void channelRead(ChannelHandlerContext ctx, Object msg) throws Exception {
                    log.debug("{}", msg.getClass());

                    if (msg instanceof HttpRequest) { // 请求行,请求头

                    } else if (msg instanceof HttpContent) { //请求体

                    }
                }
            });*/
        }
    });
    ChannelFuture channelFuture = serverBootstrap.bind(8080).sync();
    channelFuture.channel().closeFuture().sync();
} catch (InterruptedException e) {
    log.error("server error", e);
} finally {
    boss.shutdownGracefully();
    worker.shutdownGracefully();
}
2.4 自定义协议要素
- 魔数,用来在第一时间判定是否是无效数据包
- 版本号,可以支持协议的升级
- 序列化算法,消息正文到底采用哪种序列化反序列化方式,可以由此扩展,例如:json、protobuf、hessian、jdk
- 指令类型,是登录、注册、单聊、群聊… 跟业务相关
- 请求序号,为了双工通信,提供异步能力
- 正文长度
- 消息正文
编解码器
根据上面的要素,设计一个登录请求消息和登录响应消息,并使用 Netty 完成收发
@Slf4j
public class MessageCodec extends ByteToMessageCodec<Message> {
@Override
    protected void encode(ChannelHandlerContext channelHandlerContext, Message message, ByteBuf byteBuf) throws Exception {
        //1.   4字节的模数
        byteBuf.writeBytes(new byte[]{1,2,3,4});
        //2.   1字节的版本
        byteBuf.writeByte(1);
        //3.   1字节的序列化方式  jdk 0 ,json 1
        byteBuf.writeByte(0);
        //4.   1字节的指令类型
        byteBuf.writeByte(message.getMessageType());
        //5.   4字节的指令请求序号
        byteBuf.writeInt(message.getSequenceId());

        //对齐填充   无意义
        byteBuf.writeByte(0xff);
        //6.   长度
        ByteArrayOutputStream bos = new ByteArrayOutputStream();
        ObjectOutputStream oos = new ObjectOutputStream(bos);
        oos.writeObject(message);
        byte[] bytes = bos.toByteArray();
        //7.   获取内容的字节数组
        byteBuf.writeInt(bytes.length);
        //8.   写入内容
        byteBuf.writeBytes(bytes);
    }

     @Override
    protected void decode(ChannelHandlerContext channelHandlerContext, ByteBuf byteBuf, List<Object> list) throws Exception {
        int magicNum = byteBuf.readInt();
        byte version = byteBuf.readByte();
        byte serializerType = byteBuf.readByte();
        byte messageType = byteBuf.readByte();
        int sequenceId = byteBuf.readInt();
        byteBuf.readByte();
        int length = byteBuf.readInt();
        byte[] bytes = new byte[length];
        byteBuf.readBytes(bytes,0,length);


        ObjectInputStream ois = new ObjectInputStream(new ByteArrayInputStream(bytes));
        Message message = (Message) ois.readObject();

        log.debug("{}, {}, {}, {}, {}, {}", magicNum, version, serializerType, messageType, sequenceId, length);
        log.debug("{}", message);
        list.add(message);
    }
}
测试
LengthFieldBasedFrameDecoder 解决粘包半包的问题
public static void main(String[] args) throws Exception {
        EmbeddedChannel channel = new EmbeddedChannel(
                // LengthFieldBasedFrameDecoder 解决粘包半包的问题
                new LengthFieldBasedFrameDecoder(1024,12,4,0,0),
                new LoggingHandler(),
                new MessageCodeDecode());

        //encode  编码
        LoginRequestMessage message = new LoginRequestMessage("zhangsan", "123");
        channel.writeOutbound(message);

        //decode  解码
        ByteBuf buffer = ByteBufAllocator.DEFAULT.buffer();
        new MessageCodeDecode().encode(null,message,buffer);

        //入站
        channel.writeInbound(buffer);
//        ByteBuf b1 = buffer.slice(0, 100);//slice底层是零拷贝
//        ByteBuf b2 = buffer.slice(100, buffer.readableBytes() - 100);
//        b1.retain(); // 引用计数 2
//        channel.writeInbound(b1);  // release 1
//        channel.writeInbound(b2);
    }
解读

💡 什么时候可以加 @Sharable
- 当 handler 不保存状态时,就可以安全地在多线程下被共享
- 但要注意对于编解码器类,不能继承 ByteToMessageCodec 或 CombinedChannelDuplexHandler 父类,他们的构造方法对 @Sharable 有限制
- 如果能确保编解码器不会保存状态,可以继承 MessageToMessageCodec 父类
@Slf4j
@ChannelHandler.Sharable
/**
 * 必须和 LengthFieldBasedFrameDecoder 一起使用,确保接到的 ByteBuf 消息是完整的
 */
public class MessageCodecSharable extends MessageToMessageCodec<ByteBuf, Message> {
    @Override
    protected void encode(ChannelHandlerContext ctx, Message msg, List<Object> outList) throws Exception {
        ByteBuf out = ctx.alloc().buffer();
        // 1. 4 字节的魔数
        out.writeBytes(new byte[]{1, 2, 3, 4});
        // 2. 1 字节的版本,
        out.writeByte(1);
        // 3. 1 字节的序列化方式 jdk 0 , json 1
        out.writeByte(0);
        // 4. 1 字节的指令类型
        out.writeByte(msg.getMessageType());
        // 5. 4 个字节
        out.writeInt(msg.getSequenceId());
        // 无意义,对齐填充
        out.writeByte(0xff);
        // 6. 获取内容的字节数组
        ByteArrayOutputStream bos = new ByteArrayOutputStream();
        ObjectOutputStream oos = new ObjectOutputStream(bos);
        oos.writeObject(msg);
        byte[] bytes = bos.toByteArray();
        // 7. 长度
        out.writeInt(bytes.length);
        // 8. 写入内容
        out.writeBytes(bytes);
        outList.add(out);
    }

    @Override
    protected void decode(ChannelHandlerContext ctx, ByteBuf in, List<Object> out) throws Exception {
        int magicNum = in.readInt();
        byte version = in.readByte();
        byte serializerType = in.readByte();
        byte messageType = in.readByte();
        int sequenceId = in.readInt();
        in.readByte();
        int length = in.readInt();
        byte[] bytes = new byte[length];
        in.readBytes(bytes, 0, length);
        ObjectInputStream ois = new ObjectInputStream(new ByteArrayInputStream(bytes));
        Message message = (Message) ois.readObject();
        log.debug("{}, {}, {}, {}, {}, {}", magicNum, version, serializerType, messageType, sequenceId, length);
        log.debug("{}", message);
        out.add(message);
    }
}
3. 聊天室案例
3.1 聊天室业务介绍
/**
 * 用户管理接口
 */
public interface UserService {

    /**
     * 登录
     * @param username 用户名
     * @param password 密码
     * @return 登录成功返回 true, 否则返回 false
     */
    boolean login(String username, String password);
}
/**
 * 会话管理接口
 */
public interface Session {

    /**
     * 绑定会话
     * @param channel 哪个 channel 要绑定会话
     * @param username 会话绑定用户
     */
    void bind(Channel channel, String username);

    /**
     * 解绑会话
     * @param channel 哪个 channel 要解绑会话
     */
    void unbind(Channel channel);

    /**
     * 获取属性
     * @param channel 哪个 channel
     * @param name 属性名
     * @return 属性值
     */
    Object getAttribute(Channel channel, String name);

    /**
     * 设置属性
     * @param channel 哪个 channel
     * @param name 属性名
     * @param value 属性值
     */
    void setAttribute(Channel channel, String name, Object value);

    /**
     * 根据用户名获取 channel
     * @param username 用户名
     * @return channel
     */
    Channel getChannel(String username);
}
/**
 * 聊天组会话管理接口
 */
public interface GroupSession {

    /**
     * 创建一个聊天组, 如果不存在才能创建成功, 否则返回 null
     * @param name 组名
     * @param members 成员
     * @return 成功时返回组对象, 失败返回 null
     */
    Group createGroup(String name, Set<String> members);

    /**
     * 加入聊天组
     * @param name 组名
     * @param member 成员名
     * @return 如果组不存在返回 null, 否则返回组对象
     */
    Group joinMember(String name, String member);

    /**
     * 移除组成员
     * @param name 组名
     * @param member 成员名
     * @return 如果组不存在返回 null, 否则返回组对象
     */
    Group removeMember(String name, String member);

    /**
     * 移除聊天组
     * @param name 组名
     * @return 如果组不存在返回 null, 否则返回组对象
     */
    Group removeGroup(String name);

    /**
     * 获取组成员
     * @param name 组名
     * @return 成员集合, 没有成员会返回 empty set
     */
    Set<String> getMembers(String name);

    /**
     * 获取组成员的 channel 集合, 只有在线的 channel 才会返回
     * @param name 组名
     * @return 成员 channel 集合
     */
    List<Channel> getMembersChannel(String name);
}
3.2 聊天室业务-登录
@Slf4j
public class ChatServer {
    public static void main(String[] args) {
        NioEventLoopGroup boss = new NioEventLoopGroup();
        NioEventLoopGroup worker = new NioEventLoopGroup();
        LoggingHandler LOGGING_HANDLER = new LoggingHandler(LogLevel.DEBUG);
        MessageCodecSharable MESSAGE_CODEC = new MessageCodecSharable();
        try {
            ServerBootstrap serverBootstrap = new ServerBootstrap();
            serverBootstrap.channel(NioServerSocketChannel.class);
            serverBootstrap.group(boss, worker);
            serverBootstrap.childHandler(new ChannelInitializer<SocketChannel>() {
                @Override
                protected void initChannel(SocketChannel ch) throws Exception {
                    ch.pipeline().addLast(new ProcotolFrameDecoder());
                    ch.pipeline().addLast(LOGGING_HANDLER);
                    ch.pipeline().addLast(MESSAGE_CODEC);
                    ch.pipeline().addLast(new SimpleChannelInboundHandler<LoginRequestMessage>() {
                        @Override
                        protected void channelRead0(ChannelHandlerContext ctx, LoginRequestMessage msg) throws Exception {
                            String username = msg.getUsername();
                            String password = msg.getPassword();
                            boolean login = UserServiceFactory.getUserService().login(username, password);
                            LoginResponseMessage message;
                            if(login) {
                                message = new LoginResponseMessage(true, "登录成功");
                            } else {
                                message = new LoginResponseMessage(false, "用户名或密码不正确");
                            }
                            ctx.writeAndFlush(message);
                        }
                    });
                }
            });
            Channel channel = serverBootstrap.bind(8080).sync().channel();
            channel.closeFuture().sync();
        } catch (InterruptedException e) {
            log.error("server error", e);
        } finally {
            boss.shutdownGracefully();
            worker.shutdownGracefully();
        }
    }
}
@Slf4j
public class ChatClient {
    public static void main(String[] args) {
        NioEventLoopGroup group = new NioEventLoopGroup();
        LoggingHandler LOGGING_HANDLER = new LoggingHandler(LogLevel.DEBUG);
        MessageCodecSharable MESSAGE_CODEC = new MessageCodecSharable();
        CountDownLatch WAIT_FOR_LOGIN = new CountDownLatch(1);
        AtomicBoolean LOGIN = new AtomicBoolean(false);
        try {
            Bootstrap bootstrap = new Bootstrap();
            bootstrap.channel(NioSocketChannel.class);
            bootstrap.group(group);
            bootstrap.handler(new ChannelInitializer<SocketChannel>() {
                @Override
                protected void initChannel(SocketChannel ch) throws Exception {
                    ch.pipeline().addLast(new ProcotolFrameDecoder());
//                    ch.pipeline().addLast(LOGGING_HANDLER);
                    ch.pipeline().addLast(MESSAGE_CODEC);
                    ch.pipeline().addLast("client handler", new ChannelInboundHandlerAdapter() {
                        // 接收响应消息
                        @Override
                        public void channelRead(ChannelHandlerContext ctx, Object msg) throws Exception {
                            log.debug("msg: {}", msg);
                            if ((msg instanceof LoginResponseMessage)) {
                                LoginResponseMessage response = (LoginResponseMessage) msg;
                                if (response.isSuccess()) {
                                    // 如果登录成功
                                    LOGIN.set(true);
                                }
                                // 唤醒 system in 线程
                                WAIT_FOR_LOGIN.countDown();
                            }
                        }

                        // 在连接建立后触发 active 事件
                        @Override
                        public void channelActive(ChannelHandlerContext ctx) throws Exception {
                            // 负责接收用户在控制台的输入,负责向服务器发送各种消息
                            new Thread(() -> {
                                Scanner scanner = new Scanner(System.in);
                                System.out.println("请输入用户名:");
                                String username = scanner.nextLine();
                                System.out.println("请输入密码:");
                                String password = scanner.nextLine();
                                // 构造消息对象
                                LoginRequestMessage message = new LoginRequestMessage(username, password);
                                // 发送消息
                                ctx.writeAndFlush(message);
                                System.out.println("等待后续操作...");
                                try {
                                    WAIT_FOR_LOGIN.await();
                                } catch (InterruptedException e) {
                                    e.printStackTrace();
                                }
                                // 如果登录失败
                                if (!LOGIN.get()) {
                                    ctx.channel().close();
                                    return;
                                }
                                while (true) {
                                    System.out.println("==================================");
                                    System.out.println("send [username] [content]");
                                    System.out.println("gsend [group name] [content]");
                                    System.out.println("gcreate [group name] [m1,m2,m3...]");
                                    System.out.println("gmembers [group name]");
                                    System.out.println("gjoin [group name]");
                                    System.out.println("gquit [group name]");
                                    System.out.println("quit");
                                    System.out.println("==================================");
                                    String command = scanner.nextLine();
                                    String[] s = command.split(" ");
                                    switch (s[0]){
                                        case "send":
                                            ctx.writeAndFlush(new ChatRequestMessage(username, s[1], s[2]));
                                            break;
                                        case "gsend":
                                            ctx.writeAndFlush(new GroupChatRequestMessage(username, s[1], s[2]));
                                            break;
                                        case "gcreate":
                                            Set<String> set = new HashSet<>(Arrays.asList(s[2].split(",")));
                                            set.add(username); // 加入自己
                                            ctx.writeAndFlush(new GroupCreateRequestMessage(s[1], set));
                                            break;
                                        case "gmembers":
                                            ctx.writeAndFlush(new GroupMembersRequestMessage(s[1]));
                                            break;
                                        case "gjoin":
                                            ctx.writeAndFlush(new GroupJoinRequestMessage(username, s[1]));
                                            break;
                                        case "gquit":
                                            ctx.writeAndFlush(new GroupQuitRequestMessage(username, s[1]));
                                            break;
                                        case "quit":
                                            ctx.channel().close();
                                            return;
                                    }
                                }
                            }, "system in").start();
                        }
                    });
                }
            });
            Channel channel = bootstrap.connect("localhost", 8080).sync().channel();
            channel.closeFuture().sync();
        } catch (Exception e) {
            log.error("client error", e);
        } finally {
            group.shutdownGracefully();
        }
    }
}
3.3 聊天室业务-单聊
服务器端将 handler 独立出来
登录 handler
@ChannelHandler.Sharable
public class LoginRequestMessageHandler extends SimpleChannelInboundHandler<LoginRequestMessage> {
    @Override
    protected void channelRead0(ChannelHandlerContext ctx, LoginRequestMessage msg) throws Exception {
        String username = msg.getUsername();
        String password = msg.getPassword();
        boolean login = UserServiceFactory.getUserService().login(username, password);
        LoginResponseMessage message;
        if(login) {
            SessionFactory.getSession().bind(ctx.channel(), username);
            message = new LoginResponseMessage(true, "登录成功");
        } else {
            message = new LoginResponseMessage(false, "用户名或密码不正确");
        }
        ctx.writeAndFlush(message);
    }
}
单聊 handler
@ChannelHandler.Sharable
public class ChatRequestMessageHandler extends SimpleChannelInboundHandler<ChatRequestMessage> {
    @Override
    protected void channelRead0(ChannelHandlerContext ctx, ChatRequestMessage msg) throws Exception {
        String to = msg.getTo();
        Channel channel = SessionFactory.getSession().getChannel(to);
        // 在线
        if(channel != null) {
            channel.writeAndFlush(new ChatResponseMessage(msg.getFrom(), msg.getContent()));
        }
        // 不在线
        else {
            ctx.writeAndFlush(new ChatResponseMessage(false, "对方用户不存在或者不在线"));
        }
    }
}
3.4 聊天室业务-群聊
创建群聊
@ChannelHandler.Sharable
public class GroupCreateRequestMessageHandler extends SimpleChannelInboundHandler<GroupCreateRequestMessage> {
    @Override
    protected void channelRead0(ChannelHandlerContext ctx, GroupCreateRequestMessage msg) throws Exception {
        String groupName = msg.getGroupName();
        Set<String> members = msg.getMembers();
        // 群管理器
        GroupSession groupSession = GroupSessionFactory.getGroupSession();
        Group group = groupSession.createGroup(groupName, members);
        if (group == null) {
            // 发生成功消息
            ctx.writeAndFlush(new GroupCreateResponseMessage(true, groupName + "创建成功"));
            // 发送拉群消息
            List<Channel> channels = groupSession.getMembersChannel(groupName);
            for (Channel channel : channels) {
                channel.writeAndFlush(new GroupCreateResponseMessage(true, "您已被拉入" + groupName));
            }
        } else {
            ctx.writeAndFlush(new GroupCreateResponseMessage(false, groupName + "已经存在"));
        }
    }
}
群聊
@ChannelHandler.Sharable
public class GroupChatRequestMessageHandler extends SimpleChannelInboundHandler<GroupChatRequestMessage> {
    @Override
    protected void channelRead0(ChannelHandlerContext ctx, GroupChatRequestMessage msg) throws Exception {
        List<Channel> channels = GroupSessionFactory.getGroupSession()
                .getMembersChannel(msg.getGroupName());

        for (Channel channel : channels) {
            channel.writeAndFlush(new GroupChatResponseMessage(msg.getFrom(), msg.getContent()));
        }
    }
}
加入群聊
@ChannelHandler.Sharable
public class GroupJoinRequestMessageHandler extends SimpleChannelInboundHandler<GroupJoinRequestMessage> {
    @Override
    protected void channelRead0(ChannelHandlerContext ctx, GroupJoinRequestMessage msg) throws Exception {
        Group group = GroupSessionFactory.getGroupSession().joinMember(msg.getGroupName(), msg.getUsername());
        if (group != null) {
            ctx.writeAndFlush(new GroupJoinResponseMessage(true, msg.getGroupName() + "群加入成功"));
        } else {
            ctx.writeAndFlush(new GroupJoinResponseMessage(true, msg.getGroupName() + "群不存在"));
        }
    }
}
退出群聊
@ChannelHandler.Sharable
public class GroupQuitRequestMessageHandler extends SimpleChannelInboundHandler<GroupQuitRequestMessage> {
    @Override
    protected void channelRead0(ChannelHandlerContext ctx, GroupQuitRequestMessage msg) throws Exception {
        Group group = GroupSessionFactory.getGroupSession().removeMember(msg.getGroupName(), msg.getUsername());
        if (group != null) {
            ctx.writeAndFlush(new GroupJoinResponseMessage(true, "已退出群" + msg.getGroupName()));
        } else {
            ctx.writeAndFlush(new GroupJoinResponseMessage(true, msg.getGroupName() + "群不存在"));
        }
    }
}
查看成员
@ChannelHandler.Sharable
public class GroupMembersRequestMessageHandler extends SimpleChannelInboundHandler<GroupMembersRequestMessage> {
    @Override
    protected void channelRead0(ChannelHandlerContext ctx, GroupMembersRequestMessage msg) throws Exception {
        Set<String> members = GroupSessionFactory.getGroupSession()
                .getMembers(msg.getGroupName());
        ctx.writeAndFlush(new GroupMembersResponseMessage(members));
    }
}
3.5 聊天室业务-退出
@Slf4j
@ChannelHandler.Sharable
public class QuitHandler extends ChannelInboundHandlerAdapter {

    // 当连接断开时触发 inactive 事件
    @Override
    public void channelInactive(ChannelHandlerContext ctx) throws Exception {
        SessionFactory.getSession().unbind(ctx.channel());
        log.debug("{} 已经断开", ctx.channel());
    }

	// 当出现异常时触发
    @Override
    public void exceptionCaught(ChannelHandlerContext ctx, Throwable cause) throws Exception {
        SessionFactory.getSession().unbind(ctx.channel());
        log.debug("{} 已经异常断开 异常是{}", ctx.channel(), cause.getMessage());
    }
}
3.6 聊天室业务-空闲检测
连接假死
原因
- 网络设备出现故障,例如网卡,机房等,底层的 TCP 连接已经断开了,但应用程序没有感知到,仍然占用着资源。
- 公网网络不稳定,出现丢包。如果连续出现丢包,这时现象就是客户端数据发不出去,服务端也一直收不到数据,就这么一直耗着
- 应用程序线程阻塞,无法进行数据读写
问题
- 假死的连接占用的资源不能自动释放
- 向假死的连接发送数据,得到的反馈是发送超时
服务器端解决
- 怎么判断客户端连接是否假死呢?如果能收到客户端数据,说明没有假死。因此策略就可以定为,每隔一段时间就检查这段时间内是否接收到客户端数据,没有就可以判定为连接假死
// 用来判断是不是 读空闲时间过长,或 写空闲时间过长
// 5s 内如果没有收到 channel 的数据,会触发一个 IdleState#READER_IDLE 事件
ch.pipeline().addLast(new IdleStateHandler(5, 0, 0));
// ChannelDuplexHandler 可以同时作为入站和出站处理器
ch.pipeline().addLast(new ChannelDuplexHandler() {
    // 用来触发特殊事件
    @Override
    public void userEventTriggered(ChannelHandlerContext ctx, Object evt) throws Exception{
        IdleStateEvent event = (IdleStateEvent) evt;
        // 触发了读空闲事件
        if (event.state() == IdleState.READER_IDLE) {
            log.debug("已经 5s 没有读到数据了");
            ctx.channel().close();
        }
    }
});
客户端定时心跳
- 客户端可以定时向服务器端发送数据,只要这个时间间隔小于服务器定义的空闲检测的时间间隔,那么就能防止前面提到的误判,客户端可以定义如下心跳处理器
// 用来判断是不是 读空闲时间过长,或 写空闲时间过长
// 3s 内如果没有向服务器写数据,会触发一个 IdleState#WRITER_IDLE 事件
ch.pipeline().addLast(new IdleStateHandler(0, 3, 0));
// ChannelDuplexHandler 可以同时作为入站和出站处理器
ch.pipeline().addLast(new ChannelDuplexHandler() {
    // 用来触发特殊事件
    @Override
    public void userEventTriggered(ChannelHandlerContext ctx, Object evt) throws Exception{
        IdleStateEvent event = (IdleStateEvent) evt;
        // 触发了写空闲事件
        if (event.state() == IdleState.WRITER_IDLE) {
            //                                log.debug("3s 没有写数据了,发送一个心跳包");
            ctx.writeAndFlush(new PingMessage());
        }
    }
});
四. 优化与源码
1. 优化
1.1 扩展序列化算法
序列化,反序列化主要用在消息正文的转换上
- 序列化时,需要将 Java 对象变为要传输的数据(可以是 byte[],或 json 等,最终都需要变成 byte[])
- 反序列化时,需要将传入的正文数据还原成 Java 对象,便于处理
目前的代码仅支持 Java 自带的序列化,反序列化机制,核心代码如下
// 反序列化
byte[] body = new byte[bodyLength];
byteByf.readBytes(body);
ObjectInputStream in = new ObjectInputStream(new ByteArrayInputStream(body));
Message message = (Message) in.readObject();
message.setSequenceId(sequenceId);

// 序列化
ByteArrayOutputStream out = new ByteArrayOutputStream();
new ObjectOutputStream(out).writeObject(message);
byte[] bytes = out.toByteArray();
为了支持更多序列化算法,抽象一个 Serializer 接口
public interface Serializer {

    // 反序列化方法
    <T> T deserialize(Class<T> clazz, byte[] bytes);

    // 序列化方法
    <T> byte[] serialize(T object);

}
提供两个实现,我这里直接将实现加入了枚举类 Serializer.Algorithm 中
enum SerializerAlgorithm implements Serializer {
	// Java 实现
    Java {
        @Override
        public <T> T deserialize(Class<T> clazz, byte[] bytes) {
            try {
                ObjectInputStream in =
                    new ObjectInputStream(new ByteArrayInputStream(bytes));
                Object object = in.readObject();
                return (T) object;
            } catch (IOException | ClassNotFoundException e) {
                throw new RuntimeException("SerializerAlgorithm.Java 反序列化错误", e);
            }
        }

        @Override
        public <T> byte[] serialize(T object) {
            try {
                ByteArrayOutputStream out = new ByteArrayOutputStream();
                new ObjectOutputStream(out).writeObject(object);
                return out.toByteArray();
            } catch (IOException e) {
                throw new RuntimeException("SerializerAlgorithm.Java 序列化错误", e);
            }
        }
    },
    // Json 实现(引入了 Gson 依赖)
    Json {
        @Override
        public <T> T deserialize(Class<T> clazz, byte[] bytes) {
            return new Gson().fromJson(new String(bytes, StandardCharsets.UTF_8), clazz);
        }

        @Override
        public <T> byte[] serialize(T object) {
            return new Gson().toJson(object).getBytes(StandardCharsets.UTF_8);
        }
    };

    // 需要从协议的字节中得到是哪种序列化算法
    public static SerializerAlgorithm getByInt(int type) {
        SerializerAlgorithm[] array = SerializerAlgorithm.values();
        if (type < 0 || type > array.length - 1) {
            throw new IllegalArgumentException("超过 SerializerAlgorithm 范围");
        }
        return array[type];
    }
}
增加配置类和配置文件
public abstract class Config {
    static Properties properties;
    static {
        try (InputStream in = Config.class.getResourceAsStream("/application.properties")) {
            properties = new Properties();
            properties.load(in);
        } catch (IOException e) {
            throw new ExceptionInInitializerError(e);
        }
    }
    public static int getServerPort() {
        String value = properties.getProperty("server.port");
        if(value == null) {
            return 8080;
        } else {
            return Integer.parseInt(value);
        }
    }
    public static Serializer.Algorithm getSerializerAlgorithm() {
        String value = properties.getProperty("serializer.algorithm");
        if(value == null) {
            return Serializer.Algorithm.Java;
        } else {
            return Serializer.Algorithm.valueOf(value);
        }
    }
}
配置文件
serializer.algorithm=Json
修改编解码器
/**
 * 必须和 LengthFieldBasedFrameDecoder 一起使用,确保接到的 ByteBuf 消息是完整的
 */
public class MessageCodecSharable extends MessageToMessageCodec<ByteBuf, Message> {
    @Override
    public void encode(ChannelHandlerContext ctx, Message msg, List<Object> outList) throws Exception {
        ByteBuf out = ctx.alloc().buffer();
        // 1. 4 字节的魔数
        out.writeBytes(new byte[]{1, 2, 3, 4});
        // 2. 1 字节的版本,
        out.writeByte(1);
        // 3. 1 字节的序列化方式 jdk 0 , json 1
        out.writeByte(Config.getSerializerAlgorithm().ordinal());
        // 4. 1 字节的指令类型
        out.writeByte(msg.getMessageType());
        // 5. 4 个字节
        out.writeInt(msg.getSequenceId());
        // 无意义,对齐填充
        out.writeByte(0xff);
        // 6. 获取内容的字节数组
        byte[] bytes = Config.getSerializerAlgorithm().serialize(msg);
        // 7. 长度
        out.writeInt(bytes.length);
        // 8. 写入内容
        out.writeBytes(bytes);
        outList.add(out);
    }

    @Override
    protected void decode(ChannelHandlerContext ctx, ByteBuf in, List<Object> out) throws Exception {
        int magicNum = in.readInt();
        byte version = in.readByte();
        byte serializerAlgorithm = in.readByte(); // 0 或 1
        byte messageType = in.readByte(); // 0,1,2...
        int sequenceId = in.readInt();
        in.readByte();
        int length = in.readInt();
        byte[] bytes = new byte[length];
        in.readBytes(bytes, 0, length);

        // 找到反序列化算法
        Serializer.Algorithm algorithm = Serializer.Algorithm.values()[serializerAlgorithm];
        // 确定具体消息类型
        Class<? extends Message> messageClass = Message.getMessageClass(messageType);
        Message message = algorithm.deserialize(messageClass, bytes);
//        log.debug("{}, {}, {}, {}, {}, {}", magicNum, version, serializerType, messageType, sequenceId, length);
//        log.debug("{}", message);
        out.add(message);
    }
}
其中确定具体消息类型,可以根据 消息类型字节 获取到对应的 消息 class
@Data
public abstract class Message implements Serializable {

    /**
     * 根据消息类型字节,获得对应的消息 class
     * @param messageType 消息类型字节
     * @return 消息 class
     */
    public static Class<? extends Message> getMessageClass(int messageType) {
        return messageClasses.get(messageType);
    }

    private int sequenceId;

    private int messageType;

    public abstract int getMessageType();

    public static final int LoginRequestMessage = 0;
    public static final int LoginResponseMessage = 1;
    public static final int ChatRequestMessage = 2;
    public static final int ChatResponseMessage = 3;
    public static final int GroupCreateRequestMessage = 4;
    public static final int GroupCreateResponseMessage = 5;
    public static final int GroupJoinRequestMessage = 6;
    public static final int GroupJoinResponseMessage = 7;
    public static final int GroupQuitRequestMessage = 8;
    public static final int GroupQuitResponseMessage = 9;
    public static final int GroupChatRequestMessage = 10;
    public static final int GroupChatResponseMessage = 11;
    public static final int GroupMembersRequestMessage = 12;
    public static final int GroupMembersResponseMessage = 13;
    public static final int PingMessage = 14;
    public static final int PongMessage = 15;
    private static final Map<Integer, Class<? extends Message>> messageClasses = new HashMap<>();

    static {
        messageClasses.put(LoginRequestMessage, LoginRequestMessage.class);
        messageClasses.put(LoginResponseMessage, LoginResponseMessage.class);
        messageClasses.put(ChatRequestMessage, ChatRequestMessage.class);
        messageClasses.put(ChatResponseMessage, ChatResponseMessage.class);
        messageClasses.put(GroupCreateRequestMessage, GroupCreateRequestMessage.class);
        messageClasses.put(GroupCreateResponseMessage, GroupCreateResponseMessage.class);
        messageClasses.put(GroupJoinRequestMessage, GroupJoinRequestMessage.class);
        messageClasses.put(GroupJoinResponseMessage, GroupJoinResponseMessage.class);
        messageClasses.put(GroupQuitRequestMessage, GroupQuitRequestMessage.class);
        messageClasses.put(GroupQuitResponseMessage, GroupQuitResponseMessage.class);
        messageClasses.put(GroupChatRequestMessage, GroupChatRequestMessage.class);
        messageClasses.put(GroupChatResponseMessage, GroupChatResponseMessage.class);
        messageClasses.put(GroupMembersRequestMessage, GroupMembersRequestMessage.class);
        messageClasses.put(GroupMembersResponseMessage, GroupMembersResponseMessage.class);
    }
}
1.2 参数调优
1)CONNECT_TIMEOUT_MILLIS
-
属于 SocketChannal 参数
-
用在客户端建立连接时,如果在指定毫秒内无法连接,会抛出 timeout 异常
-
SO_TIMEOUT 主要用在阻塞 IO,阻塞 IO 中 accept,read 等都是无限等待的,如果不希望永远阻塞,使用它调整超时时间
@Slf4j
public class TestConnectionTimeout {
    public static void main(String[] args) {
        NioEventLoopGroup group = new NioEventLoopGroup();
        try {
            Bootstrap bootstrap = new Bootstrap()
                    .group(group)
                    .option(ChannelOption.CONNECT_TIMEOUT_MILLIS, 300)
                    .channel(NioSocketChannel.class)
                    .handler(new LoggingHandler());
            ChannelFuture future = bootstrap.connect("127.0.0.1", 8080);
            future.sync().channel().closeFuture().sync(); // 断点1
        } catch (Exception e) {
            e.printStackTrace();
            log.debug("timeout");
        } finally {
            group.shutdownGracefully();
        }
    }
}
另外源码部分 io.netty.channel.nio.AbstractNioChannel.AbstractNioUnsafe#connect
@Override
public final void connect(
        final SocketAddress remoteAddress, final SocketAddress localAddress, final ChannelPromise promise) {
    // ...
    // Schedule connect timeout.
    int connectTimeoutMillis = config().getConnectTimeoutMillis();
    if (connectTimeoutMillis > 0) {
        connectTimeoutFuture = eventLoop().schedule(new Runnable() {
            @Override
            public void run() {
                ChannelPromise connectPromise = AbstractNioChannel.this.connectPromise;
                ConnectTimeoutException cause =
                    new ConnectTimeoutException("connection timed out: " + remoteAddress); // 断点2
                if (connectPromise != null && connectPromise.tryFailure(cause)) {
                    close(voidPromise());
                }
            }
        }, connectTimeoutMillis, TimeUnit.MILLISECONDS);
    }
	// ...
}
2)SO_BACKLOG
- 属于 ServerSocketChannal 参数

- 第一次握手,client 发送 SYN 到 server,状态修改为 SYN_SEND,server 收到,状态改变为 SYN_REVD,并将该请求放入 sync queue 队列
- 第二次握手,server 回复 SYN + ACK 给 client,client 收到,状态改变为 ESTABLISHED,并发送 ACK 给 server
- 第三次握手,server 收到 ACK,状态改变为 ESTABLISHED,将该请求从 sync queue 放入 accept queue
其中
-
在 linux 2.2 之前,backlog 大小包括了两个队列的大小,在 2.2 之后,分别用下面两个参数来控制
-
sync queue - 半连接队列
- 大小通过 /proc/sys/net/ipv4/tcp_max_syn_backlog 指定,在
syncookies启用的情况下,逻辑上没有最大值限制,这个设置便被忽略
- 大小通过 /proc/sys/net/ipv4/tcp_max_syn_backlog 指定,在
-
accept queue - 全连接队列
- 其大小通过 /proc/sys/net/core/somaxconn 指定,在使用 listen 函数时,内核会根据传入的 backlog 参数与系统参数,取二者的较小值
- 如果 accpet queue 队列满了,server 将发送一个拒绝连接的错误信息到 client
netty 中
可以通过 option(ChannelOption.SO_BACKLOG, 值) 来设置大小
可以通过下面源码查看默认大小
public class DefaultServerSocketChannelConfig extends DefaultChannelConfig
                                              implements ServerSocketChannelConfig {

    private volatile int backlog = NetUtil.SOMAXCONN;
    // ...
}
课堂调试关键断点为:io.netty.channel.nio.NioEventLoop#processSelectedKey
oio 中更容易说明,不用 debug 模式
public class Server {
    public static void main(String[] args) throws IOException {
        ServerSocket ss = new ServerSocket(8888, 2);
        Socket accept = ss.accept();
        System.out.println(accept);
        System.in.read();
    }
}
客户端启动 4 个
public class Client {
    public static void main(String[] args) throws IOException {
        try {
            Socket s = new Socket();
            System.out.println(new Date()+" connecting...");
            s.connect(new InetSocketAddress("localhost", 8888),1000);
            System.out.println(new Date()+" connected...");
            s.getOutputStream().write(1);
            System.in.read();
        } catch (IOException e) {
            System.out.println(new Date()+" connecting timeout...");
            e.printStackTrace();
        }
    }
}
第 1,2,3 个客户端都打印,但除了第一个处于 accpet 外,其它两个都处于 accept queue 中
Tue Apr 21 20:30:28 CST 2020 connecting...
Tue Apr 21 20:30:28 CST 2020 connected...
第 4 个客户端连接时
Tue Apr 21 20:53:58 CST 2020 connecting...
Tue Apr 21 20:53:59 CST 2020 connecting timeout...
java.net.SocketTimeoutException: connect timed out
3)ulimit -n
- 属于操作系统参数
4)TCP_NODELAY
- 属于 SocketChannal 参数
5)SO_SNDBUF & SO_RCVBUF
- SO_SNDBUF 属于 SocketChannal 参数
- SO_RCVBUF 既可用于 SocketChannal 参数,也可以用于 ServerSocketChannal 参数(建议设置到 ServerSocketChannal 上)
6)ALLOCATOR
- 属于 SocketChannal 参数
- 用来分配 ByteBuf, ctx.alloc()
7)RCVBUF_ALLOCATOR
- 属于 SocketChannal 参数
- 控制 netty 接收缓冲区大小
- 负责入站数据的分配,决定入站缓冲区的大小(并可动态调整),统一采用 direct 直接内存,具体池化还是非池化由 allocator 决定


 255
255


 被折叠的 条评论
为什么被折叠?
被折叠的 条评论
为什么被折叠?
 到【灌水乐园】发言


