


目录
前言:
uiautomator2是基于Android平台的UI自动化测试框架,pytest是一种功能丰富的Python测试框架,而allure是一种用于生成漂亮测试报告的工具。结合使用这三个工具,您可以进行Android的UI自动化测试,并生成直观且可视化的测试报告。
本文主要讲解使用 uiautomator2+pytest+allure 进行 Android 的 UI 自动化测试,其实主要目的是写一些实战的脚本来更深入学习 pytest 框架.
另外也顺便介绍一下 uiautomator2 这款自动化框架,在使用上也是非常的顺畅.
之前我已经使用 appium+testng 写了一套自动化脚本了并且在公司实际使用了.这次就不用公司的 app 测试了,使用上家公司 58 同城的 app 进行自动化测试.
介绍
做 UI 自动化肯定需要选择一种适合的测试框架,比如 java 的 testng、python 的 unittest,主要目的是让代码的层级明确、简洁、复用性强,本次介绍下 python 的 pytest 框架.
pytest
pytest 官方:pytest: helps you write better programs — pytest documentation
The pytest framework makes it easy to write small tests, yet scales to support complex functional testing for applications and libraries.
官方的一段介绍,简单来说就是让写测试代码更容易并且没有那么多约束.当然这块不重点介绍 pytest 为什么好、怎么好,只需要记住 pytest 就是一个测试框架就够了.
uiautomator2
uiautomator2 是一个 Android UI 自动化框架,支持 Python 编写测试脚本对设备进行自动.底层基于 Google uiautomator,隶属于最近比较火热的 openatx 项目中.
下图是运行示意图:
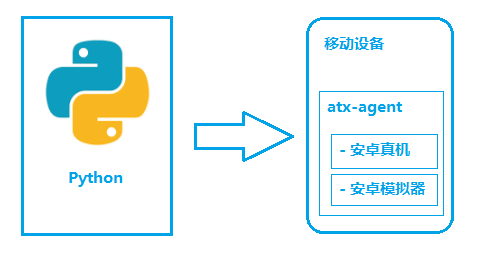
设备中需要安装 atx-agent 作为 uiautomator2 的服务端,解析收到的请求,并转化成 uiautomator2 的代码.总体看来交互过程没有那么繁琐,在实际使用上的确比 appium 快不少.
allure
allure 是一款测试报告,炫酷的页面加上多种数据统计,比 HTMLTestRunner 报告强百倍,当然也支持多语言.
环境搭建
使用 mac 电脑搭建环境
pytest
最新版本出到 4.0 了,但是实际使用 4.0 和 allure 有些不兼容.
所以推荐使用 3.7 版本的 pytest
pip install pytest==3.7
uiautomator2
uiautomator2 也是 python 的一个类库,用 pip 安装即可.
pip install uiautomator2
allure
brew install allure
pip install pytest-allure-adaptor
有了测试框架、自动化框架、测试报告,基本上就能 coding 了.
pytest 插件
pytest 插件可以实现失败重试、打印进度、指定顺序
pip install pytest-sugar # 打印进度

pip install pytest-rerunfailures # 失败重试

pip install pytest-ordering # 执行顺序
当然插件还有很多,这里就不一一介绍了.
实例
初始化 driver
做 UI 自动化都需要初始化一个 driver 对象,这个 driver 对象可以点击事件、滑动、双击等操作
uiautomator2 的初始化 driver 方式
相比 appium 配置很少,同时可以设置全局隐式等待元素时间
import uiautomator2  as ut2
def init_driver(self,device_name):
    '''
    初始化driver
    :return:driver
    '''
    try:
        logger.info(device_name)
        d = ut2.connect(device_name)
        #logger.info("设备信息:{}".format(d.info))
        # 设置全局寻找元素超时时间
        d.wait_timeout = wait_timeout  # default 20.0
        # 设置点击元素延迟时间
        d.click_post_delay = click_post_delay
        #d.service("uiautomator").stop()
        # 停止uiautomator 可能和atx agent冲突
        logger.info("连接设备:{}".format(device_name))
        return d
    except Exception as e:
        logger.info("初始化driver异常!{}".format(e))
fixture 机制
unittest 框架有 setup 和 teardown 方法,用来做初始化和结束测试操作.pytest 是用@pytest.fixture方法来实现 setup 和 teardown.
下面这段代码就是定义一个 driver_setup 方法,来初始化和结束.
# 当设置autouse为True时,
# 在一个session内的所有的test都会自动调用这个fixture
@pytest.fixture()
def driver_setup(request):
    logger.info("自动化测试开始!")
    request.instance.driver = Driver().init_driver(device_name)
    logger.info("driver初始化")
    request.instance.driver.app_start(pck_name, lanuch_activity, stop=True)
    time.sleep(lanuch_time)
    allow(request.instance.driver)
    def driver_teardown():
        logger.info("自动化测试结束!")
        request.instance.driver.app_stop(pck_name)
    request
最低0.47元/天 解锁文章


 360
360

 被折叠的 条评论
为什么被折叠?
被折叠的 条评论
为什么被折叠?
 到【灌水乐园】发言


