


Shiro担任什么角色?
首先我们来认识一下认证和授权流程

权限管理是管理安全数据来源的,比如存储账号密码、权限角色的数据库,所以这个模块一般都是由自己开发的。
安全管理模块就是Shiro负责的,负责进行认证鉴权,通过从权限管理中获得安全数据,对比用户输入。
Shiro三大对象
Shiro三大重要的对象为
- Subject:当前的实体
- SecurityManager:管控模块(最重要)
- Realm:安全数据来源,校验规则
Subject就是当前的实体,用来进行登录,保存信息等。
SecurityManager是管控模块,负责大体的校验规则和一些管理信息,比如从哪里获取安全数据来源,对数据进行缓存,先从缓存中获取信息还是从其他地方获取等。。
Realm就是安全数据的来源,访问数据库的操作一般都在这里,获取账号密码进行比对,获取权限。
下图是Shiro官网的图,这是Shiro能做的功能
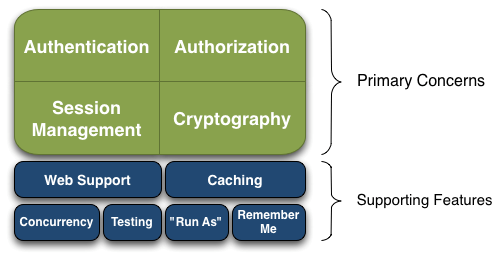
下图是SecurityManager的组成,可以看到有以下这些
- Authenticator:认证器
- Authorizer:鉴权器
- SessionManager:会话管理
- SessionDao:获取会话数据来源
- CacheManager:缓冲管理
- Pluggable Realms:可插入多个安全数据来源
- Cryptography:加密

认证源码分析
源码分析最重要一点,找到入口,而Shiro的入口,就是Subject.Login(),所以我们从这里出发
Subject.Login()方法
进去之后,我们可以看到Subjct是一个接口,他的实现类只有一个DelegatingSubject,所以login的具体方法肯定是由DelegatingSubeject实现的。

接下来点进去看具体的实现,具体的实现如下
 public void login(AuthenticationToken token) throws AuthenticationException {
        this.clearRunAsIdentitiesInternal();
     	//调用了自身的securityManager.login获取Subject当前实体
        Subject subject = this.securityManager.login(this, token);
        String host = null;
     	//这个属性是用来保存当前实体的一系列信息,也就是Subject的信息
        PrincipalCollection principals;
     	//匹配Subject的类型,这里的共同点都是将信息存到principals属性中
        if (subject instanceof DelegatingSubject) {
            DelegatingSubject delegating = (DelegatingSubject)subject;
            principals = delegating.principals;
            host = delegating.host;
        } else {
            principals = subject.getPrincipals();
        }
		//如果信息不为空,则证明登陆过
        if (principals != null && !principals.isEmpty()) {
            //将信息保存在自己的principals中
            this.principals = principals;
            //将是否已经验证的属性设为已经验证,即True
            this.authenticated = true;
            if (token instanceof HostAuthenticationToken) {
                host = ((HostAuthenticationToken)token).getHost();
            }
			//下面的都是将信息保存在自己本类中
            if (host != null) {
                this.host = host;
            }

            Session session = subject.getSession(false);
            if (session != null) {
                this.session = this.decorate(session);
            } else {
                this.session = null;
            }

        } else {
            String msg = "Principals returned from securityManager.login( token ) returned a null or empty value.  This value must be non null and populated with one or more elements.";
            throw new IllegalStateException(msg);
        }
    }
所以总的来说,Subject.login方法就是通过SecurityManager获取当前的Subject(这两个不是同一个Subject),如果有信息,就将信息封装到自己的返回值Subject身上。
this.SecurityManager.login()
接下来我们进入到SecurityManager.login的方法,去看看里面的逻辑
我们可以看到SecurityManager也是一个接口,而且其拥有一长链的实现

这里其实使用了装饰器模式,一层套一层,每一层都拥有前一层的所有功能
- CachingSecurityManager:缓存管理(抽象类)
- RealmSecurityManager:安全数据源管理(抽象类)
- AuthenticatingSecurityManager:认证管理(抽象类)
- AuthorizingSecurityManager:授权鉴权管理(抽象类)
- SessionsSecurityManager:会话管理(抽象类)
- DefaultSecurityManager:拥有前面SecurityManager所有功能的类(第一个实现类)
- DefaultWebSecurityManager:在DefaultSecurityManager扩展了Web模块支持(第二个实现类)
CachingSecurityManager
CachingSecityManager是负责缓存管理的,里面有一个属性,就是cacheManager

所以我们可以给SecurityManager注入自己定义的缓存管理器来实现自定义缓存(常用的EhCache或者Redis)
RealmSecurityManager
RealmSecurityManager里面只有一个属性,一个Realms的集合,是所有安全数据来源的集合

里面对于添加Realm,既可以添加一个,也可以添加多个

所以SecurityManager可以装配我们自定义的Realm或者Realms。
AuthenticatingSecurityManager
AuthenticatingSecurityManager是负责认证管理的,所以前面Shiro图的认证管理器就是在这里,里面只有一个熟悉感,就是认证管理器Authenticator。

可以看到,认证器默认的引用类型是ModularRealmAuthenticator。
AuthorizingSecurityManager
AuthorizingSecurityManager是负责授权管理的,也就是前面的授权器所在类,里面也是只有一个属性,就是授权器Authorizer

也是很容易看到,授权器的默认实现方式为ModularRealmAuthorizer。
SessionSecurityManager
SessionSecurityManager是负责会话管理的,里面也只有一个会话管理器属性,默认为DefaultSessionManager

DefaultSecurityManager
拥有上面提到的所有SecurityManager的功能,具体的SecurityManager.login方法就是在这里实现的。
public Subject login(Subject subject, AuthenticationToken token) throws AuthenticationException {
    	//该变量存储认证信息
        AuthenticationInfo info;
        try {
            //获取认证信息
            info = this.authenticate(token);
        } catch (AuthenticationException var7) {
            //下面的操作都是由获取认证信息步骤引起的
            //要返回上一步,看认证信息步骤
            AuthenticationException ae = var7;

            try {
                this.onFailedLogin(token, ae, subject);
            } catch (Exception var6) {
                if (log.isInfoEnabled()) {
                    log.info("onFailedLogin method threw an exception.  Logging and propagating original AuthenticationException.", var6);
                }
            }

            throw var7;
        }
		//根据认证信息和token创建出Subject对象,所以要先管抓住认证信息怎么拿
        Subject loggedIn = this.createSubject(token, info, subject);
        this.onSuccessfulLogin(token, info, loggedIn);
        return loggedIn;
    }
DefaultSecurityManager获取认证信息
来到这一步,我们首先要去认识AuthenticationInfo这个对象,因为后面的比较都与它相关。
AuthenticationInfo对象
记得Realm中,在认证方法中,我们返回的是SimpleAuthenticationInfo这个对象的,这个对象跟AuthenticationInfo接口相关,所以我们从这里入手

我们可以看到这个接口,被3个子接口继承,而这三个子接口,总体上被2个类去实现,一个是SimpleAccount,另一个是SimpleAuthenticationInfo。
我们先来认识一下这四个接口吧
AuthenticationInfo

里面只有两个方法,分别是获取认证信息和密码的。
MergableAuthenticationInfo

可以看到他新增了一个合并认证信息的功能(认证信息如何进行合并的呢?下面再说)
Account

Account没有新增抽象方法,但还多继承了一个AuthorizationInfo(用来授权的,以后再说)
SaltedAuthenticationInfo

里面增加了一个获取盐值的方法(ByteSouce类型)。
认识SimpleAuthenticationInfo

从上图源码,可以看到,SimpleAuthenticationInfo实现了MergableAuthenticationInfo和SaltedAuthenticationInfo接口,所以他就有这两个接口的所有方法,并且有三个属性
- PrincipalCollection principals 认证信息集合
- credentials:密码
- credentialsSalt:盐值
我们从构造方法开始入手

可以看到里面包括无参构造,总共有5个构造方法,盐值(credentialsSalt可以不注入)和credentials(密码)都是注入的,而principals是通过构造方法出来的,创建一个SimplePrincipalsCollection
SimplePrincipalsCollection
下面我们进入SimplePrincipalsCollection看看其到底是什么架构,
public class SimplePrincipalCollection implements MutablePrincipalCollection {
    //序列化id,可以进行序列,然后放到内存中
    private static final long serialVersionUID = -6305224034025797558L;
    //所有realm的认证信息,一个map集合,键是String类型,Value是Set类型
    private Map<String, Set> realmPrincipals;
    //内存中的对象反序列化回来变成字符串,transizent是让这个属性不被序列化
    private transient String cachedToString;

    public SimplePrincipalCollection() {
    }
	/**
	* 构造方法都是使用addAll或者add方法来进行初始化的
	* 所以下面具体看一下这两个方法
	**/
    public SimplePrincipalCollection(Object principal, String realmName) {
        if (principal instanceof Collection) {
            this.addAll((Collection)principal, realmName);
        } else {
            this.add(principal, realmName);
        }

    }

    public SimplePrincipalCollection(Collection principals, String realmName) {
        this.addAll(principals, realmName);
    }

    public SimplePrincipalCollection(PrincipalCollection principals) {
        this.addAll(principals);
    }
    //。。。。
}
add方法
/**
* add方法源码
**/
public void add(Object principal, String realmName) {
        //如果realmName或者principal为空,就抛出异常
        if (realmName == null) {
            throw new IllegalArgumentException("realmName argument cannot be null.");
        } else if (principal == null) {
            throw new IllegalArgumentException("principal argument cannot be null.");
        }
        //不为空,就初始化cachedToString属性
        //然后调用getPrincipalslazy方法
        else {
            this.cachedToString = null;
            //拿到realmName对应的set集合,存放principal信息
            this.getPrincipalsLazy(realmName).add(principal);
        }
    }
	/**
	* getPrincipalsLazy方法具体实现
	**/
    protected Collection getPrincipalsLazy(String realmName) {
        //我们可以看到,其实这个方法是用来初始化relamPrincipals的
        //如果是第一次加入,先对realmPrincipals进行初始化
        if (this.realmPrincipals == null) {
            //第一次定义为是一个LinkedHashMap
            //这个LinkedHashMap,键是realmName,值是一个set集合
            this.realmPrincipals = new LinkedHashMap();
        }
		//通过键值对方式,获取realmPrincipals的对应realmName的set集合
        Set principals = (Set)this.realmPrincipals.get(realmName);
        //如果没有,证明该Realm是第一次存放认证信息,还没有进行与其他Realm的信息合并
        if (principals == null) {
            //set集合具体是一个LinkedHashSet
            principals = new LinkedHashSet();
            //往realmPrincipals中放入这realmName为key,principals为值的键值对
            this.realmPrincipals.put(realmName, principals);
        }
        //如果已经有了,证明已经合并过了
		//返回realmName对应的set集合
        return (Collection)principals;
    }
所以SimplePrincipalCollection的底层是一个LinkedHashMap,以RealmName为键,是一个字符串对象,值对应的是一个LinkedHashSet集合,里面存放的就是principal(账号信息)

我们可以看到key是Realm的全限定符,value里面存的就是是一个以账号组成的LinkedHashSet。
为什么要用LinkedHashSet呢?一个Realm里面还会存在多个账号的吗?。

下面回到我们的认证过程
DefaultSecurityManager调用自身的authenticate方法发来获取认证信息,该方法实现具体如下

点进去,发现Authenticator是一个接口,而且拥有两个实现类,那么具体是哪一个呢?

这里,我们必须返回到上一层看一下DefaultSecurityManager的authenticator是哪一个,去看看到底调用的是哪一个实现类,前面已经提到过,DefaultSecurityManager的authenticator(认证器)是AuthenticatingSecurityManager的认证器,所以默认的类型是ModularRealmAuthenticator。

我们可以看到ModularRealmAuthenticator是继承AbstractAuthenticator的,而且并没有authenticate方法的实现,所以可以断定,authenticate的实现肯定在父类AbstractAuthenticator中

在里面,很轻易找到了对应具体实现方法
public final AuthenticationInfo authenticate(AuthenticationToken token) throws AuthenticationException {
    	//如果token不存在,抛出异常
        if (token == null) {
            throw new IllegalArgumentException("Method argument (authentication token) cannot be null.");
        } else {
            log.trace("Authentication attempt received for token [{}]", token);
			//该变量用于记录认证信息
            AuthenticationInfo info;
            try {
                //调用自身的doAuthenticate方法获取认证信息
                info = this.doAuthenticate(token);
                if (info == null) {
                    String msg = "No account information found for authentication token [" + token + "] by this " + "Authenticator instance.  Please check that it is configured correctly.";
                    throw new AuthenticationException(msg);
                }
            } catch (Throwable var8) {
                AuthenticationException ae = null;
                if (var8 instanceof AuthenticationException) {
                    ae = (AuthenticationException)var8;
                }

                if (ae == null) {
                    String msg = "Authentication failed for token submission [" + token + "].  Possible unexpected " + "error? (Typical or expected login exceptions should extend from AuthenticationException).";
                    ae = new AuthenticationException(msg, var8);
                    if (log.isWarnEnabled()) {
                        log.warn(msg, var8);
                    }
                }

                try {
                    this.notifyFailure(token, ae);
                } catch (Throwable var7) {
                    if (log.isWarnEnabled()) {
                        String msg = "Unable to send notification for failed authentication attempt - listener error?.  Please check your AuthenticationListener implementation(s).  Logging sending exception and propagating original AuthenticationException instead...";
                        log.warn(msg, var7);
                    }
                }

                throw ae;
            }

            log.debug("Authentication successful for token [{}].  Returned account [{}]", token, info);
            this.notifySuccess(token, info);
            return info;
        }
    }
我们可以看到,这里是调用了自身的doAuthenticate方法去获取认证信息的,所以,下面就去看看这个方法
protected abstract AuthenticationInfo doAuthenticate(AuthenticationToken var1) throws AuthenticationException;
这个方法是一个抽象方法,所以肯定是由AbstractAuthenticator的子类ModularRealmAuthenticator去实现的

具体实现如下
    protected AuthenticationInfo doAuthenticate(AuthenticationToken authenticationToken) throws AuthenticationException {
        //判断是否有Realm装配
        this.assertRealmsConfigured();
        //获取所有Realm
        Collection<Realm> realms = this.getRealms();
        //如果只有一个Realm,就只调用那个Realm(通过迭代器获取)
        //如果有多个Realm,就多个执行
        return realms.size() == 1 ? this.doSingleRealmAuthentication((Realm)realms.iterator().next(), authenticationToken) : this.doMultiRealmAuthentication(realms, authenticationToken);
    }
好了,现在弄清楚认证方法是怎样的了,具体的规则如下
- 如果只有一个Realm,就只调用那一个Realm
- 如果有多个Realm,都调用。
下面我们进入到Realm认证中
ModularRealmAuthenticator的doSingleRealmAuthentication
这是源码
    protected AuthenticationInfo doSingleRealmAuthentication(Realm realm, AuthenticationToken token) {
        //token类型不支持,抛出错误
        if (!realm.supports(token)) {
            String msg = "Realm [" + realm + "] does not support authentication token [" + token + "].  Please ensure that the appropriate Realm implementation is " + "configured correctly or that the realm accepts AuthenticationTokens of this type.";
            throw new UnsupportedTokenException(msg);
        } else {
            //从Realm中取出认证信息,即调用Realm的认证方法
            AuthenticationInfo info = realm.getAuthenticationInfo(token);
            //如果取不到,抛出找不到账号不匹配的异常
            if (info == null) {
                String msg = "Realm [" + realm + "] was unable to find account data for the " + "submitted AuthenticationToken [" + token + "].";
                throw new UnknownAccountException(msg);
            } else {
                return info;
            }
        }
    }
进入realm.getAuthenticationInfo()

可以看到Realm是一个接口,并且实现该接口的类,主要有CachingRealm,AuthenticatingRealm和AuthorizingRealm,这里也是使用装饰器模式,一层一层递进,而实现getAuthenticationInfo的Realm是AuthenticatingRealm(这里三个Realm都是抽象类,实现接口是不需要去实现里面的方法的)
下面是源码
    public final AuthenticationInfo getAuthenticationInfo(AuthenticationToken token) throws AuthenticationException {
        //先从缓存中获取
        AuthenticationInfo info = this.getCachedAuthenticationInfo(token);
        if (info == null) {
            //如果缓存中没有,就通过doGetAuthenticationInfo中获取
            info = this.doGetAuthenticationInfo(token);
            log.debug("Looked up AuthenticationInfo [{}] from doGetAuthenticationInfo", info);
            if (token != null && info != null) {
                //将token和info都放入缓存(前面已经判断缓存中没有)
                this.cacheAuthenticationInfoIfPossible(token, info);
            }
        } else {
            log.debug("Using cached authentication info [{}] to perform credentials matching.", info);
        }

        if (info != null) {
            //如果Info不为空,证明存在账号,然后进行校验密码
            this.assertCredentialsMatch(token, info);
        } else {
            log.debug("No AuthenticationInfo found for submitted AuthenticationToken [{}].  Returning null.", token);
        }
        return info;
    }
步骤总结如下
- 首先尝试从缓存中取出info
- 缓存中取不出就从doAuthenticationInfo方法中取
- 此时再判断info和token是否为NULL,如果不为NULL,就放入缓存中(前面已经判断缓存中没有)
- 然后通过assertCredentialsMatch方法进行校验密码
下面进入到doGetAuthenticationInfo里面看一下

这是一个抽象方法,这个方法其实就是我们自定义Realm时要去实现认证方法。
然后我们回到上一层,看一下,密码是如何校验的
下面是密码校验的源码
    protected void assertCredentialsMatch(AuthenticationToken token, AuthenticationInfo info) throws AuthenticationException {
        //拿到密码匹配器
        CredentialsMatcher cm = this.getCredentialsMatcher();
        if (cm != null) {
            //如果密码不匹配(使用token和前面获取到的认证信息进行匹配),抛出异常
            if (!cm.doCredentialsMatch(token, info)) {
                String msg = "Submitted credentials for token [" + token + "] did not match the expected credentials.";
                throw new IncorrectCredentialsException(msg);
            }
        }
        //没有密码匹配器,抛出异常
        else {
            throw new AuthenticationException("A CredentialsMatcher must be configured in order to verify credentials during authentication.  If you do not wish for credentials to be examined, you can configure an " + AllowAllCredentialsMatcher.class.getName() + " instance.");
        }
    }
cm.doCredentialsMatch方法进行密码匹对
我们再详细去看一下cm.doCredentialsMatch方法。
可以看到,这是一个接口方法,而且有三个实现类
- AllowCredentialsMatcher
- PasswordMatcher
- SimpleCredentialsMatcher

AllowAllCredentialsMatcher
一直返回都是True,即所有匹配都是成功的,无论密码是什么都会验证成功
public class AllowAllCredentialsMatcher implements CredentialsMatcher {
    public AllowAllCredentialsMatcher() {
    }

    /**
    * 返回的都是true
    **/
    public boolean doCredentialsMatch(AuthenticationToken token, AuthenticationInfo info) {
        return true;
    }
}
SimpleCredentialsMatcher
这个很简单,只是进行输入的密码跟Realm认证信息里面的密码是否一致即可
public class SimpleCredentialsMatcher extends CodecSupport implements CredentialsMatcher {
    private static final Logger log = LoggerFactory.getLogger(SimpleCredentialsMatcher.class);

    public SimpleCredentialsMatcher() {
    }

    protected Object getCredentials(AuthenticationToken token) {
        return token.getCredentials();
    }

    protected Object getCredentials(AuthenticationInfo info) {
        return info.getCredentials();
    }

    /**
    * 这里是匹配的细节
    **/
    protected boolean equals(Object tokenCredentials, Object accountCredentials) {
        if (log.isDebugEnabled()) {
            log.debug("Performing credentials equality check for tokenCredentials of type [" + tokenCredentials.getClass().getName() + " and accountCredentials of type [" + accountCredentials.getClass().getName() + "]");
        }
		//判断能否被序列化字节
        if (this.isByteSource(tokenCredentials) && this.isByteSource(accountCredentials)) {
            //如果两个参数都可以很简单的变成字符数组
            if (log.isDebugEnabled()) {
                log.debug("Both credentials arguments can be easily converted to byte arrays.  Performing array equals comparison");
            }
			//将其变成字符数组进行比较
            byte[] tokenBytes = this.toBytes(tokenCredentials);
            byte[] accountBytes = this.toBytes(accountCredentials);
            return MessageDigest.isEqual(tokenBytes, accountBytes);
        } else {
            //直接字符串进行匹配
            return accountCredentials.equals(tokenCredentials);
        }
    }

	/**
	*进行验证
	**/
    public boolean doCredentialsMatch(AuthenticationToken token, AuthenticationInfo info) {
        Object tokenCredentials = this.getCredentials(token);
        Object accountCredentials = this.getCredentials(info);
        //将输入的密码和认证信息里面的密码进行匹配
        return this.equals(tokenCredentials, accountCredentials);
    }
}
既然都来到这里了,我们再看一看是怎么判断可以序列化的,点进去this.isByteSource方法,原来是由CodeSupport实现的
/**
* 就是简单的判断是类型是否为字节数组、字符数组、字符串、文件、输入流等等
**/
protected boolean isByteSource(Object o) {
        return o instanceof byte[] || o instanceof char[] || o instanceof String || o instanceof ByteSource || o instanceof File || o instanceof InputStream;
    }
我们再看看,两个字节数组是怎么进行对比的。
    /**
     * Compares two digests for equality. Does a simple byte compare.
     *
     * @param digesta one of the digests to compare.
     *
     * @param digestb the other digest to compare.
     *
     * @return true if the digests are equal, false otherwise.
     */
    public static boolean isEqual(byte[] digesta, byte[] digestb) {
        //同一个对象,返回true
        if (digesta == digestb) return true;
        //都为空,返回false
        if (digesta == null || digestb == null) {
            return false;
        }
        //长度不一样,返回false
        if (digesta.length != digestb.length) {
            return false;
        }
		//遍历比较所有的字节
        int result = 0;
        // time-constant comparison
        for (int i = 0; i < digesta.length; i++) {
            //通过异或运算比较,两个相同就返回1
            //即digesta[i]与digestb[i]是相同的,就返回0,不同返回1
            //|=是result与右边值进行或运算后,将结果赋给result
            //所以只要出现一次不同,result就会为1,因为或运算
            result |= digesta[i] ^ digestb[i];
        }
        return result == 0;
    }
可以看到,这里前面使用了,比较两个对象的地址是否一样,和比较数组长度是否一样,来减少运算,如果地址不一样,长度一样,就要进行遍历比较,通过异或运算和或运算来比较(使用异或比较两个字节数组,只有有一个不对应就会返回1,此时result就会一直为1,因为使用或运算,然后最后比较result是否为0即可)。
PasswordMatcher
public class PasswordMatcher implements CredentialsMatcher {
    //装配一个PasswordService
    private PasswordService passwordService = new DefaultPasswordService();

    public PasswordMatcher() {
    }

    /**
    * 进行密码匹配
    **/
    public boolean doCredentialsMatch(AuthenticationToken token, AuthenticationInfo info) {
        //这一步是确保PasswordService装配成功,通过检验this.passwordService是否为Null
        PasswordService service = this.ensurePasswordService();
        //获取token里面的密码
        Object submittedPassword = this.getSubmittedPassword(token);
        //获取认证信息里面的密码信息
        Object storedCredentials = this.getStoredPassword(info);
        //判断密码的加密类型(在密码信息中有保存)
        //这个加密类型是在ShiroConfig中注入Relam时有设置的
        this.assertStoredCredentialsType(storedCredentials);

        //如果加密算法是哈希
        if (storedCredentials instanceof Hash) {
            //将密码装换成哈希类型
            Hash hashedPassword = (Hash)storedCredentials;
            //这一步是将默认的密码服务方式强转成哈希密码服务方式
            HashingPasswordService hashingService = this.assertHashingPasswordService(service);
            //进行密码对比,对比Realm的密码和进行哈希加密后的密码
            return hashingService.passwordsMatch(submittedPassword, hashedPassword);
        } else {
            //如果是普通的话,是进行特殊算法进行匹配的,没看懂
            String formatted = (String)storedCredentials;
            return this.passwordService.passwordsMatch(submittedPassword, formatted);
        }
    }

//。。。。。。
}
ModularRealmAuthenticator的doMultiRealmAuthentication
当有多个Realm时,就有问题了,如何判断认证成功呢?认证信息又该是怎样的呢?
现在我们看,当有多个Realm时,是怎么进行的
 protected AuthenticationInfo doMultiRealmAuthentication(Collection<Realm> realms, AuthenticationToken token) {
     //AuthenticationStrategy是认证策略
        AuthenticationStrategy strategy = this.getAuthenticationStrategy();
     //在经过所有的Realm进行认证时的初始化操作
        AuthenticationInfo aggregate = strategy.beforeAllAttempts(realms, token);
        if (log.isTraceEnabled()) {
            log.trace("Iterating through {} realms for PAM authentication", realms.size());
        }

        Iterator var5 = realms.iterator();
		//使用迭代器遍历所有Realm
        while(var5.hasNext()) {
            Realm realm = (Realm)var5.next();
            //记录进行验证当前Realm前的合计结果
            aggregate = strategy.beforeAttempt(realm, token, aggregate);
            if (realm.supports(token)) {
                log.trace("Attempting to authenticate token [{}] using realm [{}]", token, realm);
                AuthenticationInfo info = null;
                Throwable t = null;

                try {
                    //获取当前Realm的认证信息
                    info = realm.getAuthenticationInfo(token);
                } catch (Throwable var11) {
                    t = var11;
                    if (log.isDebugEnabled()) {
                        String msg = "Realm [" + realm + "] threw an exception during a multi-realm authentication attempt:";
                        log.debug(msg, var11);
                    }
                }
				//记录通过当前Realm后的合计结果
                aggregate = strategy.afterAttempt(realm, token, info, aggregate, t);
            } else {
                log.debug("Realm [{}] does not support token {}.  Skipping realm.", realm, token);
            }
        }
		//已经通过所有Realm的认证,获取最终的策略认证后的信息
        aggregate = strategy.afterAllAttempts(token, aggregate);
        return aggregate;
    }
在这部分,最重要的部分有两个
-
AuthenticationInfoStrategy:认证策略
-
beforeAllAttempts方法
-
beforeAttempt方法
-
afterAttempt方法
-
afterAllAttempts方法
-
-
AuthenticationInfo aggregate:合计结果的认证信息
AuthenticationInfoStrategy:认证策略
我们点进去this.getAuthenticationStrategy()方法,发现这个AuthenticationStrategy属性是在上一级的ModularRealmAuthenticator中的,默认为AtLeastOneSuccessfulStrategy,即至少有一次认证成功

而AuthenticationStrategy是一个接口,其实现类有如下几个
-
AbstractAuthenticationStrategy:抽象类,里面有缺省的afterAttempt与beforeAttempt
-
AtLeastOneSuccessfulStrategy:至少一次验证成功,返回所有成功的认证信息
-
AllSuccessfultStrategy:全部验证成功(只要出现一次失败就认证失败),返回所有成功的认证信息
-
FirstSuccessfulStrategy:第一个Realm认证成功,返回第一个认证成功信息

详细看看这几个策略的实现吧
AbstraAuthenticationStrategy
public abstract class AbstractAuthenticationStrategy implements AuthenticationStrategy {
    public AbstractAuthenticationStrategy() {
    }

    /**
    * 没有重写就会使用的beforeAllAttempts
    **/
    public AuthenticationInfo beforeAllAttempts(Collection<? extends Realm> realms, AuthenticationToken token) throws AuthenticationException {
        //直接返回一个初始化的SimpleAuthenticationsInfo
        return new SimpleAuthenticationInfo();
    }
	/**
	* 没有重写就会使用的beforeAttempt
	**/
    public AuthenticationInfo beforeAttempt(Realm realm, AuthenticationToken token, AuthenticationInfo aggregate) throws AuthenticationException {
        //只简单返回当前所有结果认证情况
        return aggregate;
    }

    /**
    * 没有重写就会使用的afterAttempt
    **/
    public AuthenticationInfo afterAttempt(Realm realm, AuthenticationToken token, AuthenticationInfo singleRealmInfo, AuthenticationInfo aggregateInfo, Throwable t) throws AuthenticationException {
        //如果当前的Realm认证失败,singleRealmInfo就会为null
        AuthenticationInfo info;
        if (singleRealmInfo == null) {
            //返回之前的所有结果认证情况即可
            info = aggregateInfo;
        } else if (aggregateInfo == null) {
            //如果当前结果认证情况为Null,而且singleRealmInfo不为Null
            //证明这是第一个通过认证的,返回singleRealmInfo
            info = singleRealmInfo;
        } else {
            //如果前面结果认证结果不为Null,且当前的Realm的认证信息也不为Null(即认证成功)
            //将当前的Realm认证信息合并到原有的结果认证中去,相当于添加进去
            info = this.merge(singleRealmInfo, aggregateInfo);
        }

        return info;
    }
	/**
	* 对结果认证信息与当前Realm认证信息进行合并
	**/
    protected AuthenticationInfo merge(AuthenticationInfo info, AuthenticationInfo aggregate) {
        //调用的AuthenticationInfo里面的方法,后面再讲
        if (aggregate instanceof MergableAuthenticationInfo) {
            ((MergableAuthenticationInfo)aggregate).merge(info);
            return aggregate;
        } else {
            throw new IllegalArgumentException("Attempt to merge authentication info from multiple realms, but aggregate AuthenticationInfo is not of type MergableAuthenticationInfo.");
        }
    }
	/**
	* 匹配完所有Realm后,执行的afterAllAttempts操作
	* 这里只是简单将所有的结果认证信息返回去
	**/
    public AuthenticationInfo afterAllAttempts(AuthenticationToken token, AuthenticationInfo aggregate) throws AuthenticationException {
        return aggregate;
    }
}
具体的流程就是
- beforeAllAttempt:初始化了结果认证信息,用来储存后面所有Realm的认证信息(是一个SimpleAuthenticationInfo)
- beforeAttempt:将当前结果认证信息返回
- afterAttempt:认证成功的Realm,返回的认证信息会与结果认证信息进行合并(调用merge方法),但如果是第一个认证成功的Realm,则结果认证信息就是它的结果认证信息
- afterAllAttempt:将结果认证信息返回
- merge方法其实就是合并两个SimpleAuthenticationInfo的SimplePrincipalCollection
下面去看具体的策略实现,都围绕这4个方法去分析
AtLeastOneSuccessfulStrategy
public class AtLeastOneSuccessfulStrategy extends AbstractAuthenticationStrategy {
    public AtLeastOneSuccessfulStrategy() {
    }

    private static boolean isEmpty(PrincipalCollection pc) {
        return pc == null || pc.isEmpty();
    }

    public AuthenticationInfo afterAllAttempts(AuthenticationToken token, AuthenticationInfo aggregate) throws AuthenticationException {
        //判断校验结果是否为空,和校验结果里面的认证信息是否为空
        if (aggregate != null && !isEmpty(aggregate.getPrincipals())) {
            //只有不为空,就代表至少有一个验证通过,返回校验结果
            return aggregate;
        } else {
            //抛出异常,没有一个Realm认证通过,请确保有一个Realm可以通过
            throw new AuthenticationException("Authentication token of type [" + token.getClass() + "] " + "could not be authenticated by any configured realms.  Please ensure that at least one realm can " + "authenticate these tokens.");
        }
    }
}
我们可以看到AtLeastOneSuccessfulStrategy只重写了最后的afterAllAttempts方法,所以,它的具体流程其实就是获取所有成功通过的认证信息,并且检查认证信息是否为空即可,如果不为空,就返回所有结果认证信息,成功通过认证。
AllSuccessfulStrategy
public class AllSuccessfulStrategy extends AbstractAuthenticationStrategy {
    private static final Logger log = LoggerFactory.getLogger(AllSuccessfulStrategy.class);

    public AllSuccessfulStrategy() {
    }

    /**
    * 在进行校验时,先判断token是否被Realm支持
    * 即beforeAttempt是检验token是否被Realm支持的
    **/
    public AuthenticationInfo beforeAttempt(Realm realm, AuthenticationToken token, AuthenticationInfo info) throws AuthenticationException {
        if (!realm.supports(token)) {
            String msg = "Realm [" + realm + "] of type [" + realm.getClass().getName() + "] does not support " + " the submitted AuthenticationToken [" + token + "].  The [" + this.getClass().getName() + "] implementation requires all configured realm(s) to support and be able to process the submitted " + "AuthenticationToken.";
            throw new UnsupportedTokenException(msg);
        } else {
            return info;
        }
    }

    public AuthenticationInfo afterAttempt(Realm realm, AuthenticationToken token, AuthenticationInfo info, AuthenticationInfo aggregate, Throwable t) throws AuthenticationException {
        String msg;
        //先判断有没有要抛出的错误
        if (t != null) {
            //有的话进行抛出
            if (t instanceof AuthenticationException) {
                throw (AuthenticationException)t;
            } else {
                msg = "Unable to acquire account data from realm [" + realm + "].  The [" + this.getClass().getName() + " implementation requires all configured realm(s) to operate successfully " + "for a successful authentication.";
                throw new AuthenticationException(msg, t);
            }
        } else if (info == null) {
            //没有异常抛出,但没有认证信息
            //标识从Realm认证中没有获取到认证信息,认证不通过
            msg = "Realm [" + realm + "] could not find any associated account data for the submitted " + "AuthenticationToken [" + token + "].  The [" + this.getClass().getName() + "] implementation requires " + "all configured realm(s) to acquire valid account data for a submitted token during the " + "log-in process.";
            //抛出账号不存在的异常
            throw new UnknownAccountException(msg);
        } else {
            //既有信息又没有抛出的异常,证明认证成功
            log.debug("Account successfully authenticated using realm [{}]", realm);
            //把info和aggregate合并起来
            //因为是要所有成功才认证成功,所以要进行合并
            this.merge(info, aggregate);
            return aggregate;
        }
    }
}
可以看到AllSuccessfulStrategy重写了afterAttempt和beforeAttempt,只要有一个认证失败,afterAttempt都会抛出异常,认证到此就失败了,不是从afterAllAttempt处进行比对,而是在beforeAttempt和afterAttempt出现失败,就认证失败。
FirstSuccessfulStrategy
public class FirstSuccessfulStrategy extends AbstractAuthenticationStrategy {
    public FirstSuccessfulStrategy() {
    }


    public AuthenticationInfo beforeAllAttempts(Collection<? extends Realm> realms, AuthenticationToken token) throws AuthenticationException {
        //我们可以看到这里beforeAllAttemps直接Return null了
        return null;
    }

    private static boolean isEmpty(PrincipalCollection pc) {
        return pc == null || pc.isEmpty();
    }

    protected AuthenticationInfo merge(AuthenticationInfo info, AuthenticationInfo aggregate) {
        //如果结果信息不为null且不为空
        if (aggregate != null && isEmpty(aggregate.getPrincipals())) {
            //返回认证信息
            return aggregate;
        }
        //如果认证信息为空
        else {
            //判断info是否为空,如果不为空,返回info
            return info != null ? info : aggregate;
        }
    }
}
可以看到,FirstSuccessfulStrategy重写了beforeAllAttempts和merge方法,记得原来的beforeAllAttempts其实是用来初始化结果认证信息的,但这里返回了NULL,不用去初始化结果认证信息,所以一开始的结果认证信息aggregate是为NULL的,我们知道,原来的merge是返回合并后的认证信息,但这里的merge返回的一直都会是同一个aggregate(从一开始为Null,然后值变成第一个认证成功的info),即最后返回的结果认证信息,一定指只会是Null,或者第一个Realm成功认证的认证信息。
总结
FirstSuccessfulStrategy与AtLeastOneSuccessfultStrategy的区别就是,前者认证通过的话,只会返回第一个Realm的认证信息,后者通过的话,是返回所有成功认证Realm的认证信息,这两者都会要遍历所有的Realm。
到此为止,认证过程就结束了。


 669
669


 被折叠的 条评论
为什么被折叠?
被折叠的 条评论
为什么被折叠?
 到【灌水乐园】发言


