


Toolbar是Android 5.0中新引入的一个控件,其出现的目的就是为了取代ActionBar,对于actionbar本人表示没有使用过。actionbar其实是系统UI,没有给开发者太多的权限来修改它,而toolbar则是应用UI,开发者可以随意改动它。
使用教程:
1、在Studio中直接在module的build.gradle文件中添加compile
dependencies {
    compile 'com.android.support:appcompat-v7:22.2.1'
}
2 修改当前activity的主题为Theme.AppCompat.NoActionBart,
3、而在Activity中我们就不要再继承ActionBarActivity了,AppCompatActivity
4、在layout布局中添加Toolbar
<RelativeLayout xmlns:android="http://schemas.android.com/apk/res/android"
    xmlns:tools="http://schemas.android.com/tools" android:layout_width="match_parent"
    android:layout_height="match_parent" tools:context=".MainActivity">

    <android.support.v7.widget.Toolbar
        android:id="@+id/my_toolbar"
        android:layout_width="match_parent"
        android:layout_height="wrap_content" />

</RelativeLayout>
5、在Activity中调用setSupportActionBar方法将Toolbar的实例对象传入即可:
Toolbar toolbar = (Toolbar) findViewById(R.id.my_toolbar);
        setSupportActionBar(toolbar);
运行效果如下,黑乎乎的,不过还是出来了,那么怎么改成我们之前的效果图呢。

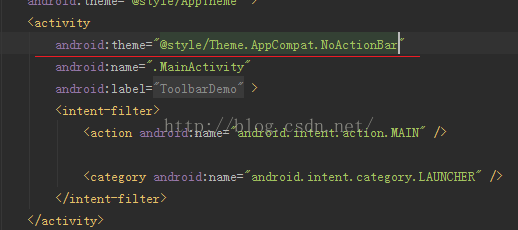
6、通过修改style来实现,在values文件夹下的style中添加如下style,这个主题继承了Theme.AppCompat.NoActionBart主题,我们在maimfest中activity换成我们现在这个 android:theme="@style/AppTheme.Base"。
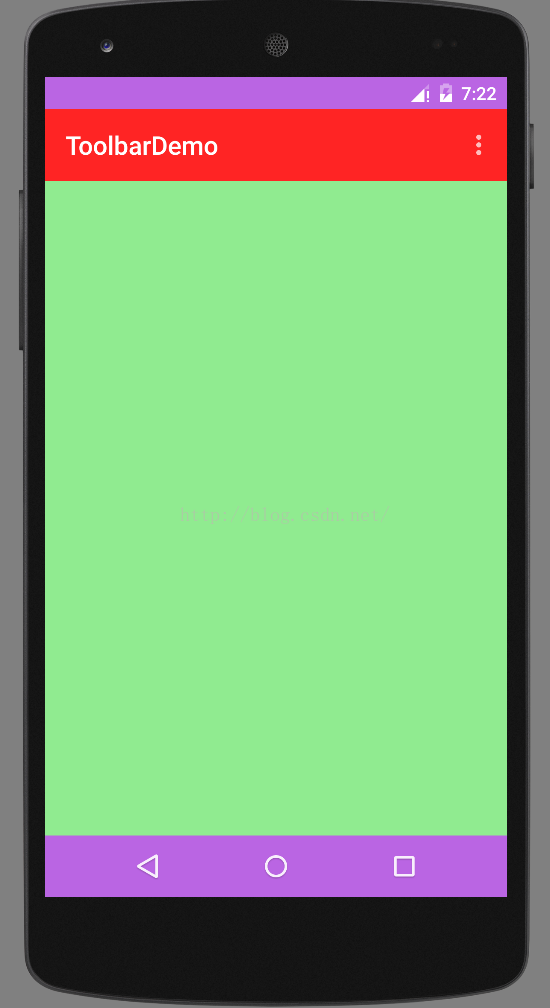
下面的colorPrimary用来定义应用的主色调,而colorPrimaryDark则是主色调偏暗的一个色调,最后的android:windowBackground则是定义整个Window窗口的背景色,
<style name="AppTheme.Base" parent="Theme.AppCompat.NoActionBar">
        <item name="windowActionBar">false</item>
        <item name="android:windowNoTitle">true</item>
        <item name="colorPrimary">@color/red0</item>
        <item name="colorPrimaryDark">@color/red1</item>
        <item name="android:windowBackground">@color/red2</item>
    </style>
7、在toolbar属性中加上android:background="?attr/colorPrimary"

效果图:
这里要注意的是底部导航栏的背景色只能在5.0以后的版本中才能修改,所以我们在这里将其单独放进v21的资源文件中,然后在mainfest中修改主题为android:theme="@style/AppTheme"
<style name="AppTheme" parent="AppTheme.Base">
        <item name="android:navigationBarColor">@color/red1</item>
    </style>
说明:这个效果只适合在Android 5.0版本的手机上,这个是我在模拟器上的运行效果,大家在Android studio中建立模拟器的时候可能会出现问题,大家可以参看我的另一篇关于创建模拟器的博客


 2029
2029


 被折叠的 条评论
为什么被折叠?
被折叠的 条评论
为什么被折叠?
 到【灌水乐园】发言


