


目录
一、QWidget核心属性
在Qt中使用QWidget类表示"控件",如按钮、视图、输入框、滚动条等具体的控件类,都是继承自Qwidget。可以认为QWidget中包含了Qt整个控件体系中的通用部分
| 属性 | 作用 |
|---|---|
| enabled | 设置控件是否可用(true为可用,false为禁用) |
| geometry | 位置和尺寸,包含x、y、width、height四个部分 其中坐标是以父元素为参考进行设置的 |
| windowTitle | 设置widget标题 |
| windowIcon | 设置widget图标 |
| windowOpacity | 设置widget的不透明度 |
| cursor | 设置鼠标悬停时显示的图标 |
| font | 字体相关属性 涉及到字体家族、字体大小、粗体、斜体、下划线 |
| toolTip | 鼠标悬停在widget上会在状态栏中显示的提示信息 |
| toolTipDuring | toolTip显示的持续时间 |
| statusTip | widget状态发生改变时显示的提示信息(如按钮被按下) |
| whatsThis | 鼠标悬停并按下alt + F1时,显示的帮助信息(显示在一个弹出的窗口中) |
| styleSheet | 允许使用CSS来设置widget的样式 |
| focusPolicy | 该widget如何获取到焦点
|
| contextMenuPolicy | 上下文菜单的显示策略 |
| locale | 设置语言与国家地区 |
| acceptDrops | 该部件是否接受拖放操作 若设置为true,那么该部件就可以接收来自其他部件的拖放操作。当一个部件被拖放到该部件上时,该部件会接收到相应的接收事件(如dropEvent) 若设置为false,那么该部件不会接收任何拖放操作 |
| minimumSize | 控件最小尺寸,包括最小宽度与最小高度 |
| maximumSize | 控件最大尺寸,包括最大宽度和最大高度 |
| sizePolicy | 尺寸策略,控制控件在布局管理器中的缩放方式 |
| windowModality | 指定窗口是否具有"模态"行为 |
| sizeIncrement | 拖动窗口大小时的增量单位 |
| baseSize | 窗口的基础大小, |
| palette | 调色板,可以设置widget的颜色风格 |
| mouseTracking | 是否要跟踪鼠标移动事件 |
| tableTracking | 是否跟踪触摸屏的移动事件(Qt5.9引进) |
| layoutDirection | 布局方向 Qt::LeftToRight:文本从左到右排列(默认值) Qt::RightToLeft:文本从右到左排列 Qt::GlobalAtomics:部件的布局方向由全局原子性决定(即根据应用程序中的其他的widget布局方向确定) |
| autoFillBackground | 是否自动填充背景颜色 |
| windowFilePath | 将widget和一个本地文件路径关联 |
| accessibleName | 设置widget的可访问名称(该名称可被辅助技术读取) 该属性用于实现无障碍程序的场景 |
| accessibleDescription | 设置widget的详细描述(作同accessibleName) |
| inputMethodHints | 针对输入框有效,用来提示用户当前能输入的合法数据的格式(如只能输入数字、只能输入日期等) |
下面介绍一些常用的属性,没有介绍到的可以自行查阅文档
二、enable属性
| API | 说明 |
|---|---|
| isEnabled() | 获取控件的可用状态 |
| setEnabled() | 设置控件是否可用,true表示可用,false表示禁用 |
说明:
- "禁用"是指该控件不能接收任何用户的输入事件,并且外观往往是灰色的
- 若一个widget被禁用,则该widget的子元素也被禁用
代码示例:设置一个按钮的初始状态为禁用,另一个按钮用于切换该按钮的状态
widget.h文件
#ifndef WIDGET_H
#define WIDGET_H

#include <QWidget>
#include <QPushButton>
#include <QDebug>

QT_BEGIN_NAMESPACE
namespace Ui { class Widget; }
QT_END_NAMESPACE

class Widget : public QWidget
{
    Q_OBJECT

public:
    Widget(QWidget *parent = nullptr);
    ~Widget();

    void Handle();
    void Change();

private:
    Ui::Widget *ui;
    QPushButton* btn1;
    QPushButton* btn2;
};
#endif // WIDGET_H
widget.cpp文件
#include "widget.h"
#include "ui_widget.h"

Widget::Widget(QWidget *parent)
    : QWidget(parent)
    , ui(new Ui::Widget)
{
    ui->setupUi(this);
    btn1 = new QPushButton("按钮", this);
    btn1->move(200, 200);
    btn1->setEnabled(false);

    btn2 = new QPushButton("切换可用状态", this);
    btn2->move(200, 400);

    connect(btn1, &QPushButton::clicked, this, &Widget::Handle);
    connect(btn2, &QPushButton::clicked, this, &Widget::Change);
}

Widget::~Widget()
{
    delete ui;
}

void Widget::Handle()
{
    qDebug() << "点击按钮成功";
}

void Widget::Change()
{
    if(btn1->isEnabled()) btn1->setEnabled(false);
    else btn1->setEnabled(true);
    qDebug() << "切换状态成功";
}
三、geometry属性
位置和尺寸,其实是四个属性的统称:x横坐标、y纵坐标、width宽度、height高度

| API | 说明 |
|---|---|
| geometry | 获取控件的位置和尺寸。返回结果是一个QRect,包含了x、y、width、height,其中x、y是左上角的坐标 |
| setGeometry(QRect) setGeometry(int x, int y, int width, int height) | 设置控件的位置和尺寸,可以直接设置一个QRect,也可以各个属性单独设置 |
代码示例:通过四个按钮分别控制一个按钮上下左右移动
#include "widget.h"
#include "ui_widget.h"

Widget::Widget(QWidget *parent)
    : QWidget(parent)
    , ui(new Ui::Widget)
{
    ui->setupUi(this);
}

Widget::~Widget()
{
    delete ui;
}

void Widget::on_pushButtonRight_clicked()
{
    QRect rect = ui->pushButtonTarget->geometry();
    rect.setX(rect.x() + 5);
    ui->pushButtonTarget->setGeometry(rect);
}

void Widget::on_pushButtonUp_clicked()
{
    QRect rect = ui->pushButtonTarget->geometry();
    rect.setY(rect.y() - 5);
    ui->pushButtonTarget->setGeometry(rect);
}

void Widget::on_pushButtonLeft_clicked()
{
    QRect rect = ui->pushButtonTarget->geometry();
    rect.setX(rect.x() - 5);
    ui->pushButtonTarget->setGeometry(rect);
}

void Widget::on_pushButtonDown_clicked()
{
    QRect rect = ui->pushButtonTarget->geometry();
    rect.setY(rect.y() + 5);
    ui->pushButtonTarget->setGeometry(rect);
}
运行程序可以发现,按下四个按钮,就会控制target的左上角的位置,对应的按钮整个尺寸也会
发生改变。上述代码中是直接设置的QRect中的x、y,实际上QRect内部存储了左上和右下两个点的坐标,再通过两个点的坐标差值计算长宽,单纯修改左上坐标就会引起整个矩形的长宽发生改变
class Q_CORE_EXPORT QRect
{
public:
    Q_DECL_CONSTEXPR QRect() noexcept : x1(0), y1(0), x2(-1), y2(-1) {}
    Q_DECL_CONSTEXPR QRect(const QPoint &topleft, const QPoint &bottomright) noexcept;
    Q_DECL_CONSTEXPR QRect(const QPoint &topleft, const QSize &size) noexcept;
    Q_DECL_CONSTEXPR QRect(int left, int top, int width, int height) noexcept;

    Q_DECL_CONSTEXPR inline bool isNull() const noexcept;
    Q_DECL_CONSTEXPR inline bool isEmpty() const noexcept;
    Q_DECL_CONSTEXPR inline bool isValid() const noexcept;

    Q_DECL_CONSTEXPR inline int left() const noexcept;
    Q_DECL_CONSTEXPR inline int top() const noexcept;
    Q_DECL_CONSTEXPR inline int right() const noexcept;
    Q_DECL_CONSTEXPR inline int bottom() const noexcept;
    Q_REQUIRED_RESULT QRect normalized() const noexcept;

    Q_DECL_CONSTEXPR inline int x() const noexcept;
    Q_DECL_CONSTEXPR inline int y() const noexcept;
    Q_DECL_RELAXED_CONSTEXPR inline void setLeft(int pos) noexcept;
    Q_DECL_RELAXED_CONSTEXPR inline void setTop(int pos) noexcept;
    Q_DECL_RELAXED_CONSTEXPR inline void setRight(int pos) noexcept;
    Q_DECL_RELAXED_CONSTEXPR inline void setBottom(int pos) noexcept;
    Q_DECL_RELAXED_CONSTEXPR inline void setX(int x) noexcept;
    Q_DECL_RELAXED_CONSTEXPR inline void setY(int y) noexcept;

    Q_DECL_RELAXED_CONSTEXPR inline void setTopLeft(const QPoint &p) noexcept;
    Q_DECL_RELAXED_CONSTEXPR inline void setBottomRight(const QPoint &p) noexcept;
    Q_DECL_RELAXED_CONSTEXPR inline void setTopRight(const QPoint &p) noexcept;
    Q_DECL_RELAXED_CONSTEXPR inline void setBottomLeft(const QPoint &p) noexcept;

    Q_DECL_CONSTEXPR inline QPoint topLeft() const noexcept;
    Q_DECL_CONSTEXPR inline QPoint bottomRight() const noexcept;
    Q_DECL_CONSTEXPR inline QPoint topRight() const noexcept;
    Q_DECL_CONSTEXPR inline QPoint bottomLeft() const noexcept;
    Q_DECL_CONSTEXPR inline QPoint center() const noexcept;

    Q_DECL_RELAXED_CONSTEXPR inline void moveLeft(int pos) noexcept;
    Q_DECL_RELAXED_CONSTEXPR inline void moveTop(int pos) noexcept;
    Q_DECL_RELAXED_CONSTEXPR inline void moveRight(int pos) noexcept;
    Q_DECL_RELAXED_CONSTEXPR inline void moveBottom(int pos) noexcept;
    Q_DECL_RELAXED_CONSTEXPR inline void moveTopLeft(const QPoint &p) noexcept;
    Q_DECL_RELAXED_CONSTEXPR inline void moveBottomRight(const QPoint &p) noexcept;
    Q_DECL_RELAXED_CONSTEXPR inline void moveTopRight(const QPoint &p) noexcept;
    Q_DECL_RELAXED_CONSTEXPR inline void moveBottomLeft(const QPoint &p) noexcept;
    Q_DECL_RELAXED_CONSTEXPR inline void moveCenter(const QPoint &p) noexcept;

    Q_DECL_RELAXED_CONSTEXPR inline void translate(int dx, int dy) noexcept;
    Q_DECL_RELAXED_CONSTEXPR inline void translate(const QPoint &p) noexcept;
    Q_REQUIRED_RESULT Q_DECL_CONSTEXPR inline QRect translated(int dx, int dy) const noexcept;
    Q_REQUIRED_RESULT Q_DECL_CONSTEXPR inline QRect translated(const QPoint &p) const noexcept;
    Q_REQUIRED_RESULT Q_DECL_CONSTEXPR inline QRect transposed() const noexcept;

    Q_DECL_RELAXED_CONSTEXPR inline void moveTo(int x, int t) noexcept;
    Q_DECL_RELAXED_CONSTEXPR inline void moveTo(const QPoint &p) noexcept;

    Q_DECL_RELAXED_CONSTEXPR inline void setRect(int x, int y, int w, int h) noexcept;
    Q_DECL_RELAXED_CONSTEXPR inline void getRect(int *x, int *y, int *w, int *h) const;

    Q_DECL_RELAXED_CONSTEXPR inline void setCoords(int x1, int y1, int x2, int y2) noexcept;
    Q_DECL_RELAXED_CONSTEXPR inline void getCoords(int *x1, int *y1, int *x2, int *y2) const;

    Q_DECL_RELAXED_CONSTEXPR inline void adjust(int x1, int y1, int x2, int y2) noexcept;
    Q_REQUIRED_RESULT Q_DECL_CONSTEXPR inline QRect adjusted(int x1, int y1, int x2, int y2) const noexcept;

    Q_DECL_CONSTEXPR inline QSize size() const noexcept;
    Q_DECL_CONSTEXPR inline int width() const noexcept;
    Q_DECL_CONSTEXPR inline int height() const noexcept;
    Q_DECL_RELAXED_CONSTEXPR inline void setWidth(int w) noexcept;
    Q_DECL_RELAXED_CONSTEXPR inline void setHeight(int h) noexcept;
    Q_DECL_RELAXED_CONSTEXPR inline void setSize(const QSize &s) noexcept;

    QRect operator|(const QRect &r) const noexcept;
    QRect operator&(const QRect &r) const noexcept;
    inline QRect& operator|=(const QRect &r) noexcept;
    inline QRect& operator&=(const QRect &r) noexcept;

    bool contains(const QRect &r, bool proper = false) const noexcept;
    bool contains(const QPoint &p, bool proper=false) const noexcept;
    inline bool contains(int x, int y) const noexcept;
    inline bool contains(int x, int y, bool proper) const noexcept;
    Q_REQUIRED_RESULT inline QRect united(const QRect &other) const noexcept;
    Q_REQUIRED_RESULT inline QRect intersected(const QRect &other) const noexcept;
    bool intersects(const QRect &r) const noexcept;

    Q_DECL_CONSTEXPR inline QRect marginsAdded(const QMargins &margins) const noexcept;
    Q_DECL_CONSTEXPR inline QRect marginsRemoved(const QMargins &margins) const noexcept;
    Q_DECL_RELAXED_CONSTEXPR inline QRect &operator+=(const QMargins &margins) noexcept;
    Q_DECL_RELAXED_CONSTEXPR inline QRect &operator-=(const QMargins &margins) noexcept;

#if QT_DEPRECATED_SINCE(5, 0)
    Q_REQUIRED_RESULT QT_DEPRECATED QRect unite(const QRect &r) const noexcept { return united(r); }
    Q_REQUIRED_RESULT QT_DEPRECATED QRect intersect(const QRect &r) const noexcept { return intersected(r); }
#endif

    friend Q_DECL_CONSTEXPR inline bool operator==(const QRect &, const QRect &) noexcept;
    friend Q_DECL_CONSTEXPR inline bool operator!=(const QRect &, const QRect &) noexcept;

#if defined(Q_OS_DARWIN) || defined(Q_QDOC)
    Q_REQUIRED_RESULT CGRect toCGRect() const noexcept;
#endif

private:
    int x1;
    int y1;
    int x2;
    int y2;
};
下面的代码可以正常实现功能
#include "widget.h"
#include "ui_widget.h"

Widget::Widget(QWidget *parent)
    : QWidget(parent)
    , ui(new Ui::Widget)
{
    ui->setupUi(this);
}

Widget::~Widget()
{
    delete ui;
}

void Widget::on_pushButtonRight_clicked()
{
    QRect rect = ui->pushButtonTarget->geometry();
    ui->pushButtonTarget->setGeometry(rect.x() + 5, rect.y(), rect.width(), rect.height());
}

void Widget::on_pushButtonUp_clicked()
{
    QRect rect = ui->pushButtonTarget->geometry();
    ui->pushButtonTarget->setGeometry(rect.x(), rect.y() - 5, rect.width(), rect.height());
}

void Widget::on_pushButtonLeft_clicked()
{
    QRect rect = ui->pushButtonTarget->geometry();
    ui->pushButtonTarget->setGeometry(rect.x() - 5, rect.y(), rect.width(), rect.height());
}

void Widget::on_pushButtonDown_clicked()
{
    QRect rect = ui->pushButtonTarget->geometry();
    ui->pushButtonTarget->setGeometry(rect.x(), rect.y() + 5, rect.width(), rect.height());
}
四、WindowFrame的影响
若widget作为⼀个窗口(带有标题栏,最小化,最大化,关闭按钮),那么在计算尺寸和坐标时就有两种算法:包含window frame和不包含window frame
若一个不是作为窗口的widget,上述两类方式得到的结果是一致的

| API | 说明 |
|---|---|
| x() | 获取横坐标 计算时包含window frame |
| y() | 计算纵坐标 计算时包含window frame |
| pos() | 返回QPoint对象,包含x()、y()、setX()、setY()等方法 计算时包含window frame |
| frameSize() | 返回QSize对象,里面包含width()、height()、setWidth()、setHeight()等方法 计算时包含window frame |
| frameGeometry() | 返回QRect对象,QRect相当于QPoint和QSize的结合体,可以获取x、y、width、size 计算时包含window frame对象 |
| ------ | ------------------ |
| width() | 获取宽度,计算时不包含window frame |
| height() | 获取高度,计算时不包含window frame |
| size() | 返回QSize对象,里面包含width()、height()、setWidth()、setHeight()等方法 计算时不包含window frame |
| rect() | 返回QRect对象,计算时不包含window frame |
| geometry() | 返回QRect对象,计算时不包含window frame |
| setGeometry() | 直接设置窗口的位置和尺寸,可以设置x、y、width、height,或者QRect对象 计算时不包含window frame |
代码示例:感受geometry()和frameGeometry()的区别
#include "widget.h"
#include "ui_widget.h"

Widget::Widget(QWidget *parent)
    : QWidget(parent)
    , ui(new Ui::Widget)
{
    ui->setupUi(this);
    QRect rect1 = this->geometry();
    QRect rect2 = this->frameGeometry();
    qDebug() << rect1;
    qDebug() << rect2;

    QPushButton* btn = new QPushButton("按钮", this);
    connect(btn, &QPushButton::clicked, this, &Widget::Handle);
}

Widget::~Widget()
{
    delete ui;
}

void Widget::Handle()
{
    QRect rect1 = this->geometry();
    QRect rect2 = this->frameGeometry();
    qDebug() << rect1;
    qDebug() << rect2;
}
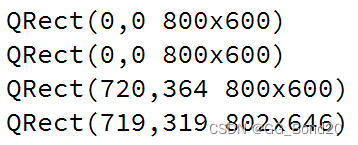
执行程序可以发现,构造函数中打印出的geometry和frameGeometry是相同的。但在点击按钮时,打印的geometry和frameGeometry则存在差异
注意:
在构造方法中,widget刚刚创建出来,还没有加入到对象树中。此时也就不具备Window frame
在按钮的slot函数中,由于用户点击时,对象树已经构造好了,此时widget已经具备了Window frame,因此在位置和尺寸上均出现了差异
五、windowTitle属性
| API | 说明 |
|---|---|
| windowTitle() | 获取到控件的窗口标题 |
| setWindowTitle(const Qstring& title) | 设置控件的窗口标题 |
注意:上述设置操作针对不同的widget可能会有不同的行为。若是顶层widget(独立窗口),这个操作才会有效;若是子widget,这个操作无任何效果
代码示例:设置窗口标题
#include "widget.h"
#include "ui_widget.h"

Widget::Widget(QWidget *parent)
    : QWidget(parent)
    , ui(new Ui::Widget)
{
    ui->setupUi(this);
    setWindowTitle("窗口标题");

    QPushButton* btn = new QPushButton("按钮", this);
    btn->setWindowTitle("按钮标题");//无作用,不报错
}

Widget::~Widget()
{
    delete ui;
}
六、windowIcon属性
| API | 说明 |
|---|---|
| windowIcon() | 获取到控件的窗口标题,返回QIcon对象 |
| setWindowIcon(const QIcon& icon) | 设置控件的窗口标题 |
注意:同windowTitle,上述操作仅针对顶层widget有效
代码示例:设置窗口图标
先在D盘放置一张图片,名为rose.png
#include "widget.h"
#include "ui_widget.h"

Widget::Widget(QWidget *parent)
    : QWidget(parent)
    , ui(new Ui::Widget)
{
    ui->setupUi(this);
    QIcon icon("D:/rose.png");
    this->setWindowIcon(icon);
}

Widget::~Widget()
{
    delete ui;
}注意:Windows下路径的分隔符可以使用 / 也可以使用 \ ,但是若在字符串中使用 \ ,需要写
作转义字符的形式 \\ ,因此还是更推荐使用 /
推荐:寻找Icon图片,iconfont-阿里巴巴矢量图标库
存在问题
实际开发中,⼀般不会在代码中通过绝对路径引入图片,因为无法保证程序发布后,用户的电脑上也有同样的路径。若使用相对路径,则需要确保代码中的相对路径写法和图片实际所在的路径匹配(如代码中写作"./image/rose.png",就需在当前工作目录中创建image目录,并将rose.png放入)
若将图片文件放入构建目录中,可能在不小心删除后就丢失了。还是希望能够将图片和源代码放到一起,并且使我们的程序无论移动到任何位置中都能正确使用图片。Qt使用qrc机制自动完成了上述工作,更方便的来管理项目依赖的静态资源
七、qrc文件管理资源
qrc文件是⼀种XML格式的资源配置文件,用XML记录硬盘上的文件和对应的随意指定的资源名称,应用程序通过资源名称来访问这些资源
在Qt开发中,可以通过将资源文件添加到项目中来方便地访问和管理这些资源,这些资源文件可以位于qrc文件所在目录的同级或其子目录下
在构建程序的过程中,Qt会把资源文件的二进制数据转成cpp代码,编译到exe中,从而使依赖的资源变得"路径无关"
这种资源管理机制并非Qt独有,很多开发框架都有类似的机制。如Android的Resources和AssetManager也是类似的效果
示例:通过qrc管理图片作为图标
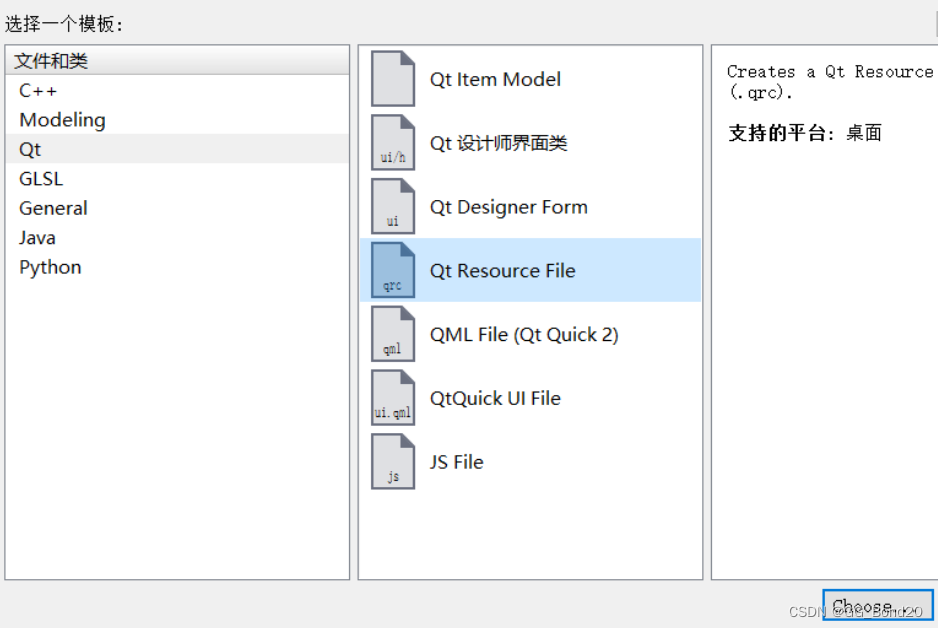
右键项目,创建一个Qt Resource File(qrc文件),文件名任意(不要带中文),此处取名为resource.qrc
在qrc编辑器中,添加前缀,此处将前缀设置成 / 即可
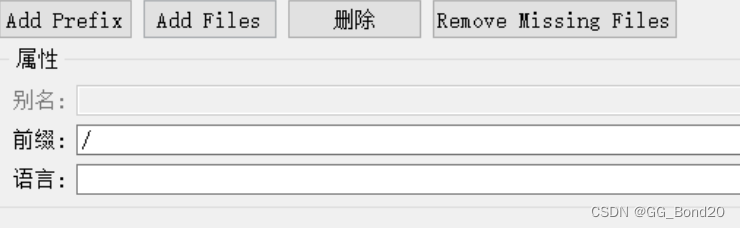
前缀可以理解成"目录",这个前缀决定了后续如何在代码中访问资源
在资源编辑器中,点击add Files添加资源文件,此处需要添加的是rose.png
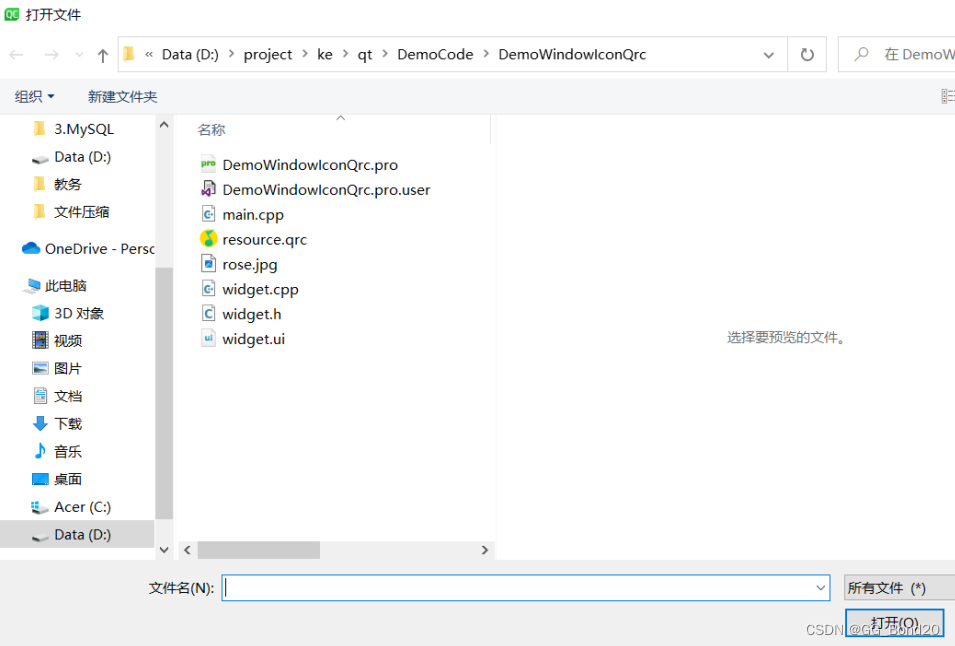
注意:添加的文件必须是在qrc文件的同级目录,或者同级目录的子目录中,因此需要把之前D盘中的rose.png复制到上述目录中
添加完毕后,可以在资源编辑器中看到添加好的文件

在代码中使用rose.png
#include "widget.h"
#include "ui_widget.h"

Widget::Widget(QWidget *parent)
    : QWidget(parent)
    , ui(new Ui::Widget)
{
    ui->setupUi(this);
    QIcon icon(":/rose.png");
    this->setWindowIcon(icon);
}

Widget::~Widget()
{
    delete ui;
}
上述路径的访问规则:
- 使用:作为开头,表示从qrc中读取资源
- /是上面配置的前缀
- rose.png是资源的名称
需确保代码中编写的路径和添加到qrc中资源的路径匹配,否则资源无法被访问(同时也不会有报错提示)
进入到项目的构建目录,可以看到目录中多了一个qrc_resource.cpp文件,直接打开该文件,可以看到类似如下代码:
/****************************************************************************
** Resource object code
**
** Created by: The Resource Compiler for Qt version 5.14.2
**
** WARNING! All changes made in this file will be lost!
*****************************************************************************/

static const unsigned char qt_resource_data[] = {
  // D:/repositorys/Qt/WindowIcon2/rose.png
  0x0,0x0,0x2f,0x71,
  0x89,
  0x50,0x4e,0x47,0xd,0xa,0x1a,0xa,0x0,0x0,0x0,0xd,0x49,0x48,0x44,0x52,0x0,
  0x0,0x0,0xc8,0x0,0x0,0x0,0xc8,0x8,0x6,0x0,0x0,0x0,0xad,0x58,0xae,0x9e,
  0x0,0x0,0x0,0x1,0x73,0x52,0x47,0x42,0x0,0xae,0xce,0x1c,0xe9,0x0,0x0,0x20,
  0x0,0x49,0x44,0x41,0x54,0x78,0x5e,0xed,0x5d,0x7,0x98,0x14,0x45,0xf6,0xff,0x55,
  0xcf,0x26,0x58,0x32,0x3b,0x3d,0xd3,0xb3,0x80,0x30,0x33,0x4,0x41,0x82,0xa0,0x98,
  ......
上述代码其实就是通过unsigned char数组,将把rose.png中的每个字节记录下来,这些代码会被编译到exe中,后续无论exe被复制到哪个目录都确保能够访问到该图片资源
优缺点
- 优点:确保了图片、字体、声音等资源能够真正的"目录无关",不会出现资源丢失的情况
- 缺点:不适合管理体积大的资源,若资源较大(如是几个MB的问价),或者资源特别多,生成的最终的exe体积就会较大,程序运行消耗的内存也会增大,程序编译的时间也会显著增加
八、windowOpacity属性
| API | 说明 |
|---|---|
| windowOpacity() | 获取控件的不透明值,返回类型为float,取值在0.0~1.0之间,0.0表示全透明,1.0表示完全不透明 |
| setWindowOpacity(float n) | 设置控件的不透明值 |
代码示例:两个按钮控制窗口的不透明度
#include "widget.h"
#include "ui_widget.h"

Widget::Widget(QWidget *parent)
    : QWidget(parent)
    , ui(new Ui::Widget)
{
    ui->setupUi(this);
}

Widget::~Widget()
{
    delete ui;
}

void Widget::on_pushButtonAdd_clicked()
{
    float opacity = this->windowOpacity();
    if(opacity >= 1.0) return;
    else this->setWindowOpacity(opacity + 0.1);
    qDebug() << opacity + 0.1;
}

void Widget::on_pushButtonSub_clicked()
{
    float opacity = this->windowOpacity();
    if(opacity <= 0.0) return;
    else this->setWindowOpacity(opacity - 0.1);
    qDebug() << opacity - 0.1;
}
注意:C++中float类型遵守IEEE 754标准,因此在进行运算时会有⼀定的精度误差,因此1 - 0.1的数值并非是0.9
九、cursor属性
| API | 说明 |
|---|---|
| cursor() | 获取当前widget的cursor属性,返回QCursor对象 当鼠标悬停在该widget上时就会显示出对应的形状 |
| setCursor(const QCursor& cursor) | 设置该widget光标的形状,仅在鼠标停留在该widget上时生效 |
| QGuiApplication::setOverrideCursor(const QCursor& cursor) | 设置全局光标的形状,对整个程序中的所有widget生效,覆盖之前setCursor设置的内容 |
在Qt Designer中设置按钮的光标
在界面中创建一个按钮

直接在右侧属性编辑区修改cursor属性为"等待"
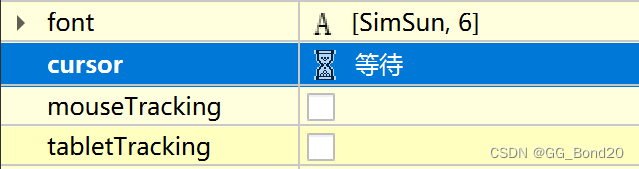
运行程序,鼠标悬停到按钮上,即可看到光标的变化
代码示例:通过代码设置按钮的光标
#include "widget.h"
#include "ui_widget.h"

Widget::Widget(QWidget *parent)
    : QWidget(parent)
    , ui(new Ui::Widget)
{
    ui->setupUi(this);
    QCursor cursor(Qt::WaitCursor);
    ui->pushButton->setCursor(cursor);
}

Widget::~Widget()
{
    delete ui;
}代码示例:自定义鼠标光标
#include "widget.h"
#include "ui_widget.h"

Widget::Widget(QWidget *parent)
    : QWidget(parent)
    , ui(new Ui::Widget)
{
    ui->setupUi(this);

    // 创建⼀个位图对象, 加载⾃定义光标图⽚
    QPixmap pixmap(":/rose.png");
    // 缩放图⽚为 64 * 64 的尺⼨
    pixmap = pixmap.scaled(64, 64);
    // 创建 QCursor 对象, 并指定 "热点" 为 (2, 2) 坐标位置
    // 所谓 "热点" 就是⿏标点击时⽣效的位置
    QCursor cursor(pixmap, 2, 2);
    // 设置光标
    this->setCursor(cursor);
}

Widget::~Widget()
{
    delete ui;
}
十、font属性
| API | 说明 |
|---|---|
| font() | 获取当前widget的字体信息,返回QFont对象 |
| setFont(const QFont& font) | 设置当前的widget的字体信息 |
关于QFont的属性
| 属性 | 说明 |
|---|---|
| family | 字体家族,如"楷体"、"宋体"、"微软雅黑"等 |
| pointSize | 字体大小 |
| weight | 字体粗细,以数值的方式表示粗细的范围[0, 99],数值越大越粗 |
| bold | 是否加粗。若设置为true,相当于weight为75;若设置为false,weight为20 |
| italic | 是否倾斜 |
| underline | 是否带有下划线 |
| strikeOut | 是否带有删除线 |
在Qt Designer中设置字体属性
在界面上创建一个label
在右侧的属性编辑区,设置该label的font相关属性(在这调整上述属性,可以实时看到文字的变化)
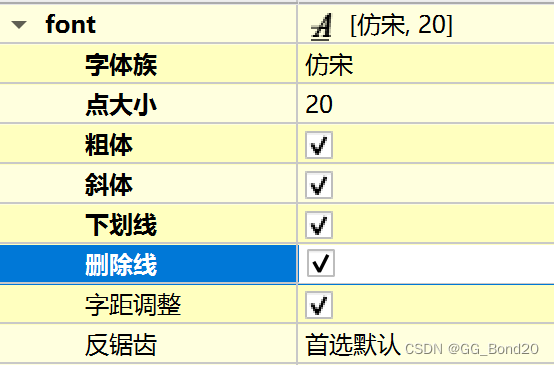
执行程序,观察效果
代码示例:在代码中设置字体属性
#include "widget.h"
#include "ui_widget.h"
Widget::Widget(QWidget *parent)
: QWidget(parent)
, ui(new Ui::Widget)
{
ui->setupUi(this);
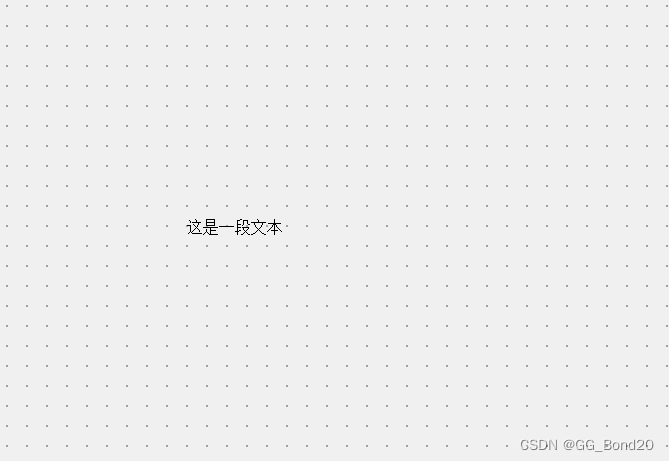
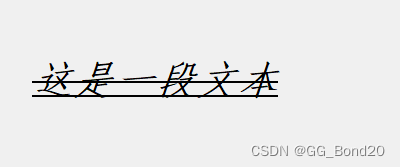
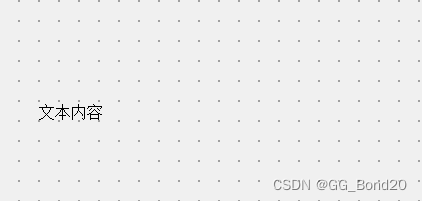
// 设置 label 的⽂本内容
ui->label->setText("这是⼀段⽂本");
// 创建字体对象
QFont font;
// 设置字体家族
font.setFamily("仿宋");
// 设置字体⼤⼩
font.setPointSize(20);
// 设置字体加粗
font.setBold(true);
// 设置字体倾斜
font.setItalic(true);
// 设置字体下划线
font.setUnderline(true);
// 设置字体删除线
font.setStrikeOut(true);
// 设置字体对象到 label 上
ui->label->setFont(font);
}
Widget::~Widget()
{
delete ui;
}十一、toolTip属性
| API | 说明 |
|---|---|
| setToolTip | 设置toolTip 鼠标悬停在该widget上时会有提示说明 |
| setToolTipDuration | 设置toolTip的提示时间,单位ms 时间到后toolTip自动消失 |
toolTip只是给用户看的,在代码中⼀般不需要获取到toolTip,但是使用toolTip()一样可以获取
代码示例:设置按钮的toolTip
#include "widget.h"
#include "ui_widget.h"

Widget::Widget(QWidget *parent)
    : QWidget(parent)
    , ui(new Ui::Widget)
{
    ui->setupUi(this);
    QPushButton* btn1 = new QPushButton("Yes", this);
    btn1->setToolTip("这是一个Yes按钮");
    btn1->setToolTipDuration(3000);

    QPushButton* btn2 = new QPushButton("No", this);
    btn2->move(100, 100);
    btn2->setToolTip("这是一个No按钮");
    btn2->setToolTipDuration(7000);
}

Widget::~Widget()
{
    delete ui;
}
十二、focusPolicy属性
设置控件获取到焦点的策略,如某个控件能否用鼠标选中或者能否通过tab键选中
所谓"焦点"指的就是能选中这个元素,接下来的操作(如键盘操作)就都是针对该焦点元素进行的
了。这个属性对于输⼊框、单选框、复选框等控件非常有用
| API | 说明 |
|---|---|
| focusPolicy() | 获取该widget的focusPolicy,返回Qt::FocusPolicy |
| setFocusPolicy(Qt::FocusPolicy policy) | 设置widget的focusPolicy |
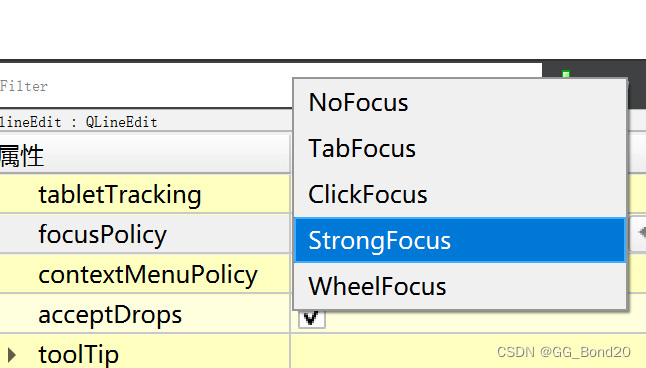
Qt::FocusPolicy是一个枚举类型,取值如下:
- Qt::NoFocus:控件不会接收键盘焦点
- Qt::TabFocus:控件可以通过Tab键接收焦点
- Qt::ClickFocus:控件在鼠标点击时接收焦点
- Qt::StrongFocus:控件可以通过Tab键和鼠标点击接收焦点(默认值)
- Qt::WheelFocus:类似于Qt::StrongFocus,同时控件也通过鼠标滚轮获取到焦点(新增的选项,一般很少使用)
十三、styleSheet属性
CSS(Cascading Style Sheets层叠样式表)本身属于网页前端技术。主要用来描述界面的样式
所谓"样式",包括不限于大小、位置、颜色、间距、字体、背景、边框等
Qt虽然是做GUI开发,但实际上和网页前端有很多异曲同工之处。因此Qt也引如了对CSS的支持
CSS中可以设置的样式属性非常多,Qt只能支持其中一部分,称为QSS(Qt Style Sheet)
具体的支持情况可以参考Qt文档中"Qt Style Sheets Reference"章节
示例:设置文本样式
在界面上创建label
编辑右侧的styleSheet属性,设置样式
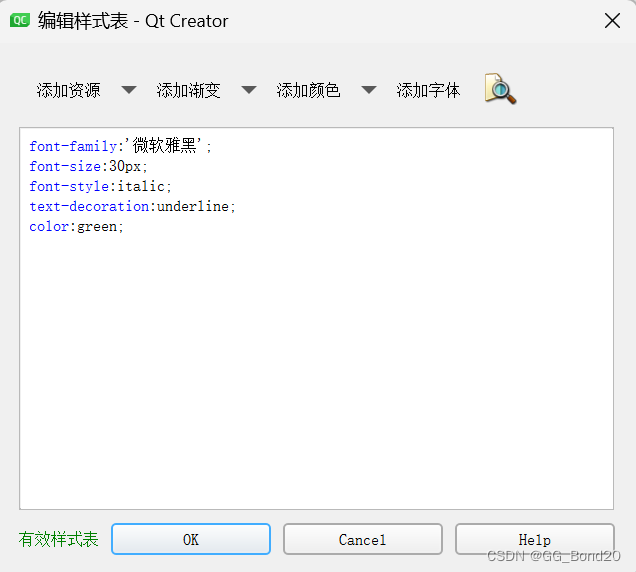
- 此处的语法格式同CSS,使用键值对的方式设置样式,其中键和值之间使用 : 分割,键值对之间使用 ; 分割
- Qt Designer只能对样式的基本格式进行校验,不能检测出哪些样式不被Qt支持
代码示例:实现日夜间模式切换
#include "widget.h"
#include "ui_widget.h"

Widget::Widget(QWidget *parent)
    : QWidget(parent)
    , ui(new Ui::Widget)
{
    ui->setupUi(this);
}

Widget::~Widget()
{
    delete ui;
}

void Widget::on_pushButtonLight_clicked()
{
    this->setStyleSheet("background-color: #f3f3f3");
    ui->textEdit->setStyleSheet("background-color: #fff; color: #000;");
    ui->pushButtonLight->setStyleSheet("color: #000");
    ui->pushButtonDark->setStyleSheet("color: #000");
}

void Widget::on_pushButtonDark_clicked()
{
    this->setStyleSheet("background-color: #333");
    ui->textEdit->setStyleSheet("background-color: #333; color: #fff;");
    ui->pushButtonLight->setStyleSheet("color: #fff");
    ui->pushButtonDark->setStyleSheet("color: #fff");
}


 被折叠的 条评论
为什么被折叠?
被折叠的 条评论
为什么被折叠?
 到【灌水乐园】发言


