


- 首先第一步yum安装
Yum -y info Bind
[root@bind-m-73 etc]# yum info Bind
Last metadata expiration check: 4:58:37 ago on Mon 22 Jan 2024 08:53:17 PM EST.
Installed Packages
Name : bind
Epoch : 32
Version : 9.16.23
Release : 14.el9
Architecture : x86_64
Size : 1.4 M
Source : bind-9.16.23-14.el9.src.rpm
Repository : @System
From repo : appstream
Summary : The Berkeley Internet Name Domain (BIND) DNS (Domain
: Name System) server
URL : https://www.isc.org/downloads/bind/
License : MPLv2.0
Description : BIND (Berkeley Internet Name Domain) is an
: implementation of the DNS (Domain Name System)
: protocols. BIND includes a DNS server (named), which
: resolves host names to IP addresses; a resolver library
: (routines for applications to use when interfacing with
: DNS); and tools for verifying that the DNS server is
: operating properly.
[root@bind-m-73 etc]# yum info bind-utils
Last metadata expiration check: 4:58:59 ago on Mon 22 Jan 2024 08:53:17 PM EST.
Installed Packages
Name : bind-utils
Epoch : 32
Version : 9.16.23
Release : 14.el9
Architecture : x86_64
Size : 644 k
Source : bind-9.16.23-14.el9.src.rpm
Repository : @System
From repo : appstream
Summary : Utilities for querying DNS name servers
URL : https://www.isc.org/downloads/bind/
License : MPLv2.0
Description : Bind-utils contains a collection of utilities for
: querying DNS (Domain Name System) name servers to find
: out information about Internet hosts. These tools will
: provide you with the IP addresses for given host names,
: as well as other information about registered domains
: and network addresses.
:
: You should install bind-utils if you need to get
: information from DNS name servers.
- 安装bind bind-utils
- 下面步骤显示已安装:
[root@bind-m-73 etc]# yum -y install bind-utils
Last metadata expiration check: 5:01:24 ago on Mon 22 Jan 2024 08:53:17 PM EST.
Package bind-utils-32:9.16.23-14.el9.x86_64 is already installed.
Dependencies resolved.
Nothing to do.
Complete!
- 进入到这个文件目录中
cd /etc/yum.repos.d
5.创建目录
mkdir bak
6备份文件到bak目录
mv -v * bak/
7.查看备份是否成功
ls -lhrt
- 查看文件目录的位置
which named-checkconf
9.查看文件目录的软件
rpm -qf `which named-checkconf`
10进入bind主配置文件
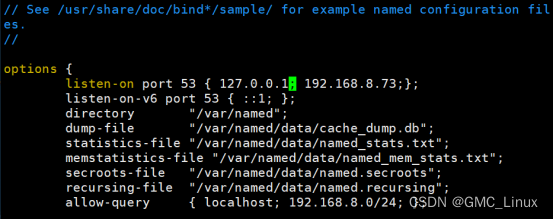
Vim /etc/named.conf
options {
listen-on port 53 { 127.0.0.1; 192.168.8.73;};
listen-on-v6 port 53 { ::1; };
directory "/var/named";
dump-file "/var/named/data/cache_dump.db";
statistics-file "/var/named/data/named_stats.txt";
memstatistics-file "/var/named/data/named_mem_stats.txt";
secroots-file "/var/named/data/named.secroots";
recursing-file "/var/named/data/named.recursing";
allow-query { localhost; 192.168.8.0/24; };
- 11.配置主的区域配置存放位置
zone "guomc.com" IN {
type master;
file "guomc.com.zone";
also-notify { 192.168.8.74; };
allow-transfer { 192.168.8.74; };
allow-update { none; };
notify yes;
};
12.进入区域配置文件中修改主向从同步的步骤,每同步一次都要修改序列号:
Vim /var/named/guomc.com.zeon
$TTL 7200
guomc.com. IN SOA guomc.com. admin.guomc.com. (
2024012311
1H
10M
1W
1D )
guomc.com. IN NS ns1.guomc.com.
guomc.com. IN NS ns2.guomc.com.
ns1.guomc.com. IN A 192.168.8.73
ns2.guomc.com. IN A 192.168.8.74
www.guomc.com. IN A 192.168.8.74
www.guomc.com. IN A 192.168.8.73
ftp. IN A 192.168.8.75
ftp. IN A 192.168.8.76
ftp. IN A 192.168.8.77
11.使用手动同步的命令将主的数据都同步到从的上面:
rsync -avz /etc/named.conf 192.168.8.74:/etc
rsync -avz /var/named/guomc.com.zone 192.168.8.74:/var/named/
- 使用重启命令重启:
Systemctl restart named
13.主从同步命令是:
Systemctl reload named
1.从的配置文件部署:
从将监控修改为了自己的IP地址
options {
listen-on port 53 { 127.0.0.1; 192.168.8.74;};
listen-on-v6 port 53 { ::1; };
directory "/var/named";
dump-file "/var/named/data/cache_dump.db";
statistics-file "/var/named/data/named_stats.txt";
memstatistics-file "/var/named/data/named_mem_stats.txt";
secroots-file "/var/named/data/named.secroots";
recursing-file "/var/named/data/named.recursing";
allow-query { localhost; 192.168.8.0/24; };
2.以及从的区域配置文件存放:
zone "guomc.com" IN {
type slave;
file "slaves/guomc.com.zone";
masters { 192.168.8.73; };
masterfile-format text;
};
- 修改dns指定IP:
[root@bind-m-74 named]# cat /etc/resolv.conf
# Generated by NetworkManager
#nameserver 8.8.8.8
nameserver 192.168.8.73
nameserver 192.168.8.74
[root@bind-m-74 named]#
- 下面的配置是主同步过来的数据
[root@bind-m-74 named]# cat /var/named/slaves/guomc.com.zone
$ORIGIN .
$TTL 7200 ; 2 hours
guomc.com IN SOA guomc.com. admin.guomc.com. (
2024012311 ; serial
3600 ; refresh (1 hour)
600 ; retry (10 minutes)
604800 ; expire (1 week)
86400 ; minimum (1 day)
)
NS ns1.guomc.com.
NS ns2.guomc.com.
$ORIGIN guomc.com.
ns1 A 192.168.8.73
ns2 A 192.168.8.74
www A 192.168.8.74
A 192.168.8.73
[root@bind-m-74 named]#


 869
869


 被折叠的 条评论
为什么被折叠?
被折叠的 条评论
为什么被折叠?
 到【灌水乐园】发言


