


目录
2.5 BeanFactory和ApplicationContext的区别
要学习Spring首先我们应该了解什么是Spring,那到底Spring是什么呢?面试官可能也会问你这样类似的问题,简单来说Spring就是一个轻量级的J2EE应用程序框架,这样讲其实是官方的说法,我们也可以用自己的话概括就是:Spring是一个轻量级的用于解决Java企业级应用开发中常见问题的技术解决方案。
1. Spring有什么优势
1.1 模块化
Spring框架是一个分层架构,它的功能是模块化的,这意味着你可以按需使用你需要的Spring模块的功能。Spring的模块包括了:核心容器(Core Container)、AOP切面编程、Web功能、数据访问/集成(Data Access/Integration)、消息(Messaging)、Test 单元测试等。

1.2 轻量级
Spring对于运行环境的要求不高,可独立于各种应用服务器,可以很好的运行在开源的 Tomcat、Resion、Jetty,以及收费的Weblogic、Websphere等容器中。
Spring轻量级的另一个体现是代码移植性高,开发Spring应用不需要实现额外的接口,低侵入式设计,Spring并不强制应用完全依赖于Spring,开发者可自由选用Spring框架的部分或全部。
1.3 方便集成各种优秀框架
Spring可以让我们很简单和方便地集成其它优秀的开源框架,比如持久层框架Hibernate、Mybatis,表现层框架Struct2、SpringMVC等。
1.4 提供了分层开发下的完整技术解决方案
分层开发是指在Java中把软件开发划分为表现层、业务层以及持久层,从而更好地专注于某一层的开发,降低代码之间的耦合关系。
Spring提供了优秀的表现层框架SpringMVC,也是目前最主流的技术框架;在业务逻辑层中则是由Spring框架提供技术支持的,比如常见的AOP、IOC以及事务处理的功能都是由Spring提供的;最后的持久层Spring提供了JdbcTemplate这种简单的数据访问方式,当然也可以很简单地整合其它第三方框架Myatis、Hibernate等。
1.5 Java语言编写的开源框架,使用了多种设计模式
- 工厂模式:BeanFactory就是工厂模式的接口抽象,其子类对对象工厂进行了实现,用来创建Bean对象。Spring中使用了简单工厂和工厂方法的设计模式。
- 单例模式:Bean对象默认为单例,单例Bean在IOC容器通过id或name获取时,拿到的都是同一个。
- 代理模式:Spring的AOP的底层是由动态代理实现,分为JDK动态代理和CGLIB动态代理。
- 适配器模式:Spring中的BeforeAdvice、AfterAdvice等通知,都需要通过对应的适配器转换为MethodBeforeAdviceInterceptor、MethodAfterAdviceInterceptor等拦截器。
- 模板方法模式:将模板式代码做统一封装,用来解决代码重复的问题。比如:RestTemplate、JdbcTemplate、TransactionTemplate。
2. Spring的第一个程序
2.1 开发环境
Jdk1.8+ Maven3.5 +IDEA2018+Spring5.1.5
2.2 环境搭建
- 引入Spring的相关jar包
 <dependency>
    <groupId>org.springframework</groupId>
    <artifactId>spring-context</artifactId>
    <version>5.1.5.RELEASE</version>
</dependency>- Spring的配置文件
- Spring的配置文件为xml格式对命名无要求,可以以bean.xml或applicationContext.xml命名
- 配置文件的放置位置没有要求,一般放置在项目的根路径下,即项目的resource文件夹下
2.3 编码测试
- MyBean实体类
package com.mj.model;

import java.io.Serializable;
import lombok.Data;
import lombok.ToString;

@Data
@ToString
public class MyBean implements Serializable {
    private Integer id;
    private String name;
}
- 在bean.xml配置文件中配置bean的属性,bean的属性也被称为元数据。
<?xml version="1.0" encoding="UTF-8"?>
<beans xmlns="http://www.springframework.org/schema/beans"
       xmlns:xsi="http://www.w3.org/2001/XMLSchema-instance"
       xsi:schemaLocation="http://www.springframework.org/schema/beans http://www.springframework.org/schema/beans/spring-beans.xsd">
     <!--
         bean标签: 用于配置bean,表示让Spring负责接管MyBean类的对象创建
           id属性: bean的唯一id,Spring创建的对象被称为bean对象
         name属性: bean的别名,可配置多个别名
        class属性: 类的全限定名
      -->
    <bean id="myBean" name="firstBean" class="com.mj.model.MyBean"></bean>
</beans>- 通过BeanFactory顶级IOC容器获取对象
import org.springframework.beans.factory.BeanFactory;
import org.springframework.beans.factory.xml.XmlBeanFactory;
import org.springframework.core.io.ClassPathResource;
import org.springframework.core.io.Resource;

/**
 * @description: BeanFactory的使用
 */
public class BeanFactoryTest {

    public static void main(String[] args) {
        // 加载Spring配置文件
        Resource resource = new ClassPathResource("bean.xml");
        // 创建工厂对象,也称IOC容器
        BeanFactory bf = new XmlBeanFactory(resource);
        // 根据id获取对象,第一次获取时才创建对象,懒加载
        MyBean myBean = (MyBean) bf.getBean("myBean");
        // 根据name获取对象,对象已经创建,直接从容器获取
        MyBean firstBean = (MyBean) bf.getBean("firstBean");
        // 结果为true,表明spring实现了Bean对象的创建,且默认单例
        System.out.println(myBean == firstBean);
    }
}
- 通过ApplicationContext应用上下文容器获取对象
import org.springframework.context.ApplicationContext;
import org.springframework.context.support.ClassPathXmlApplicationContext;

/**
 * @description: ApplicationContext上下文容器的使用
 */
public class ApplicationContextTest {
    public static void main(String[] args) {
        // 加载类路径下的Spring配置文件,创建容器和初始化
        ApplicationContext ac = new ClassPathXmlApplicationContext("bean.xml");
        // 通过id从容器中获取对象,容器创建时对象也被创建,为立即加载
        MyBean myBean1 = (MyBean) ac.getBean("myBean");
        // 根据name获取对象,对象已经创建,直接从容器获取
        MyBean firstBean = (MyBean) bf.getBean("firstBean");
        // 结果为true,表明spring实现了Bean对象的创建,且默认单例
        System.out.println(myBean == firstBean);
    }
}
2.4 BeanFactory的UML类图

2.5 BeanFactory和ApplicationContext的区别
BeanFactory和ApplicationContext都是IOC容器的接口。BeanFactory为IOC容器的根接口,ApplicationContext是BeanFactory的子接口,ApplicationContext拥有BeanFactory的全部功能,同时还扩展了更多的功能,比如:国际化的支持、事件机制、对Web应用的支持等。我们开发中经常使用的是ApplicationContext及其子类。BeanFactory 对单例对象的创建是使用懒加载的方式,这意味着对象是在我们通过 getBean() 方法获取时才进行实例化的,而ApplicationContext对单例对象的创建默认是随着容器的创建而创建,是一种立即加载的方式。
3. ApplicationContext的使用
3.1 非web环境下的常用子类
- ClassPathXmlApplicationContext:用于加载类路径下的Spring配置文件对IOC容器进行创建初始化。
FileSystemXmlApplicationContext:用于加载文件系统路径下的Spring配置文件对IOC容器进行创建初始化。
3.2 web环境下的常用子类
- XmlWebApplicationcontext:用于在web环境下对Spring的配置文件进行加载,通过监听器 ContextLoaderListener监听web服务器的启动和停止,调用ContextLoader的初始化和销毁 方法对ApplicationContext上下文进行初始化和销毁。
3.3 注解开发中常用的子类
- AnnotationConfigApplicationContext:用于在注解开发中的非web场景下对Spring的配置类进行加载的核心容器类。
- AnnotationConfigWebApplicationContext:用于在注解开发的web场景下对Spring的配置类进行加载的核心容器类。
3.4 对象特点
- 单例对象: ApplicationContext的容器对象是一个重量级资源,创建对象时占用大量资源,因此在一个应用中只会创建一个工厂对象。
- 线程安全:在多线程环境下访问该单例对象不会有线程安全问题。
- 使用方便:ApplicationContext的容器对象很容易拿到,Spring为我们提供了一个用于获取容器对象的接口ApplicationContextAware,继承这个接口的子类可以在Spring为其创建对象时通过set注入的方式将容器对象注入给类的成员变量。
3.5 基本的方法
-
public Object getBean(String name)
   // 获取ApplicationContext容器
   ApplicationContext ac = new ClassPathXmlApplicationContext("bean.xml");
   // 通过id值从容器中获取对象,此方式需要强制类型转换
MyBean myBean1 = (MyBean) ac.getBean("myBean");-
public <T> T getBean(String name, Class<T> requiredType)
   // 获取ApplicationContext容器
   ApplicationContext ac = new ClassPathXmlApplicationContext("bean.xml");
   // 通过id值从容器中获取对象,此方式无需强制类型转换
MyBean myBean1 = ac.getBean("myBean",MyBean.class);-
public String[] getBeanDefinitionNames()
   // 获取ApplicationContext容器
   ApplicationContext ac = new ClassPathXmlApplicationContext("bean.xml");
   // 获取容器中的所有的bean的名称,即我们配置文件中配置的bean的id属性值
String[] beanDefinitionNames = ac.getBeanDefinitionNames();-
public boolean containsBeanDefinition(String beanName)
    // 获取ApplicationContext容器
    ApplicationContext ac = new ClassPathXmlApplicationContext("bean.xml");
    // 判断容器中是否存在id为myBean的bean对象
boolean b = ac.containsBeanDefinition("myBean");-
public boolean containsBean(String name)
    // 获取ApplicationContext容器
    ApplicationContext ac = new ClassPathXmlApplicationContext("bean.xml");
    // 判断容器中是否存在id或者别名为myBean的bean,别名为bean标签的name属性的值
    boolean b = ac.containsBean("myBean");
3.6 扩展的方法
-
public string getMessage(String code, @Nullable Object[] args, Locale locale)
    // 加载类路径下的Spring配置文件,创建容器和初始化
    ApplicationContext context = new ClassPathXmlApplicationContext("bean.xml");
    // 读取国际化配置,根据国家切换语言
    System.out.println(context.getMessage("hi",null, Locale.CHINA));
System.out.println(context.getMessage("hi",null, Locale.US));-
public Resource[] getResources(String locationPattern)
     // 加载类路径下的Spring配置文件,创建容器和初始化
     ApplicationContext context = new ClassPathXmlApplicationContext("bean.xml");
     // 获取资源文件,默认会去类路径下找
     Resource[] resources = context.getResources("bean.xml");
     for (Resource resource : resources) {
         System.out.println(resource);
}-
public ConfigurableEnvironment getEnvironment()
     // 加载类路径下的Spring配置文件,创建容器和初始化
     ApplicationContext context = new ClassPathXmlApplicationContext("bean.xml");

     // 获取环境变量的属性
     System.out.println(context.getEnvironment().getProperty("java_home"));
3. Spring的IOC容器
3.1 什么是IOC
IOC是英文(Inversion of Control)的简写,翻译过来就是控制反转的意思。控制反转是采用了依赖倒置原则的一种代码设计的思路,这里的依赖在Java中的定义就是使用关系。在Java中如果A类要调用B类的方法就表示A类依赖了B类,当我们在A类中通过new来得到B类的实例时就是一种上层主动依赖于下层体现,这会导致模块间耦合度变高。而Spring的IOC就是通过自己管理对象的创建和注入来解耦了这种上层主动依赖与下层的关系,从而实现代码解耦合的目的。
Spring的IOC容器负责管理bean对象的一整个生命周期,在生命周期过程中控制着bean对象的创建,并通过依赖注入( Dependency Injection)实现了依赖反转从而实现了类与类之间的解耦,这个反转是指以前获取对象需要主动去new从而产生耦合关系,而使用了Spring后是通过依赖注入去获取对象,这就变成了被动接收。IOC是一种设计思想,它为了解耦类与类之间的依赖关系,在Spring中IOC的功能被实现了,在IOC的实现上用到了工厂设计模式和DI的功能。
3.2 Spring创建对象的方式
1. 反射调用构造函数
简单对象的创建,底层是通过反射调用默认无参构造函数创建,如果没有无参的构造函数,则创建对象不成功,会报异常。
<?xml version="1.0" encoding="UTF-8"?>
<beans xmlns="http://www.springframework.org/schema/beans"
       xmlns:xsi="http://www.w3.org/2001/XMLSchema-instance"
       xsi:schemaLocation="http://www.springframework.org/schema/beans http://www.springframework.org/schema/beans/spring-beans.xsd">

     <!--
         bean标签用于配置bean,让Spring负责实体类MyBean对象的创建
         id属性的值:用于从容器获取Spring创建的对象
         class属性的值: 类的全限定名
         name属性的值: 为bean创建别名,可创建多个别名
         scope属性的值:配置bean的作用范围
              * singleton:单例的(默认值)
	          * prototype:多例的(当我们让spring接管Action的对象创建时,必须配置此值)
	          * request: 作用范围是一次请求和当前请求的转发
	          * session:作用范围是一次会话
      -->
    <bean id="myBean" name="b1,b2" class="com.mj.model.MyBean"></bean>
</beans>
2. 实现FactoryBean接口
复杂对象的创建,实现FactoryBean接口,实现getObejct( )方法,在方法中书写创建复杂对象的代码,创建的对象即为getObejct( )返回的对象。
package com.mj.factory;

import org.springframework.beans.factory.FactoryBean;

import lombok.Data;
import lombok.ToString;
import java.sql.Connection;
import java.sql.DriverManager;

/**
 * @description: 实现FactoryBean接口创建复杂对象的方式
 */
@Data
@ToString
public class ConnectionFactoryBean implements FactoryBean<Connection> {

    private String driver;
    private String url;
    private String username;
    private String password;

    // 返回需要创建的对象
    public Connection getObject() throws Exception {
        Class.forName(driver);
        Connection connection = DriverManager.getConnection(url, username, password);
        return connection;
    }
    // 返回对象的类类型
    public Class<?> getObjectType() {
        return Connection.class;
    }
    // 需要根据不同对象的特点来确定返回的对象是多例还是单例,true:单例,false:多例
    public boolean isSingleton() {
        return false;
    }
}
在xml文件中配置Bean对象,通过conn获取的bean非ConnectionFactoryBean对象,而是getObject( )方法返回的对象,这点是比较特殊的地方,实现了FactoryBean接口的类,配置bean时创建的对象为getObject( )方法返回的对象。
<?xml version="1.0" encoding="UTF-8"?>
<beans xmlns="http://www.springframework.org/schema/beans"
       xmlns:xsi="http://www.w3.org/2001/XMLSchema-instance"
       xsi:schemaLocation="http://www.springframework.org/schema/beans http://www.springframework.org/schema/beans/spring-beans.xsd">
     <!--
         conn对应的Bean对象不是ConnectionFactoryBean,而是它的getObject方法返回的对象
     -->
     <bean id="conn" class="com.mj.factory.ConnectionFactoryBean">
         <property name="driver" value="com.mysql.jdbc.Driver"></property>
         <property name="url" value="jdbc:mysql://localhost:3306/mybatis?useSSL=false"></property>
         <property name="username" value="root"></property>
         <property name="password" value="123"></property>
     </bean>
</beans>
3. 通过实例工厂
通过实例工厂创建复杂对象,实例工厂中提供一个创建对象的普通方法,返回类型为目标对象类型,在配置文件中配置成实例工厂方式创建对象。
package com.mj.factory;

import java.sql.Connection;
import java.sql.DriverManager;

/**
 * @description: 复杂对象的创建,实例工厂
 */
public class ConnectionFactory {

    public Connection getConnection() throws Exception {
        Class.forName("com.mysql.jdbc.Driver");
        Connection connection = DriverManager.getConnection("jdbc:mysql://localhost:3306/mybatis?useSSL=false", "root", "123");
        return connection;
    }
}
<?xml version="1.0" encoding="UTF-8"?>
<beans xmlns="http://www.springframework.org/schema/beans"
       xmlns:xsi="http://www.w3.org/2001/XMLSchema-instance"
       xsi:schemaLocation="http://www.springframework.org/schema/beans http://www.springframework.org/schema/beans/spring-beans.xsd">

     <!-- 先有实例工厂才能创建对象,配置实例工厂对象 -->
    <bean id="connFactory" class="com.mj.factory.ConnectionFactory"></bean>
    <!--
         factory-bean属性: 配置实例工厂
       factory-method属性: 指定实例工厂的哪个方法用于创建对象
    -->
    <bean id="connection" scope="prototype" factory-bean="connFactory" factory-method="getConnection"></bean>
</beans>
4. 通过静态工厂
通过静态工厂创建复杂对象,静态工厂中提供一个创建对象的静态方法,返回类型为对象类型,在配置文件中配置成静态工厂方式创建对象。
package com.mj.factory;

import java.sql.Connection;
import java.sql.DriverManager;

/**
 * @description: 复杂对象的创建,静态工厂
 */
public class StaticConnectionFactory {

    public static Connection getConnection() throws Exception {
        Class.forName("com.mysql.jdbc.Driver");
        Connection connection = DriverManager.getConnection("jdbc:mysql://localhost:3306/mybatis?useSSL=false", "root", "123");
        return connection;
    }
}
<?xml version="1.0" encoding="UTF-8"?>
<beans xmlns="http://www.springframework.org/schema/beans"
       xmlns:xsi="http://www.w3.org/2001/XMLSchema-instance"
       xsi:schemaLocation="http://www.springframework.org/schema/beans http://www.springframework.org/schema/beans/spring-beans.xsd">

    <!--
       静态工厂由于是静态方法,无需配置静态工厂对象,和实例工厂稍有不同
       factory-method属性: 指定静态工厂的哪个方法用于创建对象
    -->
     <bean id="connection" class="com.mj.factory.StaticConnectionFactory" factory-method="getConnection"></bean>
</beans>
3.3 IOC的总结
IOC我们可以用自己的方式进行理解,IOC的核心就是控制反转,实现代码之间的解耦合。IOC如何实现控制反转,要实现控制反转所以就需要IOC容器以及各种实现类,IOC容器负责bean的一整个生命周期的管理,包括bean的实例化、初始化、销毁以及bean的加工、包装等。IOC控制反转的重要体现就是依赖注入DI,只要产生了依赖就可以通过Spring的依赖注入进行解耦合,这就是依赖注入的核心,依赖注入有三种实现:set方法注入,构造器注入,接口注入(很少使用)。
4. Spring中的注入(DI)
4.1 依赖注入的解释
依赖注入的英文单词是( Dependency Injection),从词汇中我们能大概知道依赖注入肯定是从某个容器中往另一处注入一些容器中保存的东西。在Spring中就是通过IOC容器为创建对象的成员变量进行赋值,这也是一种解耦合的方式,通过Spring的配置文件在配置bean的时候同时为对象进行成员变量的初始化,可以解决在代码编写中成员变量赋值硬编码的问题。
4.2 注入的方式
1. 通过set方法注入
必须在类中提供成员变量的set方法,才能使用set注入方式,否则会报错。在配置文件中使用 </property>标签即可启用set注入对成员变量赋值。
package com.mj.model;

import java.io.Serializable;
import lombok.Data;
import lombok.ToString;
import java.util.List;
import java.util.Map;
import java.util.Set;

/**
 * @Todo: 测试set注入成员变量
 */
@Data
@ToString
public class Account implements Serializable {

    private Integer id;
    private String username;
    private String password;
    private List<String> emails;
    private Set<String> otherName;
    private Map<String,String> qqs;
    private Properties properties;
    // 对象类型变量
    private MyBean myBean;
}
<?xml version="1.0" encoding="UTF-8"?>
<beans xmlns="http://www.springframework.org/schema/beans"
       xmlns:xsi="http://www.w3.org/2001/XMLSchema-instance"
       xsi:schemaLocation="http://www.springframework.org/schema/beans http://www.springframework.org/schema/beans/spring-beans.xsd">

    <bean id="myBean" class="com.baizhi.model.MyBean"></bean>

     <!-- set注入标签写法 -->
    <bean id="account" class="com.mj.model.Account">

        <!--  1.整数类型 -->
        <property name="id">
            <value>1</value>
        </property>
        <!--  2.字符串类型 -->
        <property name="username">
            <value>admin</value>
        </property>

        <!--  3.list集合字符串类型 -->
        <property name="emails">
            <list>
                <value>12233@ee.com</value>
                <value>444433@qq.com</value>
                <value>rkrkrkkr3@qq.com</value>
            </list>
        </property>

        <!--  4.set集合字符串类型 -->
        <property name="otherName">
            <set>
                <value>张三</value>
                <value>小张</value>
            </set>
        </property>

        <!--  5.map类型 -->
        <property name="qqs">
            <map>
                <entry>
                    <key><value>q1</value></key>
                    <value>1222222222</value>
                </entry>
                <entry>
                    <key><value>q2</value></key>
                    <value>33333444444</value>
                </entry>
            </map>
        </property>

         <!--  6. properties类型 -->
        <property name="properties">
            <props>
                <prop key="key1">value1</prop>
                <prop key="key2">value2</prop>
            </props>
        </property>

        <!--  7. 对象类型, 通过ref指向指定的对象id来注入 -->
        <property name="myBean" ref="myBean"></property>
    </bean>
</beans>
2. 通过构造器注入
必须在类中提供对应的构造方法,才能使用构造器注入方式,否则会报错。在配置文件中使用<constructor-arg/>标签即表示启用构造器注入方式对成员变量赋值。
package com.mj.model;
import lombok.Data;
import lombok.ToString;

/**
 * @Todo: 测试构造注入
 */
@Data
@ToString
public class Employee {

    private Integer id;
    private String employeeName;
    private String email;

    public Employee(Integer id) {
        this.id = id;
    }

    public Employee(String employeeName) {
        this.employeeName = employeeName;
    }

    public Employee(Integer id, String employeeName) {
        this.id = id;
        this.employeeName = employeeName;
    }

    public Employee(Integer id, String employeeName, String email) {
        this.id = id;
        this.employeeName = employeeName;
        this.email = email;
    }
}
<?xml version="1.0" encoding="UTF-8"?>
<beans xmlns="http://www.springframework.org/schema/beans"
       xmlns:xsi="http://www.w3.org/2001/XMLSchema-instance"
       xsi:schemaLocation="http://www.springframework.org/schema/beans http://www.springframework.org/schema/beans/spring-beans.xsd">

    <!--
         构造函数注入首先根据参数个数和类型寻找调用哪个构造函数
         如果参数个数相同时需要指定参数的类型
     -->

    <!-- 调用三个参数的构造函数注入 -->
    <bean id="employee" class="com.mj.model.Employee">
        <constructor-arg>
            <value>1222</value>
        </constructor-arg>
        <constructor-arg>
            <value>张无忌</value>
        </constructor-arg>
        <constructor-arg>
            <value>209588322@qq.com</value>
        </constructor-arg>
    </bean>

    <!-- 调用两个参数的构造函数注入 -->
    <bean id="employee1" class="com.mj.model.Employee">
        <constructor-arg>
            <value>18</value>
        </constructor-arg>
        <constructor-arg>
            <value>苏乞儿</value>
        </constructor-arg>
    </bean>

    <!-- 调用一个参数为Integer的构造函数注入 -->
    <bean id="employee2" class="com.mj.model.Employee">
        <constructor-arg type="java.lang.Integer">
            <value>24</value>
        </constructor-arg>
    </bean>

    <!-- 调用一个参数为String的构造函数注入 -->
    <bean id="employee3" class="com.mj.model.Employee">
        <constructor-arg type="java.lang.String">
            <value>郭靖</value>
        </constructor-arg>
    </bean>
</beans>
3. 通过注解注入
通过在属性上标注@Value、@Autowired或者@Resource注解进行注入,底层通过反射进行赋值,注解的使用在开发中已经普遍替代了xml配置文件。
package com.mj.spring.bean;

import com.mj.spring.dao.ProductDao;
import com.mj.spring.dao.UserDao;
import org.springframework.beans.factory.annotation.Autowired;
import org.springframework.beans.factory.annotation.Value;
import org.springframework.stereotype.Component;
import javax.annotation.Resource;

/**
 * @description: 注解注入的使用
 */
@Component
public class Product{

    // 注入字面量给包装类
    @Value("12")
    private Long id;
    // 读取配置文件的值进行注入
    @Value("${product.name}")
    private String productName;

    // 在字段中使用@Autowired或@Resource注解进行自动注入
    @Resource
    private ProductDao productDao;

    private UserDao userDao;
    private AccountDao accountDao;

    //在构造方法上使用@Autowired注解,表示构造注入
    @Autowired
    public Product(UserDao userDao) {
        this.userDao = userDao;
    }

     //在set方法中使用@Autowired注解,则为set注入
    @Autowired
    public setAccountDao(AccountDao accountDao) {
        this.accountDao= accountDao;
    }


}
5. Spring中bean的生命周期
5.1 bean的生命周期过程

Spring中bean的生命周期是指bean从实例化、属性赋值、初始化到销毁的一整个过程。我们要了解bean是如何根据配置文件的内容去创建我们的bean对象的;以及初始化过程包括了哪些,我们如何对bean进行自定义的初始化内容;最后我们只需简单了解如何进行bean的销毁,以及bean什么时候才会销毁。
5.2 bean的创建过程
bean的创建过程首先是把Spring的配置文件通过IO流读取到应用程序中去,配置文件中定义的每一个的bean会被BeanDefinitionReader接口的实现类XmlBeanDefinitionReader转换为Java中的GenericBeanDefinition对象,并保存在名为beanDefinitionMap的ConcurrentHashMap中。Spring的IOC容器(工厂)会对非懒加载的单例bean执行对象的实例化、属性注入、初始化等生命周期过程。
5.3 bean的属性注入
Spring的属性注入是通过依赖注入(DI)来实现的,我们需要知道Spring中的依赖注入底层都是使用反射来实现,反射的功能非常强大,是Spring中实现IOC和DI功能的核心技术。还有在bean对象注入其它bean对象时可能会产生的循环依赖问题,Spring的IOC容器利用三级缓存也帮我们解决了这个问题。
5.4 bean的初始化
Spring工厂在创建完对象后,调用对象的初始化方法,完成对应的初始化操作。这个初始化的功能是我们自行根据需求来书写并由Spring工厂进行调用的,我们可以通过实现InitializingBean接口或者自定义初始化方法通过init-method属性配置的方式对对象进行初始化,但是InitializingBean接口的afterPropertiesSet方法优先级比我们自定义的初始化方法优先级高。
- 实现InitializingBean接口方式
package com.mj.life;

import org.springframework.beans.factory.InitializingBean;

/**
 * @description: 实现InitializingBean接口对对象进行初始化
 */
public class Product implements InitializingBean {

    /**
     * 这个就是初始化方法:做一些初始化操作
     * Spring会进行调用
     * @throws Exception
     */
    @Override
    public void afterPropertiesSet() throws Exception {
        System.out.println("Product.afterPropertiesSet");
    }
}
- 通过配置文件init-method属性设置自定义初始化方法
package com.mj.life;

/**
 * @description: 使用自定义方法对对象进行初始化
 */
public class Product {

    /**
     * 自己定义一个对对象进行初始化的方法
     * 在配置文件中使用init-method配置, init-method="myInit"
     */
    public void myInit(){
        System.out.println("通过自定义初始化方法的方式对对象进行初始化操作");
    }
}
5.5 bean的扩展过程
Spring中的BeanPostProcessor也叫做后置处理器,是Spring中非常重要的一个接口,也是bean进行加工处理的核心接口,它包括了两个常用方法postProcessBeforeInitialization和postProcessAfterInitialization。我们要重点掌握这两个方法的执行时间点,其中postProcessBeforeInitialization的执行时机是在bean对象进行了实例化和成员变量的注入后,初始化方法执行之前被调用;而postProcessAfterInitialization则是在初始化方法执行完成后再被调用。
package com.mj.processor;
import org.springframework.beans.BeansException;
import org.springframework.beans.factory.config.BeanPostProcessor;

/**
 * @description: 后置处理器方法的调用时机演示
 */
public class MyBeanPostProcessor implements BeanPostProcessor {

    public Object postProcessBeforeInitialization(Object bean, String beanName) throws BeansException {
        System.out.println("postProcessBeforeInitialization方法调用了");
        return Object;
    }

    public Object postProcessAfterInitialization(Object bean, String beanName) throws BeansException {
        System.out.println("postProcessAfterInitialization方法调用了");
        return Object;
    }
}
package com.mj.model;

import org.springframework.beans.factory.InitializingBean;

import java.io.Serializable;

/**
 *  重点难点,演示了对象创建过程的各个阶段执行顺序
 *     对象创建 > 属性注入 > postProcessBeforeInitialization方法  >
 *     afterPropertiesSet方法 > postProcessAfterInitialization方法
 */

public class Category implements Serializable, InitializingBean {

    private Integer id;
    private String categoryName;

    public Category(){
        System.out.println("调用了无参构造");
    }

    @Override
    public void afterPropertiesSet() throws Exception {
        System.out.println("调用了初始化方法进行初始化");
    }

    public Integer getId() {
        return id;
    }

    public void setId(Integer id) {
        this.id = id;
        System.out.println("通过set注入了id");
    }

    public String getCategoryName() {
        return categoryName;
    }

    public void setCategoryName(String categoryName) {
        this.categoryName = categoryName;
        System.out.println("通过set注入了categoryName");
    }
}
<?xml version="1.0" encoding="UTF-8"?>
<beans xmlns="http://www.springframework.org/schema/beans"
       xmlns:xsi="http://www.w3.org/2001/XMLSchema-instance"
       xsi:schemaLocation="http://www.springframework.org/schema/beans http://www.springframework.org/schema/beans/spring-beans.xsd">

    <bean id="category" class="com.mj.model.Category">
        <property name="id" value="1222"></property>
        <property name="categoryName" value="日用百货"></property>
    </bean>
    <!-- 配置自定义的BeanPostProcessor -->
    <bean id="myBeanPostProcessor" class="com.mj.processor.MyBeanPostProcessor"></bean>
</beans>
5.6 bean的销毁过程
Spring销毁对象前,会调用对象的销毁方法,完成对象销毁前的处理操作。Spring会在调用工厂的关闭方法后执行对象的销毁方法,但是要求对象为单例对象,否则对象的销毁方法不会被调用。
- 实现DisposableBean接口方式
package com.mj.life;
import org.springframework.beans.factory.InitializingBean;

/**
 * @description: 实现DisposableBean接口实现单例对象销毁前的处理方法
 */
public class Product implements DisposableBean {

    @Override
    public void destroy() throws Exception {
        System.out.println("通过DisposableBean接口的方式对对象进行销毁操作");
    }
}
- 通过配置文件destory-method属性设置自定义初始化方法
package com.mj.life;

/**
 * @description: 自定义的对象的销毁处理方法
 */
public class Product {

    /**
     * 自定义的对象的销毁处理方法,在配置文件中使用destroy-method指定
     */
    public void myDestroy(){
        System.out.println("通过自定义对象销毁方法的方式对对象进行销毁操作");
    }
}
6. Spring中的AOP
6.1 什么是AOP
AOP是英文(Aspect Oriented Programming)面向切面编程的缩写。AOP在Spring中既是重点也是难点,所以我们要深入了解AOP的底层技术原理。AOP的底层是采用动态代理技术来实现代码中的面向切面编程开发的,而动态代理又是根据设计模式中的静态代理优化而来的,动态代理和静态代理都是代理设计模式的思想,所以我们要学习好代理设计模式的思想,从而更好地掌握Spring中的AOP编程。
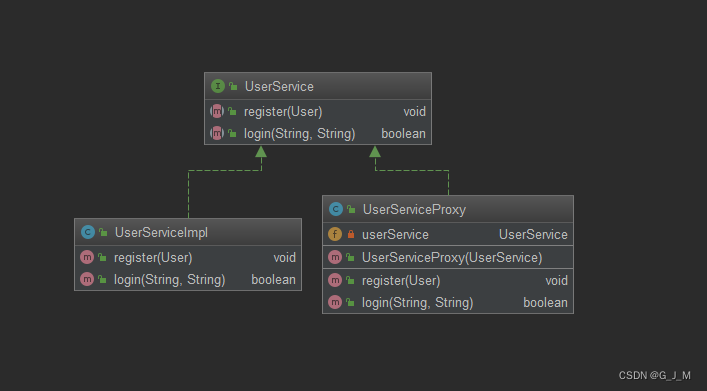
6.2 静态代理
静态代理的原理是目标类或被代理类与代理类实现同一接口,由代理类接管目标类的功能,并负责提供额外的功能。代理类要想接管目标类的功能则需要目标类的对象,故代理类中保存了目标类的对象,方便调用目标类的原有功能。
package com.mj.service;
import com.mj.model.User;

public interface UserService {

     void register(User user);

     boolean login(String username, String password);
}
package com.mj.service.impl;

import com.mj.Log;
import com.mj.model.User;
import com.mj.service.UserService;

/**
 * @description: 代理的目标类
 */
public class UserServiceImpl implements UserService {

    public void register(User user) {
        System.out.println("用户注册成功:"+ user);
    }
    public boolean login(String username, String password) {
        System.out.println("用户登录成功:"+ username);
        return true;
    }
}
package com.mj.proxy;

import com.mj.model.User;
import com.mj.service.UserService;

/**
 * @description: UserServiceProxy静态代理类
 */
public class UserServiceProxy implements UserService {

    private UserService userService ;

    public UserServiceProxy(UserService userService){
        this.userService = userService;
    }

    public void register(User user) {
        System.out.println("------ 日志记录内容,新用户注册 ------");
        userService.register(user);
    }

    public boolean login(String username, String password) {
        System.out.println("------ 日志记录内容,用户登录了 -------");
        return userService.login(username, password);
    }
}
   /**
     * 静态代理的测试1
     */
    @Test
    public void test1(){
        UserService userServiceProxy = new UserServiceProxy(new UserServiceImpl());
        userServiceProxy.register(new User(1,"zhangsan"));
        userServiceProxy.login("zhangsan","123");
    }

   结果:
   ------ 日志记录内容,新用户注册 ------
   用户注册成功:User{id=1, username='zhangsan'}
   ------ 日志记录内容,用户登录了 -------
   用户登录成功:zhangsan
6.3 动态代理
动态代理是静态代理的升级优化,静态代理在编译期就需要确定代理类及其增加的额外功能,这样的设计显然对后期功能的修改非常不友好,也不是一种优秀的设计模式。而动态代理是在程序运行期动态生成代理类的字节码,创建目标对象的代理对象,并对目标对象中的方法进行功能性增强的一种技术。在Spring中动态代理的实现技术为JDK动态代理和CGLIB动态代理两种。
- JDK动态代理
使用Proxy的newProxyInstance(ClassLoader loader,Class<?>[] interfaces, InvocationHandler h)静态方法创建动态代理对象。
newProxyInstance方法参数详解:
- classLoader:类加载器对象,代理类由动态字节码技术生成字节码,没有类加载器,创建代理对象需要类加载器 。
- interfaces: 被代理对象实现的接口类,用于代理类实现同一接口,生成对应字节码 。
- handler :需要在原始对象的方法上添加的额外功能,可在前后增加额外功能 。
package com.mj.proxy;

import com.mj.model.User;
import com.mj.service.UserService;
import com.mj.service.impl.UserServiceImpl;

import java.lang.reflect.InvocationHandler;
import java.lang.reflect.Proxy;

/**
 * @description: JDK动态代理测试
 */
public class TestJDKProxy {

    public static void main(String[] args) {
        // 1. 创建原始对象
        final UserService userService = new UserServiceImpl();

        // 2. 创建InvocationHandler对象
        InvocationHandler handler = (proxy, method, args0)->{
             System.out.println("------ JDK Proxy log ---------");
              // 调用原始对象的方法
             Object ret = method.invoke(userService, args0);
             return ret;
        };

        // 3. jdk创建动态代理测试
        UserService userServiceProxy = (UserService) Proxy.newProxyInstance(TestJDKProxy.class.getClassLoader(), userService.getClass().getInterfaces(), handler);
        userServiceProxy.login("zhangsan","123");
        userServiceProxy.register(new User(2,"lisa"));

    }
}

- CGlib动态代理
使用Enhancer字节码增强器的create() 方法创建代理对象,Enhancer创建代理对象需要设置的内容。
- setClassLoader(ClassLoader classLoader) 方法用来设置类加载器。
- setSuperclass(Class superclass) 方法用来设置目标类(被代理类)为代理类的父类。
- setCallback(Callback callback) 方法用来设置回调接口的实现,书写增强的功能。
package com.mj.cglib;

/**
 * @description: 目标类(被代理类)
 */
public class OrderService {

    public void addOrder(){
        System.out.println("生成了新订单");
    }
}
package com.mj.cglib;

import org.springframework.cglib.proxy.Enhancer;
import org.springframework.cglib.proxy.MethodInterceptor;

/**
 * @description: cglib动态代理的编码
 */
public class TestCglibProxy {

    public static void main(String[] args) {

        // 1. 创建目标对象
        final OrderService orderService = new OrderService();

        // 2. 创建Enhancer字节码增强器对象
        Enhancer enhancer = new Enhancer();

        enhancer.setClassLoader(TestCglibProxy.class.getClassLoader());
        enhancer.setSuperclass(orderService.getClass());
        // 3. 创建方法拦截器对象
        MethodInterceptor interceptor = (o, method, args0, methodProxy) ->{
            // 先执行增强的日志输出功能
            System.out.println("------ cglib Proxy log -------");
            // 后调用目标类的方法
            Object ret = method.invoke(orderService, args0);
            return ret;
        };
        enhancer.setCallback(interceptor);
        // 4. 创建代理对象
        OrderService orderServiceProxy = (OrderService) enhancer.create();
        orderServiceProxy.addOrder();
    }
}

6.4 BeanPostProcessor的作用
我们前面学习过BeanPostProcessor后置处理器这个类,这个类可以在Spring管理的bean的生命周期中为我们的bean对象进行加工和处理。我们发现这个类中的postProcessBeforeInitialization和postProcessBeforeInitialization方法的返回值都是Object,如果我们直接返回方法参数中的bean对象,那么这个bean就是Spring管理的原始bean对象,这样如果我们想对某个bean对象进行特定功能的升级,就只需要找到这个bean对象,并且返回加工升级后的对象。Spring就是通过在bean的生命周期将动态代理的原始对象转换成代理对象的。
package com.mj.service;

public interface OrderService {

     void createOrder(String name);
}
package com.mj.service.impl;
import com.mj.service.OrderService;
import java.util.concurrent.TimeUnit;

public class OrderServiceImpl implements OrderService {

    @Override
    public void createOrder(String name) {
        try {
            TimeUnit.MILLISECONDS.sleep(200);
        } catch (InterruptedException e) {
            e.printStackTrace();
        }
        System.out.println("创建了" + name + "的订单");
    }
}
package com.mj.aop;
import com.mj.service.OrderService;
import org.springframework.beans.BeansException;
import org.springframework.beans.factory.config.BeanPostProcessor;
import java.lang.reflect.InvocationHandler;
import java.lang.reflect.Proxy;
/**
* @description: 演示原始对象被代理对象替换过程
*/
public class OrderBeanPostProcessor implements BeanPostProcessor {
@Override
public Object postProcessBeforeInitialization(Object bean, String beanName) throws BeansException {
return bean;
}
@Override
public Object postProcessAfterInitialization(Object bean, String beanName) throws BeansException {
// 对OrderService的子类对象进行加工处理
if (bean instanceof OrderService) {
InvocationHandler invocationHandler = (proxy, method, args) ->{
long beginTime = System.currentTimeMillis();
System.out.println("方法开始执行,beginTime = "+ beginTime +"ms");
Object ret = method.invoke(bean, args);
long endTime = System.currentTimeMillis();
System.out.println("方法结束执行,endTime = "+ endTime + "ms");
System.out.println("方法执行耗时,time = "+ (endTime-beginTime) + "ms");
return ret;
};
OrderService orderService = (OrderService) bean;
// 这里返回的是代理对象
return Proxy.newProxyInstance(OrderBeanPostProcessor.class.getClassLoader(),orderService.getClass().getInterfaces(),invocationHandler);
}
// 这里返回的是原始对象
return bean;
}
}<?xml version="1.0" encoding="UTF-8"?>
<beans xmlns="http://www.springframework.org/schema/beans"
xmlns:xsi="http://www.w3.org/2001/XMLSchema-instance"
xsi:schemaLocation="http://www.springframework.org/schema/beans
http://www.springframework.org/schema/beans/spring-beans.xsd">
<bean id="orderService" class="com.mj.service.impl.OrderServiceImpl"></bean>
<bean id="orderBeanPostProcessor" class="com.mj.aop.OrderBeanPostProcessor"></bean>
</beans>
7. Spring中的AOP开发
7.1 aop入门案例
- 引入相关依赖
<!-- AOP基本功能开发的依赖 -->
   <dependency>
      <groupId>org.springframework</groupId>
      <artifactId>spring-aop</artifactId>
      <version>5.1.5.RELEASE</version>
   </dependency>
<!-- AspectJ是功能更全的AOP框架 -->
   <dependency>
      <groupId>org.springframework</groupId>
      <artifactId>spring-aspects</artifactId>
      <version>5.1.5.RELEASE</version>
  </dependency>
<!-- Spring中的AOP配置所需依赖,配置切入点,切入点表达式 -->
  <dependency>
     <groupId>org.aspectj</groupId>
     <artifactId>aspectjweaver</artifactId>
     <version>1.8.3</version>
</dependency>- 创建原始对象
package com.mj.service.impl;
import com.mj.Log;
import com.mj.model.User;
import com.mj.service.UserService;

/**
 * @description: 代理的目标类
 */
public class UserServiceImpl implements UserService {

    public void register(User user) {
        System.out.println("用户注册成功:"+ user);
    }
    public boolean login(String username, String password) {
        System.out.println("用户登录成功:"+ username);
        return true;
    }
}
- 实现MethodBeforeAdvice接口书写增强代码
package com.mj.dynamic;
import org.springframework.aop.MethodBeforeAdvice;
import java.lang.reflect.Method;

/**
 * @description: 通过实现MethodBeforeAdvice接口进行前置通知代码实现
 */
public class Before implements MethodBeforeAdvice {
    /**
     * 作用:  需要把运行在原始方法执行之前运行的额外功能,书写的before方法中
     * @param method
     * @param objects
     * @param o
     * @throws Throwable
     */
    public void before(Method method, Object[] objects, Object o) throws Throwable {
        System.out.println("------- method before advice log ------");
    }
}
- applicationContext.xml配置文件中配置
<?xml version="1.0" encoding="UTF-8"?>
<beans xmlns="http://www.springframework.org/schema/beans"
       xmlns:xsi="http://www.w3.org/2001/XMLSchema-instance" xmlns:aop="http://www.springframework.org/schema/aop"
       xsi:schemaLocation="http://www.springframework.org/schema/beans
                           http://www.springframework.org/schema/beans/spring-beans.xsd http://www.springframework.org/schema/aop http://www.springframework.org/schema/aop/spring-aop.xsd">

    <bean id="userService" class="com.mj.service.impl.UserServiceImpl"></bean>

    <!-- 第一步:配置通知类的bean对象 -->
    <bean id="before" class="com.mj.dynamic.Before"></bean>

    <!-- 第二步:导入AOP名称空间,并且使用aop:config开始aop的配置 -->
    <aop:config>
        <!-- 第三步:配置切入点表达式 -->
        <aop:pointcut id="pc" expression="execution(* *(..))"/>
        <!-- 第四步:配置通知的传播,满足切入点表达式的都会被通知类拦截 -->
        <aop:advisor advice-ref="before" pointcut-ref="pc"></aop:advisor>
    </aop:config>
</beans> 
7.2 aop方法增强的过程
aop对目标方法的增强可以在目标方法执行前增强,也可以在目标方法执行后增强,这就是目标方法增强的执行过程。Spring把目标方法的增强代码又叫做通知,根据增强代码书写位置的不同,分为5种通知类型。
1. 前置通知:在目标方法执行之前执行
<aop:before method="before" pointcut-ref="pc"></aop:before>2. 后置通知:在目标方法执行之后执行
<aop:after method="after" pointcut-ref="pc"></aop:after>3. 异常通知:在目标方法发生异常之后执行
<aop:after-throwing method="afterThrowing" throwing="e" pointcut-ref="pc"></aop:after-throwing>4. 环绕通知:在目标方法执行的前后过程中执行,可以包含前置通知、后置通知和异常通知
<aop:around method="around" pointcut-ref="pc"></aop:around>5. 返回通知:在目标方法返回结果后执行,如果发生异常则不会执行
<aop:after-returning method="afterReturning" pointcut-ref="pc" returning="result"></aop:after-returning>package com.mj.dynamic;
/**
* @description: 定义一个切面类
*/
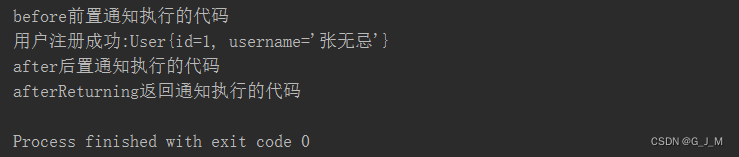
public class MyAspect {
public void before(){
System.out.println("before前置通知执行的代码");
}
public void after(){
System.out.println("after后置通知执行的代码");
}
public void afterReturning(){
System.out.println("afterReturning返回通知执行的代码");
}
public void afterThrowing(Exception e){
System.out.println("afterThrowing异常通知执行的代码"+e);
}
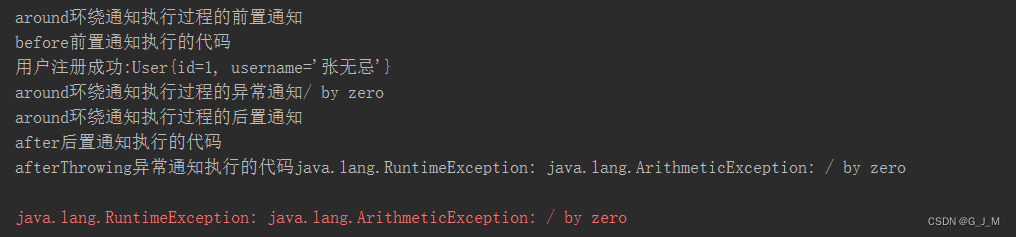
// 环绕通知过程可以包含前置通知、后置通知和异常通知
public Object around(ProceedingJoinPoint pjp){
Object ret = null;
try {
System.out.println("around环绕通知执行过程的前置通知");
ret = pjp.proceed();
} catch (Throwable e) {
System.out.println("around环绕通知执行过程的异常通知"+e.getMessage());
throw new RuntimeException(e);
}finally {
System.out.println("around环绕通知执行过程的后置通知");
}
return ret;
}
}
<?xml version="1.0" encoding="UTF-8"?>
<beans xmlns="http://www.springframework.org/schema/beans"
       xmlns:xsi="http://www.w3.org/2001/XMLSchema-instance" xmlns:aop="http://www.springframework.org/schema/aop"
       xsi:schemaLocation="http://www.springframework.org/schema/beans
                           http://www.springframework.org/schema/beans/spring-beans.xsd http://www.springframework.org/schema/aop http://www.springframework.org/schema/aop/spring-aop.xsd">

    <bean id="userService" class="com.mj.service.impl.UserServiceImpl"></bean>

    <!-- 配置切面类的bean对象 -->
    <bean id="myAspect" class="com.mj.dynamic.MyAspect"></bean>

    <aop:config>
        <!-- 配置切入点表达式,拦截所有方法 -->
        <aop:pointcut id="pc" expression="execution(* *(..))"/>
        <!-- 配置一个切面,
             id: 切面的id,需唯一
             ref: 指定切面类的bean引用
        -->
        <aop:aspect id="myAspect" ref="myAspect">
            <!-- 配置前置通知 -->
            <aop:before method="before" pointcut-ref="pc"></aop:before>
            <!-- 配置后置通知 -->
            <aop:after method="after" pointcut-ref="pc"></aop:after>
            <!-- 配置返回通知 -->
            <aop:after-returning method="afterReturning" pointcut-ref="pc"></aop:after-returning>
            <!-- 配置异常通知 -->
            <aop:after-throwing method="afterThrowing" throwing="e" pointcut-ref="pc"></aop:after-throwing>
        </aop:aspect>
    </aop:config>
</beans>
正常执行结果:
产生异常的结果:

- 5种通知执行的结果和配置有关
<aop:aspect id="myAspect" ref="myAspect">
    <!-- 先配置环绕通知,查看结果 -->
    <aop:around method="around" pointcut-ref="pc"></aop:around>
    <!-- 配置前置通知 -->
    <aop:before method="before" pointcut-ref="pc"></aop:before>
    <!-- 配置后置通知 -->
    <aop:after method="after" pointcut-ref="pc"></aop:after>
    <!-- 配置返回通知 -->
    <aop:after-returning method="afterReturning" pointcut-ref="pc"></aop:after-returning>
    <!-- 配置异常通知 -->
    <aop:after-throwing method="afterThrowing" throwing="e" pointcut-ref="pc"></aop:after-throwing>
</aop:aspect>
先配置环绕通知的结果:
<aop:aspect id="myAspect" ref="myAspect">
    <!-- 配置前置通知 -->
    <aop:before method="before" pointcut-ref="pc"></aop:before>
    <!-- 配置后置通知 -->
    <aop:after method="after" pointcut-ref="pc"></aop:after>
    <!-- 配置返回通知 -->
    <aop:after-returning method="afterReturning" pointcut-ref="pc"></aop:after-returning>
    <!-- 配置异常通知 -->
    <aop:after-throwing method="afterThrowing" throwing="e" pointcut-ref="pc"></aop:after-throwing>
    <!-- 后配置环绕通知,查看结果 -->
    <aop:around method="around" pointcut-ref="pc"></aop:around>
</aop:aspect>
后配置环绕通知的结果:

7.3 MethodInterceptor的使用
我们可以实现MethodInterceptor接口来进行AOP开发,通过实现MethodInterceptor接口自定义一个方法拦截器来拦截目标方法,并进行目标方法调用前后的时间点进行功能的增强。
package com.mj.dynamic;

import org.aopalliance.intercept.MethodInterceptor;
import org.aopalliance.intercept.MethodInvocation;

/**
 * @description: 实现MethodInterceptor接口进行AOP开发
 */
public class Around implements MethodInterceptor {
    /**
     * @param methodInvocation
     * @return
     * @throws Throwable
     */
    public Object invoke(MethodInvocation methodInvocation){
        Object ret = null;
        try {
            System.out.println("前置通知代码执行了");
            // 目标方法开始调用执行
            ret = methodInvocation.proceed();
            // 如果这里写后置通知代码会不会有问题
            System.out.println("出现异常这里的代码不会被执行");
            return ret;
        } catch (Throwable e) {
            System.out.println(e.getMessage());
            System.out.println("异常通知代码执行了");
            return ret;
        }finally {
            // 保证后置通知代码执行
            System.out.println("后置通知代码执行了");
        }
    }
}
<?xml version="1.0" encoding="UTF-8"?>
<beans xmlns="http://www.springframework.org/schema/beans"
       xmlns:xsi="http://www.w3.org/2001/XMLSchema-instance" xmlns:aop="http://www.springframework.org/schema/aop"
       xsi:schemaLocation="http://www.springframework.org/schema/beans
                           http://www.springframework.org/schema/beans/spring-beans.xsd http://www.springframework.org/schema/aop http://www.springframework.org/schema/aop/spring-aop.xsd">

    <bean id="goodsService" class="com.mj.service.impl.GoodsServiceImpl"></bean>

    <!-- 配置通知类的bean对象 -->
    <bean id="around" class="com.mj.dynamic.Around"></bean>

    <aop:config>
        <!-- 配置切入点表达式 -->
        <aop:pointcut id="pc" expression="execution(* *(..))"/>
        <!-- 配置通知的传播器,满足切入点表达式的都会被通知类拦截 -->
        <aop:advisor advice-ref="around" pointcut-ref="pc"></aop:advisor>
    </aop:config>

</beans>
测试结果:
 没有出现异常的结果:
     前置通知代码执行了
     添加商品成功
     出现异常这里的代码会不会执行
     后置通知代码执行了
 ---------------------------------------------
 出现异常的结果:
     前置通知代码执行了
     添加商品成功
     出现了自定义异常
     异常通知代码执行了
     后置通知代码执行了
7.4 什么是切入点
切入点:在AOP中表示需要被加入增强功能的方法,这个方法只能是Spring创建的Bean中的方法,这是因为我们定义的对象是在Bean的生命周期中被转换成动态代理对象的,我们在日常开发中需要知道我们使用的是原始对象还是Spring为我们转换的动态代理对象。
- 配置文件中定义
 <aop:config>
     <!--  配置切入点
             id: 多个切入点时可唯一标识
             expression: 配置切入点表达式,匹配满足的方法作为一个切入点
     -->
      <aop:pointcut id="pc" expression="execution(* *(..))"/>
</aop:config>- 配置类中注解定义
@Aspect
@Component
public class MyAspect {

    //通过@Pointcut注解声明在一个无返回值的空方法中定义切入点
    @Pointcut("execution(* *(..))")
    public void pointcut(){ }
}
7.5 切入点表达式
切入点表达式:是指切入点函数execution()中支持的语法,常见的切入点函数有execution()、args()、within()和@annotation()等。不同的切入点表达式可以控制不同的切入点粒度大小,主要有针对方法、类和包的切入点表达式。
- 方法切入点表达式
<aop:config>
    <!--
          表示匹配所有满足修饰符为public,返回值为void,
          方法名为addGoods且有一个参数为String类型的方法
    -->
    <aop:pointcut id="pc1" expression="execution(public void addGoods(String))"/>

    <!--
         " * addGoods(..)": 切入点表达式
           第一个 * 表示访问修饰符和返回值可任意
           addGoods表示限定方法名,也可用 * 表示任意方法都可以
           (..)表示方法参数可以任意,有或没有都可以
    -->
    <aop:pointcut id="pc2" expression="execution(* addGoods(..))"/>
</aop:config>- 类切入点表达式
<aop:config>
    <!--
        "* com.mj.service.impl.GoodsServiceImpl.*(..)": 切入点表达式
            第一个 * 表示访问修饰符和返回值可任意
       "com.mj.service.impl.GoodsServiceImpl.*" 表示在这个类下的所有方法
           (..)表示方法参数可以任意,有或没有都可以
    -->
   <aop:pointcut id="pc" expression="execution(* com.mj.service.impl.GoodsServiceImpl.*(..))"/>
</aop:config>- 包切入点表达式
 <aop:config>
       <!--
           "* com.mj.service.impl.*.*(..)": 切入点表达式
            第一个 * 表示访问修饰符和返回值可任意
           "com.baizhi.service.impl.*.*"表示在这个包以及子包都符合
            (..)表示方法参数可以任意,有或没有都可以
       -->
      <aop:pointcut id="pc" expression="execution(* com.mj.service.impl.*.*(..))"/>
 </aop:config>
7.6 切入点函数
切入点函数:用于解析执行切入点表达式的函数,切入点函数有多种
execution():是最常用,功能最全的切入点函数,支持三种切入点表达式。
  # 方法切入点表达式: execution(* addGoods(..))

  # 类切入点表达式: execution(* com.mj.service.impl.GoodsServiceImpl.*(..))

  # 包切入点表达式: execution(* com.mj.service.impl.*(..))
args(): 只针对方法,通过方法参数匹配的切入点函数
  # 匹配一个参数的方法: args(String)

  # 匹配两个参数的方法: args(String,Integer)

# 匹配无参或任意个参数的方法: args(..)within():只针对包,通过包切入点表达式匹配的切入点函数
  # 匹配当前包下的所有方法: within(com.mj.service.impl.*)

  # 匹配当前包以及子包下的所有方法: within(com.mj.service..*)
@annotation():只针对方法,对含有指定注解(@Log)的方法进行匹配
  # 匹配所有被@Log注解声明方法: @annotation(com.mj.annotation.Log)

  # 匹配所有被@Transactional注解声明方法: @annotation(org.springframework.transaction.annotation.Transactional)
8. Spring中的注解开发
8.1 什么是注解
Java 注解是在 JDK5 时引入的新特性,注解(也被称为元数据)为我们在代码中添加信息提供了一种形式化的方法,使我们可以在稍后某个时刻非常方便地使用这些数据。注解本质就是一个继承了Annotation 接口的特殊接口,你可以自定义注解接口中可提供的元数据,在后续通过反射获取到注解接口的动态代理对象并调用方法拿到元数据。
8.2 自定义注解使用
import java.lang.annotation.ElementType;
import java.lang.annotation.Retention;
import java.lang.annotation.RetentionPolicy;
import java.lang.annotation.Target;

/**
 * @description: 自定义一个简单注解
 */
@Target({ElementType.TYPE, ElementType.FIELD, ElementType.METHOD})  //注解可标注的位置
@Retention(RetentionPolicy.RUNTIME)  // 注解的生命周期
public @interface MyAnnotation {

    int sort() default 0;  // 默认值设为0
}
import java.lang.annotation.Annotation;
/**
* @description: 通过反射拿到注解的元数据
*/
@MyAnnotation(sort = 2)
public class TestMyAnnotation {
public static void main(String[] args) throws ClassNotFoundException {
Class<?> clazz = Class.forName("com.mj.annotation.TestMyAnnotation");
Annotation[] annotations = clazz.getAnnotations();
for (Annotation annotation : annotations) {
if (annotation instanceof MyAnnotation) {
//调用方法获取数据,对象为jdk动态代理生成的注解接口的代理对象
int sort= ((MyAnnotation) annotation).sort();
System.out.println(sort);
}
}
}
}8.3 Spring中的常用注解
| 注解 | 作用范围 | 作用 |
|---|---|---|
| @Component | 类、接口、枚举 | 使用在类上表示让Spring容器接管对象的创建 |
| @ComponentScan | 类、接口、枚举 | 使用在类上指定Spring扫描包的范围,范围以内的注解有效 |
| @Controller | 类、接口、枚举 | 使用在web环境表示创建controller层的对象 |
| @Service | 类、接口、枚举 | 使用在web环境表示创建service层的对象 |
| @Repository | 类、接口、枚举 | 使用在web环境表示创建dao层的对象 |
| @Configuration | 类、接口、枚举 | 使用在类上表示该类为一个配置类,负责bean的配置 |
| @Autowired | 构造器、方法、成员变量、方法参数、注解 | 默认按类型注入的方式对对象进行依赖注入 |
| @Qualifier | 构造器、方法、成员变量、方法参数、注解 | 配合@Autowired用于根据名称进行对象的依赖注入 |
| @Resource | 类、接口、枚举、方法、成员变量、 | J2EE注解非Spring的原生注解,默认对对象按名称进行依赖注入 |
| @Value | 方法、成员变量、方法参数、注解 | 对Spring接管的对象进行基本属性类型成员变量的注入 |
| @Scope | 类、接口、枚举、方法 | 对Spring接管的对象声明作用范围,singleton,prototype |
| @PostConstruct | 方法 | 对Spring接管的对象声明Bean的初始化方法 |
| @PreDestroy | 方法 | 对Spring接管的对象声明Bean销毁方法 |
8.4 基于注解的动态代理
- 编写aop的配置类,使用@EnableAspectJAutoProxy开启动态代理,默认使用的是jdk动态代理。
package com.mj.spring.aop;

import org.springframework.context.annotation.ComponentScan;
import org.springframework.context.annotation.Configuration;
import org.springframework.context.annotation.EnableAspectJAutoProxy;

/**
 * @description: 基于注解的动态代理开发
 *               使用@EnableAspectJAutoProxy开启动态代理
 *               proxyTargetClass = false 采用jdk动态代理
 *               proxyTargetClass = true 采用cglib动态代理
 */
@Configuration
@ComponentScan(basePackages = "com.mj.spring.aop")
@EnableAspectJAutoProxy(proxyTargetClass = false)
public class AopConfig {

}- 编写aop的切面类,使用环绕通知书写增强的代码。
package com.mj.spring.aop;
import org.aspectj.lang.ProceedingJoinPoint;
import org.aspectj.lang.annotation.Around;
import org.aspectj.lang.annotation.Aspect;
import org.springframework.stereotype.Component;
/**
* @description: 纯注解的AOP开发的切面类
*/
@Aspect
@Component
public class MyAspect {
// 通过@Pointcut注解声明在一个无返回值的空方法中定义切入点
@Pointcut("execution(* *(..))")
public void pointcut(){ }
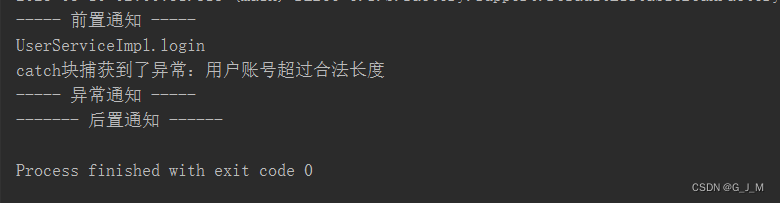
@Around("execution(* com.mj.spring.aop..*.*(..))")
public Object around(ProceedingJoinPoint joinPoint){
Object ret = null;
try {
System.out.println("----- 前置通知 -----");
// 后置通知不能放在这里,否则出现异常后置通知无法执行
ret = joinPoint.proceed();
} catch (Throwable throwable) {
// 打印异常信息
System.out.println("catch块捕获到了异常:" + throwable.getMessage());
System.out.println("----- 异常通知 -----");
} finally {
System.out.println("------- 后置通知 ------");
}
return ret;
}
}- 书写原始类的功能代码
package com.baizhi.spring.aop;

public interface UserService {

    public void register();

    public void login();
}
package com.mj.spring.aop;

import org.springframework.stereotype.Service;

/**
 * @description: 原始类的未增强前的方法
 */
@Service
public class UserServiceImpl implements UserService {
    public void register() {
        System.out.println("UserServiceImpl.register");
    }

    public void login() throws Exception {
        System.out.println("UserServiceImpl.login");
        // 手动抛出异常,模拟代码出现异常
        throw new Exception("用户账号超过合法长度");
    }
}
出现异常的执行结果:
正确的执行结果:

8.5 Java配置类的优雅使用
- 配置类的本质就是使用Java代码实现Spring核心配置文件application.xml的全部功能,其中@Configuration的作用就是标记为Java配置类,@Bean的作用就等同于<bean/>标签。
package com.mj.spring.config;


import com.alibaba.druid.pool.DruidDataSource;
import com.mj.spring.config.DruidDataSourceProperties;
import org.springframework.beans.factory.annotation.Autowired;
import org.springframework.context.annotation.Bean;
import org.springframework.context.annotation.ComponentScan;
import org.springframework.context.annotation.Configuration;

import javax.sql.DataSource;

/**
 * @description: Druid数据库连接池的自动配置类
 *               @Conditional注解判断是否存在Druid的配置文件
 */
@Configuration
@ComponentScan("com.mj.spring")
public class DruidAutoConfiguration {

    @Autowired
     private DruidDataSourceProperties properties;

    /**
     *  Druid数据库连接池
     *  配置数据库的数据源dataSource
     * @return
     */
    @Bean
    @Conditional(DruidDataSourceProperties.class)
    public DataSource dataSource(){
         DruidDataSource druidDataSource = new DruidDataSource();
        // 配置sql的连接信息
        druidDataSource.setDriverClassName(properties.getDriver());
        druidDataSource.setUrl(properties.getUrl());
        druidDataSource.setUsername(properties.getUsername());
        druidDataSource.setPassword(properties.getPassword());
        // 初始化连接数
        druidDataSource.setInitialSize(properties.getInitialSize());
        // 最大连接数
        druidDataSource.setMaxActive(properties.getMaxActive());
        // 超时时间
        druidDataSource.setMaxWait(properties.getMaxWait());
        return druidDataSource;
    }
}- 新建druid.properties配置,用于灵活配置druid连接池的配置信息。通过@PropertySource和@Value注解可读取配置中的信息。
druid.sql.driver = com.mysql.jdbc.Driver
druid.sql.url = jdbc:mysql://localhost:3306/mybatis?useSSL=false
druid.sql.username = root
druid.sql.password = 123

druid.initialSize = 25
druid.maxActive = 50
druid.maxWait = 3000
package com.mj.spring.config;
import lombok.Getter;
import lombok.Setter;
import org.springframework.beans.factory.annotation.Value;
import org.springframework.context.annotation.Condition;
import org.springframework.context.annotation.ConditionContext;
import org.springframework.context.annotation.PropertySource;
import org.springframework.core.io.Resource;
import org.springframework.core.type.AnnotatedTypeMetadata;
import org.springframework.stereotype.Component;
/**
* @description: 实现Condition接口,
* 此类可结合@Conditional注解使用
*/
@Setter
@Getter
@Component
@PropertySource("classpath:druid.properties")
public class DruidDataSourceProperties implements Condition{
@Value("${druid.sql.driver}")
private String driver;
@Value("${druid.sql.url}")
private String url;
@Value("${druid.sql.username}")
private String username;
@Value("${druid.sql.password}")
private String password;
@Value("${druid.initialSize}")
private Integer initialSize;
@Value("${druid.maxActive}")
private Integer maxActive;
@Value("${druid.maxWait}")
private Long maxWait;
// 自行判断条件是否成立
@Override
public boolean matches(ConditionContext conditionContext, AnnotatedTypeMetadata annotatedTypeMetadata) {
Resource resource = conditionContext.getResourceLoader().getResource("classpath:druid.properties");
// 当存在druid的配置文件时,条件生效
if(resource.exists()) {
return true;
}
return false;
}
}- 以上配置是不是有点Springboot的那点感觉了,当然更完整的还需要自行去完善,底层就是这个逻辑去实现的,根据@Conditional条件自行扩展,通过条件去判断Bean是否需要去注册。
8.6 @ComponentScan的使用
- @ComponentScan注解的作用是组件扫描,该注解配置的扫描范围为包级别,可配置一个或多个包名。通过basePackageClasses指定的类最终扫描的还是该类所在的包范围。
package com.mj.spring.config;

import org.springframework.context.annotation.ComponentScan;
import org.springframework.context.annotation.Configuration;

/**
 * @description: 该配置类用于配置需要进行注解(组件)扫描的多个包的范围
 */
@Configuration
@ComponentScan(value = {"com.mj.spring.config","com.mj.spring.dao"})
public class AppConfig1 {

}
package com.mj.spring.config;
import org.springframework.context.annotation.ComponentScan;
import org.springframework.context.annotation.Configuration;
/**
* @description: 配置需要扫描的包的类,即该类所在包为扫描范围
*/
@Configuration
@ComponentScan(basePackageClasses = {AppConfig2.class})
public class AppConfig2 {
}- @ComponentScan注解的排除策略,使用excludeFilters配置排除策略,即排除掉一些无需组件扫描的类,主要有五种过滤类型,我们可以选择一种或多种过滤类型组合使用。
package com.mj.spring.config;

import com.mj.spring.scan.ExcludeBean;
import org.springframework.context.annotation.ComponentScan;
import org.springframework.context.annotation.Configuration;
import org.springframework.context.annotation.FilterType;
import org.springframework.stereotype.Service;

/**
 * @description: @ComponentScan的排除策略,使用excludeFilters
 *           type = FilterType.ASSIGNABLE_TYPE 排除特定类型的bean
 *           type = FilterType.ANNOTATION 排除特定注解的bean
 *           type = FilterType.ASPECTJ 排除特定切入点表达式的bean,只支持包切入点表达式和类切入点表达式
 *           type = FilterType.REGEX  排除特定正则表达式的bean
 *           type = FilterType.CUSTOM 自定义排除策略
 */
@Configuration
@ComponentScan(basePackages = "com.mj.spring.scan",
        excludeFilters = { @ComponentScan.Filter(type = FilterType.ANNOTATION, value={Service.class}),
                @ComponentScan.Filter(type = FilterType.ASSIGNABLE_TYPE, value = {ExcludeBean.class}) } )
public class AppConfig1 {

}- @ComponentScan注解的包含策略,使用includeFilters配置包含策略,需要配置useDefaultFilters = false,表示使用自己配置的过滤类型,即自行控制需要组件扫描的类。
package com.mj.spring.config;

import com.mj.spring.scan.IncludeBean;
import org.springframework.context.annotation.ComponentScan;
import org.springframework.context.annotation.Configuration;
import org.springframework.context.annotation.FilterType;
import org.springframework.stereotype.Service;

/**
 * @description: @ComponentScan的包含策略,使用includeFilters
 *           type = FilterType.ASSIGNABLE_TYPE 包含特定类型的bean
 *           type = FilterType.ANNOTATION 包含特定注解的bean
 *           type = FilterType.ASPECTJ 包含特定切入点表达式的bean,只支持包切入点表达式和类切入点表达式
 *           type = FilterType.REGEX  包含特定正则表达式的bean
 *           type = FilterType.CUSTOM 自定义包含策略
 */
 */
@Configuration
@ComponentScan(basePackages = "com.mj.spring.scan",useDefaultFilters = false,
includeFilters = {@ComponentScan.Filter(type = FilterType.ANNOTATION, value = {Service.class}),
        @ComponentScan.Filter(type = FilterType.ASSIGNABLE_TYPE, value = {IncludeBean.class})})
public class AppConfig3 {

}
9. Spring中的事务编程
9.1 什么是事务
所谓事务是用户定义的一个数据库操作序列,这些操作要么全部成功,要么全部不成功,是一个不可分割的最小的工作单位。事务管理最重要的是要保证事务的4个特性:原子性(Atomicity)、一致性(Consistency)、隔离性(Isolation)、持久性(Durability)。
- 原子性(Atomicity):在一个事务中的一组数据库操作只能全部执行成功或执行失败。
- 一致性(Consistency):事务的执行结果必须是使数据库从一个一致性状态变到另一个一致性状态。
- 隔离性(Isolation) :事务的隔离性是指一个事务的执行不能被其它事务干扰,即 一个事务的内部操作及使用的数据对其它并发事务是隔离的,并发执行的各个事务之间不能互相干扰。
- 持久性(Durability) :指一个事务一旦提交,它对数据库中数据的改变就是永久的,其它事务的操作或者系统故障不会对数据有影响。
9.2 Spring中的编程式事务
编程式事务是指我们用编写代码的形式去手动控制事务。Spring中支持的事务功能包括编程式事务和声明式事务两种,对于编程式事务的开发我们可以使用TransactionTemplate或者直接使用底层的PlatformTransactionManager。对于编程式事务的管理,Spring推荐使用TransactionTemplate,因为使用起来会更简单。
- PlatformTransactionManager的使用
package com.mj.spring.configs;

import org.springframework.context.annotation.Bean;
import org.springframework.context.annotation.Configuration;
import org.springframework.jdbc.datasource.DataSourceTransactionManager;
import org.springframework.transaction.PlatformTransactionManager;
import org.springframework.transaction.annotation.EnableTransactionManagement;

import javax.annotation.Resource;
import javax.sql.DataSource;

/**
 * @description: 配置事务管理器: PlatformTransactionManager
 */
@Configuration
@EnableTransactionManagement
public class TransactionAutoConfiguration {

    @Resource
    private DataSource dataSource;

    @Bean
    public PlatformTransactionManager platformTransactionManager(){
        DataSourceTransactionManager transactionManager = new DataSourceTransactionManager();
        transactionManager.setDataSource(this.dataSource);
        return transactionManager;
    }
}- 在业务中使用PlatformTransactionManager编写声明式事务的代码
@Resource
private PlatformTransactionManager transactionManager;

public void save(User user) {
      // 手动开启事务
     TransactionStatus status = transactionManager.getTransaction(new DefaultTransactionDefinition());
     try {
          int result = userMapper.save(user);
           // 模拟出现异常
          int i = 10/0;
          // 手动提交事务
          transactionManager.commit(status);
     }catch (Exception e){
         // 手动回滚事务
          transactionManager.rollback(status);
     }
}- TransactionTemplate的使用
package com.mj.spring.configs;

import org.springframework.context.annotation.Bean;
import org.springframework.context.annotation.Configuration;
import org.springframework.jdbc.datasource.DataSourceTransactionManager;
import org.springframework.transaction.PlatformTransactionManager;
import org.springframework.transaction.annotation.EnableTransactionManagement;

import javax.annotation.Resource;
import javax.sql.DataSource;

/**
 * @description: 配置事务管理器: PlatformTransactionManager
 */
@Configuration
@EnableTransactionManagement
public class TransactionAutoConfiguration {

    @Resource
    private DataSource dataSource;

    @Bean
    public PlatformTransactionManager platformTransactionManager(){
        DataSourceTransactionManager transactionManager = new DataSourceTransactionManager();
        transactionManager.setDataSource(this.dataSource);
        return transactionManager;
    }

     @Bean
    public TransactionTemplate transactionTemplate(){
        TransactionTemplate transactionTemplate = new TransactionTemplate();
        transactionTemplate.setTransactionManager(platformTransactionManager());
        return transactionTemplate;
    }
}- 在业务中使用TransactionTemplate编写声明式事务的代码
@Resource
private TransactionTemplate transactionTemplate;

public void save(User user) {
    // 方法里面执行需要事务控制的代码
    transactionTemplate.execute((transactionStatus) -> {
        // 保存
        int result = userMapper.save(user);
        // 出现异常事务会回滚
        int i = 10 / 0;
        return result;
    });
}
9.3 Spring中的声明式事务
Spring中的声明式事务是指可以只使用注解或基于XML文件配置的方式来管理事务。这意味着你可以将事务管理从事务代码中隔离出来,这可以解决编程式事务中事务代码耦合度高的问题。
- XML文件配置方式使用声明式事务
<?xml version="1.0" encoding="UTF-8"?>
<beans xmlns="http://www.springframework.org/schema/beans"
       xmlns:xsi="http://www.w3.org/2001/XMLSchema-instance" xmlns:tx="http://www.springframework.org/schema/tx"
       xmlns:aop="http://www.springframework.org/schema/aop"
       xsi:schemaLocation="http://www.springframework.org/schema/beans http://www.springframework.org/schema/beans/spring-beans.xsd http://www.springframework.org/schema/tx http://www.springframework.org/schema/tx/spring-tx.xsd http://www.springframework.org/schema/aop http://www.springframework.org/schema/aop/spring-aop.xsd">

    <!-- 数据源配置 -->
    <bean id="dataSource" class="com.alibaba.druid.pool.DruidDataSource">
        <property name="driverClassName" value="com.mysql.jdbc.Driver"></property>
        <property name="url" value="jdbc:mysql://localhost:3306/mybatis?useSSL=false"></property>
        <property name="username" value="root"></property>
        <property name="password" value="123"></property>
    </bean>

    <!-- spring创建的bean才支持配置的事务 -->
    <bean id="userService" class="com.baizhi.service.impl.UserServiceImpl">
        <property name="userMapper" ref="userMapper"></property>
    </bean>

    <!-- 配置事务管理器 -->
    <bean id="dataSourceTransactionManager" class="org.springframework.jdbc.datasource.DataSourceTransactionManager">
         <property name="dataSource" ref="dataSource"></property>
    </bean>

    <!-- 使用标签的方式进行事务的切面配置 -->
    <tx:advice id="txAdvice" transaction-manager="dataSourceTransactionManager">
        <tx:attributes>
            <tx:method name="*" propagation="REQUIRED" />
            <tx:method name="find.*" propagation="SUPPORTS" read-only="true"/>
        </tx:attributes>
    </tx:advice>

     <!-- 组装切面 -->
    <aop:config>
        <!-- 配置切入点,service包及其子包下的类下的所有方法 -->
        <aop:pointcut id="pc" expression="execution(* com.mj.service..*.*(..))"></aop:pointcut>
        <aop:advisor advice-ref="txAdvice" pointcut-ref="pc"></aop:advisor>
    </aop:config>

</beans>- 匹配的切入点方法上就会存在事务,底层是aop实现,所以需要配置切入点以及组装切面
// 切入点方法就会存在事务
public int save(User user) {
     // 保存
     int result = userMapper.save(user);
     // 出现异常事务会回滚
     int i = 10 / 0;
     return result;
}- 注解方式使用声明式事务
package com.mj.spring.configs;

import org.springframework.context.annotation.Bean;
import org.springframework.context.annotation.Configuration;
import org.springframework.jdbc.datasource.DataSourceTransactionManager;
import org.springframework.transaction.PlatformTransactionManager;
import org.springframework.transaction.annotation.EnableTransactionManagement;

import javax.annotation.Resource;
import javax.sql.DataSource;

/**
 * @description: @EnableTransactionManagement注解开启自动事务管理
 */
@Configuration
@EnableTransactionManagement
public class TransactionAutoConfiguration {

    @Resource
    private DataSource dataSource;

    @Bean
    public PlatformTransactionManager platformTransactionManager(){
        DataSourceTransactionManager transactionManager = new DataSourceTransactionManager();
        transactionManager.setDataSource(this.dataSource);
        return transactionManager;
    }
}- 使用@Transactional注解标注在类上或方法上使用事务
// @Transactional注解标注的方法就会存在事务
@Transactional
 public int save(User user) {
     // 保存
     int result = userMapper.save(user);
     // 出现异常事务会回滚
     int i = 10 / 0;
     return result;
}
9.4 Spring中的事务属性
1. 隔离属性: 对应数据库的隔离级别,为了解决并发场景下数据库操作可能出现的脏读、不可重复读和幻影读的问题;数据库系统设计了四种隔离级别:读未提交、读已提交、可重复读和串行化。
读未提交(Read Uncommitted) :在该隔离级别下,一个事务可以读取到另一个事务中没有提交的数据,即发生了脏读。由于事务存在回滚机制,未提交的事务对数据库中数据的修改就有可能会被回滚;如果此时一个新事务进来读取到了未提交事务修改的数据,并进行了修改和事务提交,恰好未提交事务又进行了回滚的话,就产生了脏写。
读已提交(Read Committed) :读已提交就是一个事务只可以读取到其它事务中已提交的数据,在这个隔离级别下可以解决脏读和脏写的问题,但是无法解决不可重复读的问题。不可重复读就是在同一个事务范围内,对同一行数据的多次读操作,返回的结果不是每次都是一样的,因为一旦有别事务更新这行数据并提交的话,查出来的一定是最新的。
可重复读(Read Committed) :可重复读就是在一个事务范围内,对同一行记录的多次读操作,每次都能返回一样的结果。不可重复读是保证能读取到最新数据,在业务中需要注意才能避免出现问题。可重复读的隔离级别解决了不可重复读的问题,底层是通过MVCC多版本并发控制实现的。
串行化(Serializable) : 串行化是最高的隔离级别,通过加锁(X锁)让事务串行执行,这样也就不会存在并发冲突,可以解决前面所有问题,但是严重影响系统性能,在所有隔离级别中效率最低。
- 默认隔离属性:default
使用@Transactional(isolation = Isolation.DEFAULT)配置默认隔离属性,表示使用数据库的默认隔离级别,mysql是可重复读,oracle是读已提交。
- 读未提交:read_uncommitted
使用@Transactional(isolation = Isolation.READ_UNCOMMITTED)配置隔离属性值为读未提交,表示此次会话使用数据库的读未提交隔离级别。
- 读已提交: read_committed
使用@Transactional(isolation = Isolation.READ_COMMITTED)配置隔离属性值为读已提交,表示此次会话使用数据库的读已提交隔离级别。
- 串行化:serializable
使用@Transactional(isolation = Isolation.SERIALIZABLE)配置隔离属性值为串行化,表示此次会话使用数据库的串行化隔离级别。
2. 传播属性: 用于解决事务的嵌套问题,通过配置事务的传播行为,解决事务混合在一起无法控制的问题。在存在外部事务和内部事务的情况下,为了保证事务的原子性,需要通过配置传播属性解决。
| 传播属性 | 解释 |
|---|---|
| REQUIRED | Spring默认的传播属性,必须存在事务,如果外层方法存在事务则会使用外层事务;外层方法不存在事务则开启自身的事务。 |
| REQUIRES_NEW | 必须新开启一个事务,如果外层方法存在事务会让外层事务挂起,不受外层事务影响;必须使用自身事务。 |
| SUPPORTS | 支持事务,如果外层方法存在事务则会使用外层事务;外层方法不存在事务则以非事务方式运行。 |
| NOT_SUPPORTED | 不支持事务,外层方法存在事务也不会使用外层事务;外层事务回滚不会影响当前方法。 |
| NEVER | 以非事务方式运行,外层方法存在事务时,调用非事务方式运行的内层方法会抛异常。 |
| MANDATORY | 强制性依赖事务,外层方法存在事务则加入,不存在则抛异常,自身内层方法不会开启事务。 |
| NESTED | 支持嵌套事务,必须开启自己的事务,外层方法存在事务也新开启一个事务。 |
3. 超时属性: 单位是秒,默认值是-1,表示事务不会超时。我们可以根据业务设置Spring的事务超时时间,是指一个事务所允许执行的最长时间,如果超过该时间限制但事务还没有完成,则自动回滚事务。
| 超时属性 | 解释 |
|---|---|
| timeout | @Transaction(timeout = 2),单位是秒,表示事务的最大超时时间,超时则自动回滚事务。 |
4. 只读属性:readonly = true, 表示这个事务只读取数据而不更新数据,这样可以帮助数据库引擎优化事务。如果你一次执行单条查询语句,则没有必要启用事务支持,数据库默认支持SQL执行期间的读一致性;注意是一次执行多次查询来统计某些信息,这时为了保证数据整体的一致性,要用只读事务。
| 只读属性 | 解释 |
|---|---|
| readonly | @Transaction(readonly = false),事务的只读属性默认为false,如果只读属性设置为true,那么在该事务中就不能存在写操作,否则会抛异常。 |
5. 回滚属性:事务的回滚属性可以用来设置事务的需要回滚的异常以及不需要回滚的异常,这在日常开发中还是挺重要的,默认的回滚异常是运行时异常(RuntimeException),不设置rollbackfor时,默认遇到运行时异常(RuntimeException)才回滚事务,非运行时异常不会回滚。
| 回滚属性 | 解释 |
|---|---|
| rollbackFor | @Transaction(rollbackFor = RuntimeException.class),事务的默认回滚属性,当捕获到运行时异常或其子类异常时,Spring的事务管理器会对该事务进行回滚。 |
| noRollbackFor | @Transaction(noRollbackFor =IndexOutOfBoundsException.class),设置事务无需回滚的异常,比如数组下标越界异常,这种通常不会影响程序的正确执行,这个属性通常也比较少用。 |


 1795
1795


 被折叠的 条评论
为什么被折叠?
被折叠的 条评论
为什么被折叠?
 到【灌水乐园】发言


