


关于使用webuploader进行初步的文件上传,做一个笔记。
开发工具: IntelliJ IDEA
使用框架: SpringBoot
前端页面: FreeMaker
- 项目准备
引入需要的jar包
<dependencies>
        <dependency>
            <groupId>org.springframework.boot</groupId>
            <artifactId>spring-boot-starter-freemarker</artifactId>
        </dependency>

        <dependency>
            <groupId>org.springframework.boot</groupId>
            <artifactId>spring-boot-starter-web</artifactId>
        </dependency>

        <!--JDBC的支持依赖-->
        <!--<dependency>-->
            <!--<groupId>org.springframework.boot</groupId>-->
            <!--<artifactId>spring-boot-starter-jdbc</artifactId>-->
        <!--</dependency>-->

        <!--mysql的连接依赖-->
        <!--<dependency>-->
            <!--<groupId>mysql</groupId>-->
            <!--<artifactId>mysql-connector-java</artifactId>-->
        <!--</dependency>-->

        <dependency>
            <groupId>org.springframework.boot</groupId>
            <artifactId>spring-boot-starter-test</artifactId>
            <scope>test</scope>
        </dependency>

        <!--热部署依赖配置-->
        <dependency>
            <groupId>org.springframework.boot</groupId>
            <artifactId>spring-boot-devtools</artifactId>
            <optional>true</optional>
        </dependency>

        <!--Google Guava 类库
       包含集合(Collections),缓存(Caching),并发编程库(Concurrency)
       ,常用注解(Common annotations),String操作,I/O操作方面的众多非常实用的函数。-->
        <dependency>
            <groupId>com.google.guava</groupId>
            <artifactId>guava</artifactId>
            <version>20.0</version>
        </dependency>

        <!--lang3.StringEscapeUtils-->
        <dependency>
            <groupId>org.apache.commons</groupId>
            <artifactId>commons-lang3</artifactId>
            <version>3.5</version>
        </dependency>

        <dependency>
            <groupId>commons-io</groupId>
            <artifactId>commons-io</artifactId>
            <version>2.5</version>
        </dependency>
    </dependencies>
    <build>
        <plugins>
            <plugin>
                <groupId>org.springframework.boot</groupId>
                <artifactId>spring-boot-maven-plugin</artifactId>
                <configuration>
                    <fork>true</fork><!--该配置为热部署必须的-->
                </configuration>
            </plugin>
        </plugins>
    </build>
2.从官网下载webuploader插件,并引入
webuploader官网地址:http://fex.baidu.com/webuploader/getting-started.html
#以下两个文件是必要的
    <link rel="stylesheet" type="text/css" href="/webuploder/css/webuploader.css">
    <script type="text/javascript" src="/webuploder/js/webuploader.js"></script>
3.上传页面
完整的demo页面如下:upload_file.ftl
(由于只是一个demo,所以很简单,不影响功能)
1). 引入了bootstrap,目的是为了显示进度条,这个webuploader插件似乎是不自带的。
<!DOCTYPE html>
<html>
<head>
    <meta charset="UTF-8">
    <meta http-equiv="X-UA-Compatible" content="IE=edge,chrome=1">
    <meta http-equiv="Content-Type" content="text/html; charset=UTF-8">
    <meta name="viewport" content="width=device-width, initial-scale=1, maximum-scale=1">
    <#--引入bootstrap,用于进度条的展示-->
    <link rel="stylesheet" type="text/css" href="/bootstrap/css/bootstrap.min.css">
    <link rel="stylesheet" type="text/css" href="/webuploder/css/webuploader.css">
    <#--调节按钮的样式-->
    <style>
        #picker div.webuploader-pick{
            height: 30px;
            padding: 6px 15px;
            margin-top: 3px;
            height: 30px!important;
        }
        #picker {
            float: left;
        }
        #ctlBtn {
            float: left;
            height: 30px;
            margin-left: 15px;
            margin-top: 3px;
            width: 90px;
        }
    </style>
    <title>使用webuploader进行文件上传</title>
</head>
<body>
    <h3>使用webuploader进行文件的上传</h3>
    <div>
        <div id="uploader" class="wu-example">
            <!--待上传的文件列表,用来存放文件信息-->
            <div id="thelist" class="uploader-list"></div>
            <div class="btns">
                <div id="picker">选择文件</div>
                <button id="ctlBtn" class="btn btn-default">开始上传</button>
            </div>
        </div>
    </div>
</body>
<script type="text/javascript" src="/jquery/jquery-1.8.3.min.js"></script>
<script type="text/javascript" src="/bootstrap/js/bootstrap.min.js"></script>
<#--官网下载的js-->
<script type="text/javascript" src="/webuploder/js/webuploader.js"></script>
<#--这是对webuploader的初始化,必要-->
<script type="text/javascript" src="/js/upload_file.js"></script>
</html>
4.初始化webuploder插件(引用见上)
可以从官网直接拿下来,F12 –> sourse
upload_file.js
// 文件上传
jQuery(function() {
    /*对于一些控件的初始化*/
    var $ = jQuery,
        //待上传的文件列表
        $list = $('#thelist'),
        //开始上传按钮
        $btn = $('#ctlBtn'),
        //显示状态 上传成功、上传失败。。
        state = 'pending',
        //上传的方法
        uploader;

    uploader = WebUploader.create({

        // 不压缩image
        resize: false,

        // 为true 文件则自动上传
        auto: false,

        // swf文件路径  使用flash才会用到
        // swf: BASE_URL + '/js/Uploader.swf',

        // 文件接收服务端。就是上传文件走的url
        server: '/upload',

        // 选择文件的按钮。可选。
        pick: '#picker',

        // 默认所有都可选,过滤文件类型参考网址: http://www.cnblogs.com/s.sams/archive/2007/10/10/918817.html
        // 只允许选择图片文件。
        /*accept: {
            title: 'Images',
            extensions: 'gif,jpg,jpeg,bmp,png',
            mimeTypes: 'image/!*'
        },*/

        // 只允许选择Excel文件。
        accept: {// 只允许选择Excel文件格式
            title: 'Excel',
            extensions: 'xls,xlsx',
            mimeTypes: 'application/vnd.ms-excel,application/vnd.openxmlformats-officedocument.spreadsheetml.sheet'  /*限制选择文件的类型*/
        }
    });

    // 当有文件添加进来的时候
    uploader.on( 'fileQueued', function( file ) {
        $list.append( '<div id="' + file.id + '" class="item">' +
            '<h4 class="info">' + file.name + '</h4>' +
            '<p class="state">等待上传...</p>' +
        '</div>' );
    });

    // 文件上传过程中创建进度条实时显示。
    // 进度条我引用了bootStrap.css来进行展示,webuploader.css是不带的
    uploader.on( 'uploadProgress', function( file, percentage ) {
        var $li = $( '#'+file.id ),
            $percent = $li.find('.progress .progress-bar');

        // 避免重复创建
        if ( !$percent.length ) {
            $percent = $('<div class="progress progress-striped active">' +
              '<div class="progress-bar" role="progressbar" style="width: 0%">' +
              '</div>' +
            '</div>').appendTo( $li ).find('.progress-bar');
        }

        $li.find('p.state').text('上传中');

        $percent.css( 'width', percentage * 100 + '%' );
    });

    // 上传成功
    uploader.on( 'uploadSuccess', function( file ) {
        $( '#'+file.id ).find('p.state').text('已上传');
    });

    // 上传失败
    uploader.on( 'uploadError', function( file ) {
        $( '#'+file.id ).find('p.state').text('上传出错');
    });

    uploader.on( 'uploadComplete', function( file ) {
        $( '#'+file.id ).find('.progress').fadeOut();
    });

    uploader.on( 'all', function( type ) {
        if ( type === 'startUpload' ) {
            state = 'uploading';
        } else if ( type === 'stopUpload' ) {
            state = 'paused';
        } else if ( type === 'uploadFinished' ) {
            state = 'done';
        }

        if ( state === 'uploading' ) {
            $btn.text('暂停上传');
        } else {
            $btn.text('开始上传');
        }
    });

    // 开始上传 按钮点击事件 触发 上传方法
    // 如果开启了自动上传,则不必要
    $btn.on( 'click', function() {
        if ( state === 'uploading' ) {
            uploader.stop();
        } else {
            uploader.upload();
        }
    });
});
5.页面跳转
@Controller
public class UploadController {
    @GetMapping("index")
    public String uploadIndex(){
        return "upload_file";
    }
}
6.文件的接收和上传
@Controller
public class UploadRestController {
@PostMapping("/upload")
public String uploadFile(@RequestPart("file") MultipartFile file) throws IOException {
// 获取文件名
String fileName = file.getOriginalFilename();
// 获取项目的路径 + 拼接得到文件要保存的位置
String filePath = System.getProperties().getProperty("user.dir") + "\\src\\main\\resources\\file\\" + fileName;
// 创建一个文件的对象
File file1 = new File(filePath);
// 创建父文件夹
Files.createParentDirs(file1);
// 把上传的文件复制到文件对象中
file.transferTo(file1);
return "upload_file";
}
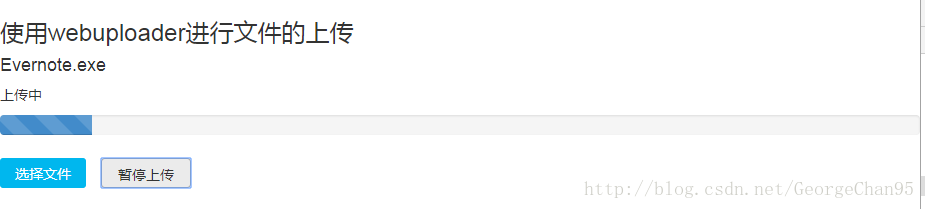
}最终效果:
总结:
1. webuploader样式比较好看,用起来也比较简单,样式在使用的时候可能和官网例子不太一样,这个可以自己去调。
2. webuploader必须初始化,初始化js:【upload_file.js】,当然这里的只是文件的上传,图片的以后再补充,或者从官网开发者模式,把源文件取下来都可以。
3. 进度条我使用的也是官网上的bootstrap
如有需要修正的地方,还请指教。


 7301
7301

 被折叠的 条评论
为什么被折叠?
被折叠的 条评论
为什么被折叠?
 到【灌水乐园】发言


