


拦截器概念和Struts2一致,对请求进行拦截,类似于Servlet的Filter,用于对处理器进行预处理和后处理。
常见应用场景
1、日志记录:记录请求信息的日志,以便进行信息监控、信息统计、计算PV(Page View)等。
2、权限检查:如登录检测,进入处理器检测检测是否登录,如果没有直接返回到登录页面;
spring MVC拦截器的实现一般有两种方式
 第一种方式是要定义的Interceptor类要实现了Spring的HandlerInterceptor 接口

 第二种方式是继承实现了HandlerInterceptor接口的类,比如Spring已经提供的实现了HandlerInterceptor接口的抽象类HandlerInterceptorAdapter
这里讲第一种,最常用也最常见
实现HandlerInterceptor接口,接口有三种方法,参数简写:
1 . boolean preHandle(req,response,handler)
预处理回调方法,实现处理器的预处理(如登录检查),第三个参数为响应的处理器(Controller实现);
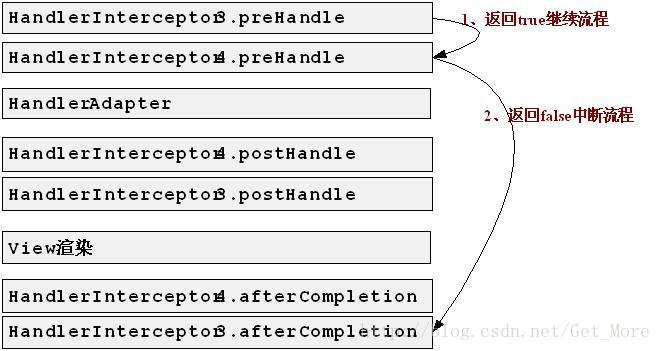
返回值:true表示继续流程(如调用下一个拦截器或处理器);
false表示流程中断(如登录检查失败),不会继续调用其他的拦截器或处理器,此时我们需要通过response来产生响应;
2 . void postHandle (req,response,handler,modelandview)
后处理回调方法,实现处理器的后处理(但在渲染视图之前),此时我们可以通过modelAndView(模型和视图对象)对模型数据进行处理或对视图进行处理,modelAndView也可能为null。
3 . void afterCompletion (req,response,handler,Exception)
整个请求处理完毕回调方法,即在视图渲染完毕时回调,如性能监控中我们可以在此记录结束时间并输出消耗时间,还可以进行一些资源清理,类似于try-catch-finally中的finally,但仅调用处理器执行链中preHandle返回true的拦截器的afterCompletion。
正常流程图和中断流程图:

public class MyInterceptor implements HandlerInterceptor{

    @Override
    public boolean preHandle(HttpServletRequest arg0, HttpServletResponse arg1,
            Object arg2) throws Exception {
        System.out.println("-------------处理前-----------");
        return true;
    }

    @Override
    public void postHandle(HttpServletRequest arg0, HttpServletResponse arg1,
            Object arg2, ModelAndView arg3) throws Exception {
        System.out.println("-------------处理后-----------");
    }

    @Override
    public void afterCompletion(HttpServletRequest arg0,
            HttpServletResponse arg1, Object arg2, Exception arg3)
                    throws Exception {
        // TODO Auto-generated method stub

    }
mvc.xml配置Interceptor,有两种方式配置,一种是注解,一种是在配置文件中,但是一般不用注解,因为注解还是要写一通,可以查阅文档比较,下面是第二种的代码
  <mvc:interceptors>
    <mvc:interceptor>
    //除了admin/*都回调用这个拦截器
        <mvc:mapping path="/**"/>
        <mvc:exclude-mapping path="/admin/*"/>
        <bean class="cn.sxt.Interceptor.MyInterceptor"/>
    </mvc:interceptor>
    </mvc:interceptors>
这里命名空间为mvc,原来模板没有,所以需要导入,
将
xmlns:context="http://www.springframework.org/schema/context"复制后把其中context替换为mvc,即
xmlns:mvc="http://www.springframework.org/schema/mvc"
同理
 http://www.springframework.org/schema/context
        http://www.springframework.org/schema/context/spring-context.xsd
复制后改为
http://www.springframework.org/schema/mvc
        http://www.springframework.org/schema/mvc/spring-mvc.xsd"
然后取
http://www.springframework.org/schema/mvc/spring-mvc.xsd
为key在xml catalog中配置,导入文件中schema中的mvc里面的任意一个
调试记载:
1 ./** 包含路径及其子路径
/admin/* /admin/user/add不匹配
/admin/** /admin/user/add匹配
2 .exclude-maping path 除外路径
3 . Struts2的拦截器实对所有请求拦截,在Action中配置拦截器,Spring MVC是拦截器中指定琪琪路径,一个是Action选拦截器,一个是拦截器选请求
4 . 如果被拦截怎么到达指定页面(即返回false)
用response响应
response.sendRedirect(request.getContextPath()+"/index.jsp")5 . 可以利用mvc:interceptors标签声明一系列的拦截器,然后它们就可以形成一个拦截器链,拦截器的执行顺序是按声明的先后顺序执行的,先声明的拦截器中的preHandle方法会先执行,然而它的postHandle方法和afterCompletion方法却会后执行。
在mvc:interceptors标签下声明interceptor主要有两种方式:
(1)直接定义一个Interceptor实现类的bean对象。使用这种方式声明的Interceptor拦截器将会对所有的请求进行拦截。
(2)使用mvc:interceptor标签进行声明。使用这种方式进行声明的Interceptor可以通过mvc:mapping子标签来定义需要进行拦截的请求路径。
经过上述两步之后,定义的拦截器就会发生作用对特定的请求进行拦截了。


 2108
2108


 被折叠的 条评论
为什么被折叠?
被折叠的 条评论
为什么被折叠?
 到【灌水乐园】发言


