


JS window对象详解
1.window对象
在JavaScript中,一个浏览器窗口就是一个window对象
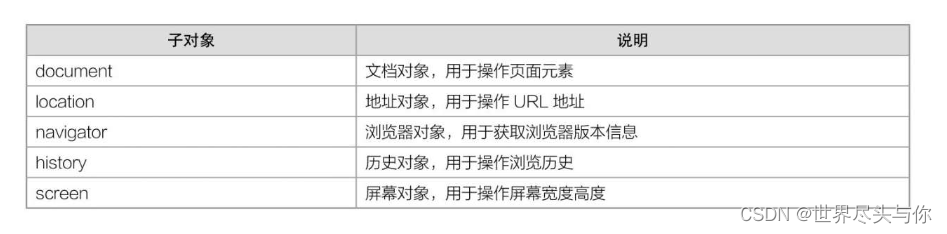
window对象存放了这个页面的所有信息,为了更好地分类处理这些信息,window对象下面又分为很多对象
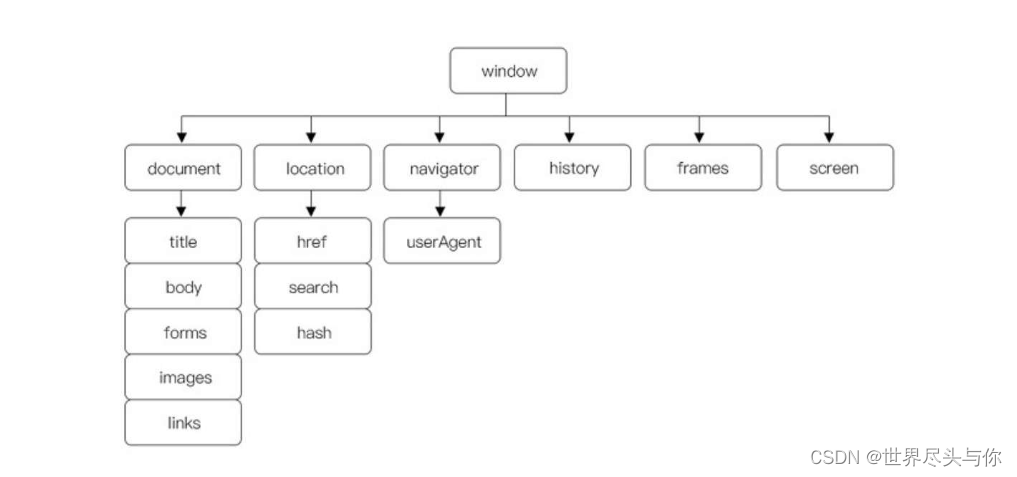
一个窗口就是一个window对象,这个窗口里面的HTML文档就是一个document对象,document对象是window对象的子对象
window对象及下面这些location、navigator等子对象,由于都是用于操作浏览器窗口的,所以我们又称之为“BOM”,也就是Browser Object Module(浏览器对象模型)
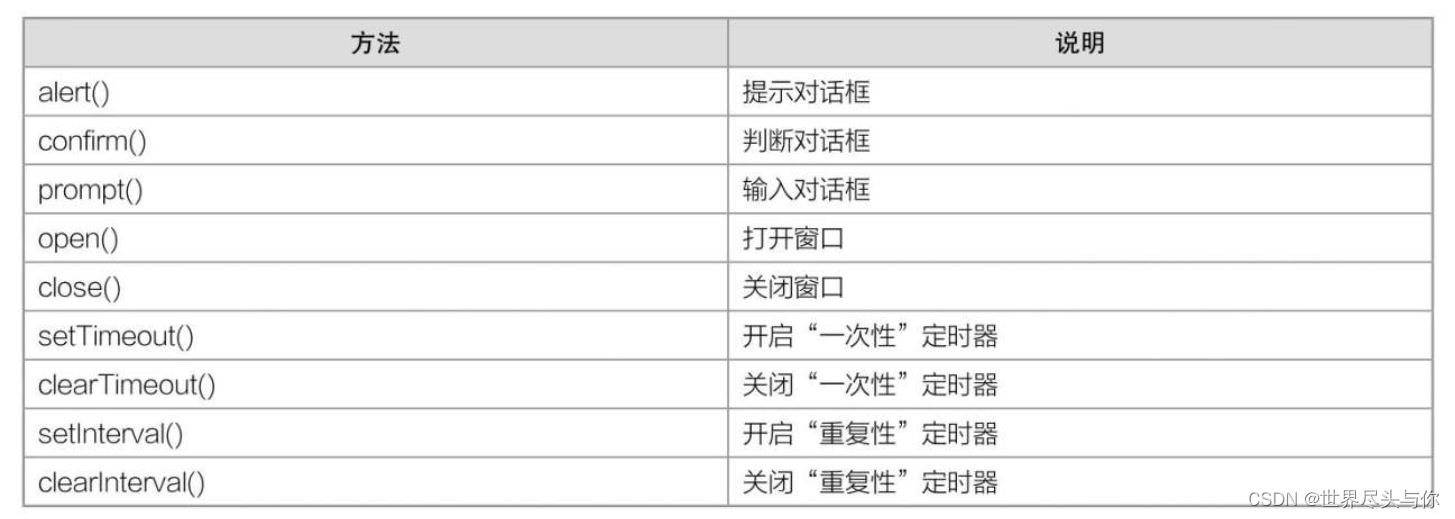
window对象的常用方法:
对于window对象,无论是它的属性,还是方法,都可以省略window前缀。如window.alert()可以简写为alert(),window.open()可以简写为open(),甚至window.document.getElementById()可以简写为document.getElementById(),以此类推
2.窗口操作
在JavaScript中,窗口常见的操作有两种:一种是“打开窗口”,另一种是“关闭窗口”。打开窗口和关闭窗口,在实际开发中经常用到
打开窗口
在JavaScript中,我们可以使用window对象的open()方法来打开一个新窗口
语法:
window.open(url,target)
url指的是新窗口的地址
target表示打开方式,它的取值跟a标签中target属性的取值是一样的,常用取值有两个:_blank(默认)和_self
案例:点击按钮打开百度网:
<!DOCTYPE html>
<html lang="en">
<head>
    <meta charset="utf-8"/>
    <title></title>
    <script>
        window.onload = function () {
            const oBtn = document.getElementById("btn");
            oBtn.onclick = function () {
                window.open("https://www.baidu.com");
            };
        }
    </script>
</head>
<body>
<input id="btn" type="button" value="打开"/>
</body>
</html>
案例:往空白窗口输出一个页面
<!DOCTYPE html>
<html lang="en">
<head>
    <meta charset="utf-8"/>
    <title></title>
    <script>
        window.onload = function () {
            const oBtn = document.getElementById("btn");
            let opener = null;
            oBtn.onclick = function () {
                opener = window.open();
                const strHtml = '<!DOCTYPE html>\
<html lang="en">\
<head>\
<title></title>\
</head>\
<body>\
<strong>小心偷影子的人,他会带走你的心。</strong>\
</body>\
</html>';
                opener.document.write(strHtml);
            };
        }
    </script>
</head>
<body>
<input id="btn" type="button" value="打开"/>
</body>
</html>
利用这个技巧,我们可以开发一个在线代码测试的小工具
关闭窗口
在JavaScript中,我们可以使用window.close()来关闭一个新窗口
语法:
window.close()
案例:关闭当前窗口
<!DOCTYPE html>
<html lang="en">
<head>
    <meta charset="utf-8"/>
    <title></title>
    <script>
        window.onload = function () {
            const oBtn = document.getElementById("btn");
            oBtn.onclick = function () {
                window.close();
            };
        }
    </script>
</head>
<body>
<input id="btn" type="button" value="关闭"/>
</body>
</html>
3.对话框
在JavaScript中,对话框有3种:
alert()、confirm()、prompt()
alert()很简单,这里就不多介绍了,只需记住一点:在alert()中实现文本换行,用的是\n
confirm
在JavaScript中,confirm()对话框不仅提示文字,还提供确认
语法:
confirm("提示文字")
如果用户点击【确定】按钮,会返回true;如果用户点击【取消】按钮,则会返回false
案例:确定跳转
<!DOCTYPE html>
<html lang="en">
<head>
    <meta charset="utf-8"/>
    <title></title>
    <script>
        window.onload = function () {
            const oBtn = document.getElementById("btn");
            oBtn.onclick = function () {
                if (confirm("确定要跳转到百度首页吗?")) {
                    window.location.href = "https://www.baidu.com";
                } else {
                    document.write("你取消了跳转");
                }
            };
        }
    </script>
</head>
<body>
<input id="btn" type="button" value="回到首页"/>
</body>
</html>

prompt
在JavaScript中,prompt()对话框不仅会提示文字,还会返回一个字符串
语法:
prompt("提示文字")
案例:主页欢迎语
<!DOCTYPE html>
<html lang="en">
<head>
    <meta charset="utf-8"/>
    <title></title>
    <script>
        window.onload = function () {
            const oBtn = document.getElementById("btn");
            oBtn.onclick = function () {
                const name = prompt("请输入你的名字");
                document.write("欢迎来到<strong>" + name + "</strong>的小屋");
            };
        }
    </script>
</head>
<body>
<input id="btn" type="button" value="按钮"/>
</body>
</html>
在弹出的对话框中,有一个输入文本框。输入内容,然后点击对话框中的【确定】按钮,就会返回刚刚输入的文本
4.定时器
在浏览网页的过程中,我们经常可以看到这样的动画:轮播效果中,图片每隔几秒就切换一次;在线时钟中,秒针每隔一秒转一次
所谓的“定时器”,指的是每隔一段时间就执行一次代码。在JavaScript中,对于定时器的实现,有以下两组方法。
setTimeout(),clearTimeout(),setInterval(),clearInterval()
setTimeout和clearTimeout
在JavaScript中,我们可以使用setTimeout()方法来“一次性”地调用函数,并且可以使用clearTimeout()来取消执行setTimeout()
语法:
setTimeout(code,time);
- 参数code可以是一段代码,可以是一个函数,也可以是一个函数名。
- 参数time是时间,单位为毫秒,表示要过多长时间才执行code中的代码。
案例:2秒提示欢迎语:
<!DOCTYPE html>
<html lang="en">
<head>
    <meta charset="utf-8" />
    <title></title>
    <script>
        window.onload=function()
         {
             setTimeout('alert("欢迎来到我的家");',2000);
         }
    </script>
</head>
<body>
<p>2秒后提示欢迎语。</p>
</body>
</html>
由于setTimeout()方法只会执行一次,所以只会弹出一次对话框
案例:clearTimeout取消执行setTimeout:
<!DOCTYPE html>
<html lang="en">
<head>
    <meta charset="utf-8"/>
    <title></title>
    <style>
        div {
            width: 100px;
            height: 100px;
            border: 1px solid silver;
        }
    </style>
    <script>
        window.onload = function () {
            //获取元素
            const oBtn = document.getElementsByTagName("input");
            //timer存放定时器
            let timer = null;
            oBtn[0].onclick = function () {
                timer = setTimeout(function () {
                    alert("欢迎来到我的家");
                }, 2000);
            };
            oBtn[1].onclick = function () {
                clearTimeout(timer);
            };
        }
    </script>
</head>
<body>
<p>点击"开始"按钮,2秒后提示欢迎语。</p>
<input type="button" value="开始"/>
<input type="button" value="暂停"/>
</body>
</html>
如果点击【开始】按钮,2秒后就会弹出对话框。如果在2秒内再次点击【暂停】按钮,就不会弹出对话框
setInterval和clearInterval
在JavaScript中,我们可以使用setInterval()方法来“重复性”地调用函数,并且可以使用clearInterval()来取消执行setInterval()
语法:
setInterval(code,time);
参数code可以是一段代码,可以是一个函数,也可以是一个函数名
参数time是时间,单位为毫秒,表示要过多长时间才执行code中的代码
setInterval跟setTimeout语法是一样的,唯一不同的是setTimeout只执行一次,而setInterval可以重复执行无数次
案例:实现页面倒计时:
<!DOCTYPE html>
<html lang="en">
<head>
    <meta charset="utf-8"/>
    <title></title>
    <script>
        //定义全局变量,用于记录秒数
        let n = 5;
        window.onload = function () {
            //设置定时器,重复执行函数countDown
            setInterval(countDown, 1000);
        }

        //定义函数
        function countDown() {
            //判断n是否大于0,因为倒计时不可能有负数
            if (n > 0) {
                n--;
                document.getElementById("num").innerHTML = n;
            }
        }
    </script>
</head>
<body>
<p>倒计时:<span id="num">5</span></p>
</body>
</html>
案例:实现控制div块变色:
<!DOCTYPE html>
<html lang="en">
<head>
    <meta charset="utf-8"/>
    <title></title>
    <style>
        div {
            width: 100px;
            height: 100px;
            border: 1px solid silver;
        }
    </style>
    <script>
        window.onload = function () {
            //获取元素
            const oBtn = document.getElementsByTagName("input");
            const oDiv = document.getElementsByTagName("div")[0];
            //定义一个数组colors,存放6种颜色
            const colors = ["red", "orange", "yellow", "green", "blue", "purple"];
            //timer用于定时器
            let timer = null;
            //i用于计数
            let i = 0;
            //"开始"按钮
            oBtn[0].onclick = function () {
                //每隔1秒切换一次背景颜色
                timer = setInterval(function () {
                    oDiv.style.backgroundColor = colors[i];
                    i++;
                    i = i % colors.length;
                }, 1000);
            };
            //"暂停"按钮
            oBtn[1].onclick = function () {
                clearInterval(timer);
            };
        }
    </script>
</head>
<body>
<input type="button" value="开始"/>
<input type="button" value="暂停"/>
<div></div>
</body>
</html>
当我们点击【开始】按钮后,div元素每隔一秒就会切换一次背景颜色。当我们点击【暂停】按钮后,就会停止切换
如果我们快速不断地点击【开始】按钮,神奇的一幕发生了:背景颜色切换的速度加快了。此时点击【暂停】按钮,却发现根本停不下来!这是什么原因导致的呢?
其实每点击一次,都会新开一个setInterval(),如果你不断点击按钮,setInterval()就会累加起来。也就是说,当你点击3次按钮时,其实已经开了3个setInterval(),此时如果想要停下来,就必须点击3次【暂停】按钮。为了避免产生这个累加的bug,我们在每次点击【开始】按钮时就要清除一次定时器,改进后的代码如下:
<!DOCTYPE html>
<html lang="en">
<head>
    <meta charset="utf-8"/>
    <title></title>
    <style>
        div {
            width: 100px;
            height: 100px;
            border: 1px solid silver;
        }
    </style>
    <script>
        window.onload = function () {
            //获取元素
            const oBtn = document.getElementsByTagName("input");
            const oDiv = document.getElementsByTagName("div")[0];
            //定义一个数组colors,存放6种颜色
            const colors = ["red", "orange", "yellow", "green", "blue", "purple"];
            //timer用于定时器
            let timer = null;
            //i用于计数
            let i = 0;
            //"开始"按钮
            oBtn[0].onclick = function () {
                clearInterval(timer);
                //每隔1秒切换一次背景颜色
                timer = setInterval(function () {
                    oDiv.style.backgroundColor = colors[i];
                    i++;
                    i = i % colors.length;
                }, 1000);
            };
            //"暂停"按钮
            oBtn[1].onclick = function () {
                clearInterval(timer);
            };
        }
    </script>
</head>
<body>
<input type="button" value="开始"/>
<input type="button" value="暂停"/>
<div></div>
</body>
</html>
5.location对象
在JavaScript中,我们可以使用window对象下的location子对象来操作当前窗口的URL
location对象的属性:

window.location.href
在JavaScript中,我们可以使用location对象的href属性来获取或设置当前页面的地址
语法:
window.location.href
举例:获取当前页面地址:
<!DOCTYPE html>
<html lang="zh-CN">
<head>
    <meta charset="utf-8"/>
    <title></title>
    <script>
        const url = window.location.href;
        document.write("当前页面地址是:" + url);
    </script>
</head>
<body>
</body>
</html>

举例:设置当前页面地址:
<!DOCTYPE html>
<html lang="en">
<head>
    <meta charset="utf-8"/>
    <title></title>
    <script>
        setTimeout(function () {
            window.location.href = "https://www.baidu.com";
        }, 2000);
    </script>
</head>
<body>
<p>2秒后跳转</p>
</body>
</html>
window.location.search
在JavaScript中,我们可以使用location对象的search属性来获取和设置当前页面地址“?”后面的内容
语法:
window.location.search
案例:
<!DOCTYPE html>
<html lang="en">
<head>
    <meta charset="utf-8"/>
    <title></title>
    <script>
        document.write(window.location.search);
    </script>
</head>
<body>
</body>
</html>

window.location.hash
在JavaScript中,我们可以使用location对象的hash属性来获取和设置当前页面地址井号(#)后面的内容
案例:
<!DOCTYPE html>
<html lang="en">
<head>
    <meta charset="utf-8"/>
    <title></title>
    <script>
        document.write(window.location.hash);
    </script>
</head>
<body>
</body>
</html>

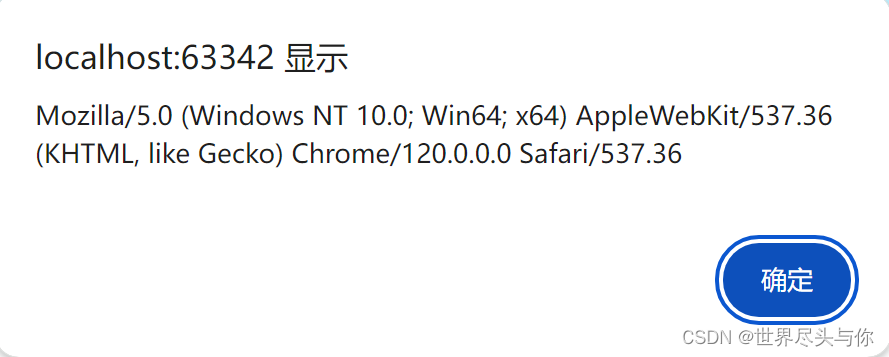
6.navigator对象
在JavaScript中,我们可以使用window对象下的子对象navigator来获取浏览器的类型
语法:
window.navigator.userAgent
案例:
<!DOCTYPE html>
<html lang="en">
<head>
    <meta charset="utf-8"/>
    <title></title>
    <script>
        alert(window.navigator.userAgent)
    </script>
</head>
<body>
</body>
</html>
不同的浏览器,会弹出相应的版本号信息,如下是Chrome的浏览器提示:


 378
378


 被折叠的 条评论
为什么被折叠?
被折叠的 条评论
为什么被折叠?
 到【灌水乐园】发言


