


1、编写一个连接其它主机脚本,在网络畅通的情况下,只要有IP,用户和密码,就能连接。

2、编写一个创建用户的脚本,分别有存放用户名和密码的两个文件,文件中一行对应一个密码或用户,该脚本能够创建用户文件中的用户,并给用户密码文件中对应的密码,同时要考虑,文件不存在、文件行数不一致以及用户已经存在的情况。

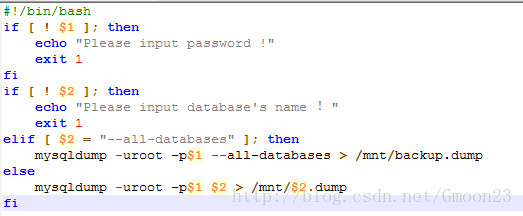
3、数据库的备份脚本,第一个输入为密码,第二个输入为数据库名字,如果数据库名字为 --all-databases 就备份所有数据库
4、配置DDNS主服务器的脚本
#!/bin/bash
yum install bind -y
yum install dhcp -y
systemctl start named
systemctl enable named
firewall-cmd --permanent --add-service=dns
firewall-cmd --permanent --add-service=dhcp
firewall-cmd --reload
##生成密钥
cd /mnt
dnssec-keygen -a HMAC-MD5 -b 128 -n HOST hello
KEY=`cat K*.key | cut -d " " -f 7`
cp -p /etc/rndc.key /etc/hello.key
cat > /etc/hello.key <<END
key "hello" {
algorithm hmac-md5;
secret "$KEY";
};
END
##配置/etc/named.conf文件
chmod 770 /var/named
sed -i 's/127\.0\.0\.1/any/g' /etc/named.conf
sed -i 's/localhost/any/g' /etc/named.conf
sed -i 's/dnssec-validation\ yes/dnssec-validation\ no/g' /etc/named.conf
cat >> /etc/named.conf << END
include "/etc/hello.key";
END
##正向解析
cat >> /etc/named.rfc1912.zones <<END
zone "hello.com" IN {
type master;
file "hello.com.zone";
allow-update { key hello; };
allow-transfer{ 172.25.254.105;};
also-notify {172.25.254.105;};
};
END
cp -p /var/named/named.localhost /var/named/hello.com.zone
cat > /var/named/hello.com.zone << END
\$TTL 1D
@ IN SOA dns.hello.com. root.redhat.com. (
0 ; serial
1D ; refresh
1H ; retry
1W ; expire
3H ) ; minimum
NS dns.hello.com.
dns A 172.25.254.67
www A 172.25.254.100
END
##配置/etc/dhcp/dhcpd.conf文件
cat > /etc/dhcp/dhcpd.conf << END
option domain-name "hello.com";
option domain-name-servers 172.25.254.67;
ddns-update-style interim;
default-lease-time 600;
max-lease-time 7200;
log-facility local7;
subnet 172.25.254.0 netmask 255.255.255.0 {
range 172.25.254.100 172.25.254.200;
option routers 172.25.254.67;
}
key hello {
algorithm hmac-md5;
secret "$KEY";
};
zone hello.com {
primary 127.0.0.1;
key hello;
}
END
systemctl start dhcpd
systemctl restart named
systemctl enable dhcpd


 2万+
2万+

 被折叠的 条评论
为什么被折叠?
被折叠的 条评论
为什么被折叠?
 到【灌水乐园】发言


