


AppWidget
关于AppWidget的那些事… …
详尽的AppWidget Demo
因为项目的要求,最近制作了一个相对比较复杂的AppWidget,因为其复杂性及要求的特殊性,
所以,必须深入的了解AppWidget。
github项目地址:https://github.com/GodDavide/AppWidget
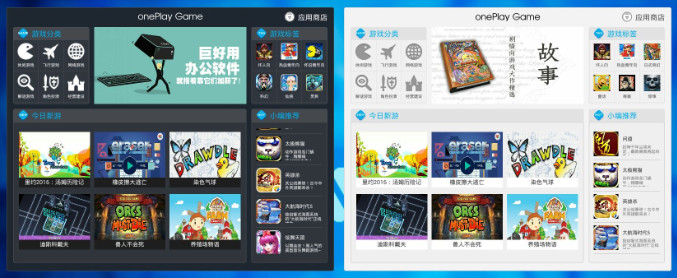
项目原图:
在项目过程中,发现网上并没有很详细的WidgetDemo,现在我项目基础上,重新写一个Demo,争取在此Demo中,展现出Widget的所有功能。
功能列表:
普通控件展示数据
Widget与app的交互
Gridview和Listview展示数据
刷新功能,临时包括:开机刷新、首次创建刷新、点击按钮刷新
有关定时刷新功能,可直接在appwidget-provider.xml文件夹中设置updatePeriodMillis属性;也可以自定义AlarmManager
设置定时器实现定时更新。在此提供本人的一个简单的AlarmManager类,仅供参考。(AlarmManager见文章末,暂时项目中没有添加)
备注:
项目中的接口用的是百度ApiStore里的免费测试接口,请下载下代码后,替换成您自己的ApiKey.
start
AppWidget就是用户在桌面上添加的小窗口或者说小部件,利用这个小窗口可以给用户提供更加方便快捷的操作。
项目效果图:

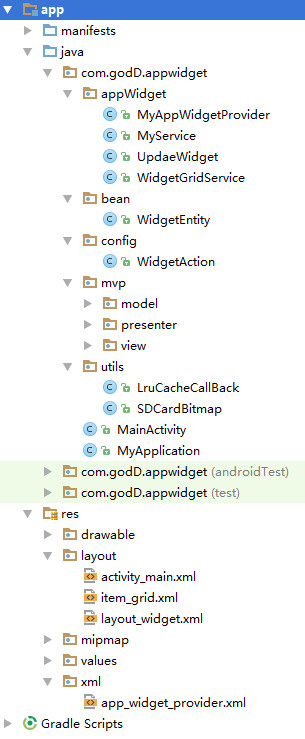
项目文件结构:
jar包需求:
compile 'com.squareup.retrofit2:converter-gson:2.0.0-beta4'
compile files('libs/ApiStoreSDK1.0.4.jar')
<!-- 项目中我直接将已下载好的xUtils Jar放在了labs下 -->
compile 'com.jiechic.library:xUtils:2.6.14'
代码编写:
step1:在res文件夹下新建一个xml文件夹,然后在xml目录下创建一个名为app_widget_privider.xml文件(刻在文件结构图中查看位置)
<?xml version="1.0" encoding="utf-8"?>
<appwidget-provider xmlns:android="http://schemas.android.com/apk/res/android"
    android:minHeight="300dp"
    android:minWidth="180dp"
    android:updatePeriodMillis="0"
    android:initialLayout="@layout/layout_widget"
    android:resizeMode="horizontal|vertical"
    android:previewImage="@drawable/ss_bg"
    >

</appwidget-provider>
step2:创建Widget布局xml文件;
<?xml version="1.0" encoding="utf-8"?>
<RelativeLayout xmlns:android="http://schemas.android.com/apk/res/android"
    android:layout_width="match_parent"
    android:layout_height="match_parent"
    android:background="@drawable/bg_widget"
    android:paddingBottom="10dp">


    <TextView
        android:id="@+id/widget_title"
        android:layout_width="wrap_content"
        android:layout_height="40dp"
        android:layout_centerHorizontal="true"
        android:layout_marginTop="8dp"
        android:gravity="center"
        android:text="God David"
        android:textColor="#0000CD"
        android:textSize="25dp" />


    <ImageView
        android:id="@+id/widget_refresh"
        android:layout_width="40dp"
        android:layout_height="40dp"
        android:layout_alignParentRight="true"
        android:layout_marginRight="50dp"
        android:layout_marginTop="12dp"
        android:scaleType="centerCrop"
        android:src="@drawable/widget_refresh" />

    <RelativeLayout
        android:layout_width="match_parent"
        android:layout_height="match_parent"
        android:layout_below="@id/widget_title"
        android:background="#fff">

        <ImageView
            android:id="@+id/widget_image"
            android:layout_width="match_parent"
            android:layout_height="150dp"
            android:background="@drawable/empty_image"
            android:scaleType="fitCenter" />

        <FrameLayout
            android:layout_width="match_parent"
            android:layout_height="match_parent"
            android:layout_below="@id/widget_image"
            android:layout_marginTop="5dp">

            <GridView
                android:id="@+id/widget_grid"
                android:layout_width="match_parent"
                android:layout_height="match_parent"
                android:layout_marginLeft="1dp"
                android:layout_marginRight="1dp"
                android:background="#912CEE"
                android:columnWidth="150dp"
                android:gravity="center"
                android:horizontalSpacing="1dp"
                android:numColumns="auto_fit"
                android:verticalSpacing="1dp" />

            <RelativeLayout
                android:id="@+id/widget_empty_view"
                android:layout_width="match_parent"
                android:layout_height="match_parent"
                android:background="#fff">

                <ProgressBar
                    android:id="@+id/widget_progressBar"
                    android:layout_width="wrap_content"
                    android:layout_height="wrap_content"
                    android:layout_centerInParent="true" />

                <TextView
                    android:layout_width="wrap_content"
                    android:layout_height="30dp"
                    android:layout_below="@id/widget_progressBar"
                    android:layout_centerHorizontal="true"
                    android:layout_marginTop="10dp"
                    android:gravity="center"
                    android:text="使劲加载中... ..." />
            </RelativeLayout>
        </FrameLayout>
    </RelativeLayout>
</RelativeLayout>
step3:编写处理Widget的java类,使其继承AppWidgetProvider;
package com.godD.appwidget.appWidget;

import android.appwidget.AppWidgetManager;
import android.appwidget.AppWidgetProvider;
import android.content.Context;
import android.content.Intent;

/**
 * @author David  create on 2016/8/10  13:34.
 * @email david.forever.god@gmail.com
 * Learn from yesterday, live for today, hope for tomorrow.
 */
public class MyAppWidgetProvider extends AppWidgetProvider {

    /**
     * @author David  created at 2016/8/10 15:43
     * 当第1个 widget 的实例被创建时触发。
     */
    @Override
    public void onEnabled(Context context) {
        super.onEnabled(context);

    }

    /**
     * @author David  created at 2016/8/10 15:43
     * 接收到任意广播时触发,并且会在上述的方法之前被调用。
     */
    @Override
    public void onReceive(Context context, Intent intent) {
        super.onReceive(context, intent);
        /**
         * @author  David  created at 2016/8/11 17:24
         *  如果你的Widget要求并不是很特殊,一般情况下,在此接收广播,即可处理相应事务,但在此就放弃该方法了。
         */
    }

    /**
     * @author David  created at 2016/8/10 15:44
     * 当 widget 更新时被执行。每次创建Widget,或者刚开机等情况下,都会被执行。
     */
    @Override
    public void onUpdate(Context context, AppWidgetManager appWidgetManager, int[] appWidgetIds) {
        /**
         * @author  David  created at 2016/8/11 17:22
         *  由于Widget本身不支持执行太过耗时的操作,所以,为了实现开机刷新和每次添加的时候刷新数据,开启服务,
         *  让数据在后台下载,等下载完成之后,在进行更新Widget的操作。
         *
         */
        Intent intent = new Intent(context, MyService.class);
        intent.putExtra("appWidgetIds", appWidgetIds);
        context.startService(intent);

    }

    /**
     * @author David  created at 2016/8/10 15:44
     * 当 widget 被删除时被触发。
     */
    @Override
    public void onDeleted(Context context, int[] appWidgetIds) {
        super.onDeleted(context, appWidgetIds);
    }

    /**
     * @author David  created at 2016/8/10 15:44
     * 当最后1个 widget 的实例被删除时触发。
     */
    @Override
    public void onDisabled(Context context) {
        super.onDisabled(context);
    }
}
step4:编写服务类,在服务类里实现网络请求,并在请求成功后更新Widget;
package com.godD.appwidget.appWidget;

import android.app.Service;
import android.appwidget.AppWidgetManager;
import android.content.Intent;
import android.os.Handler;
import android.os.IBinder;
import android.os.Message;
import android.support.annotation.Nullable;
import android.util.Log;
import android.widget.Toast;

import com.godD.appwidget.MyApplication;
import com.godD.appwidget.R;
import com.godD.appwidget.bean.WidgetEntity;
import com.godD.appwidget.mvp.presenter.GridInfoPresenter;
import com.godD.appwidget.mvp.view.GridInfoView;
import com.lidroid.xutils.exception.DbException;

import java.util.List;

/**
 * @author David  create on 2016/8/11  11:34.
 * @email david.forever.god@gmail.com
 * Learn from yesterday, live for today, hope for tomorrow.
 */
public class MyService extends Service implements GridInfoView {

    private GridInfoPresenter gridInfoPresenter;
    private int[] appWidgetIds;
    private AppWidgetManager appWidgetManager;
    private Handler handler;

    @Override
    public void onCreate() {
        super.onCreate();
    }

    @Override
    public int onStartCommand(Intent intent, int flags, int startId) {
        //拿到更新所需要的内容:appWidgetIds;appWidgetManager;
        appWidgetIds = intent.getIntArrayExtra("appWidgetIds");
        appWidgetManager = AppWidgetManager.getInstance(MyService.this);
        //利用MVP模式,下载数据。备注:如果对MVP不是很了解的话,也可以使用自己的请求方式请求数据即可。
        //另:如果你想学习MVP模式的话:可前往“https://github.com/GodDavide/MVP”查看MVP模式介绍,感谢您的支持。
        Toast.makeText(MyService.this, "正在加载最新数据,请稍等... ...", Toast.LENGTH_SHORT).show();
        gridInfoPresenter = new GridInfoPresenter(this);
        gridInfoPresenter.loadWidgetInfo();

        //初始化Widget(此时Gridview还没有最新数据,如果是首次创建的话,数据为空,非首次,显示的是上次请求的数据。数据存储在数据库里)
        //为了方便,将更新方法直接写进构造函数里了
        new UpdaeWidget(MyService.this, appWidgetIds, appWidgetManager);
        handler = new Handler() {
            @Override
            public void handleMessage(Message msg) {
                super.handleMessage(msg);
                //当数据下砸完成后,返回信息,因为数据源发生了改变,所以直接调用:notifyAppWidgetViewDataChanged  方法;
                //WidgetGridService将自动执行:onDataSetChanged()方法,然后,从新对Gridview进行赋值刷新。
                if (msg.what == 100) {
                    appWidgetManager.notifyAppWidgetViewDataChanged(appWidgetIds, R.id.widget_grid);
                }
            }
        };

        return super.onStartCommand(intent, flags, startId);
    }

    @Nullable
    @Override
    public IBinder onBind(Intent intent) {
        return null;
    }

    @Override
    public void loadWidgetInfo(WidgetEntity widgetEntity) {
        //利用MVP模式下载数据,下载成功后,首先更新数据库,然后,通过Handler返回信息,执行刷新Widget功能。
        try {
            if (widgetEntity != null) {
                //首先,清空数据库,然后,将新数据添加进去。
                MyApplication.getMyApp().getDbUtils().deleteAll(WidgetEntity.NewslistBean.class);
                List<WidgetEntity.NewslistBean> all = MyApplication.getMyApp().getDbUtils().findAll(WidgetEntity.NewslistBean.class);
                for (int i = 0; i < widgetEntity.getNewslist().size(); i++) {
                    String picUrl = widgetEntity.getNewslist().get(i).getPicUrl();
                    MyApplication.getMyApp().getDbUtils().saveOrUpdate(widgetEntity.getNewslist().get(i));
                }
                Message obtain = Message.obtain();
                obtain.what = 100;
                handler.sendMessage(obtain);
            }
        } catch (DbException e) {
            e.printStackTrace();
        }
    }

    @Override
    public void loadFailed(String s) {
        Toast.makeText(MyService.this, "数据请求失败,请稍后重试... ...", Toast.LENGTH_SHORT).show();
    }
}
package com.godD.appwidget.appWidget;
import android.app.PendingIntent;
import android.appwidget.AppWidgetManager;
import android.content.Context;
import android.content.Intent;
import android.util.Log;
import android.widget.RemoteViews;
import com.godD.appwidget.MainActivity;
import com.godD.appwidget.R;
import com.godD.appwidget.config.WidgetAction;
/**
* @author David create on 2016/8/11 11:39.
* @email david.forever.god@gmail.com
* Learn from yesterday, live for today, hope for tomorrow.
*/
public class UpdaeWidget {
private RemoteViews remoteViews;
private Context context;
private int[] appWidgetIds;
private AppWidgetManager appWidgetManager;
public UpdaeWidget(Context context, int[] appWidgetIds, AppWidgetManager appWidgetManager) {
this.context = context;
this.appWidgetIds = appWidgetIds;
this.appWidgetManager = appWidgetManager;
this.remoteViews = new RemoteViews(context.getPackageName(), R.layout.layout_widget);
//为了方便,在创建UpdateWidget实例的时候,直接调用UpdateWidgetView();
UpdateWidgetView();
}
public void UpdateWidgetView() {
for (int appWidgetId : appWidgetIds) {
/**
* @author David created at 2016/8/11 17:37
* 刷新按钮的点击事件,通过Intent启动服务,PendingIntent.getSwevice();
*/
Intent intent = new Intent(context, MyService.class);
intent.putExtra("appWidgetIds", appWidgetIds);
PendingIntent pendingIntent = PendingIntent.getService(context, 0, intent, PendingIntent.FLAG_UPDATE_CURRENT);
remoteViews.setOnClickPendingIntent(R.id.widget_title, pendingIntent);
remoteViews.setOnClickPendingIntent(R.id.widget_refresh, pendingIntent);
/**
* @author David created at 2016/8/11 17:37
* 显示Topic及点击事件,通过Intent启动Activity,PendingIntent.getActivity();
*/
remoteViews.setImageViewResource(R.id.widget_image, R.drawable.ss_bg);
Intent topicIntent = new Intent(context, MainActivity.class);
topicIntent.setAction(WidgetAction.GOD_START_ACTIVITY);
topicIntent.setFlags(Intent.FLAG_ACTIVITY_CLEAR_TASK);
PendingIntent pendingIntentActivity = pendingIntent.getActivity(context, 0, topicIntent, PendingIntent.FLAG_UPDATE_CURRENT);
remoteViews.setOnClickPendingIntent(R.id.widget_image, pendingIntentActivity);
/**
* @author David created at 2016/8/11 17:37
* 加载Gridview
*/
showGridInfo();
/**
* @author David created at 2016/8/11 17:37
* 最后,刷新remoteViews
*/
appWidgetManager.updateAppWidget(appWidgetIds, remoteViews);
}
}
private void showGridInfo() {
//设置数据显示
Intent intent = new Intent(context, WidgetGridService.class);
intent.putExtra(AppWidgetManager.EXTRA_APPWIDGET_ID, appWidgetIds);
remoteViews.setRemoteAdapter(R.id.widget_grid, intent);
remoteViews.setEmptyView(R.id.widget_grid, R.id.widget_empty_view);
//响应事件
Intent intentEvent = new Intent(context, MainActivity.class);
intentEvent.setAction(WidgetAction.GOD_GRID);
intentEvent.setFlags(Intent.FLAG_ACTIVITY_CLEAR_TASK);
PendingIntent pendingIntent = PendingIntent.getActivity(context, 0, intentEvent, PendingIntent.FLAG_UPDATE_CURRENT);
remoteViews.setPendingIntentTemplate(R.id.widget_grid, pendingIntent);
appWidgetManager.updateAppWidget(appWidgetIds, remoteViews);
}
}
step5:特别注意,不要忘了在清单文件中注册
 <application
    <!-- 注册 WidgetProvider -->
    <receiver
            android:name=".appWidget.MyAppWidgetProvider"
            android:exported="true"
            android:label="God David">
            <intent-filter>
                <!--AppWidget更新注册广播-->
                <action android:name="android.appwidget.action.APPWIDGET_UPDATE" />
                <!--AppWidget交互事件广播-->
                <action android:name="android.appwidget.action.GOD_DAVID_GTIDVIEW" />
                <action android:name="android.appwidget.action.GOD_DAVID_REFRESH" />
                <action android:name="android.appwidget.action.GOD_DAVID_START_ACTIVITY" />

            </intent-filter>
            <meta-data
                android:name="android.appwidget.provider"
                android:resource="@xml/app_widget_provider" />
        </receiver>

    <!-- Gridview适配是在服务中进行的 -->
        <service
            android:name=".appWidget.WidgetGridService"
            android:permission="android.permission.BIND_REMOTEVIEWS" />
    <!-- 自定义服务,在服务里请求网络数据,然后,更新布局 -->
        <service android:name=".appWidget.MyService">
            <intent-filter>
                <action android:name="android.appwidget.action.GOD_DAVID_MYSERVICE"></action>
            </intent-filter>
        </service>
    </application>
最后:相关的响应事件,都在UpdateWidget和WidgetGridService中有详细的注释。可在代码中查看。
AlarmManager工具类:
public class MyAlarmManager {
    private Context context;
    public static int[] appWidgetIds;

    public MyAlarmManager(Context context, int[] appWidgetIds) {
        this.context = context;
        this.appWidgetIds = appWidgetIds;

        AlarmManager alarmMgr = (AlarmManager) context.getSystemService(Context.ALARM_SERVICE);
        Intent intent = new Intent();//AppWidgetManager.ACTION_APPWIDGET_UPDA
        intent.setAction("android.intent.action.MY_BROADCAST");
        Bundle bundle = new Bundle();
        bundle.putIntArray(AppWidgetManager.EXTRA_APPWIDGET_IDS, appWidgetIds);
        intent.putExtras(bundle);

        int requestCode = 0;
        PendingIntent pendIntent = PendingIntent.getBroadcast(context, requestCode, intent, PendingIntent.FLAG_UPDATE_CURRENT);
        /**
         * @author Davide  created at 2016/7/19 17:12
         * 5秒后发送广播,然后每个**秒重复发广播。广播都是直接发到AlarmReceiver的
         */
        long triggerAtTime = SystemClock.elapsedRealtime() + 1 * 1000;//闹钟开始时间
        int interval = 20 * 1000;//闹钟间隔时间。ps:仅供测试用,实际项目时间间隔要大得多。
        alarmMgr.setRepeating(AlarmManager.RTC, triggerAtTime, interval, pendIntent);
    }
}
end
========================
Remember Me


 343
343


 被折叠的 条评论
为什么被折叠?
被折叠的 条评论
为什么被折叠?
 到【灌水乐园】发言


