


 本文介绍了三种在Android中全局修改APP字体的方法:1) 自定义FontTextView控件;2) 递归批量替换TextView及其子View;3) 通过反射改变默认字体。每种方法的优缺点都有详细说明,个人中心设置部分展示了如何实现实时字体切换。
最近一直在如何全局修改app字体上困惑着,今天终于有了突破。我将搜集的资料进行了整理,现在提供给大家。
前面为分析,建议直接翻到最后看【个人中心设置】。
参考链接:
Android应用使用自定义字体
Android应用使用自定义字体的一些探究
Android如何高效率的替换整个APP的字体?
Android自定义字体的库
小体积字体文件集
首先将项目需要的字体资源放置在app下:
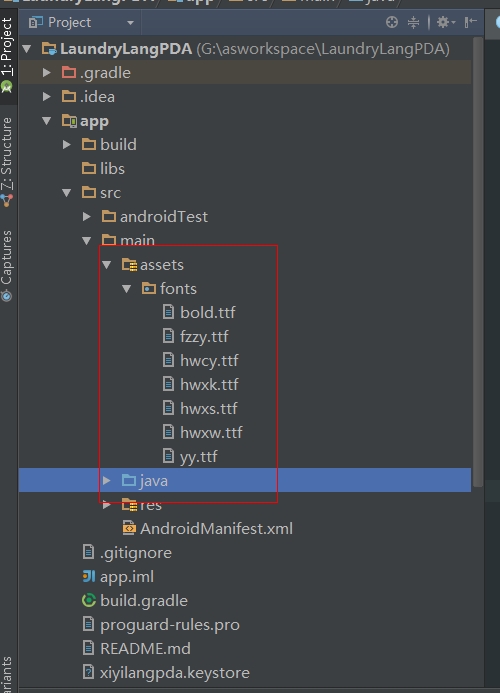
这是我自己找的字体文件,分别代表粗体,方正准圆,华文彩云,华文行楷,华文新宋,华文新魏,幼圆。
注意,字体ttf文件只能用英文字母,中文会报找不到文件异常。
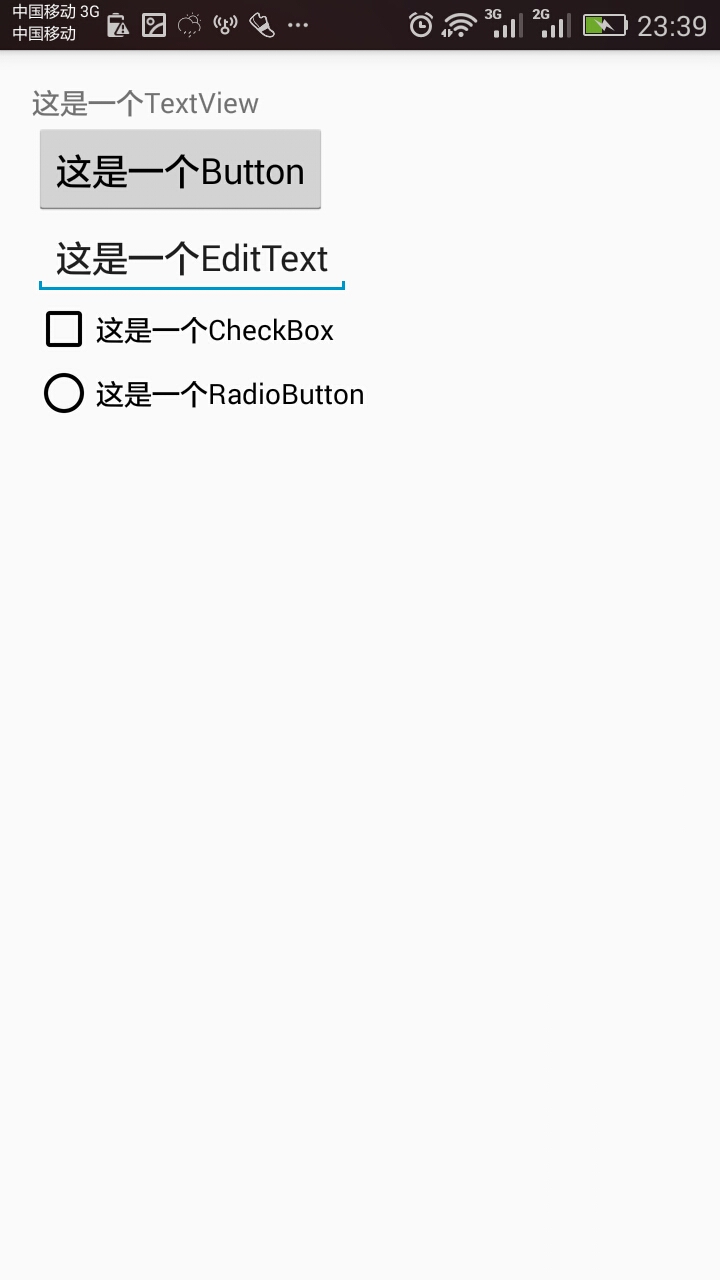
我们先看看未设置之前的布局样式:
字体文件准备好后,我们就可以按需设置自己想要的字体样式。下面提供了3种设置方法,这3种方法都可以改变可以显示文本的控件字体样式,如TextView,Button,EditText,CheckBox,RadioButton等等:
方法1:自定义控件 FontTextView
重写TextView,重写其中的setTypeface方法,设置自己的字体样式
package com.laundrylang.laundrylangpda.view;
public class FontTextView extends TextView{
public FontTextView(Context context) {
super(context);
}
public FontTextView(Context context, AttributeSet attrs) {
super(context, attrs);
}
public FontTextView(Context context, AttributeSet attrs, int defStyleAttr) {
super(context, attrs, defStyleAttr);
}
private Typeface createTypeface(Context context, String fontPath) {
return Typeface.createFromAsset(context.getAssets(), fontPath);
}
@Override
public void setTypeface(Typeface tf, int style) {
super.setTypeface(createTypeface(getContext(),"fonts/fzzy.ttf"), style);
}
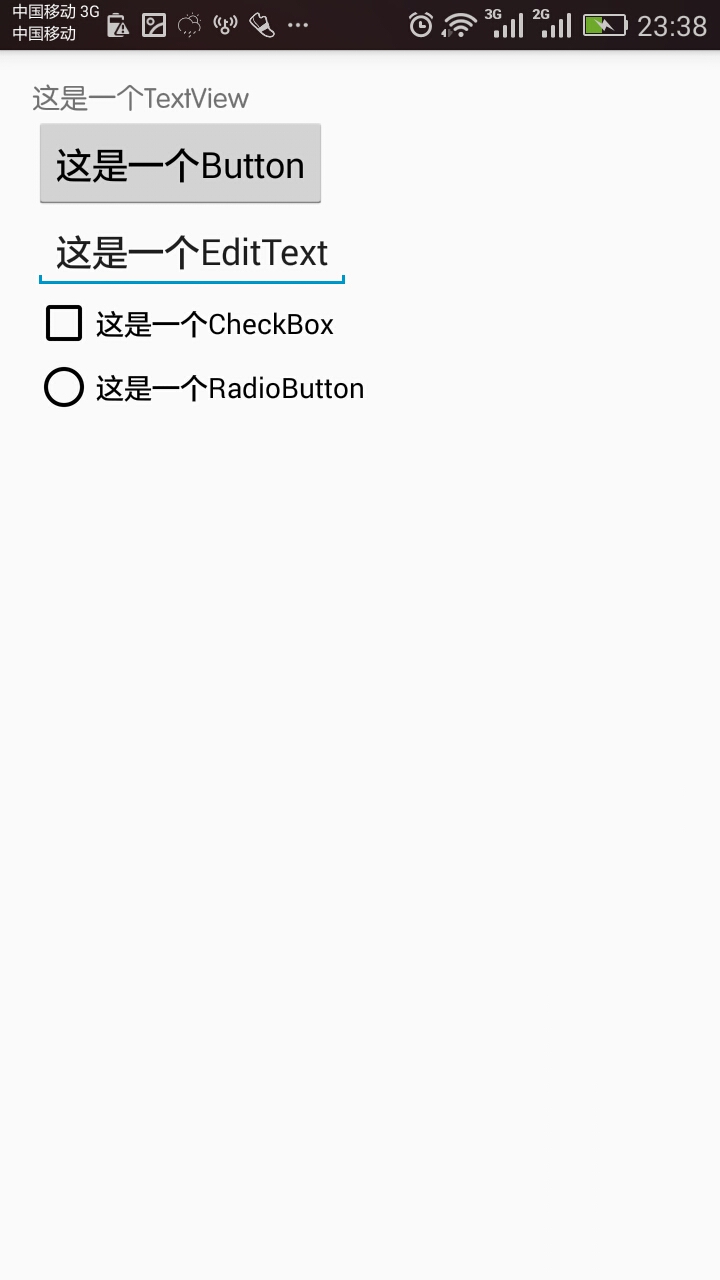
}布局中直接用自定义的FontTextView类即可。
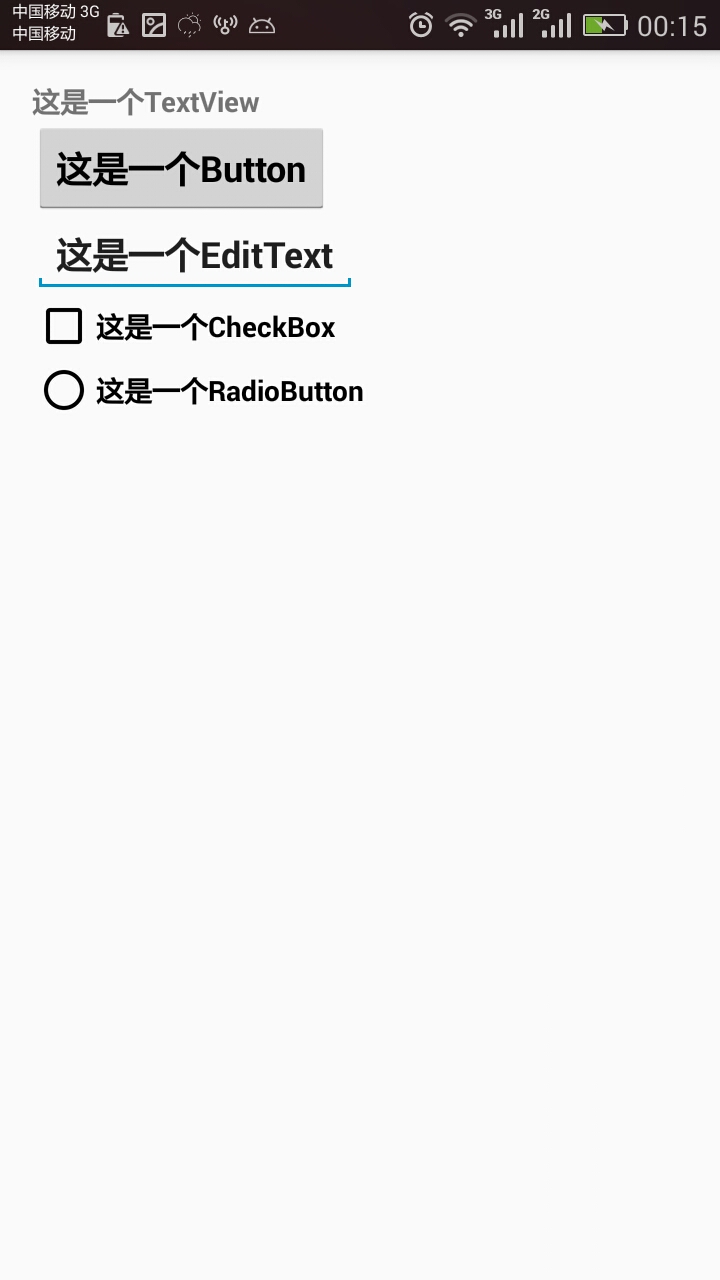
<com.laundrylang.laundrylangpda.view.FontTextView
        android:layout_width="wrap_content"
        android:layout_height="wrap_content"
        android:text="这是一个TextView"/>
    <Button
        android:layout_width="wrap_content"
        android:layout_height="wrap_content"
        android:text="这是一个Button"/>
    <EditText
        android:layout_width="wrap_content"
        android:layout_height="wrap_content"
        android:text="这是一个EditText"/>
    <CheckBox
        android:layout_width="wrap_content"
        android:layout_height="wrap_content"
        android:text="这是一个CheckBox"/>
    <RadioButton
        android:layout_width="wrap_content"
        android:layout_height="wrap_content"
        android:text="这是一个RadioButton"/>
前后对照布局文件,因为这里只重写了TextView,所以只有TextView有变化:
这种设置方式的优缺点:
优点:使用简单方便,不需要额外的工作。
缺点:只能替换一类控件的字体,如果需要替换Button或EditText控件的字体,需要以相同的方式自定义这些控件,这样工作量大。
方法2:递归批量替换某个View及其子View的字体
Android中可显示文本的控件都直接或间接继承自TextView,批量替换字体的原理就是从指定的View节点开始递归遍历所有子View,如果子View类型是TextView类型或其子类型则替换字体,如果子View是ViewGroup类型则重复这一过程。我抽取了一个工具类,代码如下:
public class TypefaceUtil {

    /**
     * <p>Replace the font of specified view and it's children</p>
     * @param root The root view.
     * @param fontPath font file path relative to 'assets' directory.
     */
    public static void replaceFont(@NonNull View root, String fontPath) {
        if (root == null || TextUtils.isEmpty(fontPath)) {
            return;
        }


        if (root instanceof TextView) { // If view is TextView or it's subclass, replace it's font
            TextView textView = (TextView)root;
            int style = Typeface.NORMAL;
            if (textView.getTypeface() != null) {
                style = textView.getTypeface().getStyle();
            }
            textView.setTypeface(createTypeface(root.getContext(), fontPath), style);
        } else if (root instanceof ViewGroup) { // If view is ViewGroup, apply this method on it's child views
            ViewGroup viewGroup = (ViewGroup) root;
            for (int i = 0; i < viewGroup.getChildCount(); ++i) {
                replaceFont(viewGroup.getChildAt(i), fontPath);
            }
        }
    }

    /**
     * <p>Replace the font of specified view and it's children</p>
     * @param context The view corresponding to the activity.
     * @param fontPath font file path relative to 'assets' directory.
     */
    public static void replaceFont(@NonNull Activity context, String fontPath) {
        replaceFont(getRootView(context),fontPath);
    }


    /*
     * Create a Typeface instance with your font file
     */
    public static Typeface createTypeface(Context context, String fontPath) {
        return Typeface.createFromAsset(context.getAssets(), fontPath);
    }

    /**
     * 从Activity 获取 rootView 根节点
     * @param context
     * @return 当前activity布局的根节点
     */
    public static View getRootView(Activity context)
    {
        return ((ViewGroup)context.findViewById(android.R.id.content)).getChildAt(0);
    }
}
代码中调用,这里建议最好放在BaseActivity中,因为this只能代表当前页面,放在BaseActivity中让所有Activity继承自BaseActivity可以全局的改变字体样式:
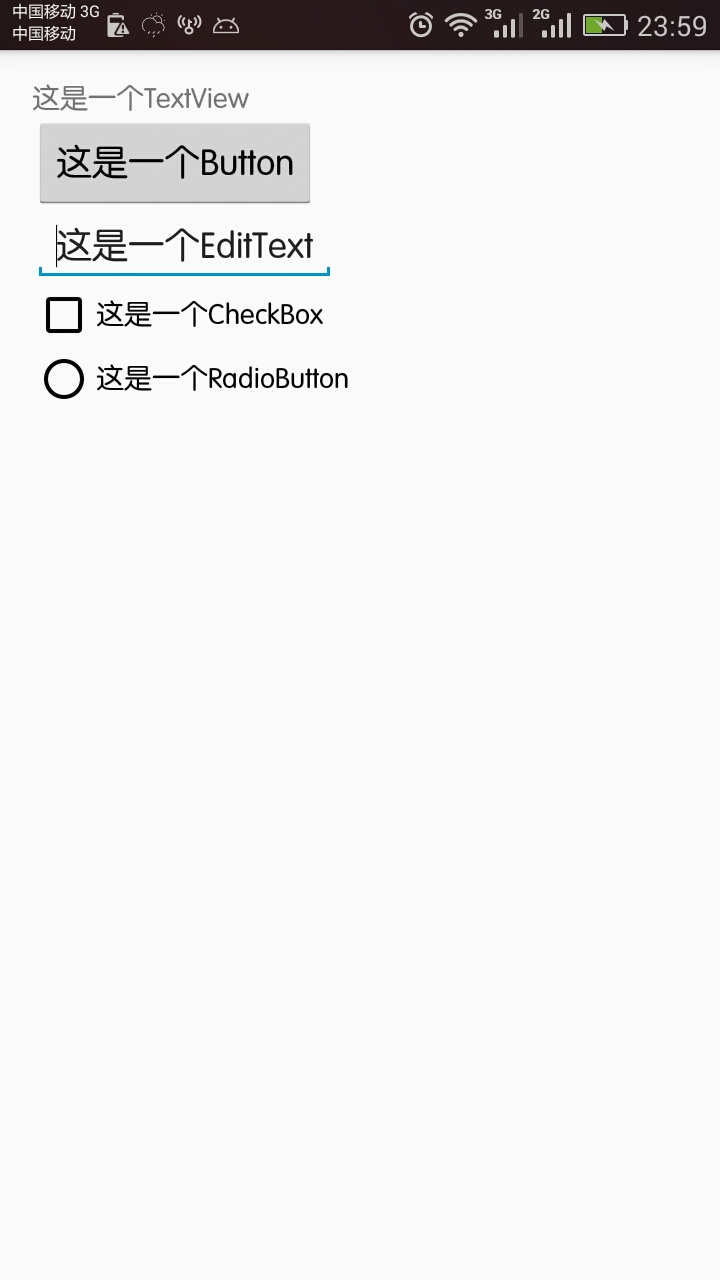
TypefaceUtil.replaceFont(this, "fonts/fzzy.ttf");前后对照布局文件,可以发现所有的控件字体都变了:
这种设置方式的优缺点:
优点:不需要修改XML布局文件,不需要重写控件,可以批量替换所有继承自TextView的控件的字体,适合需要批量替换字体的场合,如程序的默认字体。
缺点:如果要替换整个App的所有字体,需要在每个有界面的地方批量替换一次,页面多了还是有些工作量的,不过可以在Activity和Fragment的基类中完成这个工作。其次,性能可能差一点,毕竟要递归遍历所有子节点(不过实际使用中没有明显的性能下降程序依然流畅)。
方法3:通过反射替换默认字体
App中显示的字体来自于Typeface中的预定义的字体,这种方式是通过改变系统字体样式改变字体。
首先需要改变APP的BaseTheme
<!-- Base application theme. -->
    <style name="AppTheme" parent="Theme.AppCompat.Light.DarkActionBar">
        <!-- Customize your theme here. -->
        <!-- Set system default typeface -->
        <item name="android:typeface">monospace</item>
    </style>
再然后我将需要的方法又抽取了一下,和之前的TypefaceUtil形成了一个完整的工具类,代码如下:
package com.laundrylang.laundrylangpda.util;

import android.app.Activity;
import android.content.Context;
import android.graphics.Typeface;
import android.support.annotation.NonNull;
import android.text.TextUtils;
import android.view.View;
import android.view.ViewGroup;
import android.widget.TextView;

import java.lang.reflect.Field;

/*
 * Copyright (C) 2013 Peng fei Pan <sky@xiaopan.me>
 *
 * Licensed under the Apache License, Version 2.0 (the "License");
 * you may not use this file except in compliance with the License.
 * You may obtain a copy of the License at
 *
 *   http://www.apache.org/licenses/LICENSE-2.0
 *
 * Unless required by applicable law or agreed to in writing, software
 * distributed under the License is distributed on an "AS IS" BASIS,
 * WITHOUT WARRANTIES OR CONDITIONS OF ANY KIND, either express or implied.
 * See the License for the specific language governing permissions and
 * limitations under the License.
 */
public class TypefaceUtil {
    /**
     * 为给定的字符串添加HTML红色标记,当使用Html.fromHtml()方式显示到TextView 的时候其将是红色的
     *
     * @param string 给定的字符串
     * @return
     */
    public static String addHtmlRedFlag(String string) {
        return "<font color=\"red\">" + string + "</font>";
    }

    /**
     * 将给定的字符串中所有给定的关键字标红
     *
     * @param sourceString 给定的字符串
     * @param keyword      给定的关键字
     * @return 返回的是带Html标签的字符串,在使用时要通过Html.fromHtml()转换为Spanned对象再传递给TextView对象
     */
    public static String keywordMadeRed(String sourceString, String keyword) {
        String result = "";
        if (sourceString != null && !"".equals(sourceString.trim())) {
            if (keyword != null && !"".equals(keyword.trim())) {
                result = sourceString.replaceAll(keyword, "<font color=\"red\">" + keyword + "</font>");
            } else {
                result = sourceString;
            }
        }
        return result;
    }

    /**
     * <p>Replace the font of specified view and it's children</p>
     * @param root The root view.
     * @param fontPath font file path relative to 'assets' directory.
     */
    public static void replaceFont(@NonNull View root, String fontPath) {
        if (root == null || TextUtils.isEmpty(fontPath)) {
            return;
        }


        if (root instanceof TextView) { // If view is TextView or it's subclass, replace it's font
            TextView textView = (TextView)root;
            int style = Typeface.NORMAL;
            if (textView.getTypeface() != null) {
                style = textView.getTypeface().getStyle();
            }
            textView.setTypeface(createTypeface(root.getContext(), fontPath), style);
        } else if (root instanceof ViewGroup) { // If view is ViewGroup, apply this method on it's child views
            ViewGroup viewGroup = (ViewGroup) root;
            for (int i = 0; i < viewGroup.getChildCount(); ++i) {
                replaceFont(viewGroup.getChildAt(i), fontPath);
            }
        }
    }

    /**
     * <p>Replace the font of specified view and it's children</p>
     * 通过递归批量替换某个View及其子View的字体改变Activity内部控件的字体(TextView,Button,EditText,CheckBox,RadioButton等)
     * @param context The view corresponding to the activity.
     * @param fontPath font file path relative to 'assets' directory.
     */
    public static void replaceFont(@NonNull Activity context, String fontPath) {
        replaceFont(getRootView(context),fontPath);
    }


    /*
     * Create a Typeface instance with your font file
     */
    public static Typeface createTypeface(Context context, String fontPath) {
        return Typeface.createFromAsset(context.getAssets(), fontPath);
    }

    /**
     * 从Activity 获取 rootView 根节点
     * @param context
     * @return 当前activity布局的根节点
     */
    public static View getRootView(Activity context)
    {
        return ((ViewGroup)context.findViewById(android.R.id.content)).getChildAt(0);
    }

    /**
     * 通过改变App的系统字体替换App内部所有控件的字体(TextView,Button,EditText,CheckBox,RadioButton等)
     * @param context
     * @param fontPath
     * 需要修改style样式为monospace:
     */
//    <style name="AppTheme" parent="Theme.AppCompat.Light.DarkActionBar">
//    <!-- Customize your theme here. -->
//    <!-- Set system default typeface -->
//    <item name="android:typeface">monospace</item>
//    </style>
    public static void replaceSystemDefaultFont(@NonNull Context context, @NonNull String fontPath) {
        replaceTypefaceField("MONOSPACE", createTypeface(context, fontPath));
    }

    /**
     * <p>Replace field in class Typeface with reflection.</p>
     */
    private static void replaceTypefaceField(String fieldName, Object value) {
        try {
            Field defaultField = Typeface.class.getDeclaredField(fieldName);
            defaultField.setAccessible(true);
            defaultField.set(null, value);
        } catch (NoSuchFieldException e) {
            e.printStackTrace();
        } catch (IllegalAccessException e) {
            e.printStackTrace();
        }
    }
}
代码中引用只需要在BaseApplication的onCreate里设置,为了增强效果,这里我将显示样式变成粗体:
TypefaceUtil.replaceSystemDefaultFont(this,"fonts/bold.ttf");前后对照布局文件,可以看到,虽然是粗体,但和方法2一样,也是所有的字体都更换样式了:
这种设置方式的优缺点:
优点:方式2的优点+更加简洁
缺点:字体文件一般比较大,加载时间长而且占内存(不过实际使用中没有明显的性能下降程序依然流畅)。
个人中心设置
我一般都是用第2,3种,简洁高效,现在说一下如何在个人设置里边改变你的app字体:
经实践,第2种方法是最好的,可以实时更新页面。而第三种需要返回重新进入到activity才会看到效果。
先在BaseActivity注册一个字体改变监听的广播
package com.laundrylang.laundrylangpda.activity;

import android.content.BroadcastReceiver;
import android.content.Context;
import android.content.Intent;
import android.content.IntentFilter;
import android.os.Bundle;
import android.support.v4.app.FragmentActivity;

import com.laundrylang.laundrylangpda.constant.ConstantValue;
import com.laundrylang.laundrylangpda.util.PreferencesUtil;
import com.laundrylang.laundrylangpda.util.TypefaceUtil;

public abstract class BaseActivity extends FragmentActivity {
    private TypefaceChangeReceiver typefaceChangeReceiver;
    @Override
    protected void onCreate(Bundle savedInstanceState) {
        super.onCreate(savedInstanceState);
        setContentView(getLayout());
        //改变新创建Activity的字体
        onTypefaceChange(PreferencesUtil.getString(ConstantValue.AppSetting.SHPNAME,ConstantValue.AppSetting.typeface));

        typefaceChangeReceiver = new TypefaceChangeReceiver();
        IntentFilter typefaceFilter = new IntentFilter();
        typefaceFilter.addAction(ConstantValue.ReceiverAction.TYPEFACE_ACTION);
        registerReceiver(typefaceChangeReceiver,typefaceFilter);
    }

    @Override
    protected void onDestroy() {
        unregisterReceiver(typefaceChangeReceiver);
        super.onDestroy();
    }

    /**
     * 设置当前activity的layout
     * @return 当前界面的布局id
     */
    protected abstract int getLayout();

    /**
     * 字体改变
     */
    protected void onTypefaceChange(String typeface){
        TypefaceUtil.replaceFont(this, typeface);
    }

    /**
     * 字体改变监听,用于改变整个APP字体
     */
    public class TypefaceChangeReceiver extends BroadcastReceiver {
        @Override
        public void onReceive(Context context, Intent intent) {
            if(ConstantValue.ReceiverAction.TYPEFACE_ACTION.equals(intent.getAction())){
                String typeface = intent.getStringExtra("typeface");
                //改变未销毁尚存在的Activity的字体
                onTypefaceChange(typeface);
            }
        }
    }
}
常量抽取出来,放到ConstantValue常量类中:
    interface AppSetting{
        String SHPNAME = "SETTING";
        String typeface = "typeface";
    }

    interface ReceiverAction{
        String TYPEFACE_ACTION = "font.TYPEFACE_CHANGE";
    }

    interface Typeface{
        String BOLD = "fonts/bold.ttf";//粗体
        String FZZY = "fonts/fzzy.ttf";//方正准圆
        String HWCY = "fonts/hwcy.ttf";//华文彩云
        String HWXK = "fonts/hwxk.ttf";//华文行楷
        String HWXS = "fonts/hwxs.ttf";//华文新宋
        String HWXW = "fonts/hwxw.ttf";//华文新魏
        String YY = "fonts/yy.ttf";//幼圆
    }
在SettingActivity里发送特定的广播即可:
@Override
    public void onClick(View v) {
        Intent intent = new Intent(ConstantValue.ReceiverAction.TYPEFACE_ACTION);
        String typeface = null;
        switch (v.getId()){
            case R.id.bold:
                typeface = ConstantValue.Typeface.BOLD;
                break;
            case R.id.hwcy:
                typeface = ConstantValue.Typeface.HWCY;
                break;
        }
        //保存字体设置
        PreferencesUtil.put(ConstantValue.AppSetting.SHPNAME, ConstantValue.AppSetting.typeface, typeface);
        intent.putExtra("typeface", typeface);
        sendBroadcast(intent);
    }
这里有两个动作,
一个是发送广播,用于修改之前创建了但并未销毁的Activity的字体;
另一个是保存设置的字体,用于修改之后将创建的Activity的字体。
不过需要在BaseActivity里setContentView之后添加代码:
onTypefaceChange(PreferencesUtil.getString(ConstantValue.AppSetting.SHPNAME,ConstantValue.AppSetting.typeface));顺便附上PreferencesUtil的一部分代码:
private static Context context = BaseApplication.getContext();
private final static String DEFAULT_STRING_VALUE = "";

public static void put(@NonNull String SHPNAME,@NonNull String key,Object value){
        SharedPreferences shp = context.getSharedPreferences(SHPNAME, Context.MODE_PRIVATE);
        SharedPreferences.Editor edit = shp.edit();
        if(value instanceof String)
            edit.putString(key,(String)value);
        if(value instanceof Boolean)
            edit.putBoolean(key, (Boolean) value);
        if(value instanceof Float)
            edit.putFloat(key, (Float) value);
        if(value instanceof Long)
            edit.putLong(key, (Long) value);
        if(value instanceof Integer)
            edit.putInt(key, (Integer) value);
        if(value instanceof Set)
            edit.putStringSet(key, (Set<String>) value);
        edit.apply();
    }

    public static String getString(@NonNull String SHPNAME,@NonNull String key){
        SharedPreferences shp = context.getSharedPreferences(SHPNAME, Context.MODE_PRIVATE);
        return shp.getString(key, DEFAULT_STRING_VALUE);
    }
这样便实现了在一个SettingActivity里改变全局字体的功能。
使用注意:
1.如果字体文件比较大,当设置后可能并不会立即生效,有1~2s的延迟,具体还依据类中控件的数量来定。
2.至关重要,所有的Activity请务必要继承BaseActivity。


 1万+
1万+

 被折叠的 条评论
为什么被折叠?
被折叠的 条评论
为什么被折叠?
 到【灌水乐园】发言


