


四、Spring Boot与Web开发
1、使用Spring Boot
-
创建Spring Boot应用,选中我们需要的模块,Spring Boot默认将选中的模块配置好了,我们只需要在配置文件中指定少量的配置就可以运行
**自动配置原理:**根据之前的Spring Boot配置文章中的原理
-
自己编写业务逻辑代码
2、Spring Boot静态资源的映射
在WebMvcAutoConfiguration下我们可以找到下面这个方法
public void addResourceHandlers(ResourceHandlerRegistry registry) {
    if (!this.resourceProperties.isAddMappings()) {
        logger.debug("Default resource handling disabled");
    } else {
        Duration cachePeriod = this.resourceProperties.getCache().getPeriod();
        CacheControl cacheControl = this.resourceProperties.getCache().getCachecontrol().toHttpCacheControl();
        if (!registry.hasMappingForPattern("/webjars/**")) {
            this.customizeResourceHandlerRegistration(registry.addResourceHandler(new String[]{"/webjars/**"}).addResourceLocations(new String[]{"classpath:/META-INF/resources/webjars/"}).setCachePeriod(this.getSeconds(cachePeriod)).setCacheControl(cacheControl));
        }

        String staticPathPattern = this.mvcProperties.getStaticPathPattern();
        if (!registry.hasMappingForPattern(staticPathPattern)) {
            this.customizeResourceHandlerRegistration(registry.addResourceHandler(new String[]{staticPathPattern}).addResourceLocations(WebMvcAutoConfiguration.getResourceLocations(this.resourceProperties.getStaticLocations())).setCachePeriod(this.getSeconds(cachePeriod)).setCacheControl(cacheControl));
        }

    }
}

//欢迎页映射
public WelcomePageHandlerMapping welcomePageHandlerMapping(ApplicationContext applicationContext, FormattingConversionService mvcConversionService, ResourceUrlProvider mvcResourceUrlProvider) {
    WelcomePageHandlerMapping welcomePageHandlerMapping = new WelcomePageHandlerMapping(new TemplateAvailabilityProviders(applicationContext), applicationContext, this.getWelcomePage(), this.mvcProperties.getStaticPathPattern());
    welcomePageHandlerMapping.setInterceptors(this.getInterceptors(mvcConversionService, mvcResourceUrlProvider));
    return welcomePageHandlerMapping;
}
-
所有**/webjars/**的请求都去classpath:/META-INF/resources/webjars/**找资源,webjars就是以jar包的方式引入静态资源
webjars官网,在官网中我们可以看到一些静态资源我们可以以maven的方式导入
-
**/****为访问当前项目的任何资源,
"classpath:/META-INF/resources/" "classpath:/resources/" "classpath:/static/" "classpath:/public/" -
欢迎页映射,从2中路径下查找index.html
-
我们也可以自己设置静态资源的路径
spring.resources.static-locations=classpath:/sp/,classpath:/sp1/
多个文件用逗号分割
3、Spring Boot模板引擎
<dependency>
    <groupId>org.springframework.boot</groupId>
    <artifactId>spring-boot-starter-thymeleaf</artifactId>
</dependency>
我们把html页面放在classpath:/template/下,thymeleaf就能自动渲染
-
导入thymeleaf的名称空间
<html xmlns:th="http://www.thymeleaf.org"> -
使用thymeleaf
public class ThymeleafProperties {
    private static final Charset DEFAULT_ENCODING;
    public static final String DEFAULT_PREFIX = "classpath:/templates/";
    public static final String DEFAULT_SUFFIX = ".html";
    private boolean checkTemplate = true;
    private boolean checkTemplateLocation = true;
    private String prefix = "classpath:/templates/";
    private String suffix = ".html";
    private String mode = "HTML";
    //只要我们把HTML页面放在classpath:/templates/下,thymeleaf就能帮我们渲染
<!DOCTYPE html> <html lang="en" xmlns:th="http://www.thymeleaf.org"> <head> <meta charset="UTF-8"> <title>Title</title> </head> <body> <div th:text="${hello}"> 这里是欢迎信息 </div> </body> </html> -
语法规则
th:text 改变当前元素的文本内容
th:insert th:replace 片段包含
th:each 遍历
th:if th:unless th:switch th:case 条件判断
th:object th:with 声明变量
th:attr th:attrprepend th:attrappend 任意属性修改
th:value th:src th:href 修改指定属性默认值
th:text th:utext 修改标签体内容,utext不转义特殊字符
${…} 获取变量属性,调用方法
*{…} 在功能上和${…}一样
#{…} 获取国际化内容
@{…} 定义url
~{…} 片段引用
更多的请查看官方thymeleaf文档
-
Spring Boot MVC
Spring MVC Auto-configuration
Spring Boot provides auto-configuration for Spring MVC that works well with most applications.
The auto-configuration adds the following features on top of Spring’s defaults:
-
Inclusion of
ContentNegotiatingViewResolverandBeanNameViewResolverbeans.自动配置了ViewResolver(视图解析器:根据方法的返回值得到视图对象,视图对象决定如何渲染(转发或者重定向))
-
Support for serving static resources, including support for WebJars (covered later in this document)).
静态资源路径
-
Automatic registration of
Converter,GenericConverter, andFormatterbeans.Converter:转换器,类型转换
Formatter:格式化器
-
Support for
HttpMessageConverters(covered later in this document).HttpMessageConverters:SpringMVC转换http请求与响应的,是从容器中确定并获得所有的HttpMessageConverters
-
Automatic registration of
MessageCodesResolver(covered later in this document).定义代码错误规则
-
Static
index.htmlsupport. -
Custom
Faviconsupport (covered later in this document). -
Automatic use of a
ConfigurableWebBindingInitializerbean (covered later in this document).初始化WebDataBinder
If you want to keep Spring Boot MVC features and you want to add additional MVC configuration (interceptors, formatters, view controllers, and other features), you can add your own
@Configurationclass of typeWebMvcConfigurerbut without@EnableWebMvc. If you wish to provide custom instances ofRequestMappingHandlerMapping,RequestMappingHandlerAdapter, orExceptionHandlerExceptionResolver, you can declare aWebMvcRegistrationsAdapterinstance to provide such components.If you want to take complete control of Spring MVC, you can add your own
@Configurationannotated with@EnableWebMvc. -
-
如何修改默认配置
- Spring Boot在自动配置组件的时候,先看用户有没有自己配,如果有就用用户配置的,没有就自动配置,如果有多个组件就将用户配置的和自己默认的组合起来
4、扩展SpringMVC
<mvc:view-controller path="/hello" view-name="success">
    <mvc:interceptors>
        <mvc:interceptor>
            <mvc:mapping path="/hello"/>
            <bean></bean>
        </mvc:interceptor>
    </mvc:interceptors>
编写一个配置类(@Configuration),是WebMvcConfigurer类型,不能标注@EnableWebMvc
@Configuration
public class MyConfig implements WebMvcConfigurer {
    @Override
    public void addViewControllers(ViewControllerRegistry registry) {
        //浏览器发送
        registry.addViewController("/test").setViewName("success");
    }

}
既保留了自动配置,又有我们的配置,我们可以看到WebMvcAutoConfigurationAdapter也实现了WebMvcConfigurer,重要的是上面有
@Import({WebMvcAutoConfiguration.EnableWebMvcConfiguration.class})
   @Import({WebMvcAutoConfiguration.EnableWebMvcConfiguration.class})
public static class WebMvcAutoConfigurationAdapter implements WebMvcConfigurer {
EnableWebMvcConfiguration里的代码
public static class EnableWebMvcConfiguration extends DelegatingWebMvcConfiguration implements ResourceLoaderAware {
我们点开EnableWebMvcConfiguration可以看到这样一段代码
private final WebMvcConfigurerComposite configurers = new WebMvcConfigurerComposite();

public DelegatingWebMvcConfiguration() {
}
//从容器中获取所有的WebMvcConfigurer
@Autowired(
    required = false
)
public void setConfigurers(List<WebMvcConfigurer> configurers) {
    if (!CollectionUtils.isEmpty(configurers)) {
        this.configurers.addWebMvcConfigurers(configurers);
        //将所有的WebMvcConfigurer一起来调用
    }

}
比如addViewControllers的实现
public void addViewControllers(ViewControllerRegistry registry) {
    Iterator var2 = this.delegates.iterator();

    while(var2.hasNext()) {
        WebMvcConfigurer delegate = (WebMvcConfigurer)var2.next();
        delegate.addViewControllers(registry);
    }

}
这样Spring Boot的自动配置和我们自己的配置会一起起作用
5、全面接管SpringMVC
Spring Boot的自动配置不要了,我们需要在配置类中加入@EnableWebMvc,加入后所有的自动配置都会失效,例如静态资源访问的路径Spring Boot默认的路径就不会生效,需要你自己配置
@EnableWebMvc注解的核心就是
@Import({DelegatingWebMvcConfiguration.class})
public @interface EnableWebMvc {
}

//DelegatingWebMvcConfiguration.class

@Configuration(
    proxyBeanMethods = false
)
public class DelegatingWebMvcConfiguration extends WebMvcConfigurationSupport {
为什么加了@EnableWebMvc自动配置就失效了,我们现在来看自动配置类
@Configuration(
    proxyBeanMethods = false
)
@ConditionalOnWebApplication(
    type = Type.SERVLET
)
@ConditionalOnClass({Servlet.class, DispatcherServlet.class, WebMvcConfigurer.class})
//容器中没有这个组件的时候,这个自动配置类才生效
@ConditionalOnMissingBean({WebMvcConfigurationSupport.class})
@AutoConfigureOrder(-2147483638)
@AutoConfigureAfter({DispatcherServletAutoConfiguration.class, TaskExecutionAutoConfiguration.class, ValidationAutoConfiguration.class})
public class WebMvcAutoConfiguration {
我们加了@EnableWebMvc就会导入WebMvcConfigurationSupport类,所以自动配置类判断后发现容器里有WebMvcConfigurationSupport,就不会生效了
而导入的WebMvcConfigurationSupport只是最基本的功能,需要我们自己写配置
在Spring Boot中会有很多xxxxConfigurer来帮助我们配置
6、Web开发实验
6.1、引入资源
index.html(即欢迎页映射)会首先取static、public、resources里的文件,而在xxxxController中return "xxx"会先取templates中的文件
server.servlet.context-path=/test
之后访问时需要在端口后加上/test
6.2、根据浏览器原信息展示页面的国际化效果
-
编写国际化配置文件,抽取页面需要显示的国际化消息
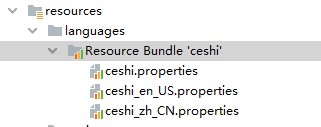
在编写过程中遇到了ceshi_zh_CN.properties被识别为普通文件的问题,在setting->Editor->File Types中在上方选择Text,然后在下方拉到最底会有你创建的文件,删除它就可以了,你会发现xxx_zh_CN.properties被正常识别了
-
Spring Boot自动配置好了管理国际化资源配置的组件
public class MessageSourceProperties {
    private String basename = "messages";
    //默认基础名是messages

public class MessageSourceAutoConfiguration {
    private static final Resource[] NO_RESOURCES = new Resource[0];

    public MessageSourceAutoConfiguration() {
    }

    @Bean
    @ConfigurationProperties(
        prefix = "spring.messages"
    )
    @Bean
    public MessageSource messageSource(MessageSourceProperties properties) {
        ResourceBundleMessageSource messageSource = new ResourceBundleMessageSource();
        if (StringUtils.hasText(properties.getBasename())) {
                    messageSource.setBasenames(StringUtils.commaDelimitedListToStringArray(StringUtils.trimAllWhitespace(properties.getBasename())));
            //setBasenames设置国际化资源文件的基础名(去掉语言国家代码的)
        }

        if (properties.getEncoding() != null) {
            messageSource.setDefaultEncoding(properties.getEncoding().name());
        }

        messageSource.setFallbackToSystemLocale(properties.isFallbackToSystemLocale());
        Duration cacheDuration = properties.getCacheDuration();
        if (cacheDuration != null) {
            messageSource.setCacheMillis(cacheDuration.toMillis());
        }

        messageSource.setAlwaysUseMessageFormat(properties.isAlwaysUseMessageFormat());
        messageSource.setUseCodeAsDefaultMessage(properties.isUseCodeAsDefaultMessage());
        return messageSource;
    }
我们可以更改默认的基础名,在application.properties里写spring.messages.basename=languages.ceshi,就能连接到我们自己写的配置文件
-
页面获取
在ceshi.html页面中
<h1 th:text="#{ceshi.name}"></h1>
<label th:text="#{ceshi.password}"></label>
[[#{ceshi.data}]] <!-- 这是行内写法 -->
如果访问时遇到乱码,可以按照下图改为utf-8并打上勾

-
设置语言切换按钮
国际化的原理,在WebMvcAutoConfiguration.class中可以看到
@Bean
@ConditionalOnMissingBean
@ConditionalOnProperty(
    prefix = "spring.mvc",
    name = {"locale"}
)
public LocaleResolver localeResolver() {
    if (this.mvcProperties.getLocaleResolver() == org.springframework.boot.autoconfigure.web.servlet.WebMvcProperties.LocaleResolver.FIXED) {
        return new FixedLocaleResolver(this.mvcProperties.getLocale());
        //可以指定用固定的
    } else {
        AcceptHeaderLocaleResolver localeResolver = new AcceptHeaderLocaleResolver();
        //否则是用AcceptHeaderLocaleResolver
        localeResolver.setDefaultLocale(this.mvcProperties.getLocale());
        return localeResolver;
    }
}
我们打开AcceptHeaderLocaleResolver
public Locale resolveLocale(HttpServletRequest request) {
    //获取区域信息
    Locale defaultLocale = this.getDefaultLocale();
    if (defaultLocale != null && request.getHeader("Accept-Language") == null) {
        return defaultLocale;
    } else {
        //区域信息是在request中获取
        Locale requestLocale = request.getLocale();
        List<Locale> supportedLocales = this.getSupportedLocales();
        if (!supportedLocales.isEmpty() && !supportedLocales.contains(requestLocale)) {
            Locale supportedLocale = this.findSupportedLocale(request, supportedLocales);
            if (supportedLocale != null) {
                return supportedLocale;
            } else {
                return defaultLocale != null ? defaultLocale : requestLocale;
            }
        } else {
            return requestLocale;
        }
    }
}
如果我们要设计为按按钮切换那我们就不要使用自动配置里的区域解析器,我们创建一个MyLocaleResolver
//我们既然要点击链接切换国际化,那么我们可以在链接上带有区域信息
public class MyLocaleResolver implements LocaleResolver {
    @Override
    public Locale resolveLocale(HttpServletRequest httpServletRequest) {
        String l = httpServletRequest.getParameter("l");
        System.out.println(l);
        Locale locale = Locale.getDefault();
        if (!StringUtils.isEmpty(l)){
            String[] s = l.split("_");
            locale = new Locale(s[0], s[1]);
        }
        return locale;
    }

    @Override
    public void setLocale(HttpServletRequest httpServletRequest, HttpServletResponse httpServletResponse, Locale locale) {

    }
}
然后在MyConfig中将它加入容器,这样我们自己的组件就会生效,可以实现按钮切换了
@Bean
public LocaleResolver localeResolver(){
    return new MyLocaleResolver();
}
6.3、登录与拦截器
登录
模板引擎页面开发期间需要实时生效,首先禁用缓存,然后按Ctrl+F9,就可以实时生效了
spring.thymeleaf.cache=false
@PostMapping(value = "/user/login")
//@RequestMapping(value = "/user/login", method = RequestMethod.POST),两种都可以
//@RequestParam("username"),如果没有传入参数就会报错
public String loginceshi(@RequestParam("username") String username,
                         @RequestParam("password") String password){
    System.out.println("登录跳转");
    if (!StringUtils.isEmpty(username) && password.equals("123456")){
        return "loginsuccess";
    }else {
        return "ceshi";
    }
}
<form action="/user/login" method="post">
    <input placeholder="用户名" name="username">
    <input placeholder="密码" name="password">
    <p style="color: red" th:text="${msg}" th:if="${not #strings.isEmpty(msg)}"></p>
    <button type="submit">sign in</button>
</form>
这里注意有个重复提交表单的问题,我们按住F5浏览器会提示是否重新发送表单,要解决重复提交的问题,我们可以重定向
拦截器
我们创建自己的拦截器LoginHandlerInterceptor,这里实现HandlerInterceptor类不会报错,在后来的版本中,这个接口的方法从原来的抽象方法变成了default修饰的默认方法,因此不会显红线报需要实现的方法,需要按Ctrl + O手动选择。
//目标方法执行之前
@Override
public boolean preHandle(HttpServletRequest request, HttpServletResponse response, Object handler) throws Exception {
    Object user = request.getSession().getAttribute("name");
    if (user == null){
        //没有登陆,应该返回登录界面
        request.setAttribute("msg", "请先登录");
        request.getRequestDispatcher("/ceshi").forward(request, response);
        return false;
    }else {
        return true;
    }
}
之后添加到我们的配置类中
@Override
public void addInterceptors(InterceptorRegistry registry) {
    registry.addInterceptor(new LoginHandlerInterceptor()).addPathPatterns("/main")
        .excludePathPatterns("/asserts/**", "/webjars/**");
    //也可以不用特意过滤静态资源,SpringBoot会自动放行static下的
}
6.4、Restful CRUD
-
RestfulCRUD:CRUD满足Rest风格;
URI: /资源名称/资源标识 HTTP请求方式区分对资源CRUD操作
普通CRUD RestfulCRUD 查询 getEmp emp—GET 添加 addEmp?xxx emp—POST 修改 updateEmp?id=xxx&xxx=xx emp/{id}—PUT 删除 deleteEmp?id=1 emp/{id}—DELETE -
实验的请求架构;
实验功能 请求URI 请求方式 查询所有员工 emps GET 查询某个员工(来到修改页面) emp/1 GET 来到添加页面 emp GET 添加员工 emp POST 来到修改页面(查出员工进行信息回显) emp/1 GET 修改员工 emp PUT 删除员工 emp/1 DELETE thymeleaf公共页面抽取
<!-- 公共页面抽取,copy可以随意取名 --> <div th:fragment="copy"> © 2011 The Good Thymes Virtual Grocery </div> <!-- 引入公共片段 --> <!-- 一个是~{templatename::selector}:模板名::选择器 另一种写法是~{templatename::fragmentname}:模板名::片段名 --> <!-- 将公共片段插入到div中 --> <div th:insert="footer :: copy"></div> <!-- 将声明引入的元素替换为公共片段 --> <div th:replace="footer :: copy"></div> <!-- 将被引入片段的内容包含进标签中 --> <div th:include="footer :: copy"></div> <!-- 也可以写为 --> <!-- 如果使用以上方法引入可以不用写~{},而行内写法必须加上[[~{}]]、[(~{})] --> <div th:insert="~{footer :: copy}"></div> [[~{footer :: copy}]] <!-- 实际效果 --> <div> <footer> © 2011 The Good Thymes Virtual Grocery </footer> </div> <footer> © 2011 The Good Thymes Virtual Grocery </footer> <div> © 2011 The Good Thymes Virtual Grocery </div>引入片段时传入参数
<!-- 在引入片段需要传参的地方写入 -->
<a class="nav-link active" th:class="${activeIf=="main"?"nav-link active":"nav-link"}"</a>
<a class="nav-link active" th:class="${activeIf=="test"?"nav-link active":"nav-link"}"</a>


<!-- 传参时 -->
<div th:replace="::frag (${value1},${value2})">...</div>
<div th:replace="::frag (onevar=${value1},twovar=${value2})">...</div>
<!-- 例如 -->
<div th:replace="footer::copy (activeIf='main')"></div>
遍历数据
<tbody>
    <!-- 会生成一个个tr -->
    <tr th:each="emp:${emps}">
        <td th:text="${emp.name}"></td>
        <td th:text="${emp.gender}==0'男':'女'"></td>
        <td th:text="${emp.phone.number}"></td>
        <td th:text="${#dates.format(emp.date,'yyyy-MM-dd HH:mm')}"></td>
    </tr>
</tbody>
自定义属性
单个
th:attr="action=@{/subscribe}"
多个
th:attr="src=@{/images/gtvglogo.png},title=#{logo},alt=#{logo}"
PUT和DELETE请求的发送
-
配置HiddenHttpMethodFilter
-
创建一个post表单和一个隐藏的input项,必须满足name="_method",input值就是我们的请求方式
-
emp传递参数
@DeleteMapping("/emp/{id}")
public String deleteEmployee(@PathVariable("id") Integer id){
	//id为传递的参数

}
<!-- 若是通过重定向到了这个界面,即使用了redirectAttributes.addAttribute,则用 <form th:action="@{/emp/}+${param.id}" method="post"> --> <form th:action="@{/emp/}+${id}" method="post"> <input type="hidden" name="_method" value="delete"> <button type="submit">删除</button> </form> -
在application.properties中写入
spring.mvc.hiddenmethod.filter.enabled=true我们可以查看WebMvcAutoConfiguration里的OrderedHiddenHttpMethodFilter
@Bean
@ConditionalOnMissingBean({HiddenHttpMethodFilter.class})
@ConditionalOnProperty(
    prefix = "spring.mvc.hiddenmethod.filter",
    name = {"enabled"},
    matchIfMissing = false
    //自己将其设为true
)
public OrderedHiddenHttpMethodFilter hiddenHttpMethodFilter() {
    return new OrderedHiddenHttpMethodFilter();
}
-
7、错误处理机制
7.1、Spring Boot默认的错误处理机制
错误处理机制
-
浏览器访问localhost:8080/aaa

-
Http Client访问localhost:8080/aaa
点击Tools -> Http Client -> Test RESTful Web Service,在path输入/aaa
可以得到

为什么会有默认的界面,我们可以查看ErrorMvcAutoConfiguration错误处理的自动配置,这个类给容器添加了以下组件,原理方面将组件介绍与下面的运行步骤结合看
-
DefaultErrorAttributes
能获得的信息有
- timestamp:时间戳
- status:状态码
- error:错误提示
- exception:异常对象
- message:异常消息
- errors:JSR303数据校验的错误
public Map<String, Object> getErrorAttributes(WebRequest webRequest, boolean includeStackTrace) { //能获取的信息的信息有timestamp:时间戳、status:状态码 Map<String, Object> errorAttributes = new LinkedHashMap(); errorAttributes.put("timestamp", new Date()); this.addStatus(errorAttributes, webRequest); this.addErrorDetails(errorAttributes, webRequest, includeStackTrace); this.addPath(errorAttributes, webRequest); return errorAttributes; } -
BasicErrorController
@Controller
@RequestMapping({"${server.error.path:${error.path:/error}}"})
//处理默认/error请求
public class BasicErrorController extends AbstractErrorController {
    @RequestMapping(
        produces = {"text/html"}
    )
    //产生html类型的数据,浏览器的请求到这里处理
    public ModelAndView errorHtml(HttpServletRequest request, HttpServletResponse response) {
        HttpStatus status = this.getStatus(request);
        Map<String, Object> model = Collections.unmodifiableMap(this.getErrorAttributes(request, this.isIncludeStackTrace(request, MediaType.TEXT_HTML)));
        response.setStatus(status.value());
        //去哪个页面作为错误页面,包含页面地址和页面内容
        ModelAndView modelAndView = this.resolveErrorView(request, response, status, model);
        return modelAndView != null ? modelAndView : new ModelAndView("error", model);
        /**
        	返回是空,即我们没有自己设置错误页面,就返回一个error视图,相关视图在
        	ErrorMvcAutoConfiguration下有设置
        **/
    }

    @RequestMapping
    //产生json类型的数据,其它客户端的请求到这里处理
    public ResponseEntity<Map<String, Object>> error(HttpServletRequest request) {
        HttpStatus status = this.getStatus(request);
        if (status == HttpStatus.NO_CONTENT) {
            return new ResponseEntity(status);
        } else {
            Map<String, Object> body = this.getErrorAttributes(request, this.isIncludeStackTrace(request, MediaType.ALL));
            return new ResponseEntity(body, status);
        }
    }
至于如何如何分辨的,我们可以在浏览器查看请求头

而在Http Client中我们可以看到请求头为

-
ErrorPageCustomizer
@Value("${error.path:/error}") private String path = "/error"; //系统出现错误以后来到error请求 -
DefaultErrorViewResolver
/** 以下为DefaultErrorViewResolver的方法 **/
public ModelAndView resolveErrorView(HttpServletRequest request, HttpStatus status, Map<String, Object> model) {
    ModelAndView modelAndView = this.resolve(String.valueOf(status.value()), model);
    if (modelAndView == null && SERIES_VIEWS.containsKey(status.series())) {
        modelAndView = this.resolve((String)SERIES_VIEWS.get(status.series()), model);
    }

    return modelAndView;
}

private ModelAndView resolve(String viewName, Map<String, Object> model) {
    //默认Spring Boot可以去找到一个页面,例如 error/404
    String errorViewName = "error/" + viewName;
    //如果模板引擎可以解析就用模板引擎解析
    TemplateAvailabilityProvider provider = this.templateAvailabilityProviders.getProvider(errorViewName, this.applicationContext);
    //模板引擎可以使用则返回到errorViewName指定的视图地址
    //模板引擎不可用就在静态资源文件夹下找到errorViewName对应的页面,error/404.html
    //然后返回产生一个ModelAndView对象
    return provider != null ? new ModelAndView(errorViewName, model) : this.resolveResource(errorViewName, model);
}
运行步骤
-
一旦出现4xx和5xx之类的错误,ErrorPageCustomizer就会生效(定制错误响应规则),就会来到/error请求,然后被BasicErrorController处理
-
响应页面:去哪个页面是由DefaultErrorViewResolver决定的,在resolveErrorView得到所有的errorViewResolvers的ModelAndView,而DefaultErrorViewResolver会得到一个默认的ModelAndView
响应数据:查看getErrorAttributes方法里的errorAttributes对象,可以发现ErrorAttributes是一个抽象类,而DefaultErrorAttributes正实现了它,所以我们查看ErrorMvcAutoConfiguration下的DefaultErrorAttributes组件
/** 以下为BasicErrorController类下的errorHtml方法里所使用的resolveErrorView方法 **/
protected ModelAndView resolveErrorView(HttpServletRequest request, HttpServletResponse response, HttpStatus status, Map<String, Object> model) {
    Iterator var5 = this.errorViewResolvers.iterator();

    ModelAndView modelAndView;
    //所有的errorViewResolvers得到ModelAndView
    do {
        if (!var5.hasNext()) {
            return null;
        }

        ErrorViewResolver resolver = (ErrorViewResolver)var5.next();
        modelAndView = resolver.resolveErrorView(request, status, model);
    } while(modelAndView == null);
    //模板引擎和静态资源文件夹下都没有文件,即我们没有自己设置错误页面的情况下,就返回空

 return modelAndView;
}
/** 以下为BasicErrorController类下的errorHtml方法里所使用的getErrorAttributes方法 **/
protected Map<String, Object> getErrorAttributes(HttpServletRequest request, boolean includeStackTrace) {
    WebRequest webRequest = new ServletWebRequest(request);
    return this.errorAttributes.getErrorAttributes(webRequest, includeStackTrace);
}
7.2、定制自己的错误处理页面和数据
如何定制自己的错误页面和页面的错误信息
-
有模板引擎情况下,就创建error/
状态码.html,例如 error/404.html,要想匹配状态码4xx或者5xx,就在error文件夹下创建4xx.html或者5xx.html,注意有精确匹配的情况下,即有404.html和4xx.html发生404错误会来到404.html页面能获取的信息,可以查看DefaultErrorAttributes组件,获取信息例子如下
<p>status:[[${status}]]</p> <p>timestamp:[[${timestamp}]]</p> -
没有模板引擎的情况下(模板引擎找不到这个错误页面),在静态资源文件夹下找
-
模板引擎和静态资源文件夹下都没有就来到Spring Boot默认的空白页面
如何定制错误的json信息
-
首先我们可以创建一个自己的异常类,例如
//为了异常能够抛出,继承运行时异常(RuntimeException)
public class DataNullException extends RuntimeException{
    public DataNullException() {
        super("数据空异常");
    }
}
再创建一个增强Controller(@ControllerAdvice)配合@ExceptionHandler来处理异常
@ControllerAdvice
public class MyExceptionHandler {

    @ResponseBody
    @ExceptionHandler(DataNullException.class)
    public Map<String, Object> errorException(Exception e){
        Map<String, Object> map = new HashMap<>();
        map.put("code", "Data Null");
        map.put("message", e.getMessage());
        return map;
    }
}
但是这样无论是浏览器访问还是客户端访问都只返回json字符串,注意要在配置文件加上下面的配置才能获取Exception信息
server.error.include-exception=true -
我们希望能够有自适应效果,在不改变原来json数据的同时往里面添加数据
@Component
//继承DefaultErrorAttributes,重写getErrorAttributes方法
public class MyErrorAttributes extends DefaultErrorAttributes {

    //保证能够得到自定义的exception,默认为false
    public MyErrorAttributes(){
        super(true);
    }
    @Override
    public Map<String, Object> getErrorAttributes(WebRequest webRequest, boolean includeStackTrace) {
        Map<String, Object> map = super.getErrorAttributes(webRequest, includeStackTrace);
        //得到父类里的数据
        map.put("code", "Data Null");
        map.put("message", "cs");
        Map<String, Object> ceshi = (Map<String, Object>) webRequest.getAttribute("ceshi", 0);
        map.put("ceshi", ceshi);
        //将我们自己的数据与源数据合并
        return map;
    }
}


@ControllerAdvice
public class MyExceptionHandler {

    @ExceptionHandler(DataNullException.class)
    public String errorException(Exception e, HttpServletRequest httpServletRequest){
        Map<String, Object> map = new HashMap<>();
        httpServletRequest.setAttribute("javax.servlet.error.status_code", "500");
        //设置状态码
        map.put("code", "Data Null");
        map.put("message", e.getMessage());
        httpServletRequest.setAttribute("ceshi", map);
        //携带数据
        return "/forward:/error";
		//转发到/error
    }
}


 637
637


 被折叠的 条评论
为什么被折叠?
被折叠的 条评论
为什么被折叠?
 到【灌水乐园】发言


