


写在前面:各位看到此博客的小伙伴,如有不对的地方请及时通过私信我或者评论此博客的方式指出,以免误人子弟。多谢!如果我的博客对你有帮助,欢迎进行评论✏️✏️、点赞👍👍、收藏⭐️⭐️,满足一下我的虚荣心💖🙏🙏🙏 。
前面几篇已经搭建好了授权服务uaa和资源服务product,并且也测试过了客户端模式、密码模式,还使用了JWT模式来授权认证,但是还没有记录另外两种模式,这里统一记录一下OAuth2的四种授权模式。
目录
环境搭建
新建oauth2服务,引入如下依赖:
        <dependency>
            <groupId>com.alibaba.cloud</groupId>
            <artifactId>spring-cloud-starter-alibaba-nacos-discovery</artifactId>
        </dependency>
        <dependency>
            <groupId>org.springframework.cloud</groupId>
            <artifactId>spring-cloud-starter-oauth2</artifactId>
        </dependency>
        <dependency>
            <groupId>org.springframework.cloud</groupId>
            <artifactId>spring-cloud-starter-security</artifactId>
        </dependency>
        <dependency>
            <groupId>org.springframework.boot</groupId>
            <artifactId>spring-boot-starter-web</artifactId>
        </dependency>
        <dependency>
            <groupId>org.springframework.boot</groupId>
            <artifactId>spring-boot-starter-actuator</artifactId>
        </dependency>
        <dependency>
            <groupId>mysql</groupId>
            <artifactId>mysql-connector-java</artifactId>
        </dependency>
        <dependency>
            <groupId>com.alibaba</groupId>
            <artifactId>druid-spring-boot-starter</artifactId>
        </dependency>
        <dependency>
            <groupId>org.springframework.boot</groupId>
            <artifactId>spring-boot-starter-jdbc</artifactId>
        </dependency>
        <dependency>
            <groupId>org.springframework.boot</groupId>
            <artifactId>spring-boot-starter-test</artifactId>
            <scope>test</scope>
        </dependency>
        <dependency>
            <groupId>org.projectlombok</groupId>
            <artifactId>lombok</artifactId>
        </dependency>
        <dependency>
            <groupId>com.alibaba</groupId>
            <artifactId>fastjson</artifactId>
        </dependency>
        <dependency>
            <groupId>com.baomidou</groupId>
            <artifactId>mybatis-plus-boot-starter</artifactId>
        </dependency>
Web安全配置
@Configuration
@EnableWebSecurity
@EnableGlobalMethodSecurity(prePostEnabled = true)
public class WebSecurityConfig extends WebSecurityConfigurerAdapter {

    @Bean
    public PasswordEncoder passwordEncoder() {
        return new BCryptPasswordEncoder();
    }

    @Override
    @Bean
    public AuthenticationManager authenticationManagerBean() throws Exception {
        return super.authenticationManagerBean();
    }

    @Override
    public void configure(HttpSecurity http) throws Exception {
        http.authorizeRequests()
                .antMatchers("/admin").hasAuthority("admin")
                .antMatchers("/common").permitAll()
                .anyRequest().authenticated()
                .and().formLogin()
                .and().csrf().disable();
    }

    @Autowired
    public void globalUserDetails(AuthenticationManagerBuilder auth) throws Exception {
        auth.inMemoryAuthentication()
                .withUser("zhangsan")
                .password(passwordEncoder().encode("123456"))
                .roles("common");
    }

}
授权服务器配置
配置客户端信息
这里为了快速的将整个流程记录完整,客户端信息及后面用到的用户信息都存在内存中。
    @Override
    public void configure(ClientDetailsServiceConfigurer clients) throws Exception {
        clients.inMemory()
                .withClient("dev-client")
                .secret(new BCryptPasswordEncoder().encode("123456"))
                // 资源列表
                .resourceIds("product-service")
                // 此客户端允许的授权类型
                .authorizedGrantTypes("authorization_code","client_credentials", "password","implicit","refresh_token")
                // 用来限制客户端的访问范围 如果为空(默认) 那么客户端拥有全部的访问范围
                .scopes("all")
                // 跳转到授权页面
                .autoApprove(false)
                // 验证回调地址
                .redirectUris("https://www.baidu.com");
    }
配置令牌管理器
    @Bean
    public AuthorizationServerTokenServices tokenServices() {
        DefaultTokenServices tokenServices = new DefaultTokenServices();
        tokenServices.setSupportRefreshToken(true);
        tokenServices.setTokenStore(tokenStore());
        // 有效期10秒
        tokenServices.setAccessTokenValiditySeconds(10);
        // 刷新令牌默认有效期3天
        tokenServices.setRefreshTokenValiditySeconds(10);
        return tokenServices;
    }

    @Bean
    public TokenStore tokenStore() {
        return new InMemoryTokenStore();
    }
配置令牌访问端点
    @Autowired
    private AuthenticationManager authenticationManager;
    @Autowired
    private AuthorizationCodeServices authorizationCodeServices;

    @Override
    public void configure(AuthorizationServerEndpointsConfigurer endpoints) throws Exception {
        endpoints.allowedTokenEndpointRequestMethods(HttpMethod.GET, HttpMethod.POST);
        // 密码模式需要
        endpoints.authenticationManager(authenticationManager);
        // 授权码模式需要
        endpoints.authorizationCodeServices(authorizationCodeServices());
        // 令牌管理服务
        endpoints.tokenServices(tokenServices());

    }

    @Bean
    public AuthorizationCodeServices authorizationCodeServices() {
        return new InMemoryAuthorizationCodeServices();
    }
配置令牌端点的安全约束
    @Override
    public void configure(AuthorizationServerSecurityConfigurer security) throws Exception {
        security.allowFormAuthenticationForClients();
        security.checkTokenAccess("permitAll()");
        security.tokenKeyAccess("permitAll()");
    }
四种授权模式
授权码模式
步骤一
申请授权码,资源拥有者打开客户端,客户端要求资源拥有者给预授权,它将浏览器重定向到授权服务器,重定向时会附加客户端的身份信息,如:
参数列表如下:
- client_id:客户端标识。
- response_code:授权码模式固定为code。
- scope:客户端权限范围。
- redirect_uri:跳转uri,当授权码申请成功后会跳转到此地址,并在后边带上code参数。
步骤二
浏览器出现向授权服务器授权页面,之后用户同意授权。
步骤三
授权服务器将授权码经浏览器发送给client(通过redirect_uri)。
步骤四
客户端拿着授权码想授权服务器申请token,请求如下:
参数列表如下:
- client_id:客户端标识。
- client_secret:客户端密钥。
- grant_type:授权类型,填写authorization_code。
- code:授权码,授权码只使用一次就失效。
- redirect_uri:申请授权码时的跳转url。
步骤五
授权服务器返回令牌(access_token)。
这种模式是四种模式中最安全的,一般用于client是Web服务器端应用或第三方App调用资源服务的时候,因为在这种模式中access_token不经过浏览器或者移动端的App,而是直接从服务端去交换,这样就最大限度的减少了令牌泄露的风险。
测试
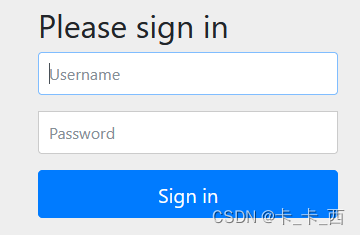
浏览器访问认证页面,如下:
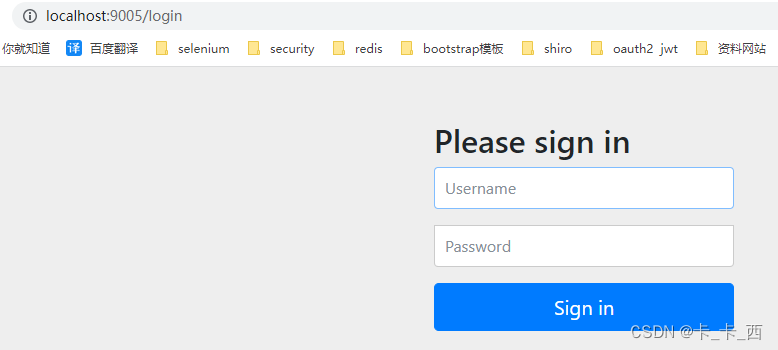
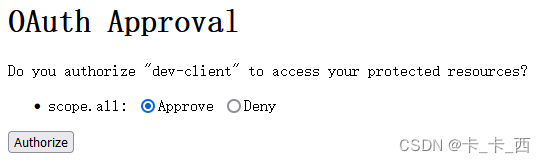
输入账号:zhangsan 密码:123456,登录进入授权页面:
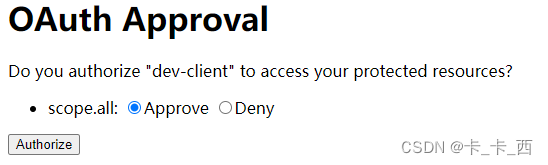
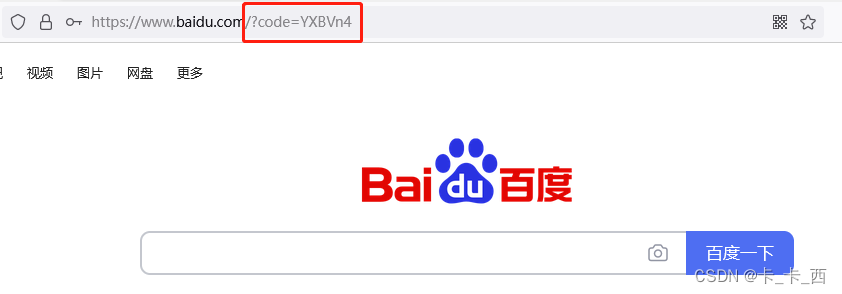
确认授权后,浏览器会重定向到指定路径并附加验证码,code每次都不一样,最后使用该code获取token。
使用该code申请令牌,如下:
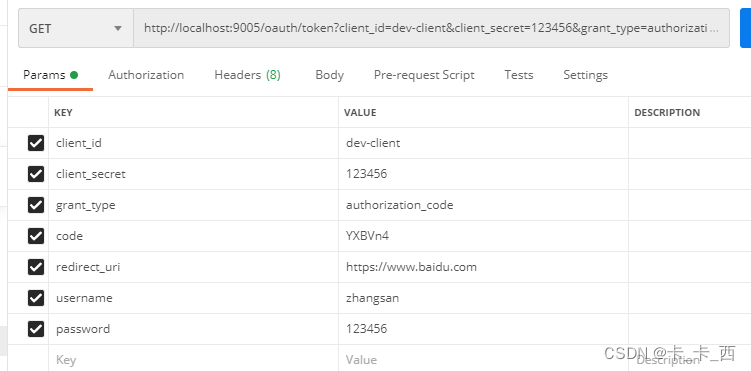
上面的username和password带不带都可以,返回结果如下:
{
"access_token": "31482019-12af-47d7-be87-a9db014e5ac0",
"token_type": "bearer",
"refresh_token": "b1a28869-e0b8-4825-8158-9454acd233b6",
"expires_in": 9,
"scope": "all"
}
可能你会遇到返回没有refresh_token的情况,检查看下客户端配置authorizedGrantTypes是否支持refresh_token,我上面配置了才会返回,如下:
.authorizedGrantTypes("authorization_code", "client_credentials", "password", "implicit", "refresh_token")简化模式
步骤一
资源拥有者打开客户端,客户端要求资源拥有者给预授权,它将浏览器重定向到授权服务器,重定向时会附加客户端的身份信息,如:
参数同授权码模式,将response_type改为token即可。
步骤二
浏览器出现向授权服务器授权页面,之后用户同意授权。
步骤三
授权服务器将授权码和令牌到重定向uri之后。
测试
浏览器访问认证页面:
输入账号:zhangsan 密码:123456,登录进入授权页面:
确认授权后,浏览器会重定向到指定的redirect_uri路径,并将token存放在uri路径之后。

密码模式
步骤一
资源拥有者将用户名、密码发送给客户端。
步骤二
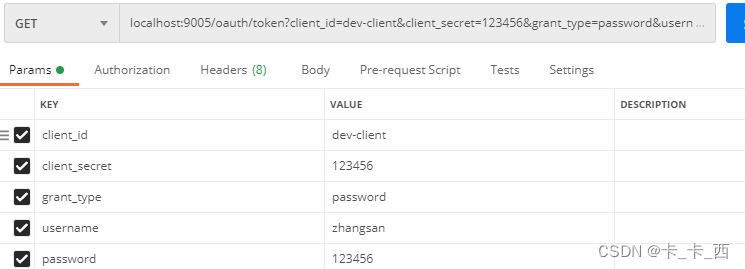
客户端拿着资源拥有者的用户名、密码向授权服务器请求令牌,如下:
localhost:9005/oauth/token?client_id=dev-client&client_secret=123456&grant_type=password&scopes=all&username=zhangsan&password=123456
参数列表如下:
- client_id:客户端标识。
- client_secret:客户端密钥。
- grant_type:授权类型,填写password。
- username:资源拥有者用户名。
- password:资源拥有者密码。
步骤三
授权服务器将令牌发送给client。
这种模式十分简单,但直接将用户敏感信息泄露给了client,因此这就说明这种模式只能用于client是我们自己开发的情况下。
测试
请求令牌,如下:
返回如下:
{
"access_token": "3c79f517-b725-48cc-a7b2-98613909b43a",
"token_type": "bearer",
"expires_in": 9,
"scope": "all"
}
客户端模式
步骤一
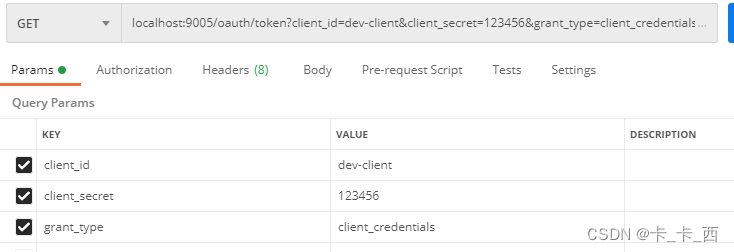
客户端向授权服务器发送自己的身份信息,并请求令牌。
步骤二
确认客户端身份无误后,将令牌发送给client,请求如下:
localhost:9005/oauth/token?client_id=dev-client&client_secret=123456&grant_type=client_credentials&scopes=all
参数列表如下:
- client_id:客户端标识。
- client_secret:客户端密钥。
- grant_type:授权类型,填写client_credentials。
这种模式是最方便但最不安全的模式。
因此这就要求我们对client完全信任,而client本身也是安全的,因此这种模式一般用来提供给我们完全信任的服务端使用。
测试
请求令牌,如下:
返回如下:
{
"access_token": "3f064d7b-aaeb-4d7f-a7e8-e9b8a3aa627a",
"token_type": "bearer",
"expires_in": 9,
"scope": "all"
}
完整代码
授权服务
@EnableAuthorizationServer
@Configuration
public class AuthorizationServer extends AuthorizationServerConfigurerAdapter {

    @Autowired
    private TokenStore tokenStore;
    @Autowired
    private AuthenticationManager authenticationManager;

    @Override
    public void configure(ClientDetailsServiceConfigurer clients) throws Exception {
        clients.inMemory()
                .withClient("dev-client")
                .secret(new BCryptPasswordEncoder().encode("123456"))
                // 资源列表
                .resourceIds("product-service")
                // 此客户端允许的授权类型
                .authorizedGrantTypes("authorization_code", "client_credentials", "password", "implicit", "refresh_token")
                // 用来限制客户端的访问范围 如果为空(默认) 那么客户端拥有全部的访问范围
                .scopes("all")
                // 跳转到授权页面
                .autoApprove(false)
                // 验证回调地址
                .redirectUris("https://www.baidu.com");
//        clients.withClientDetails(clientDetails());
    }

    @Override
    public void configure(AuthorizationServerEndpointsConfigurer endpoints) throws Exception {
        endpoints.allowedTokenEndpointRequestMethods(HttpMethod.GET, HttpMethod.POST);
        // 密码模式需要
        endpoints.authenticationManager(authenticationManager);
        // 授权码模式需要
        endpoints.authorizationCodeServices(authorizationCodeServices());
        // 令牌管理服务
        endpoints.tokenServices(tokenServices());

    }

    @Override
    public void configure(AuthorizationServerSecurityConfigurer security) throws Exception {
        security.allowFormAuthenticationForClients();
        security.checkTokenAccess("permitAll()");
        security.tokenKeyAccess("permitAll()");
    }

    @Bean
    public AuthorizationServerTokenServices tokenServices() {
        DefaultTokenServices tokenServices = new DefaultTokenServices();
        tokenServices.setSupportRefreshToken(true);
        tokenServices.setTokenStore(tokenStore);
        // 有效期10秒
        tokenServices.setAccessTokenValiditySeconds(10);
        // 刷新令牌默认有效期3天
        tokenServices.setRefreshTokenValiditySeconds(10);
        return tokenServices;
    }

    @Bean
    public AuthorizationCodeServices authorizationCodeServices() {
        return new InMemoryAuthorizationCodeServices();
    }

}
Web安全
@Configuration
@EnableWebSecurity
@EnableGlobalMethodSecurity(prePostEnabled = true)
public class WebSecurityConfig extends WebSecurityConfigurerAdapter {

    @Bean
    public PasswordEncoder passwordEncoder() {
        return new BCryptPasswordEncoder();
    }

    @Override
    @Bean
    public AuthenticationManager authenticationManagerBean() throws Exception {
        return super.authenticationManagerBean();
    }

    @Override
    public void configure(WebSecurity web) throws Exception {
        web.ignoring().antMatchers("/ignore");
    }

    @Override
    public void configure(HttpSecurity http) throws Exception {
        http.authorizeRequests()
                .antMatchers("/admin").hasAuthority("admin")
                .antMatchers("/common").permitAll()
                .anyRequest().authenticated()
                .and().formLogin()
                .and().csrf().disable();
    }

    @Autowired
    public void globalUserDetails(AuthenticationManagerBuilder auth) throws Exception {
        auth.inMemoryAuthentication()
                .withUser("zhangsan")
                .password(passwordEncoder().encode("123456"))
                .roles("common");
    }

}
Token配置
@Configuration
public class TokenConfig {

    @Bean
    public TokenStore tokenStore() {
        return new InMemoryTokenStore();
    }

}


 2741
2741


 被折叠的 条评论
为什么被折叠?
被折叠的 条评论
为什么被折叠?
 到【灌水乐园】发言


