


本文转载自:http://blog.csdn.net/pucker/article/details/7634479
UIView类中定义了三个属性,分别是frame、bounds与center属性:
@property(nonatomic) CGRect frame;
@property(nonatomic) CGRect bounds;
@property(nonatomic) CGPoint center;
在详细介绍这三个属性之前,我们应该知道UIKit中的坐标系X轴正方向为水平向右,Y轴正方向为竖直向下。
frame属性指的是视图在其父视图坐标系中的位置与尺寸。在创建视图时,我们就需要在初始化方法中指定视图的frame:
- (id)initWithFrame:(CGRect)frame; 这样创建了视图之后,通过addSubview:方法就可以将创建的子视图放置在父视图的指定位置,并以指定的尺寸显示出来。
center属性理解起来也很简单,它就是视图的中心点在其父视图坐标系中的位置坐标。简单讲,center属性就定义了当前视图在父视图中的位置。
那么bounds属性呢?它指的是视图在其自己的坐标系中的位置与尺寸。
- (BOOL)application:(UIApplication *)application didFinishLaunchingWithOptions:(NSDictionary *)launchOptions
{
    self.window = [[UIWindow alloc] initWithFrame:[[UIScreen mainScreen] bounds]];
    // Override point for customization after application launch.
    self.window.backgroundColor = [UIColor whiteColor];

    UIView* testView = [[UIView alloc] initWithFrame:CGRectMake(50, 50, 100, 100)];
    testView.backgroundColor = [UIColor redColor];
    [self.window addSubview:testView];

    NSLog(@"Frame: (%.2f, %.2f, %.2f, %.2f)", testView.frame.origin.x, testView.frame.origin.y, testView.frame.size.width, testView.frame.size.height);
    NSLog(@"Bounds: (%.2f, %.2f, %.2f, %.2f)", testView.bounds.origin.x, testView.bounds.origin.y, testView.bounds.size.width, testView.bounds.size.height);
    NSLog(@"Center: (%.2f, %.2f)", testView.center.x, testView.center.y);

    [self.window makeKeyAndVisible];
    return YES;
}
输出:
Frame: (50.00, 50.00, 100.00, 100.00)
Bounds: (0.00, 0.00, 100.00, 100.00)
Center: (100.00, 100.00)
运行界面:
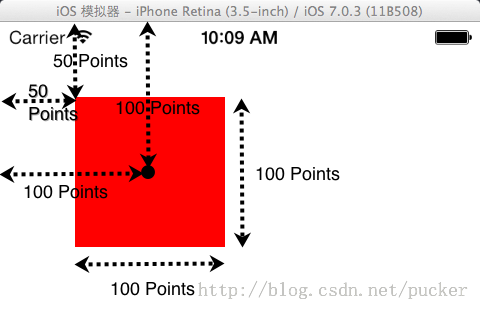
由于视图的定位一定需要针对父视图,而不是针对自己,所以bounds属性并不能够决定当前视图的位置(因为它与父视图根本无关,就谈不上定位),所以bounds属性与center属性是完全独立的,前者规定尺寸,后者定义位置。换句话说,修改bounds不影响center;修改center不影响bounds。(《iOS应用程序开发方法与实践》中讲到当修改bounds时center会更改,这是一个错误。特附此文。)
默认情况下,当视图创建后,其自己的坐标系原点(0, 0)位于其左上角位置。不过,本地原点位置是会随时发生变化的。例如将bounds由最初的(0, 0, 100, 100)修改为(50, 50, 100, 100),则意味着本地原点向左向上移动了50。由于位置和尺寸都未发生变化,所以frame属性与center属性不变。在[self.window makeKeyAndVisible];语句之前加入下面的代码:
NSLog(@"Modify Bounds to (50, 50, 100, 100)");
testView.bounds = CGRectMake(50, 50, 100, 100);
NSLog(@"Frame: (%.2f, %.2f, %.2f, %.2f)", testView.frame.origin.x, testView.frame.origin.y, testView.frame.size.width, testView.frame.size.height);
NSLog(@"Bounds: (%.2f, %.2f, %.2f, %.2f)", testView.bounds.origin.x, testView.bounds.origin.y, testView.bounds.size.width, testView.bounds.size.height);
NSLog(@"Center: (%.2f, %.2f)", testView.center.x, testView.center.y);
输出:
Modify Bounds to (50, 50, 100, 100)
Frame: (50.00, 50.00, 100.00, 100.00)
Bounds: (50.00, 50.00, 100.00, 100.00)
Center: (100.00, 100.00)
运行界面依然是图1。
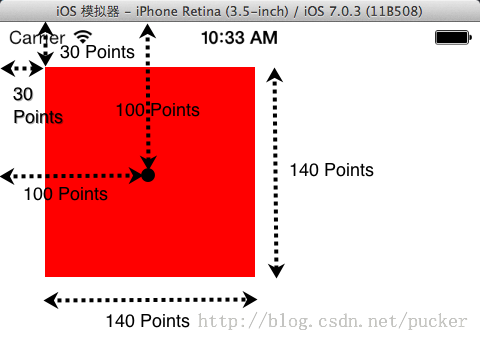
再例如将bounds由最初的(0, 0, 100, 100)修改为(0, 0, 140, 140),则本地原点向左向上移动20。frame属性变为(30, 30, 140, 140),center属性不变,仍然是(100, 100)。
NSLog(@"Modify Bounds to (0, 0, 140, 140)");
testView.bounds = CGRectMake(0, 0, 140, 140);
NSLog(@"Frame: (%.2f, %.2f, %.2f, %.2f)", testView.frame.origin.x, testView.frame.origin.y, testView.frame.size.width, testView.frame.size.height);
NSLog(@"Bounds: (%.2f, %.2f, %.2f, %.2f)", testView.bounds.origin.x, testView.bounds.origin.y, testView.bounds.size.width, testView.bounds.size.height);
NSLog(@"Center: (%.2f, %.2f)", testView.center.x, testView.center.y);
输出:
Modify Bounds to (0, 0, 140, 140)
Frame: (30.00, 30.00, 140.00, 140.00)
Bounds: (0.00, 0.00, 140.00, 140.00)
Center: (100.00, 100.00)
运行界面:
现在我们把testView改回为最初的状态,并在其中添加一个子视图greenView。
- (BOOL)application:(UIApplication *)application didFinishLaunchingWithOptions:(NSDictionary *)launchOptions
{
    self.window = [[UIWindow alloc] initWithFrame:[[UIScreen mainScreen] bounds]];
    // Override point for customization after application launch.
    self.window.backgroundColor = [UIColor whiteColor];

    UIView* testView = [[UIView alloc] initWithFrame:CGRectMake(50, 50, 100, 100)];
    testView.backgroundColor = [UIColor redColor];
    [self.window addSubview:testView];

    UIView* greenView = [[UIView alloc] initWithFrame:CGRectMake(30, 30, 80, 80)];
    greenView.backgroundColor = [UIColor greenColor];
    [testView addSubview:greenView];

    NSLog(@"testView Frame: (%.2f, %.2f, %.2f, %.2f)", testView.frame.origin.x, testView.frame.origin.y, testView.frame.size.width, testView.frame.size.height);
    NSLog(@"testView Bounds: (%.2f, %.2f, %.2f, %.2f)", testView.bounds.origin.x, testView.bounds.origin.y, testView.bounds.size.width, testView.bounds.size.height);
    NSLog(@"testView Center: (%.2f, %.2f)", testView.center.x, testView.center.y);

    NSLog(@"greenView Frame: (%.2f, %.2f, %.2f, %.2f)", greenView.frame.origin.x, greenView.frame.origin.y, greenView.frame.size.width, greenView.frame.size.height);
    NSLog(@"greenView Bounds: (%.2f, %.2f, %.2f, %.2f)", greenView.bounds.origin.x, greenView.bounds.origin.y, greenView.bounds.size.width, greenView.bounds.size.height);
    NSLog(@"greenView Center: (%.2f, %.2f)", greenView.center.x, greenView.center.y);

    [self.window makeKeyAndVisible];
    return YES;
}
输出:
testView Frame: (50.00, 50.00, 100.00, 100.00)
testView Bounds: (0.00, 0.00, 100.00, 100.00)
testView Center: (100.00, 100.00)
greenView Frame: (30.00, 30.00, 80.00, 80.00)
greenView Bounds: (0.00, 0.00, 80.00, 80.00)
greenView Center: (70.00, 70.00)
界面:
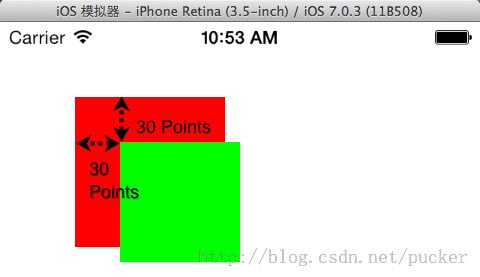
图3
然后在[self.window makeKeyAndVisible];语句之前加入下面的代码,将testView的bounds改为(50, 50, 100, 100):
NSLog(@"Modify testView Bounds to (50, 50, 100, 100)");
testView.bounds = CGRectMake(50, 50, 100, 100);
NSLog(@"testView Frame: (%.2f, %.2f, %.2f, %.2f)", testView.frame.origin.x, testView.frame.origin.y, testView.frame.size.width, testView.frame.size.height);
NSLog(@"testView Bounds: (%.2f, %.2f, %.2f, %.2f)", testView.bounds.origin.x, testView.bounds.origin.y, testView.bounds.size.width, testView.bounds.size.height);
NSLog(@"testView Center: (%.2f, %.2f)", testView.center.x, testView.center.y);

NSLog(@"greenView Frame: (%.2f, %.2f, %.2f, %.2f)", greenView.frame.origin.x, greenView.frame.origin.y, greenView.frame.size.width, greenView.frame.size.height);
NSLog(@"greenView Bounds: (%.2f, %.2f, %.2f, %.2f)", greenView.bounds.origin.x, greenView.bounds.origin.y, greenView.bounds.size.width, greenView.bounds.size.height);
NSLog(@"greenView Center: (%.2f, %.2f)", greenView.center.x, greenView.center.y);
输出:
testView Frame: (50.00, 50.00, 100.00, 100.00)
testView Bounds: (0.00, 0.00, 100.00, 100.00)
testView Center: (100.00, 100.00)
greenView Frame: (30.00, 30.00, 80.00, 80.00)
greenView Bounds: (0.00, 0.00, 80.00, 80.00)
greenView Center: (70.00, 70.00)
Modify testView Bounds to (50, 50, 100, 100)
testView Frame: (50.00, 50.00, 100.00, 100.00)
testView Bounds: (50.00, 50.00, 100.00, 100.00)
testView Center: (100.00, 100.00)
greenView Frame: (30.00, 30.00, 80.00, 80.00)
greenView Bounds: (0.00, 0.00, 80.00, 80.00)
greenView Center: (70.00, 70.00)
界面:

图4
由于testView自己坐标的原点被移动到了屏幕的左上角位置,所以greenView在界面上的位置也相应发生了变化。所以,当修改了视图自身的原点位置时,不会影响其自身的位置,而会影响到其子视图的位置。


 290
290


 被折叠的 条评论
为什么被折叠?
被折叠的 条评论
为什么被折叠?
 到【灌水乐园】发言


