


一、Java线程概述
进程:进程就是在操作系统中运行的程序。
线程:线程就是进程的一个执行单元, 或者一条执行路径。
启动迅雷应用程序,就是打开一个进程, 在该软件中可以同时下载多部电影, 每部电影的下载就是一个线程。
一个进程至少有一个线程, 如果这个进程有多个线程,称该进程为多线程应用程序。
进程中的多个线程是相互独立的, 每个线程都有它自己的线程栈。

主线程:JVM启动主线程,主线程运行main方法
用户线程:用户开启的新的线程, 也称子线程
守护线程:
守护线程是为其他线程提供服务的线程,也叫后台线程. JVM中垃圾回收器就是一个守护线程。
守护线程不能单独运行, 当JVM中只有守护线程时, JVM会退出。
二、创建线程的两种方式:
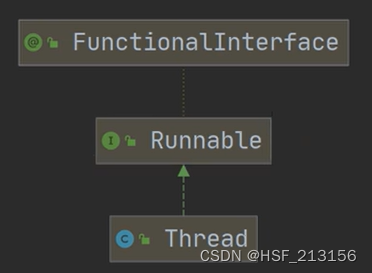
1、继承Thread类,重run方法:
package Thread;/*
 * @author HSF
 * @version 8.0
 */

public class Thread01 {
    public static void main(String[] args) throws InterruptedException {
        Cat cat = new Cat();
        cat.start(); // 启动线程,最终执行run方法
//      cat.run();  为什么不直接调用run方法:这样不会开启线程,只是普通方法的调用
// 普通方法的调用:必须等到run方法执行完毕才会继续向下执行,而不是和线程一样交替执行。

        // 当前线程是main线程
        for (int i = 0; i < 10; i++) {
            System.out.println("main线程" + i);
            Thread.sleep(1000);  // 抛出异常快捷键:alt+enter
        }

        /*
         * 每次运行程序, 运行的结果可能不一样
         * 运行程序后, 当前程序就有两个线程main线程和cat线程在同时执行, 这两个线程中哪个线程抢到CPU执行权, 这个线程就执行
         *
         * 在单核CPU中, 在某一时刻CPU只能执行一个任务, 因为CPU执行速度非常快, 可以在各个线程之间进行快速切换
         * 对于用户来说, 感觉是多个线程在同时执行
         *
         */
    }
}

/*
1、当一个类继承了Thread类,该类就可以当做线程使用。
2、我们会重写run方法,在里面写上自己的业务代码。
3、该run方法时Runnable接口中的。
* */
class Cat extends Thread {
    @Override
    public void run() { // 每隔一秒钟输出一句话。
        int times = 0;
        while (true) {
            System.out.println("hello word" + times++);
            try {
                Thread.sleep(1000); // 使用sleep会有异常
            } catch (InterruptedException e) {
                e.printStackTrace();
            }
            if (times == 8) {
                break;
            }
        }
    }
}
2、实现Runnable接口,重写run方法:

package Thread;/*
 * @author HSF
 * @version 8.0
 */

import com.sun.xml.internal.ws.runtime.config.TubelineFeatureReader;

public class Runnable_ {
    public static void main(String[] args) {
        Dog dog = new Dog();
        //dog.start(); Runnable里面没有start()方法
        // 创建了Thread对象,将dog对象(实现runnable),放入thread
        Thread thread = new Thread(dog); // 底层使用了代理模式(静态代理)
        thread.start();
    }
}

class Dog implements Runnable {
    int times = 0;
    @Override
    public void run() {
        while (true) {
            System.out.println("小狗汪汪叫..." + (++times));
            try {
                Thread.sleep(1000);
            } catch (InterruptedException e) {
                e.printStackTrace();
            }
            if (times == 8) {
                break;
            }
        }
    }
}
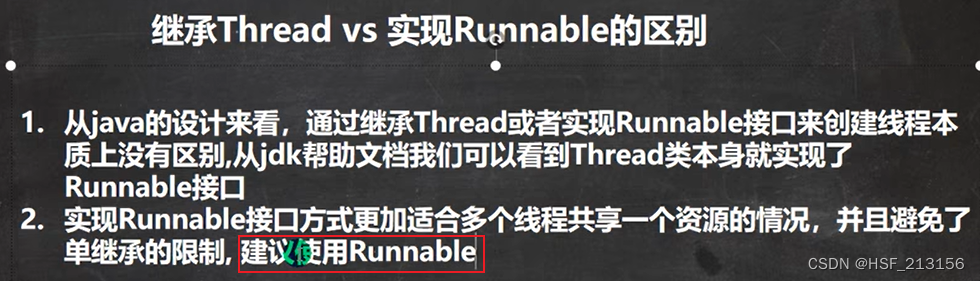
3、两者比较:
三、线程终止:
1、通知方式
通过控制loop变量方式退出run方法
package Thread.exit_;/*
 * @author HSF
 * @version 8.0
 */

public class ThreadExit {
    public static void main(String[] args) throws InterruptedException {
        T t = new T();
        t.start();

        // 希望主线程可以控制t线程的终止,必须修改loop
        // 让线程t退出run方法,从而终止线程的运行:通知方式。
        // 让主线程休眠10秒再通知,让线程退出。
        Thread.sleep(10000); // 抛出异常快捷键:alt+enter
        t.setLoop(false);
    }
}

class T extends Thread {
    private int count = 0;
    // 设置一个控制变量
    private boolean loop = true;
    @Override
    public void run() {
        while (loop) {
            try {
                Thread.sleep(50);  // 让当前线程休眠50ms
            } catch (InterruptedException e) {
                e.printStackTrace();
            }
            System.out.println("hello Word" + (++count));
        }
    }
    // 使用setLoop方法
    public void setLoop(boolean loop) {
        this.loop = loop;
    }
}
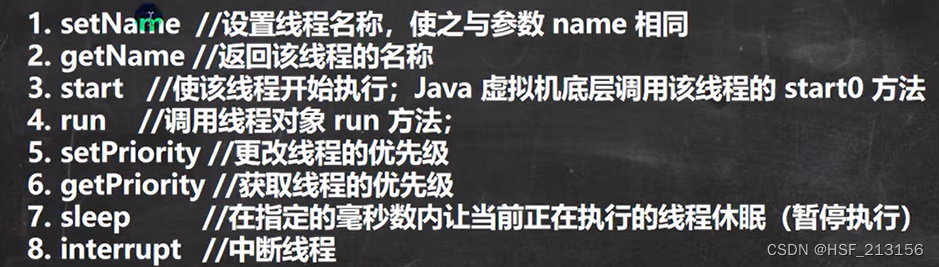
四、线程方法:
1、常用线程方法。
package Thread;/*
 * @author HSF
 * @version 8.0
 */

public class Method_ {
    public static void main(String[] args) throws InterruptedException {
        T t = new T();
        // 1、设置线程
        t.setName("Thread01");
        // 2、设置线程优先级
        t.setPriority(Thread.MAX_PRIORITY);
        // 3、启动线程
        t.start();

        for (int i = 0; i < 5; i++) {
            Thread.sleep(1000);
            System.out.println("hi" + i);
        }

        t.interrupt(); // 将休眠中的线程唤醒


    }
}

class T extends Thread {
    @Override
    public void run() {
        while (true) {
            for (int i = 0; i < 100; i++) {
                // 获取线程名称
                System.out.println(Thread.currentThread().getName() + "吃包子。。。");
            }
            try {
                System.out.println(Thread.currentThread().getName() + "休眠中.....");
                Thread.sleep(10000);
            } catch (InterruptedException e) {  // InterruptedException:捕获到一个中断异常
                // 当线程执行到一个interrupt 方法时,就会catch一个异常
                System.out.println(Thread.currentThread().getName() + "被唤醒了");
            }
        }
    }
}

2、线程礼让、线程插队。

package Thread;/*
 * @author HSF
 * @version 8.0
 */

public class Join {
    public static void main(String[] args) throws InterruptedException {
        Son son = new Son();
        son.start();

        for (int i = 0; i < 10; i++) {
            Thread.sleep(1000);
            System.out.println("主线程在吃第" + i + "个包子");
            if (i == 5) {
                System.out.println("主线程让子线程先吃");
                son.join();  // 线程插队,一定可以插队成功
                // son.yield(); // 线程礼让,不一定成功
                System.out.println("子线程吃完了,主线程开始吃了");

            }
        }
    }
}

class Son extends Thread {
    @Override
    public void run() {
        for (int i = 0; i < 10; i++) {
            try {
                Thread.sleep(1000);
            } catch (InterruptedException e) {

            }
            System.out.println("子线程在吃第" + i + "个包子");
        }
    }
}
作业:
package Thread;/*
 * @author HSF
 * @version 8.0
 */

public class HomeWork02 {
    public static void main(String[] args) throws InterruptedException {
//        T3 t = new T3();
        Thread t3 = new Thread(new T3());
        for (int i = 0; i < 10; i++) {
            Thread.sleep(1000);
            System.out.println("hi");
            if (i == 5) {
                t3.start();
                t3.join();
            }
        }
    }
}

class T3 implements Runnable {
    @Override
    public void run() {
        for (int i = 0; i < 10; i++) {
            try {
                Thread.sleep(1000);
            } catch (InterruptedException e) {
                e.printStackTrace();
            }
            System.out.println("hello");
        }
    }
}
3、用户线程和守护线程:

如何设置守护线程:
package Thread;/*
 * @author HSF
 * @version 8.0
 */

public class Daemon_ {
    public static void main(String[] args) throws InterruptedException {
        T4 t4 = new T4();
        // 如果想让main线程结束后子线程也结束,将子线程设置为守护线程
        t4.setDaemon(true);
        t4.start();
        for (int i = 0; i < 10; i++) {
            Thread.sleep(1000);
            System.out.println("hi");
        }
    }
}

class T4 extends Thread {
    @Override
    public void run() {
        for (; ;) {
            try {
                Thread.sleep(1000);
            } catch (InterruptedException e) {
                e.printStackTrace();
            }
            System.out.println("helloWord");
        }
    }
}
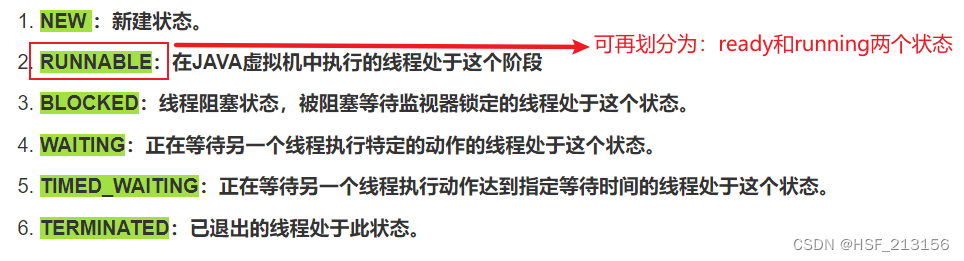
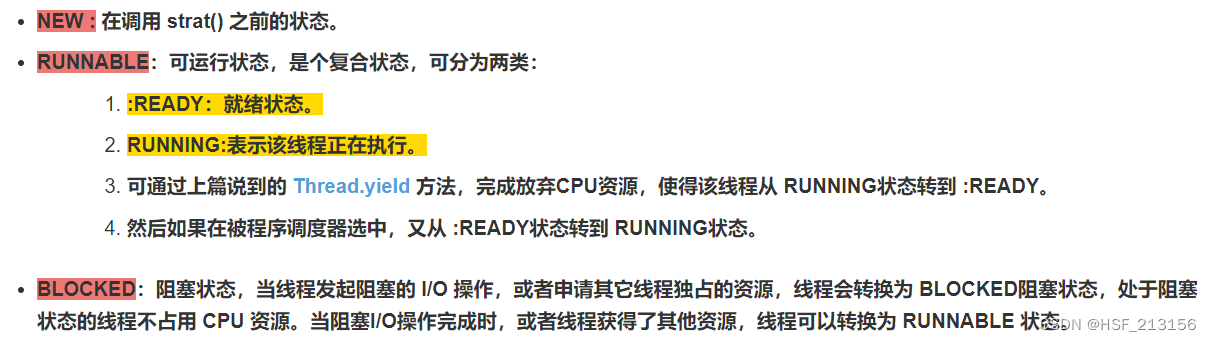
4、线程生命周期:


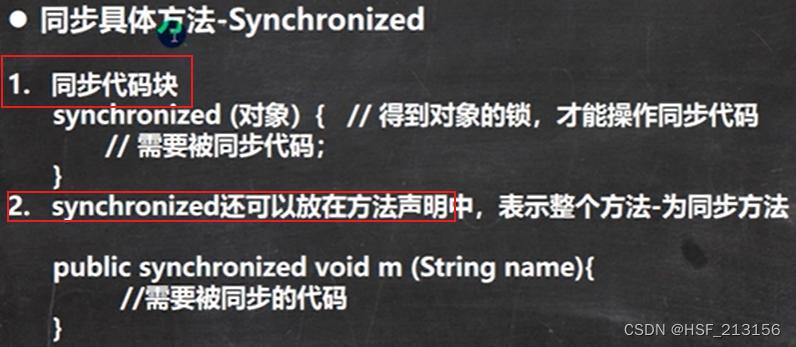
5、线程同步机制:
如3个窗口同时卖票的话会出现超卖现象:
原因就是:3个线程同时访问数据,容易出现错误。

public class HomeWork01 {
    public static void main(String[] args) {

        Station3 station3 = new Station3();
        new Thread(station3).start();
        new Thread(station3).start();
        new Thread(station3).start();
	}
}

class Station3 extends Thread {
    private static int sellTicket = 200;
    private static boolean flag = true;
    public static synchronized void sell() {
        if (sellTicket <= 0) {
            System.out.println("票卖完了");
            flag = false;
            return;
        }
        try {
            Thread.sleep(50);
        } catch (InterruptedException e) {
            e.printStackTrace();
        }
        System.out.println("窗口" + Thread.currentThread().getName() + "卖出一张票" +
                "还剩" + (--sellTicket) + "张票");
    }
    @Override
    public void run() {
        while (flag) {
            sell();
        }
    }
}
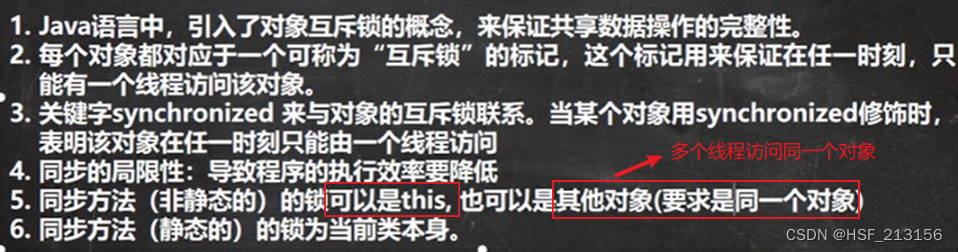
5.1:互斥锁:
package Thread;/*
 * @author HSF
 * @version 8.0
 */

public class HomeWork01 {
    public static void main(String[] args) {
        Station station1 = new Station();
        Station station2 = new Station();
        Station station4 = new Station();
        station1.start();
        station2.start();
        station4.start();

//        Station3 station3 = new Station3();
//        new Thread(station3).start();
//        new Thread(station3).start();
//        new Thread(station3).start();
    }
}


// public synchronized void run() {  // 不能直接加在run方法中,不然只会有一个线程访问run方法


@SuppressWarnings("all")
class Station3 implements Runnable {
    private static int sellTicket = 100;
    private static boolean flag = true;
    Object object = new Object();
    // 1、public  synchronized void sell() {}就是一个同步方法,这是锁在this对象上。
    // 2、也可以在代码块上写synchronize,同步代码块,互斥锁还是在this对象。
    public  /*synchronized*/ void sell() {  // 同步代码块
        synchronized (/*this*/object) {  // this或者object都可以
            if (sellTicket <= 0) {
                System.out.println("票卖完了");
                flag = false;
                return;
            }
            try {
                Thread.sleep(50);
            } catch (InterruptedException e) {
                e.printStackTrace();
            }
            System.out.println("窗口" + Thread.currentThread().getName() + "卖出一张票" +
                    "还剩" + (--sellTicket) + "张票");
        }
    }

    // 在静态方法中:
    // 1、public synchronized static void m1()锁是加在Station3.class上
    // 下面是同步方法:
    public synchronized static void m1() {

    }
    // 2、如果在静态方法中实现一个同步代码块:
    // 下面是同步代码块
    public static void m2() {
        synchronized (Station3.class) {
            System.out.println("hello");
        }
    }
    @Override
    public void run() {
        while (flag) {
            sell();
        }
    }
}

@SuppressWarnings("all")
class Station extends Thread {
    private static int sellTicket = 100;
    private static boolean flag = true;
    public void sell() {  // 同步代码块
        synchronized (Station.class) { // 如果继承Thread类,那就锁类对象。
            if (sellTicket <= 0) {
                System.out.println("票卖完了");
                flag = false;
                return;
            }
            try {
                Thread.sleep(50);
            } catch (InterruptedException e) {
                e.printStackTrace();
            }
            System.out.println("窗口" + Thread.currentThread().getName() + "卖出一张票" +
                    "还剩" + (--sellTicket) + "张票");
        }
    }

    public void run() {
        while (flag) {
            sell();
        }
    }
}
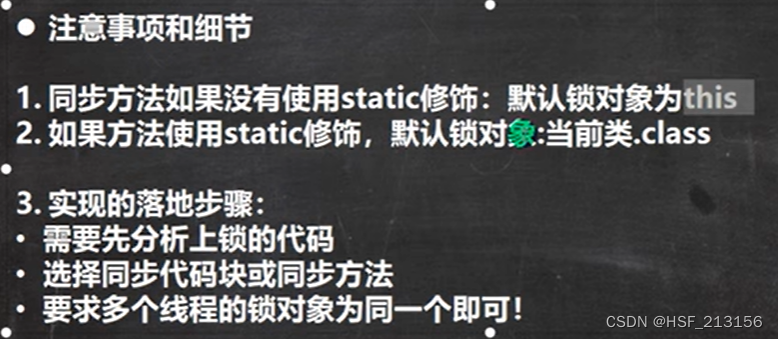
要求多个线程的锁为同一个对象:
1、如果是继承Thread类,那么会创建多个不同对象。
    Station station1 = new Station();
    Station station2 = new Station();
    Station station3 = new Station();
    station1.start();
    station2.start();
    station3.start();
2、如果实现Runnable接口,那么都是同一个对象。
        Station3 station3 = new Station3();
        new Thread(station3).start();
        new Thread(station3).start();
        new Thread(station3).start();
线程同步作业:

package Thread.homework;/*
 * @author HSF
 * @version 8.0
 */

public class HomeWork02_ {
    public static void main(String[] args) {
        Customer01 customer01 = new Customer01();
        Thread thread01 = new Thread(customer01);
        thread01.setName("线程1");
        Thread thread02 = new Thread(customer01);
        thread02.setName("线程2");
        thread01.start();
        thread02.start();
    }
}

class Customer01 implements Runnable{
    private int money = 10000;

    @Override
    public void run() {
        while (true) {
            /*
            * 1、这里使用synchronized实现了线程同步。
            * 2、当多个线程执行到这里,就会去争夺 this 对象锁。
            * 3、哪个线程争取到this对象锁,就执行synchronized代码块,执行完后,会释放this对象锁。
            * 4、争夺不到this对象锁,就blocked,准备下次继续争夺。
            * 5、this是非公平锁。
            * 6、this:多个线程操作同一个对象才可以使用,如果是继承Thread就不能使用this。
            * */
            synchronized (this) {
                if (money < 1000) {
                    System.out.println("余额不足");
                    break;
                }
                money -= 1000;
                System.out.println(Thread.currentThread().getName() + "取出了1000元,还剩" + money);
            }
            try {
                Thread.sleep(1000);
            } catch (InterruptedException e) {
                e.printStackTrace();
            }
        }
    }
}


 4151
4151


 被折叠的 条评论
为什么被折叠?
被折叠的 条评论
为什么被折叠?
 到【灌水乐园】发言


