


首先是创建一个vue3项目
npm create vue@latest这一指令将会安装并执行 create-vue,它是 Vue 官方的项目脚手架工具。你将会看到一些诸如 TypeScript 和测试支持之类的可选功能提示:
✔ Project name: … <your-project-name>
✔ Add TypeScript? … No / Yes
✔ Add JSX Support? … No / Yes
✔ Add Vue Router for Single Page Application development? … No / Yes
✔ Add Pinia for state management? … No / Yes
✔ Add Vitest for Unit testing? … No / Yes
✔ Add an End-to-End Testing Solution? … No / Cypress / Nightwatch / Playwright
✔ Add ESLint for code quality? … No / Yes
✔ Add Prettier for code formatting? … No / Yes
✔ Add Vue DevTools 7 extension for debugging? (experimental) … No / Yes

Scaffolding project in ./<your-project-name>...
Done.
如果不确定是否要开启某个功能,你可以直接按下回车键选择 No。
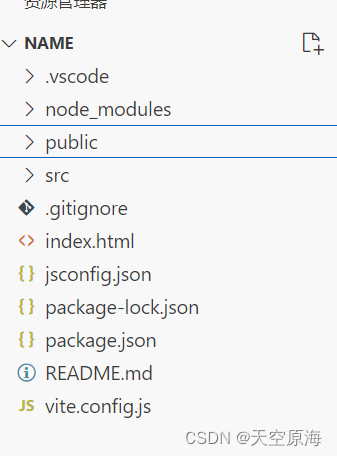
创建之后就能得到一个这样的项目
npm run dev可运行项目
下一步开始导入threejs
npm install three cannon cannon-es或者使用yarn来导入依赖
yarn install three cannon cannon-es然后直接上代码
<template></template>
<script setup>
import * as THREE from "three";
import { onMounted } from "vue";
import { OrbitControls } from "three/examples/jsm/controls/OrbitControls";
// 导入connon引擎
import * as CANNON from "cannon-es";
// 创建物理世界
const world = new CANNON.World();
const scene = new THREE.Scene();
const camera = new THREE.PerspectiveCamera(
75,
window.innerWidth / window.innerHeight,
0.1,
1000
);
const renderer = new THREE.WebGLRenderer({ antialias: true, alpha: true });
const controls = new OrbitControls(camera, renderer.domElement);
scene.background = new THREE.Color(0x000000);
renderer.shadowMap.enabled = true;
renderer.shadowMap.type = THREE.PCFSoftShadowMap;
renderer.outputEncoding = THREE.sRGBEncoding;
// 设置时钟
const clock = new THREE.Clock();
onMounted(() => {
init();
});
function init() {
camera.position.set(0, 5, 10);
renderer.setSize(window.innerWidth, window.innerHeight);
document.body.appendChild(renderer.domElement);
// 创建球和平面
const sphereGeometry = new THREE.SphereGeometry(1, 26, 26); // 球的几何形状
const sphereMaterial = new THREE.MeshStandardMaterial();
const sphereGeometry1 = new THREE.SphereGeometry(1, 26, 26); // 球的几何形状
const sphereMaterial1 = new THREE.MeshStandardMaterial();
const sphere1 = new THREE.Mesh(sphereGeometry1, sphereMaterial1);
sphere1.castShadow = true; // 阴影
sphere1.position.set(2, 7, 2.5); // 球的位置
scene.add(sphere1);
const cjSphere = new THREE.SphereGeometry(1, 26, 26);
const cjMaterial = new THREE.MeshStandardMaterial();
const cjMesh = new THREE.Mesh(cjSphere,cjMaterial);
cjMesh.castShadow = true;
cjMesh.position.set(2,3,2.5)
scene.add(cjMesh)
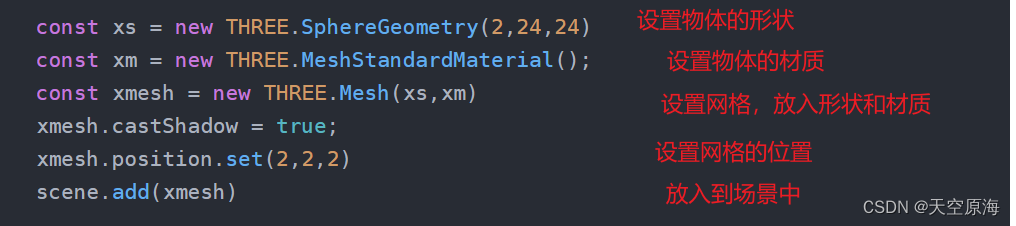
const xs = new THREE.SphereGeometry(2,24,24)
const xm = new THREE.MeshStandardMaterial();
const xmesh = new THREE.Mesh(xs,xm)
xmesh.castShadow = true;
xmesh.position.set(2,2,2)
scene.add(xmesh)
// 定义两个材料
const sphere = new THREE.Mesh(sphereGeometry, sphereMaterial);
sphere.castShadow = true; // 阴影
sphere.position.set(0, 5, 0.5); // 球的位置
scene.add(sphere);
const floorMaterial = new THREE.MeshStandardMaterial({
// map: texture,
color: 0xe4e4e4,
transparent: true,
opacity: 0.5,
});
const floor = new THREE.Mesh(new THREE.PlaneGeometry(20, 20), floorMaterial);
floor.position.set(0, -5, 0);
floor.rotation.x = -Math.PI / 2;
floor.receiveShadow = true; // 接收阴影
scene.add(floor);
// 设置物理世界的重力
world.gravity.set(0, -9.8, 0);
// 创建物理小球形状
// const sphereShape = new CANNON.Sphere(1)
const sphereShape = new CANNON.Sphere(sphereGeometry.parameters.radius); // 使用场景中小球的半径
//设置物体材质
// const sphereWorldMaterial = new CANNON.Material()
const sphereWorldMaterial = new CANNON.Material("sphereMaterial");
const groundWorldMaterial = new CANNON.Material("groundMaterial");
// 创建物理世界的物体
const sphereBody = new CANNON.Body({
shape: sphereShape,
position: new CANNON.Vec3(0, 5, 0.5),
// 小球质量
mass: 1,
// 物体材质
material: sphereWorldMaterial,
});
// 将物体添加至物理世界
world.addBody(sphereBody);
const sphereShape1 = new CANNON.Sphere(sphereGeometry1.parameters.radius); // 使用场景中小球的半径
//设置物体材质
// const sphereWorldMaterial1 = new CANNON.Material()
const sphereWorldMaterial1 = new CANNON.Material("sphereMaterial1");
// const groundWorldMaterial1 = new CANNON.Material("groundMaterial1");
// 创建物理世界的物体
const sphereBody1 = new CANNON.Body({
shape: sphereShape1,
position: new CANNON.Vec3(2, 7, 2.5),
// 小球质量
mass: 10,
// 物体材质
material: sphereWorldMaterial1,
});
// 将物体添加至物理世界
world.addBody(sphereBody1);
const world_shape = new CANNON.Sphere(1)
const world_material = new CANNON.Material('cjMaterial')
const worldBody = new CANNON.Body({
shape:world_shape,
position:new CANNON.Vec3(2,3,2.5),
mass:1,
material:world_material
});
world.addBody(worldBody);
const wm = new CANNON.Material('xm')
const wb = new CANNON.Body({
shape:new CANNON.Sphere(2),
position:new CANNON.Vec3(4,2,4),
mass:10,
material:wm
})
world.addBody(wb)
//添加环境光和平行光
const ambientLight = new THREE.AmbientLight(0xffffff, 0.5);
scene.add(ambientLight);
const dirLight = new THREE.DirectionalLight(0xffffff, 0.5);
dirLight.castShadow = true; // 阴影
scene.add(dirLight);
// 开启场景中的阴影贴图
renderer.shadowMap.enabled = true;
// 设置控制器阻尼,让控制器更有真实效果,必须在动画循环里调用.update()。
controls.enableDamping = true;
// 物理世界创建地面
const floorShape = new CANNON.Plane();
const floorBody = new CANNON.Body();
floorBody.material = groundWorldMaterial;
// 当质量为0的时候,可以使得物体保持不动
floorBody.mass = 0;
floorBody.addShape(floorShape);
// 地面位置
floorBody.position.set(0, -5, 0);
// 旋转地面的位置
floorBody.quaternion.setFromAxisAngle(new CANNON.Vec3(1, 0, 0), -Math.PI / 2);
world.addBody(floorBody);
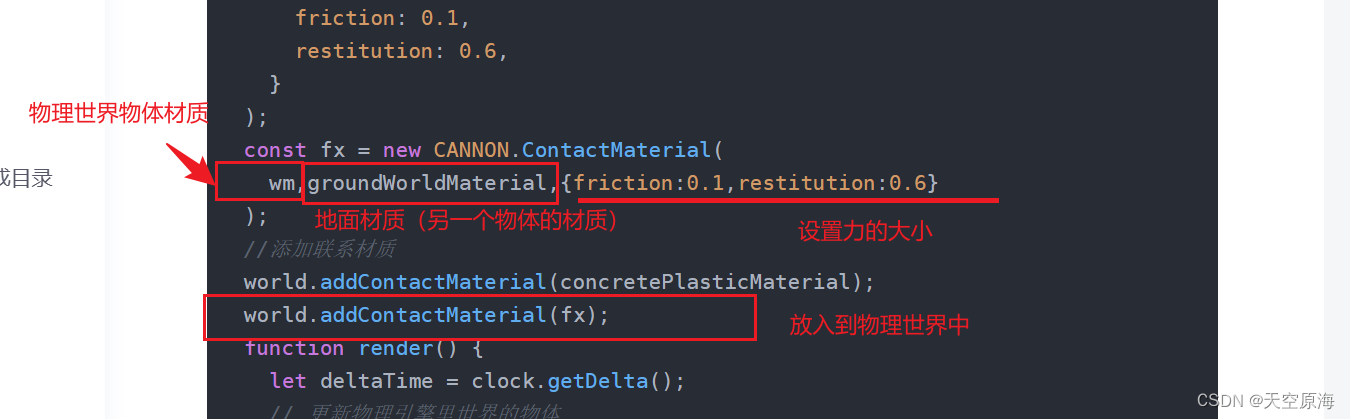
//创建联系材质
const concretePlasticMaterial = new CANNON.ContactMaterial(
sphereWorldMaterial,
groundWorldMaterial,
{
friction: 0.1,
restitution: 0.6,
}
);
const fx = new CANNON.ContactMaterial(
wm,groundWorldMaterial,{friction:0.1,restitution:0.6}
);
//添加联系材质
world.addContactMaterial(concretePlasticMaterial);
world.addContactMaterial(fx);
function render() {
let deltaTime = clock.getDelta();
// 更新物理引擎里世界的物体
world.step(1 / 120, deltaTime); // 更新
controls.update();
sphere.position.copy(sphereBody.position); // 渲染引擎复制物理引擎中的数据
sphere1.position.copy(sphereBody1.position); // 渲染引擎复制物理引擎中的数据
cjMesh.position.copy(worldBody.position);
xmesh.position.copy(wb.position)
renderer.render(scene, camera);
// 渲染下一帧的时候就会调用render函数
requestAnimationFrame(render);
}
render();
}
</script>
小白的话,可以直接将这段代码放入到App.vue中,直接替换掉app.vue,就能够直接运行,
接下来说一下原理:
threejs首先是场景,也就是能够看到的界面,我们可以生成一个物体放入到场景中,这样我们就能在场景中看到这个物体,通过设置这个物体的属性,可以改变物体的形状、材质、位置,
还有一个是物理世界,这个在页面中是看不到的,但是能够展示一些物理效果,比如设置重力、碰撞等等。
物理世界中同样需要放入物体,设置物体的一些属性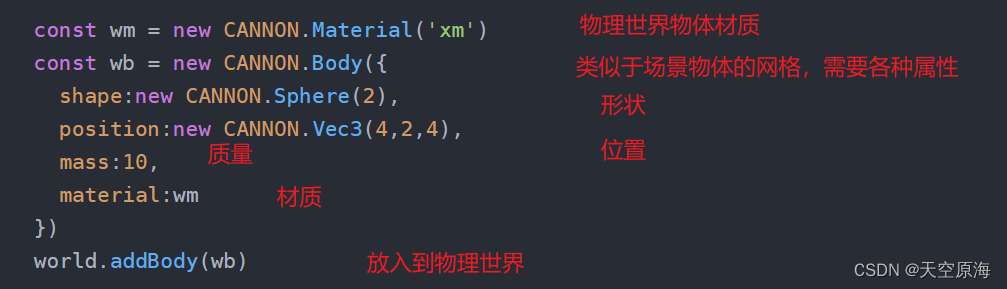
如果这个时候看网页的话,就会发现页面中有一个物体,但是并不会动,因为场景物体和物理世界物体并没有关联,但是物理世界的物体是真实存在的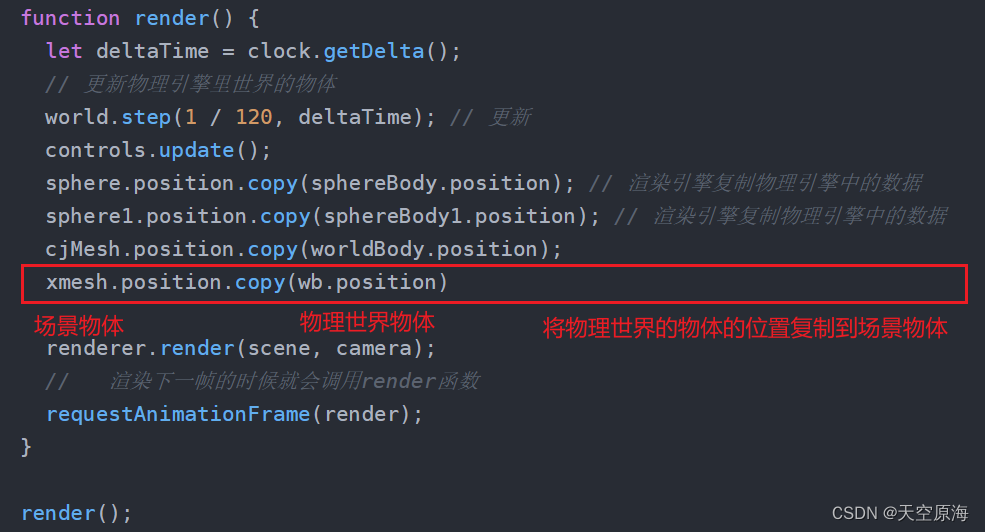
这样就关联上了
但是物体之间的碰撞没有效果
增加物体之间的关联,这样物体之间碰撞就有效果了


 被折叠的 条评论
为什么被折叠?
被折叠的 条评论
为什么被折叠?
 到【灌水乐园】发言


