


创建Vue项目
前提准备
Vue环境
创建方式
- 方式1:
-
cmd打开终端 输入命令
vue ui,输入命令后自动开打浏览器页面 -
修改项目创建路径,修改路径后点击下方
在此创建新项目
-
填写项目名,同步Git按需勾选
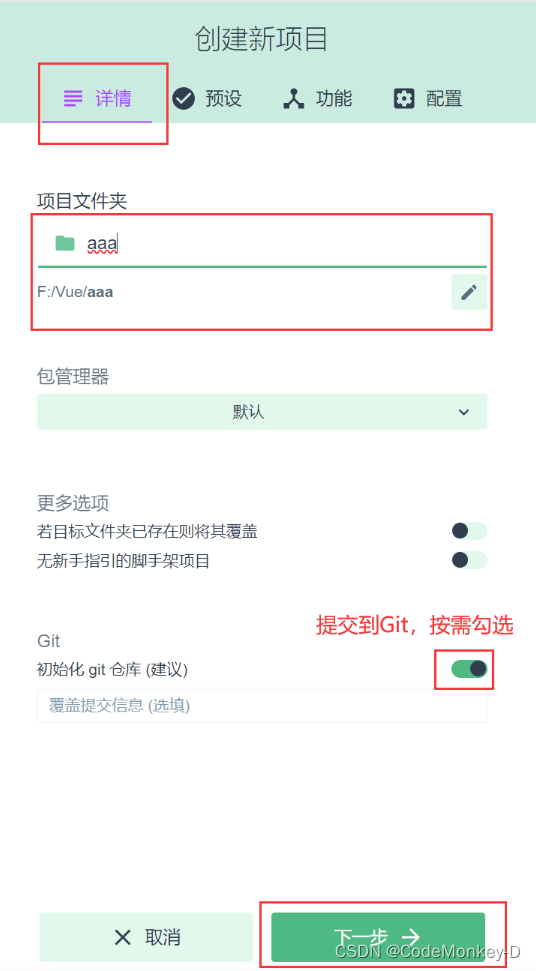
-
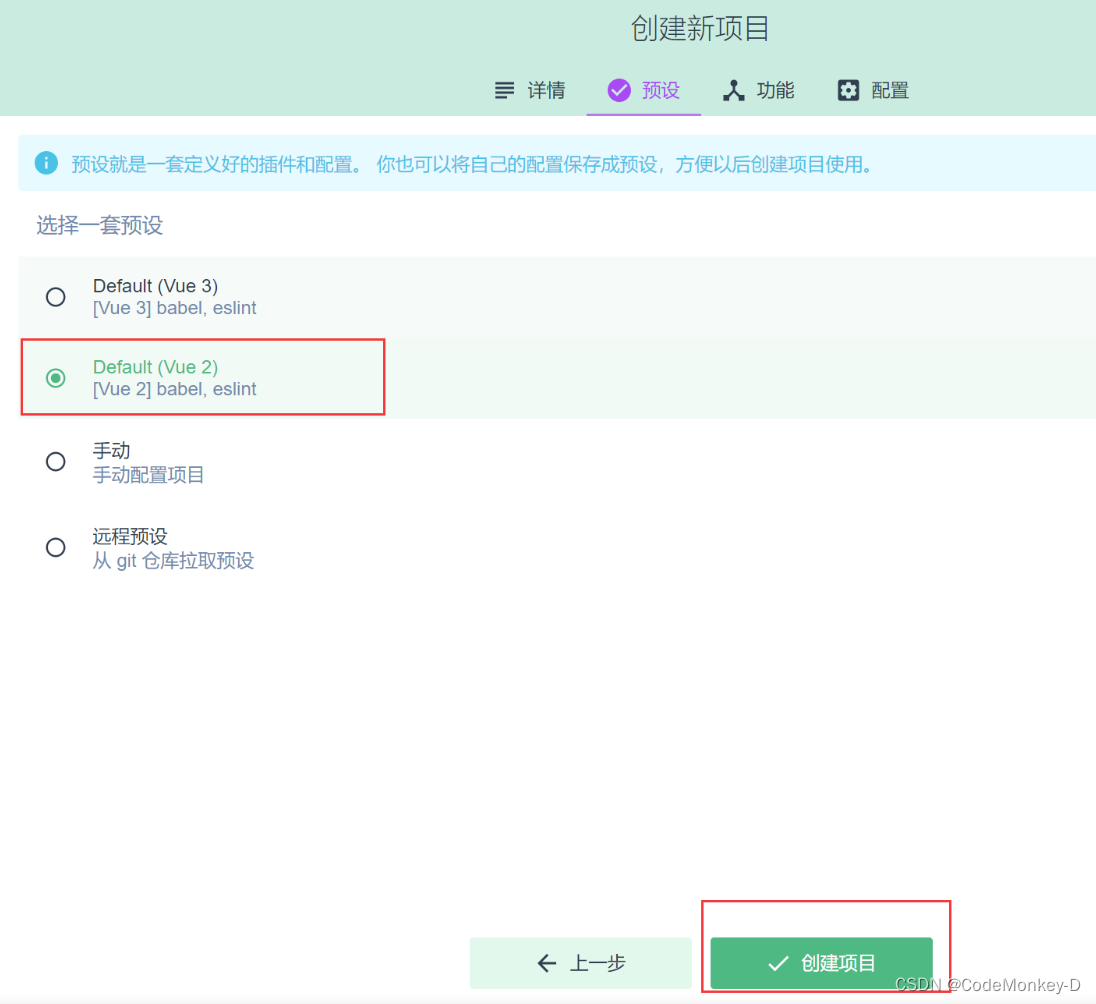
预设勾选Vue2,点击创建项目即可
- 方式2:
-
在WebStrom工具控制台中输入命令:
vue create xxxx>>> xxxx为项目名 -
选择使用Vue的版本(vue2)按方向键↓

-
进入项目的根目录(项目创建完成后会有提示)
cd xxxx // xxxx为项目名 -
启动项目
npm run serve -
访问:启动后控制台会输出访问端口,点击即可访问
停止项目:Ctrl+C
项目结构
public
	favicon.ico  主页图标
	index.html 主页页面  容器的位置 #app
src
	assets 静态资源存放
		logo.png logo图标 .....
components  组件存储
	HelloWorld.vue
App.vue  汇总所有的组件
main.js  入口文件  new Vue
.gitignore  git版本管理 忽略的配置
babel.config.js
jsconfig.json
package.json   应用包的配置文件
package-lock.json 包的版本控制文件
README.md  应用描述文件
vue.config.js 项目配置文件
Vue下创建组件步骤
-
在src目录下components路径下,右键new创建一个
Vue Component -
在
<template></template>标签中写代码,只允许有一个一级标签,通常写一个div标签在里面写所有内容<template> <div> <h2>学校名称:xx</h2> <h2>学校地址:xx</h2> </div> </template> -
在App.vue中注册组件
import School from "@/components/School";
export default {
  name: 'App',
  data(){
    return{}
  },
  methods:{},
  components: {
    School
  }
}
需要使用
import引入,在components配置中注册使用:在标签
<div id="App"></div>中使用<!--App.vue--> <template> <div id="app"> <School></School> <!--可以双标签使用--> <School/> <!--也可以单标签使用--> </div> </template>
基本配置
配置参考文档:https://cli.vuejs.org/zh/config/
常用:
// vue.config.js
module.exports = {
  devServer: {
    port: 8083        //配置端口号
  },
  lintOnSave: false		// 关闭命名规范(自动检验命名规范过于严格,所以关闭)
}
若不配置端口号,Vue在端口不可应的情况下会自动向下延续端口号,知道找到可用的;如8080被占用,Vue会匹配8081,8082…
ref属性
- 用于给元素或者 组件 注册引用信息(类似id属性)
- 在html标签上 可以获取到真实的DOM元素,在组件标签上 可以获取到组件实例对象(vc)
案例:
<!--App.vue-->
<template>
  <div id="app">
    <h1 ref="title">{{msg}}</h1>
		<School ref="sch"></School>
    <button @click="demo">点击此按钮控制台查看ref</button>
  </div>
</template>

<script>
import School from "@/components/School";

export default {
  name: 'App',
  data(){
    return{}
  },
  methods:{},
  components: {
    School
  }
}
</script>
props配置项
让组件接收外部传入的数据,使用组件时传参,并在子组件中添加props
App.vue
<template>
  <div id="app">
    <Student name="张三" :age="21" sex="男" />
  </div>
</template>

<script>
import Student from "@/components/Student";

export default {
  name: 'App',
  data(){
    return{}
  },
  methods:{},
  components: {
    Student
  }
}
</script>
age前添加:是为了让Vue接管,不然子组件在运算时数字就变成了字符串拼接,如20+1变成了211,添加:后,不会出现该问题
-
简单声明接收
<template> <div> <h2>学生姓名:{{name}}</h2> <h2>学生年龄:{{ age + 1}}</h2> <h2>学生性别:{{sex}}</h2> </div> </template> <script> export default { name: "Student", // 简单声明接收 props: ['name','age','sex'], data(){ return { } } } </script> <style scoped> </style> -
在接收的同时要求类型
<template> <div> <h2>学生姓名:{{name}}</h2> <h2>学生年龄:{{ age + 1}}</h2> <h2>学生性别:{{sex}}</h2> </div> </template> <script> export default { name: "Student", // 在接收的同时 要求类型 props:{ name:String, age:Number, sex:String }, data(){ return { } } } </script> <style scoped> </style> -
接收同时要求类型,默认值,限制必要性
<Student name="李四" />子组件
<template>
  <div>
    <h2>学生姓名:{{name}}</h2>
    <h2>学生年龄:{{ age + 1}}</h2>
    <h2>学生性别:{{sex}}</h2>
  </div>
</template>

<script>
export default {
  name: "Student",
  // 接收同时要求类型,默认值,限制必要性
  props:{
    name:{
      type:String,
      required: true   // 是否必要
    },
    age:{
      type:Number,
      default: 20   // 默认值
    },
    sex:{
      type:String,
      required: false
    }
  },
  data(){
    return {
    }
  }
}
</script>

<style scoped>

</style>
组件传参值给了一个name属性,但是子组件中props中age有默认值,sex非必要,所以页面会显示姓名李四,年龄21,性别没数据且控制台也不报错
注意:props 是只读的, 如果需要改变 那么复制props中的数据 再修改
<template>
  <div>
    <h2>学生姓名:{{ name }}</h2>
    <h2>学生年龄:{{ sAge + 1 }}</h2>
    <h2>学生性别:{{ sex }}</h2>
    <button @click="sAge++">age+++</button>
  </div>
</template>

<script>
export default {
  name: "Student",
  // 接收 父组件  传递 来的数据
  // 接收的同时 要求类型  默认值 限制必要性
  props: {
    name: {
      type: String,
      required: true
    },
    age: {
      type: Number,
      default: 99
    },
    sex: {
      type: String,
      required: true
    }
  },
  data() {
    return {
      sAge:this.age
    }
  }
}
</script>
<style scoped>
</style>
mixin混入
Vue混入提供了一种非常灵活的方式,来分发Vue组件中的可复用功能。一个混入对象可以包含任意组件选项(如data、methods、mounted等等)。当组件使用混入对象时,所有混入对象的选项将被“混合”进入该组件本身的选项。
把多个组件的共同的配置提取到一个混入对象中
局部混入
在src创建mixin.js
export const mixin ={
    methods:{
        showName(){
            alert(this.name);
        }
    },
    mounted() {
        console.log("这是mixin的mounted")
    }
}
School组件
<template>
  <div>
    <h2>学校名称:{{name}}</h2>
    <h2>学校地址:{{address}}</h2>
    <button @click="showName">mixin混用</button>
  </div>
</template>

<script>
import {mixin} from "@/mixin";

export default {
  name: "School",
  data(){
    return {
      name:'清华大学',
      address:'北京'
    }
  },
  mixins:[mixin],      //局部混入
  /*methods:{
    showName(){
      console.log("这是组件的方法");
    }
  },
  mounted() {
    console.log("这是School组件的mounted")
  }*/
}
</script>
<style scoped>
</style>
-
组件中的methods和mounted注掉:
- 点击按钮出现弹框
-
组件中的methods和mounted未注掉:
-
点击按钮不会走混入的js方法,而是走组件自己的方法
在发生冲突时(方法)会以组件优先
-
组件和混入对象如果含有同名的项时:
这些项目会合并(生命周期函数)
-
全局混入
- 导入全局混入
- 配置混入到Vue中
<!--main.js-->
import Vue from 'vue'
import App from './App.vue'

//配置全局混入
import {mixin} from "@/mixin";

Vue.config.productionTip = false
//配置 混入到Vue
Vue.mixin(mixin)

new Vue({
  render: h => h(App),
}).$mount('#app')
plugin插件
plugin用于增加Vue,包含了install方法的一个对象,第一个参数是Vue,后续参数是使用者传入的
插件的使用步骤:
-
在src下新建plugin.js
export default { // Vue实例,可以传多参 install(Vue,a,b,c){ console.log(a,b,c); // 过滤器 Vue.filter('strSlice',function (){ return value.slice(0,4) }) // 混入 Vue.mixin({ data(){ return{ count:1024 } } }) // 原型 Vue.prototype.hello = () =>{ console.log("hello,world"); } } } -
main.js中配置plugin
import Vue from 'vue' import App from './App.vue' //第一步:引入plugin import plugin from "@/plugin"; Vue.config.productionTip = false //第二部:插件传参 VUe.use(plugin,1,2,3) new Vue({ render: h => h(App), }).$mount('#app') -
在组件中使用插件
<template>
  <div>
    <h2>当前count的值:{{count}}</h2>
    <h2>学生姓名:{{name | strSlice }}</h2>
    <h2>学生年龄:{{age}}</h2>
    <button @click="demo">按钮</button>
  </div>
</template>

<script>
export default {
  name: "Student",
  data(){
    return {
      name:'测试数据张三',
      age: 18
    }
  },
  methods:{
    demo(){
      this.hello();
    }
  }
}
</script>

<style scoped>
</style>
结果:
控制台会输出1,2,3
当前count值:1024 (混入起作用)
学生姓名:测试数据 (插件中过滤器起作用)
点击按钮:控制台输出hello,world(插件中的原型)
scoped样式
让样式在局部生效,防止冲突
-
components目录下的组件中样式都是
<style scoped></style>,添加scoped是隔离样式 -
App.vue中的样式是
<style></style>,未添加scoped是全局样式 -
隔离样式优先级高于全局样式
School.vue
<template>
  <div>
    <h2>学校名称:{{ name }}</h2>
    <h2>学校地址:{{ address }}</h2>
  </div>
</template>

<script>

export default {
  name: "School",
  data() {
    return {
      name: '猿究院',
      address: '太白南路'
    }
  },
  methods: {
  }
}
</script>

<style scoped>
  // 给h2标签添加属性
  h2{
    color: red;
  }
</style>
Student.vue
<template>
  <div>
    <h2>学生姓名:{{name}}</h2>
    <h2>学生年龄:{{age}}</h2>
  </div>
</template>

<script>
export default {
  name: "Student",
  data() {
    return {
      name: '张三-测试数据',
      age: 18
    }
  },
  methods: {}
}
</script>

<style scoped>
  // 给 h2标签添加样式
  h2 {
    color: pink;
  }
</style>
App.vue
<template>
  <div>
    <h2>测试数据</h2>
    <Student></Student>
    <School></School>
  </div>
</template>

<script>
import Student from "@/components/Student.vue";
import School from "@/components/School.vue";

export default {
  name: 'App',
  data() {
    return {}
  },
  methods: {},
  components: {School, Student}
}
</script>

<style >
h2{
  color: orange;
}
</style>
-
School、Student、App都给h2标签添加了样式
测试数据:橘色(App.vue 的全局样式)
学生组件数据:粉色
学校组件数据:红色
-
若给School和Student组件样式的scoped去掉,所有样式变为最后使用的样式,即所有字体都是School的样式,字体都为红色
webStorage
- sessionStorage:基于会话
- localStorage:基于本地
 <template>
  <div>
    <button @click="saveData">保存数据</button>
    <button @click="readData">读取数据</button>
    <button @click="deleteData">删除数据</button>
    <button @click="deleteAll">清除数据</button>
  </div>
</template>

<script>

export default {
  name: 'App',
  data() {
    return {}
  },
  methods: {
    saveData(){
      sessionStorage.setItem("msg","sessionStorage");
    },
    readData(){
      console.log(sessionStorage.getItem("msg"))
    },
    deleteData(){
      sessionStorage.removeItem("msg");
    },
    deleteAll(){
      sessionStorage.clear();
    }
  },
  components: {}
}
</script>

<style>
</style>
自定义事件
是一种组件之间的通信方式;用于子组件 ----> 父组件
自定义事件实现步骤:
- 创建子组件,在App.vue中注册使用
- 给子组件标签添加ref属性
- 父组件中绑定自定义事件,编写回调函数
- 子组件中触发自定义事件
- 解绑自定义事件:
- 解绑单个:this.$off(‘xxx’);
- 解绑多个:this.$off([‘demo’]);
- 解绑全部:this.$off();
父组件App.vue
<template>
  <div>
    <Student :getStudentName="getStudentName"></Student>
    <Student @demo="demo"></Student>
    <Student ref="student"></Student>
  </div>
</template>

<script>
import Student from "@/components/Student.vue";

export default {
  name: 'App',
  data() {
    return {}
  },
  methods: {
    getStudentName(name) {
      console.log("收到了Student组件的传递的数据:", name);
    },
    demo(value){
      console.log("收到了数据:",value)
    }
  },
  mounted() {
    //自定义事件 名称为demo  回调函数为 demo(value)
    this.$refs.student.$on("demo",this.demo);
  },
  components: {Student}
}
</script>

<style>
</style>
子组件Student.vue
<template>
  <div>
    <h2>学生姓名:{{ name }}</h2>
    <h2>学生性别:{{ sex }}</h2>
    <button @click="sendStudentName">传递学生姓名</button>
    <button @click="off">销毁自定义事件</button>
  </div>
</template>

<script>
export default {
  name: "Student",
  props: ['getStudentName'],
  data() {
    return {
      name: '张三',
      sex: '男'
    }
  },
  methods: {
    sendStudentName() {
      // props 子  ---> 父 传值
      // this.getStudentName(this.name);
      //触发自定义事件 传值
      this.$emit('demo',this.name);
    },
    off(){
      // 解绑 一个自定义事件
      // this.$off('demo');
      //解绑 多个自定义事件
      // this.$off(['demo']);
      //解绑 所有自定义事件
      this.$off();
    }
  }
}
</script>

<style scoped>
</style>
全局事件总线
可以在任意组件之间进行通信
同级组件之间通信实现步骤:
-
在main.js中配置
import Vue from 'vue'
import App from './App.vue'

Vue.config.productionTip = false

new Vue({
  render: h => h(App),
  beforeCreate() {
    Vue.prototype.$bus = this;//.$bus --->给原型定义一个对象  this指向Vue实例
  }
}).$mount('#app')
绑定后,此时的$bus就是Vue实例对象
-
在App.vue中注册子组件
<template> <div id="app"> <School/> <Student/> </div> </template> <script> import School from "@/components/School"; import Student from "@/components/Student"; export default { name: 'App', data(){ return{} }, methods:{}, mounted() {}, components: {Student, School} } </script> -
确定接受数据组件,eg:school组件为接受数据组件
<template>
  <div>
    <h2>学校名称:{{ name }}</h2>
    <h2>学校地址:{{ address }}</h2>
  </div>
</template>

<script>
export default {
  name: "School",
  data() {
    return {
      name: '清华大学',
      address: '北京'
    }
  },
  methods: {
    demo(value){
      console.log("school组件收到了数据:",value)
    }
  },
  mounted() {
    this.$bus.$on('demo',this.demo)
    // school 自己没有$bus属性,向上找到prototype父类原型,是一个公共的区域
    // 在其上绑定一个自定义事件,创建回调函数
  },
  beforeDestroy() {
    this.$bus.$off("demo")
    // 在销毁VUe销毁之前,解绑自定义事件
  }
}
</script>

<style scoped>
</style>
school组件自己没有$bus属性,向上找到prototype父类原型,是一个公共的区域
-
发送数据组件,eg:Student
<template>
  <div>
      <h2>学生姓名:{{name}}</h2>
      <h2>学生年龄:{{age}}</h2>
      <button @click="sendStuName">点击传参给School</button>
  </div>
</template>

<script>
export default {
  name: "Student",
  data() {
    return {
      name: '张三',
      age: 18
    }
  },
  methods: {
    sendStuName(){
      this.$bus.$emit('demo',this.name)
    }
  }
}
</script>
<style scoped>
</style>
在发送数据组件中创建方法,触发自定义事件
pubsub消息订阅与发布
pubsub是组件之间的通信方式 任意组件之间
-
安装pubsub:在控制台中根目录下安装第三方插件:pubsub,命令如下
官方文档:https://github.com/mroderick/PubSubJS
npm install pubsub-js查看是否安装成功:打开package.json查看dependencies是否由pubsub
-
消息订阅方,订阅消息(数据接收方),eg:school
步骤:
- 引入pubsub: import pubsub from ‘pubsub-js’
- 发起一个订阅,并编写回调函数
- 不用的时候取消订阅
<template> <div> <h2>学校名称:{{ name }}</h2> <h2>学校地址:{{ address }}</h2> </div> </template> <script> // 引入pubsub import pubsub from 'pubsub-js'; export default { name: "School", data() { return { name: '清华大学', address: '北京' } }, methods: { // 回调函数 @param1:订阅名称(即demo) @param2:接受的数据 demo(pub,value){ console.log("订阅者School:",pub,value) } }, mounted() { // 发起订阅 (订阅名称,回调函数) this.pubID = pubsub.subscribe('demo',this.demo); }, beforeDestroy() { // 取消订阅 pubsub.unsubscribe(this.pubID); } } </script> <style scoped> </style> -
消息发布方,发布消息(数据发送方),eg:student
步骤:
- 导入pubsub: import pubsub from ‘pubsub-js’
- 定义方法触发订阅
<template> <div> <h2>学生姓名:{{name}}</h2> <h2>学生年龄:{{age}}</h2> <button @click="sendStuName">点击传参给School</button> </div> </template> <script> // 引入pubsub import pubsub from "pubsub-js"; export default { name: "Student", data() { return { name: '张三', age: 18 } }, methods: { sendStuName(){ // 发布消息('订阅名称',传递的数据) pubsub.publish('demo',this.name); } } } </script> <style scoped> </style> -
App.vue中注册组件
<template>
  <div id="app">
    <School/>
    <Student/>
  </div>
</template>

<script>
import School from "@/components/School";
import Student from "@/components/Student";
export default {
  name: 'App',
  data(){
    return{}
  },
  methods:{},
  mounted() {},
  components: {Student, School}
}
</script>
axios
axios:Vue中的请求,官方文档:https://github.com/axios/axios,本质上是对原生XMLHttpRequest的封装,可用于浏览器和nodejs的HTTP客户端
使用步骤:
-
安装axios:
npm isntall axios -
引入axios:import axios from “axios”;
-
axios可以请求的方法:
- get:获取数据,请求指定的信息,返回实体对象
<template>
  <div>
  </div>
</template>

<script>
import axios from "axios";

export default {
  name: 'App',
  data() {
    return {}
  },
  methods: {},
  mounted() {
    axios.get('/user?ID=12345')
        .then((response) => {
          console.log("请求成功", response);
        })
        .catch((error) => {
          console.log("请求失败", error);
        })
        .finally(() => {
              console.log("释放资源");
            }
        )
  },
  components: {}
}
</script>
案例:
<template> <div> </div> </template> <script> import axios from "axios"; export default { name: 'App', data() { return {} }, methods: {}, mounted() { axios.get("/api1/getTeaGrowerData") // /api1 在config.js中配置 .then(response=>{ console.log("请求成功", response.data); }, error=>{ console.log("请求失败", error); }); }, components: {} } </script>- post:向指定资源提交数据(例如表单提交或文件上传)
<template> <div> </div> </template> <script> import axios from "axios"; export default { name: 'App', data() { return {} }, methods: {}, mounted() { axios({ url: '', method: 'post', headers: {'content-type': 'application/x-www-form-urlencoded'}, // 声明传参方式:from表单 data: {} }).then(response => { console.log("请求成功", response.data); }, error => { console.log("请求失败", error); }); }, components: {} } </script>- put:更新数据,从客户端向服务器传送的数据取代指定的文档的内容
- patch:更新数据,是对put方法的补充,用来对已知资源进行局部更新
- delete:请求服务器删除指定的数据
-
vue.config.js配置,跨域处理
在前端处理跨域问题module.exports = { lintOnSave: false, devServer: { port: 8083, //开始代理服务 方式1: // proxy:"http://localhost:8081/" // 方式2: proxy: { '/api1': { target: 'http://localhost:8081/', pathRewrite: {'^/api1': '/garden/' }, // 路径替换 // ws: true,// 用于支持webSocket 默认值为 true changeOrigin: true // 控制头部请求中的host值 启用跨域处理 }, '/api2': { target: 'http://localhost:8082/', // ws: true,// 用于支持webSocket 默认值为 true changeOrigin: true // 控制头部请求中的host值 } } }, }target:填写需要访问的url地址
pathRewrite:路径替换,{‘^/api1’:‘/graden/’}会将第一个参替换成第二个参数,拼到url中
ws:用于支持webSocket 默认值为 true
changeOrigin:启用跨域处理,控制头部请求中的host值
axios案例
Github的用户查询
-
vue.config.js配置代理服务器
module.exports = { lintOnSave: false, devServer: { port: 8083, proxy:{ '/api1':{ target:'https://api.github.com/', pathRewrite:{'^/api1':'//'}, changeOrigin:true } } } } -
main.js中配置全局事件总线
import Vue from 'vue' import App from './App.vue' Vue.config.productionTip = false new Vue({ render: h => h(App), beforeCreate() { Vue.prototype.$bus=this; } }).$mount('#app') -
Search组件,用于搜索请求接口
<template> <section> <h1>GitHub用户搜索</h1> <input type="text" placeholder="请输入搜索内容(英文)" v-model="keyWord" /> <button @click="getUsers">点击搜索</button> </section> </template> <script> import axios from "axios"; export default { name: "Search", data(){ return{ keyWord: '' } }, methods:{ getUsers() { this.$bus.$emit('updateListData',{isLoading:true,errMsg:'',users:[],isFirst:true}) axios.get(`/api1/search/users?q=${this.keyWord}`) .then(res=>{ console.log(res.data) this.$bus.$emit('updateListData',{isLoading:false,errMsg:'',users:res.data.items,isFirst:false}) },error=>{ console.log('发生异常',error) this.$bus.$emit('updateListData',{isLoading:true,errMsg:error.message,users:[],isFirst:false}) }) } } } </script> -
List组件,用于接收Search传递的数据,并展示数据
<template> <div class="row"> <div class="card" v-for="user in info.users" :key="user.id" v-show="info.users.length"> <a :href="user.html_url" target="_blank"> <img :src="user.avatar_url" style="width: 100px;"/> </a> <h4 class="care-title">{{ user.login }}</h4> </div> <h1 v-if="info.isFirst">欢迎使用查询</h1> <h1 v-show="info.isLoading">欢迎使用查询</h1> <h1 v-show="info.errMsg">{{ info.errMsg }}</h1> </div> </template> <script> export default { name: "List", data() { return { info: { isFirst: true, isLoading: true, errMsg: '', users: [] } } }, mounted() { this.$bus.$on('updateListData',(data)=>{ this.info = {...this.info,...data} }) }, beforeDestroy() { this.$bus.$off('updateListData') } } </script> <style scoped> .card { float: left; width: 31%; padding: .75rem; margin-bottom: 2rem; border: 1px solid #efefef; text-align: center; } .card img { margin-bottom: .75rem; border-radius: 100%; } </style> -
App.vue中注册组件
<template>
  <div id="app">
    <Search/>
    <List/>
  </div>
</template>

<script>

import Search from "@/components/Search";
import List from "@/components/List";
export default {
  name: 'App',
  components: {
    List,
    Search
  }
}
</script>
插槽
Vue中的插槽(slot)是一种用于在组件中插入内容的机制。它允许我们在组件的模板中定义一些占位符,然后在使用该组件时,可以将具体的内容插入到这些占位符中。
默认插槽
实现步骤
-
创建插槽组件
<template> <div class="category"> <h3>{{title}}分类</h3> <slot></slot> // 插槽(插槽相当于是挖了个坑儿) </div> </template> <script> export default { name: "Category", props:['title'] } </script> <style scoped> .category { background-color: aqua; width: 200px; height: 300px; } h3{ text-align: center; background-color: orange; } img{ width: 100%; } </style> -
App.vue中使用插槽
<template>
  <div id="app" class="cont">
    <Category title="美食">
      <img src="./assets/头像.jpg">
    </Category>
    <Category title="影视">
      <h4>电影</h4>
    </Category>
    <Category title="游戏">
      <ul>
        <li v-for="(game,index) in games" :key="index">
          {{game}}
        </li>
      </ul>
    </Category>
  </div>
</template>

<script>
import Category from "@/components/Category";
export default {
  name: 'App',
  data(){
    return{
      games:['猪猪侠','喜羊羊','菠萝吹雪']
    }
  },
  components:{
    Category
  }
}
</script>

<style scoped>
  .cont{
    display: flex;
    justify-content: space-around;
  }
</style>
默认插槽缺点:插槽内的布局统一
具名插槽
解决了默认插槽布局统一的缺点
-
插槽组件
<template> <div class="category"> <h3>{{title}}分类</h3> <slot name="center"></slot> // 具名插槽 <slot name="footer"></slot> // 具名插槽 </div> </template> <script> export default { name: "Category", props:['title'] } </script> <style scoped> .category { background-color: aqua; width: 200px; height: 300px; } h3{ text-align: center; background-color: orange; } img{ width: 100%; } </style> -
App.vue
<template>
  <div id="app" class="cont">
    <Category title="美食">
      <img slot="footer" src="./assets/头像.jpg">
      <a href="#" slot="center" >点击跳转</a>
    </Category>
    <Category title="影视">
      <h4 slot="footer" >电影</h4>
      <img slot="center"  src="./assets/logo.png">
    </Category>
    <Category title="游戏">
      <img src="./assets/logo.png" slot="footer" >
      <ul slot="center">
        <li v-for="(game,index) in games" :key="index">
          {{game}}
        </li>
      </ul>
    </Category>
  </div>
</template>

<script>
import Category from "@/components/Category";
export default {
  name: 'App',
  data(){
    return{
      games:['猪猪侠','喜羊羊','菠萝吹雪']
    }
  },
  components:{
    Category
  }
}
</script>

<style scoped>
  .cont{
    display: flex;
    justify-content: space-around;
  }
</style>
具名插槽缺点:数据在父组件App.vue中,
作用域插槽
解决具名插槽数据在父组件中
-
插槽组件
<template> <div class="category"> <h3>{{title}}分类</h3> <slot :games="games"></slot> <!--作用域插槽--> </div> </template> <script> export default { name: "Category", data(){ return{ games:['猪猪侠','喜羊羊','菠萝吹雪'] } }, props:['title'] } </script> <style scoped> .category { background-color: aqua; width: 200px; height: 300px; } h3{ text-align: center; background-color: orange; } img{ width: 100%; } </style> -
App.vue组件
<template>
  <div id="app" class="cont">
    <Category title="游戏">
      <!-- template标签scope属性接收子组件传过来的数据 -->
      <template scope="obj">
        <ul>
          <li v-for="(g,index) in obj.games" :key="index" >
            {{g}}
          </li>
        </ul>
      </template>
    </Category>
  </div>
</template>

<script>

import Category from "@/components/Category";
export default {
  name: 'App',
  data(){
    return{
    }
  },
  components:{
    Category
  }
}
</script>

<style scoped>
  .cont{
    display: flex;
    justify-content: space-around;
  }
</style>


 4085
4085

 被折叠的 条评论
为什么被折叠?
被折叠的 条评论
为什么被折叠?
 到【灌水乐园】发言


