


最近一直想总结一下Spring+SpringMVC+Mybatis的整合过程,也便于以后忘了什么细节的东西却要用到的时候面对海量的搜索结果不好选择。
下面是我参考一些文档博文,自己动手总结出来的一些东西。浅显勿怪!
首先是相关框架的职责功能:
》SpringMVC:负责表现层
》Service接口:处理业务
》Mapper:持久层(相当于DAO接口)
》Spring:将各个层整合,管理持久层的Mapper,管理业务层的Service,管理表现层的Handler。
》》在Handler中可以调用Service接口,在Service接口中可以调用Mapper接口。(为了记忆我通常用“A-S-D”来记住调用关系)
下面是具体的整合思路:
第一步:整合DAO层(Mybatis和Spring整合,通过Spring管理Mapper接口):使用Mapper的扫描器自动扫描Mapper接口在Spring容器中注册。
第二步:整合Service层(通过Spring管理Service接口):使用配置方式将Service接口配置在Spring配置文件中,实现事务控制。
第三步:整合SpringMVC(因为SpringMVC是Spring的一个子模块,故而无需进一步做整合操作)。
接下来做具体的环境搭建操作
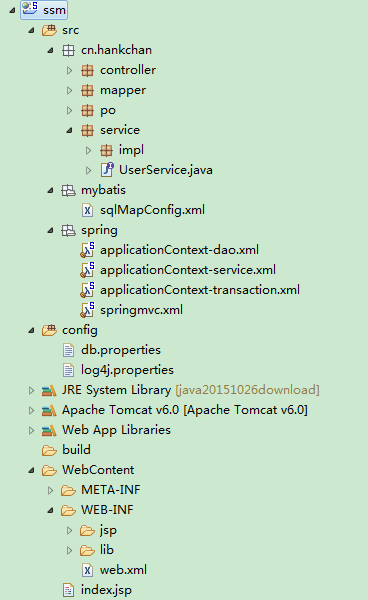
1. 新建动态web工程,建立目录结构并导入包括spring、mybatis、c3p0、mysql等相关的jar包。
以下是我的目录结构:
2. 配置web.xml文件:
》1.配置Spring容器:ContextLoaderListener及spring配置文件的路径地址
在这里我采用了restful风格的applicationContext-*.xml的spring配置文件的配置
》2.配置DispatcherServlet前端控制器并指明前端控制器的配置文件上下文配置文件的位置
在这里我不使用默认定义命名,而是使用了自己定义的配置文件名:springmvc.xml
》3.可以配置编码过滤器
具体代码如下:
<?xml version="1.0" encoding="UTF-8"?>
<web-app xmlns:xsi="http://www.w3.org/2001/XMLSchema-instance" xmlns="http://java.sun.com/xml/ns/javaee" xsi:schemaLocation="http://java.sun.com/xml/ns/javaee http://java.sun.com/xml/ns/javaee/web-app_2_5.xsd" id="WebApp_ID" version="2.5">
  <display-name>ssm</display-name>
  <welcome-file-list>
    <welcome-file>index.jsp</welcome-file>
  </welcome-file-list>

  <!-- 配置Spring容器 -->
  <!-- needed for ContextLoaderListener -->
    <context-param>
        <param-name>contextConfigLocation</param-name>
        <param-value>classpath:spring/applicationContext-*.xml</param-value>
    </context-param>
    <!-- Bootstraps the root web application context before servlet initialization -->
    <listener>
        <listener-class>org.springframework.web.context.ContextLoaderListener</listener-class>
    </listener>

  <!-- 配置前端控制器 -->
    <!-- The front controller of this Spring Web application, responsible for handling all application requests -->
    <servlet>
        <servlet-name>springmvc</servlet-name>
        <servlet-class>org.springframework.web.servlet.DispatcherServlet</servlet-class>
        <!-- 加载前端控制器配置文件 上下文配置文件的位置 -->
        <init-param>
            <param-name>contextConfigLocation</param-name>
            <param-value>classpath:spring/springmvc.xml</param-value>
        </init-param>
        <load-on-startup>1</load-on-startup>
    </servlet>
    <!-- Map all requests to the DispatcherServlet for handling -->
    <servlet-mapping>
        <servlet-name>springmvc</servlet-name>
        <url-pattern>/</url-pattern>
    </servlet-mapping>

  <!-- 编码过滤配置 -->
    <filter>
        <filter-name>CharacterEncodingFilter</filter-name>
        <filter-class>org.springframework.web.filter.CharacterEncodingFilter</filter-class>
        <init-param>
            <param-name>encoding</param-name>
            <param-value>utf-8</param-value>
        </init-param>
    </filter>
    <filter-mapping>
        <filter-name>CharacterEncodingFilter</filter-name>
        <url-pattern>/*</url-pattern>
    </filter-mapping>

</web-app>
3. 配置applicationContext.xml文件
》1.在web.xml指定的命名方式和路径下在spring目录下新建applicationContext-dao.xml配置文件:
》2.配置加载db.properties:指定配置文件路径
》3.配置数据源:配置dataSource及其username,password,driverClass等属性
》4.配置SqlSessionFactoryBean:配置SqlSessionFactoryBean的bean并引用dataSource和加载mybatis的全局配置文件sqlMapConfig.xml的路径位置
》5.配置Mapper扫描器:配置mapper扫描器的bean并配置其扫描mapper的包basePackage的路径,同时在设置其sqlSessionFactoryBeanName属性时注意不能使用ref,否则会因为前面加载配置文件导致这里报错,要使用value设置属性值。
具体代码如下:
<?xml version="1.0" encoding="UTF-8"?>
<beans xmlns="http://www.springframework.org/schema/beans"
    xmlns:xsi="http://www.w3.org/2001/XMLSchema-instance"
    xmlns:context="http://www.springframework.org/schema/context"
    xsi:schemaLocation="http://www.springframework.org/schema/beans http://www.springframework.org/schema/beans/spring-beans.xsd
        http://www.springframework.org/schema/context http://www.springframework.org/schema/context/spring-context-4.2.xsd">

  <!-- 加载数据库配置文件 -->
    <context:property-placeholder location="classpath:db.properties"/>

  <!-- 配置数据源 -->
    <bean id="dataSource" class="com.mchange.v2.c3p0.ComboPooledDataSource">
        <property name="user" value="${jdbc.username}"></property>
        <property name="password" value="${jdbc.password}"></property>
        <property name="jdbcUrl" value="${jdbc.jdbcUrl}"></property>
        <property name="driverClass" value="${jdbc.driverClass}"></property>
    </bean>

  <!-- 配置SqlSessionFactoryBean -->
    <bean id="sqlSessionFactoryBean" class="org.mybatis.spring.SqlSessionFactoryBean">
        <!-- 数据源 -->
        <property name="dataSource" ref="dataSource"></property>
        <!-- 加载mybatis的全局配置文件 -->
        <property name="configLocation" value="classpath:mybatis/sqlMapConfig.xml"></property>
    </bean>

  <!-- 配置mapper扫描器 -->
    <bean class="org.mybatis.spring.mapper.MapperScannerConfigurer">
        <!-- 扫描mapper的包路径, 如果需要扫描多个包中间用半角逗号隔开 -->
        <property name="basePackage" value="cn.hankchan.mapper"></property>
        <!-- 不能使用ref="" 因为上面加载配置文件导致这里引用会报错 -->
        <property name="sqlSessionFactoryBeanName" value="sqlSessionFactoryBean"></property>
    </bean>

</beans>
4. 配置applicationContext-service.xml配置文件
》配置扫描Service的包路径:
只用于加载Service组件。
具体代码如下:
<?xml version="1.0" encoding="UTF-8"?>
<beans xmlns="http://www.springframework.org/schema/beans"
    xmlns:xsi="http://www.w3.org/2001/XMLSchema-instance"
    xmlns:context="http://www.springframework.org/schema/context"
    xsi:schemaLocation="http://www.springframework.org/schema/beans http://www.springframework.org/schema/beans/spring-beans.xsd
        http://www.springframework.org/schema/context http://www.springframework.org/schema/context/spring-context-4.2.xsd">

  <!-- 扫描Service -->
    <context:component-scan base-package="cn.hankchan.service.impl"></context:component-scan>

</beans>
5. 配置applicationContext-transaction.xml文件
》主要用于事务处理。具体用途请自己查阅资料学习相关的知识,我自己忘得差不多了。就不废话了,直接上代码。(需要说明的是:因为一些不记得什么原因的原因,这个文件有一个配置的错误,所以我是直接注掉不使用事务管理的。留待后续再解决。)
代码如下:
<?xml version="1.0" encoding="UTF-8"?>
<beans xmlns="http://www.springframework.org/schema/beans"
    xmlns:xsi="http://www.w3.org/2001/XMLSchema-instance"
    xmlns:tx="http://www.springframework.org/schema/tx"
    xmlns:aop="http://www.springframework.org/schema/aop"
    xsi:schemaLocation="http://www.springframework.org/schema/beans http://www.springframework.org/schema/beans/spring-beans.xsd
        http://www.springframework.org/schema/aop http://www.springframework.org/schema/aop/spring-aop-4.2.xsd
        http://www.springframework.org/schema/tx http://www.springframework.org/schema/tx/spring-tx-4.2.xsd">

  <!-- 事务管理器 对mybatis操作数据库事务控制,spring使用jdbc的事务控制类 -->
    <bean id="transactionManager" class="org.springframework.jdbc.datasource.DataSourceTransactionManager">
        <property name="dataSource" ref="dataSource"></property>
    </bean>

  <!-- 通知 -->
    <tx:advice id="txAdvice" transaction-manager="transactionManager">
        <tx:attributes>
            <tx:method name="save*" propagation="REQUIRED"/>
            <tx:method name="delete*" propagation="REQUIRED"/>
            <tx:method name="insert*" propagation="REQUIRED"/>
            <tx:method name="update*" propagation="REQUIRED"/>
            <tx:method name="find*" propagation="SUPPORTS" read-only="true"/>
            <tx:method name="get*" propagation="SUPPORTS" read-only="true"/>
            <tx:method name="select*" propagation="SUPPORTS" read-only="true"/>
        </tx:attributes>
    </tx:advice>
  <!-- AOP -->
    <aop:config>
        <aop:advisor advice-ref="txAdvice"
            pointcut="execution(* cn.hankchan.service.impl.*.*(..))"/>
    </aop:config>

</beans>
6. 接下来配置前端控制器的配置文件springmvc.xml
》1.配置扫描Controller的路径
》2.配置注解的映射器和适配器
》3.配置视图解析器及响应路径的前后缀
这是很基础的东西,不多解释,直接上代码:
<?xml version="1.0" encoding="UTF-8"?>
<beans xmlns="http://www.springframework.org/schema/beans"
    xmlns:xsi="http://www.w3.org/2001/XMLSchema-instance"
    xmlns:context="http://www.springframework.org/schema/context"
    xmlns:mvc="http://www.springframework.org/schema/mvc"
    xsi:schemaLocation="http://www.springframework.org/schema/mvc http://www.springframework.org/schema/mvc/spring-mvc-4.2.xsd
        http://www.springframework.org/schema/beans http://www.springframework.org/schema/beans/spring-beans.xsd
        http://www.springframework.org/schema/context http://www.springframework.org/schema/context/spring-context-4.2.xsd">

  <!-- 扫描Controller -->
    <context:component-scan base-package="cn.hankchan.controller"></context:component-scan>

  <!-- 配置注解的映射器和适配器 -->
    <mvc:annotation-driven></mvc:annotation-driven>

  <!-- 配置视图解析器 -->
    <bean class="org.springframework.web.servlet.view.InternalResourceViewResolver">
        <property name="prefix" value="/WEB-INF/jsp/"></property>
        <property name="suffix" value=".jsp"></property>
    </bean>
</beans>
7. 最后我们配置mybatis的配置文件:sqlMapConfig.xml
》主要用于配置mybatis框架的一些设置如配置pojo类的别名、开启二级缓存等等。
代码如下:
<?xml version="1.0" encoding="UTF-8"?>
<!DOCTYPE configuration
PUBLIC "-//mybatis.org//DTD Config 3.0//EN"
"http://mybatis.org/dtd/mybatis-3-config.dtd">
<configuration>
    <!-- 全局setting配置,根据需要添加 -->
    <!-- 配置别名 -->
    <typeAliases>
        <!-- 批量扫描设置别名 -->
        <package name="cn.hankchan.po"/>
    </typeAliases>
    <!-- 配置Mapper
        备注: 由于使用Spring整合mybatis的整合包进行mapper扫描,这里无需配置
        必须遵循mapper.xml和mapper.java文件同名且在同一文件目录下
     -->
</configuration>
8. 编写配置db.properties、log4j.properties等相关的配置文件
根据情况自己设置相关的参数,我的相关代码如下:
db.properties:
jdbc.username=root
jdbc.password=
jdbc.jdbcUrl=com.mysql.jdbc.Driver
jdbc.driverClass=jdbc:mysql:///qxt
log4j.properties:
log4j.rootLogger=DEBUG, stdout
# Console output...
log4j.appender.stdout=org.apache.log4j.ConsoleAppender
log4j.appender.stdout.layout=org.apache.log4j.PatternLayout
log4j.appender.stdout.layout.ConversionPattern=%5p [%t] - %m%n
到了这里,整合SSM的环境基本上就搭建完成。
我在相关目录下新建了XxxPo.java,XxxMapper.java,XxxMapper.xml,XxxController.java,XxxService.java,XxxServiceImpl.java用于测试。具体的类可以根据需求自己设计添加。
运行一次如果不报错的话说明这个整合过程是成功了。
拖了好一阵子,终于把这个整合思路过程自己记录了下路,BINGO!!


 1618
1618

 被折叠的 条评论
为什么被折叠?
被折叠的 条评论
为什么被折叠?
 到【灌水乐园】发言


