


Spring Boot:是由Pivotal团队提供的全新框架,其设计目的是用来简化Spring应用的创建、运行、调试、部署等。使用Spring Boot可以做到专注于Spring应用的开发,而无需过多关注XML的配置。Spring Boot使用“习惯优于配置”的理念,简单来说,它提供了一堆依赖打包,并已经按照使用习惯解决了依赖问题。使用Spring Boot可以不用或者只需要很少的Spring配置就可以让企业项目快速运行起来
Redis:全称 Remote Dictionary Server(即远程字典服务),它是一个基于内存实现的键值型非关系(NoSQL)数据库,由意大利人 Salvatore Sanfilippo 使用 C 语言编写。
Lua: 是一种轻量小巧的脚本语言,用标准C语言编写并以源代码形式开放, 其设计目的是为了嵌入应用程序中,从而为应用程序提供灵活的扩展和定制功能。
注解:注解也叫元数据,即一种描述数据的数据。注解是JDK1.5版本开始引入的一个特性,用于对代码进行说明,可以对包、类、接口、字段、方法参数、局部变量等进行注解。
课前结束,进入正题!
1.准备工作
首先我们创建一个 Spring Boot 工程,引入 Web 和 Redis 依赖,同时考虑到接口限流一般是通过注解来标记,而注解是通过 AOP 来解析的,所以我们还需要加上 AOP 的依赖,最终的依赖如下:
 <!--redis的incr指令限流-->
        <dependency>
            <groupId>org.springframework.boot</groupId>
            <artifactId>spring-boot-starter-data-redis</artifactId>
        </dependency>
        <!--web服务  -->
        <dependency>
            <groupId>org.springframework.boot</groupId>
            <artifactId>spring-boot-starter-web</artifactId>
        </dependency>
        <!--通过注解来限流 而注解是通过 AOP 来解析的-->
        <dependency>
            <groupId>org.springframework.boot</groupId>
            <artifactId>spring-boot-starter-aop</artifactId>
        </dependency>
        <!--HttpCore是一组低级别的HTTP传输组件-->
        <dependency>
            <groupId>org.apache.httpcomponents</groupId>
            <artifactId>httpcore</artifactId>
            <version>4.4.12</version>
        </dependency>
然后提前准备好一个 Redis 实例,这里我们项目配置好之后,直接配置一下 Redis 的基本信息即可,如下:
spring.redis.host=192.168.19.10
spring.redis.port=6379
spring.redis.password=123123
好啦,准备工作就算是到位了。
2. 限流注解
接下来我们创建一个限流注解,我们将限流分为两种情况:
针对当前接口的全局性限流,例如该接口可以在 1 分钟内访问 100 次。
针对某一个 IP 地址的限流,例如某个 IP 地址可以在 1 分钟内访问 100 次
针对这两种情况,我们创建一个枚举类:
public class CurrentLimitingEnum {
    public enum LimitType {
        /**
         * 默认策略全局限流
         */
        DEFAULT,
        /**
         * 根据请求者IP进行限流
         */
        IP
    }
}
接下来我们来创建限流注解:
@Target(ElementType.METHOD)//作用在那个位置
@Retention(RetentionPolicy.RUNTIME)//作用在什么时候
@Documented
//格式:修饰符(public abstract【默认且唯一】),返回值类型,属性名,默认值(可忽略)
public @interface RateLimiter {
    /**
     * 限流key
     */
    public String key() default "rate_limit";

    /**
     * 限流时间,单位秒
     */
    public int time() default 60;

    /**
     * 限流次数
     */
    public int count() default 100;

    /**
     * 限流类型
     */

    public CurrentLimitingEnum.LimitType limitType() default CurrentLimitingEnum.LimitType.DEFAULT;
}
第一个参数限流的 key,这个仅仅是一个前缀,将来完整的 key 是这个前缀再加上接口方法的完整路径,共同组成限流 key,这个 key 将被存入到 Redis 中。
另外三个参数好理解,我就不多说了。
好了,将来哪个接口需要限流,就在哪个接口上添加 @RateLimiter 注解,然后配置相关参数即可。
3. 定制 RedisTemplate
小伙伴们知道,在 Spring Boot 中,我们其实更习惯使用 Spring Data Redis 来操作 Redis,不过默认的 RedisTemplate 有一个小坑,就是序列化用的是 JdkSerializationRedisSerializer,不知道小伙伴们有没有注意过,直接用这个序列化工具将来存到 Redis 上的 key 和 value 都会莫名其妙多一些前缀,这就导致你用命令读取的时候可能会出错。
例如存储的时候,key 是 name,value 是 javaboy,但是当你在命令行操作的时候,
get name却获取不到你想要的数据,原因就是存到 redis 之后 name 前面多了一些字符,此时只能继续使用 RedisTemplate 将之读取出来。我们用 Redis 做限流会用到 Lua 脚本,使用 Lua 脚本的时候,就会出现上面说的这种情况,所以我们需要修改 RedisTemplate 的序列化方案。
修改 RedisTemplate 序列化方案,代码如下:
@Configuration
public class RedisConfig {

    @Bean
    public RedisTemplate<Object, Object> redisTemplate(RedisConnectionFactory connectionFactory) {
        RedisTemplate<Object, Object> redisTemplate = new RedisTemplate<>();
        redisTemplate.setConnectionFactory(connectionFactory);
        // 使用Jackson2JsonRedisSerialize 替换默认序列化(默认采用的是JDK序列化)
        Jackson2JsonRedisSerializer<Object> jackson2JsonRedisSerializer = new Jackson2JsonRedisSerializer<>(Object.class);
        ObjectMapper om = new ObjectMapper();
        om.setVisibility(PropertyAccessor.ALL, JsonAutoDetect.Visibility.ANY);
        om.enableDefaultTyping(ObjectMapper.DefaultTyping.NON_FINAL);
        jackson2JsonRedisSerializer.setObjectMapper(om);
        redisTemplate.setKeySerializer(jackson2JsonRedisSerializer);
        redisTemplate.setValueSerializer(jackson2JsonRedisSerializer);
        redisTemplate.setHashKeySerializer(jackson2JsonRedisSerializer);
        redisTemplate.setHashValueSerializer(jackson2JsonRedisSerializer);
        return redisTemplate;
    }
}
4. 开发 Lua 脚本
在 Redis 服务端定义好 Lua 脚本,然后计算出来一个散列值,在 Java 代码中,通过这个散列值锁定要执行哪个 Lua 脚本。
直接在 Java 代码中将 Lua 脚本定义好,然后发送到 Redis 服务端去执行。
我们在 resources 目录下新建 lua 文件夹专门用来存放 lua 脚本,脚本内容如下:
local key = KEYS[1]
local count = tonumber(ARGV[1])
local time = tonumber(ARGV[2])
local current = redis.call('get', key)
if current and tonumber(current) > count then
    return tonumber(current)
end
current = redis.call('incr', key)
if tonumber(current) == 1 then
    redis.call('expire', key, time)
end
return tonumber(current)
这个脚本其实不难,大概瞅一眼就知道干啥用的。KEYS 和 ARGV 都是一会调用时候传进来的参数,tonumber 就是把字符串转为数字,redis.call 就是执行具体的 redis 指令,具体流程是这样:
首先获取到传进来的 key 以及 限流的 count 和时间 time。
通过 get 获取到这个 key 对应的值,这个值就是当前时间窗内这个接口可以访问多少次。
如果是第一次访问,此时拿到的结果为 nil,否则拿到的结果应该是一个数字,所以接下来就判断,如果拿到的结果是一个数字,并且这个数字还大于 count,那就说明已经超过流量限制了,那么直接返回查询的结果即可。
如果拿到的结果为 nil,说明是第一次访问,此时就给当前 key 自增 1,然后设置一个过期时间。
最后把自增 1 后的值返回就可以了。
接下来我们在一个 Bean 中来加载这段 Lua 脚本,如下:
local key = KEYS[1]
local count = tonumber(ARGV[1])
local time = tonumber(ARGV[2])
local current = redis.call('get', key)
if current and tonumber(current) > count then
    return tonumber(current)
end
current = redis.call('incr', key)
if tonumber(current) == 1 then
    redis.call('expire', key, time)
end
return tonumber(current)
5. 注解解析(重难点)
接下来我们就需要自定义切面,来解析这个注解了,我们来看看切面的定义:
@Aspect
@Component
public class RateLimiterAspect {
    private static final Logger log = LoggerFactory.getLogger(RateLimiterAspect.class);
    @Autowired
    private RedisTemplate<Object, Object> redisTemplate;

    @Autowired
    private RedisScript<Long> limitScript;

    @Before("@annotation(rateLimiter)")
    public void doBefore(JoinPoint point, RateLimiter rateLimiter) throws Throwable {
        String key = rateLimiter.key();
        int time = rateLimiter.time();
        int count = rateLimiter.count();

        String combineKey = getCombineKey(rateLimiter, point);
        List<Object> keys = Collections.singletonList(combineKey);
        try {
            Long number = redisTemplate.execute(limitScript, keys, count, time);
            if (number==null || number.intValue() > count) {
                throw new ServiceException("访问过于频繁,小哥哥注意节制哦");
            }
            log.info("限制请求'{}',当前请求'{}',缓存key'{}'", count, number.intValue(), key);
        } catch (ServiceException e) {
            throw e;
        } catch (Exception e) {
            throw new RuntimeException("服务器限流异常,请稍候再试");
        }
    }

    public String getCombineKey(RateLimiter rateLimiter, JoinPoint point) {
        StringBuffer stringBuffer = new StringBuffer(rateLimiter.key());
        if (rateLimiter.limitType() == CurrentLimitingEnum.LimitType.IP) {
            stringBuffer.append(IPUtils.getIpAddr(((ServletRequestAttributes) RequestContextHolder.currentRequestAttributes()).getRequest())).append("-");
        }
        MethodSignature signature = (MethodSignature) point.getSignature();
        Method method = signature.getMethod();
        Class<?> targetClass = method.getDeclaringClass();
        stringBuffer.append(targetClass.getName()).append("-").append(method.getName());
        return stringBuffer.toString();
    }
}
这个切面就是拦截所有加了 @RateLimiter 注解的方法,在前置通知中对注解进行处理。
首先获取到注解中的 key、time 以及 count 三个参数。
获取一个组合的 key,所谓的组合的 key,就是在注解的 key 属性基础上,再加上方法的完整路径,如果是 IP 模式的话,就再加上 IP 地址。以 IP 模式为例,最终生成的 key 类似这样:
rate_limit:127.0.0.1-org.javaboy.ratelimiter.controller.HelloController-hello(如果不是 IP 模式,那么生成的 key 中就不包含 IP 地址)。将生成的 key 放到集合中。
通过 redisTemplate.execute 方法取执行一个 Lua 脚本,第一个参数是脚本所封装的对象,第二个参数是 key,对应了脚本中的 KEYS,后面是可变长度的参数,对应了脚本中的 ARGV。
将 Lua 脚本执行的结果与 count 进行比较,如果大于 count,就说明过载了,抛异常就行了。
6. 接口测试
@RestController
public class IndexController {
    @RequestMapping("/index")
    @RateLimiter(time = 5, count = 3, limitType = CurrentLimitingEnum.LimitType.IP)
    public String hello(HttpServletRequest request, HttpServletResponse response) {
        ServletContext servletContext = request.getServletContext();
        Integer num = (Integer) servletContext.getAttribute("num");
        if (num == null) {
            servletContext.setAttribute("num", 1);
        } else {
            servletContext.setAttribute("num", ++num);
        }
        SimpleDateFormat dateFormat = new SimpleDateFormat("yyyy:MM:dd HH:mm:ss");
        String dateTime = dateFormat.format(new Date());
        return "您是第" + servletContext.getAttribute("num") + "次访问了,时间是:" + dateTime+"</br>"+"5秒内只可以访问3次哦,小哥哥";
    }
}
7. 全局异常处理
![]()
public class ServiceException extends RuntimeException {
    private static final long serialVersionUID = 1L;
    private String msg;
    private int code = 500;

    public ServiceException(String msg) {
        super(msg);
        this.msg = msg;
    }

    public ServiceException(String msg, Throwable e) {
        super(msg, e);
        this.msg = msg;
    }

    public ServiceException(String msg, int code) {
        super(msg);
        this.msg = msg;
        this.code = code;
    }

    public ServiceException(String msg, int code, Throwable e) {
        super(msg, e);
        this.msg = msg;
        this.code = code;
    }

    public String getMsg() {
        return msg;
    }

    public void setMsg(String msg) {
        this.msg = msg;
    }

    public int getCode() {
        return code;
    }

    public void setCode(int code) {
        this.code = code;
    }
} ![]()
@RestControllerAdvice
public class GlobalException {
    @ExceptionHandler(ServiceException.class)
    public R serviceException(ServiceException e) {
            R r = new R();
            r.put("code", e.getCode());
            r.put("msg", e.getMessage());
            return r;
    }
}
8.工具类(实体类R,IPUtils)
public class R extends HashMap<String, Object> {
	private static final long serialVersionUID = 1L;

	public R() {
		put("code", 0);
		put("msg", "success");
	}

	public static R error() {
		return error(HttpStatus.SC_INTERNAL_SERVER_ERROR, "未知异常,请联系管理员");
	}

	public static R error(String msg) {
		return error(HttpStatus.SC_INTERNAL_SERVER_ERROR, msg);
	}

	public static R error(int code, String msg) {
		R r = new R();
		r.put("code", code);
		r.put("msg", msg);
		return r;
	}

	public static R ok(String msg) {
		R r = new R();
		r.put("msg", msg);
		return r;
	}

	public static R ok(Map<String, Object> map) {
		R r = new R();
		r.putAll(map);
		return r;
	}

	public static R ok() {
		return new R();
	}

	public R put(String key, Object value) {
		super.put(key, value);
		return this;
	}
}
public class IPUtils {
private static Logger logger = LoggerFactory.getLogger(IPUtils.class);
/**
* 获取IP地址
*
* 使用Nginx等反向代理软件, 则不能通过request.getRemoteAddr()获取IP地址
* 如果使用了多级反向代理的话,X-Forwarded-For的值并不止一个,而是一串IP地址,X-Forwarded-For中第一个非unknown的有效IP字符串,则为真实IP地址
*/
public static String getIpAddr(HttpServletRequest request) {
String ip = null;
try {
ip = request.getHeader("x-forwarded-for");
if (StringUtils.isEmpty(ip) || "unknown".equalsIgnoreCase(ip)) {
ip = request.getHeader("Proxy-Client-IP");
}
if (StringUtils.isEmpty(ip) || ip.length() == 0 || "unknown".equalsIgnoreCase(ip)) {
ip = request.getHeader("WL-Proxy-Client-IP");
}
if (StringUtils.isEmpty(ip) || "unknown".equalsIgnoreCase(ip)) {
ip = request.getHeader("HTTP_CLIENT_IP");
}
if (StringUtils.isEmpty(ip) || "unknown".equalsIgnoreCase(ip)) {
ip = request.getHeader("HTTP_X_FORWARDED_FOR");
}
if (StringUtils.isEmpty(ip) || "unknown".equalsIgnoreCase(ip)) {
ip = request.getRemoteAddr();
}
} catch (Exception e) {
logger.error("IPUtils ERROR ", e);
}
// //使用代理,则获取第一个IP地址
// if(StringUtils.isEmpty(ip) && ip.length() > 15) {
// if(ip.indexOf(",") > 0) {
// ip = ip.substring(0, ip.indexOf(","));
// }
// }
return ip;
}
}我们启动项目!!
第一次访问我们正常访问

然后我们5秒内点击3次以上
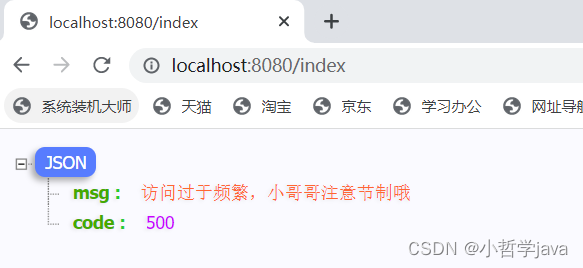
大功告成!!!


 703
703


 被折叠的 条评论
为什么被折叠?
被折叠的 条评论
为什么被折叠?
 到【灌水乐园】发言


