


接上篇博客中的控件介绍:
一、ExpandableListView,这是一个伸缩展开页列表控件,效果如下:
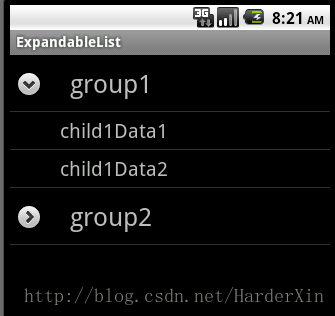
下面让我们看看怎么实现的吧:
一、首先定义我们的布局文件,其中有我们的main.xml文件将我们的ExpandableListView控件加入进去,还要有我们页面初始化显示出来的group1、group2这些数据的布局文件,定义为group.xml,还要有点击展开group1后child1data1等这些数据的布局文件,定义为child.xml,下面我们分别给它们进行定义:
main.xml:
<?xml version="1.0" encoding="utf-8"?>
<LinearLayout xmlns:android="http://schemas.android.com/apk/res/android"
    android:layout_width="fill_parent"
    android:layout_height="fill_parent"
    android:orientation="vertical" >

    <ExpandableListView
        android:id="@id/android:list"
        android:layout_width="fill_parent"
        android:layout_height="fill_parent"
        android:drawSelectorOnTop="false"/>

    <TextView
        android:id="@id/android:empty"
        android:layout_width="fill_parent"
        android:layout_height="fill_parent"
        android:text="No Data" />

</LinearLayout>
在main.xml中加入我们的ExpendableListView控件上面的TextView中的android:text="No Data"是默认无数据的时候所显示的文本信息
group.xml:
<?xml version="1.0" encoding="utf-8"?>
<LinearLayout xmlns:android="http://schemas.android.com/apk/res/android"
    android:layout_width="fill_parent"
    android:layout_height="fill_parent"
    android:orientation="vertical" >
    <TextView
        android:id="@+id/groupTo"
        android:layout_width="fill_parent"
        android:layout_height="fill_parent"
        android:paddingLeft="60px"
        android:paddingTop="10px"
        android:paddingBottom="10px"
        android:textSize="26sp"
        android:text="No Data" />

</LinearLayout>
child.xml:
<?xml version="1.0" encoding="utf-8"?>
<LinearLayout xmlns:android="http://schemas.android.com/apk/res/android"
    android:layout_width="fill_parent"
    android:layout_height="fill_parent"
    android:orientation="vertical" >
    <TextView
        android:id="@+id/childTo"
        android:layout_width="fill_parent"
        android:layout_height="fill_parent"
        android:paddingLeft="50px"
        android:paddingTop="5px"
        android:paddingBottom="5px"
        android:textSize="20sp"
        android:text="No Data" />

</LinearLayout>
好了,把各部分布局定义好了,下面我们通过代码显示我们要的信息吧:
我们创建的Activity必须继承自:ExpendableListActivity
/**
 * 创建一个Activity,继承自ExpandableListActivity
 * @author Administrator
 *
 */
public class MainActivity extends ExpandableListActivity {
    @Override
    public void onCreate(Bundle savedInstanceState) {
        super.onCreate(savedInstanceState);
        setContentView(R.layout.main);
        //定义一个List,该List为一级条目提供数据
        List<Map<String,String>> groups=new ArrayList<Map<String,String>>();
        Map<String,String> group1=new HashMap<String,String>();
        group1.put("group", "group1");
        Map<String,String> group2=new HashMap<String,String>();
        group2.put("group", "group2");
        groups.add(group1);
        groups.add(group2);

        //定义一个List,该List为第一个一级条目提供二级条目数据
        List<Map<String,String>> child1=new ArrayList<Map<String,String>>();
        Map<String,String> child1Data1=new HashMap<String,String>();
        child1Data1.put("child", "child1Data1");
        child1.add(child1Data1);
        Map<String,String> child1Data2=new HashMap<String,String>();
        child1Data2.put("child", "child1Data2");
        child1.add(child1Data2);

        //定义一个List,该List为第二个一级条目提供二级条目数据
        List<Map<String,String>> child2=new ArrayList<Map<String,String>>();
        Map<String,String> child2Data1=new HashMap<String,String>();
        child2Data1.put("child", "child2Data1");
        child2.add(child2Data1);

        //定义一个List,该List对象用来存储所有的二级条目数据
        List<List<Map<String,String>>> childs=new ArrayList<List<Map<String,String>>>();
        childs.add(child1);
        childs.add(child2);

        /**
         * 生成一个SimpleExpandableListAdapter对象,参数介绍
         * 1、当前上下文对象
         * 2、一级条目数据
         * 3、用来设置一级条目样式的布局文件
         * 4、指定一级条目的数据key,要与Map中的可以一样
         * 5、指定一级条目数据显示控件的id
         * 6、二级条目数据
         * 7、用来设置二级条目样式的布局文件
         * 8、指定二级条目的数据key,要与Map中的可以一样
         * 9、指定二级条目数据显示控件的id
         */
        SimpleExpandableListAdapter sela=new SimpleExpandableListAdapter
        		(this, groups, R.layout.group, new String[]{"group"},new int[]{R.id.groupTo},
        				childs, R.layout.child, new String[]{"child"}, new int[]{R.id.childTo});
        //将SimpleExpandableListAdapter对象设置给当前的ExpandableListActivity
        setListAdapter(sela);
    }
}
详细解答见代码中的注释部分,运行程序就可以看到我们之前那个页面的效果了!
二、SeekBar和RatingBar:分别表示可拖拽的进度条和星级评分条,显示效果如下:

相信大家看到图片后就应该知道它所表示的是什么了,下面我们来看看它是怎么实现的吧,很简单哦!
1、定义布局文件,main.xml在布局文件中加入:SeekBar和RatingBar控件:
<?xml version="1.0" encoding="utf-8"?>
<LinearLayout xmlns:android="http://schemas.android.com/apk/res/android"
    android:layout_width="fill_parent"
    android:layout_height="fill_parent"
    android:orientation="vertical" >
    <TextView
        android:layout_width="fill_parent"
        android:layout_height="wrap_content"
        android:text="测试SeekBar" />
    <SeekBar
        android:id="@+id/seekBarId"
        android:layout_width="fill_parent"
        android:layout_height="wrap_content"/>

    <TextView
        android:layout_width="fill_parent"
        android:layout_height="wrap_content"
        android:text="测试RatingBar" />
    <!--numStars:初始化显示几颗星   stepSize:移动后增加或减少的大小-->
    <RatingBar
        android:id="@+id/ratingBarId"
        android:layout_width="wrap_content"
        android:layout_height="wrap_content"
        android:numStars="5"
        android:stepSize="1.0"/>
</LinearLayout>
2、通过代码控制显示和加入相应的方法:
package com.harder.xin;

import android.app.Activity;
import android.os.Bundle;
import android.widget.RatingBar;
import android.widget.SeekBar;

public class MainActivity extends Activity {
	private SeekBar seekBar=null;
	private RatingBar ratingBar=null;

    @Override
    public void onCreate(Bundle savedInstanceState) {
        super.onCreate(savedInstanceState);
        setContentView(R.layout.main);
        seekBar=(SeekBar)findViewById(R.id.seekBarId);
        //设置SeekBar的最大值
        seekBar.setMax(100);
        //为进度条绑定监听器
        seekBar.setOnSeekBarChangeListener(new SeekBarChangeListener());
        ratingBar=(RatingBar)findViewById(R.id.ratingBarId);
        //为评分条绑定监听器
        ratingBar.setOnRatingBarChangeListener(new RatingBarChangeListener());
    }

    //监听器,监听进度条进度的改变
    class SeekBarChangeListener implements SeekBar.OnSeekBarChangeListener{
    	//当进度条进度发生改变的时候触发该事件
    	//fromUser 是否由用户触发,true则由用户触发,false,可能是由程序控制,例如Handler
		@Override
		public void onProgressChanged(SeekBar seekBar, int progress,
				boolean fromUser) {
			System.out.println("progress-->"+progress);
		}

		//当用户开始滑东滑块的时候触发的事件
		@Override
		public void onStartTrackingTouch(SeekBar seekBar) {
			System.out.println("start-->"+seekBar.getProgress());
		}

		//当用户停止滑东滑块的时候触发的事件
		@Override
		public void onStopTrackingTouch(SeekBar seekBar) {
			System.out.println("stop-->"+seekBar.getProgress());
		}
    }

    class RatingBarChangeListener implements RatingBar.OnRatingBarChangeListener{
    	//当Rating发生改变的时候触发该事件
		@Override
		public void onRatingChanged(RatingBar ratingBar, float rating,
				boolean fromUser) {
			System.out.println("rating-->"+rating);
		}

    }
}
相信大家看代码注释基本上就能明白他们的意思了,这里就不多描述了!!
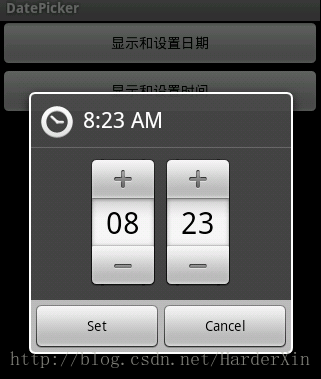
三、DatePickerDialog和TimePickerDialog,见名之意,他们就是用来显示和设置日期和时间的对话框咯,页面展示效果如下:
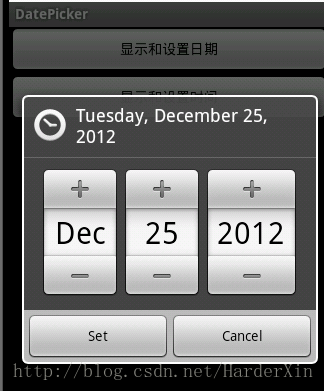
呵呵....他们实现方法也很简单哦:
在main.xml中定义两个按钮,分别用来测试他们:
<?xml version="1.0" encoding="utf-8"?>
<LinearLayout xmlns:android="http://schemas.android.com/apk/res/android"
    android:layout_width="fill_parent"
    android:layout_height="fill_parent"
    android:orientation="vertical" >

    <Button
        android:id="@+id/DateButton"
        android:layout_width="fill_parent"
        android:layout_height="wrap_content"
        android:text="显示和设置日期"/>

    <Button
        android:id="@+id/TimeButton"
        android:layout_width="fill_parent"
        android:layout_height="wrap_content"
        android:text="显示和设置时间"/>

</LinearLayout>
下面在代码中控制:
package com.harder.xin;

import android.app.Activity;
import android.app.DatePickerDialog;
import android.app.Dialog;
import android.app.TimePickerDialog;
import android.os.Bundle;
import android.view.View;
import android.view.View.OnClickListener;
import android.widget.Button;
import android.widget.DatePicker;
import android.widget.TimePicker;

public class MainActivity extends Activity {
	private Button showDateButton=null;
	private Button showTimeButton=null;
	private static final int DATE_PICKER_ID=1;
	private static final int Time_PICKER_ID=2;

    @Override
    public void onCreate(Bundle savedInstanceState) {
        super.onCreate(savedInstanceState);
        setContentView(R.layout.main);
        showDateButton=(Button)findViewById(R.id.DateButton);
        showDateButton.setOnClickListener(new ShowDateButtonListener());
        showTimeButton=(Button)findViewById(R.id.TimeButton);
        showTimeButton.setOnClickListener(new ShowTimeButtonListener());
    }

    class ShowDateButtonListener implements OnClickListener{
    	//此方法用于显示DatePickerDialog
		@Override
		public void onClick(View v) {
			showDialog(DATE_PICKER_ID);
		}
    }

    class ShowTimeButtonListener implements OnClickListener{
		@Override
		public void onClick(View v) {
			showDialog(Time_PICKER_ID);
		}
    }

    @Override
    protected Dialog onCreateDialog(int id) {
    	switch (id) {
		case DATE_PICKER_ID:
			//创建一个DatePickerDialog对象,接收一个监听对象,用来显示用户设置后所显示的信息
			//后面三个参数表示启动DatePickerDialog后所提供的默认的时间
			//注意月份时间是从0开始,0到11月,所以我们得到实际月份的时间需要加1
			return new DatePickerDialog(this, onDateSetListener, 2012, 11, 25);
		case Time_PICKER_ID:
			return new TimePickerDialog(this, onTimeSetListener, 8, 23, true);
		}
    	return null;
    }

    //监听器,监听用户点下DatePickerDialog的set按钮后,所设置的年月日
    DatePickerDialog.OnDateSetListener onDateSetListener=new DatePickerDialog.OnDateSetListener() {
		@Override
		public void onDateSet(DatePicker view, int year, int monthOfYear,
				int dayOfMonth) {
			System.out.println(year+"--"+(monthOfYear+1)+"--"+dayOfMonth);
		}
	};

	TimePickerDialog.OnTimeSetListener onTimeSetListener=new TimePickerDialog.OnTimeSetListener() {
		@Override
		public void onTimeSet(TimePicker view, int hourOfDay, int minute) {
			System.out.println("hourOfDay="+hourOfDay+"---"+"minute="+minute);
		}
	};

}
基本思路就是:获取new DatePickerDialog(this, onDateSetListener, 2012, 11, 25);和new TimePickerDialog(this, onTimeSetListener, 8, 23, true);对象,其中的Listener是监听里面日期或者时间变化时所触发的事件,后面的几个参数是启动后默认的日期和时间,TimePickerDialog最后一个参数表示是否启用24小时制,当我们点击set后,就会触发监听器里面的方法,相应的方法就会得到调用!注意:
1、创建相应监听器,使用的是其中的类部类:
DatePickerDialog.OnDateSetListener onDateSetListener=new DatePickerDialog.OnDateSetListener(){};
TimePickerDialog.OnTimeSetListener onTimeSetListener=new TimePickerDialog.OnTimeSetListener(){};
2、因为是在窗口中显示,所以调用了showDialog方法,将相应的标识作为参数传入进去!
3、DatePickerDialog和TimePickerDialog一般和DatePicker及TimePicker搭配使用,DatePicker及TimePicker大家可以在网上找相关资料学习,也比较简单。
4、其中日期里面的月份和java里面的new date()是一样的,都是从0开始到11月,没有12月之说,所以我们获取得到的月份需要加上1。
大家自己去把这些控件写出来吧!!欢迎大家一起来交流分享!


 309
309

 被折叠的 条评论
为什么被折叠?
被折叠的 条评论
为什么被折叠?
 到【灌水乐园】发言


