


 本文介绍了如何模拟新浪微博的随便看栏目,通过使用ListView控件和自定义FruitAdapter,详细讲解了Android应用中实现列表展示的过程。涉及到的步骤包括XML布局设计、Adapter的创建、数据绑定以及监听事件的添加。
一
今天来模拟新浪微博随便看栏目,来掌握 ListView 控件的使用,理解 Adapter 的作用并掌握自定义 FruitAdapter 的使用方式
二具体代码
1.修改res/layout/activity_main.xml文件
<LinearLayout xmlns:android="http://schemas.android.com/apk/res/android"
xmlns:tools="http://schemas.android.com/tools"
android:layout_width="fill_parent"
android:layout_height="fill_parent"
android:background="@drawable/ptu" >
<ListView
android:id="@+id/listView"
android:layout_width="fill_parent"
android:layout_height="fill_parent" />
</LinearLayout>
2新建res/layout/list_view.xml文件
<?xml version="1.0" encoding="utf-8"?>
<LinearLayout xmlns:android="http://schemas.android.com/apk/res/android"
android:layout_width="fill_parent"
android:layout_height="fill_parent"
android:orientation="horizontal" >
<!-- 左边图片 -->
<ImageView
android:id="@+id/photo"
android:padding="10dp"
android:layout_width="48dp"
android:layout_height="48dp" />
<!-- 右边布局 -->
<LinearLayout
android:layout_width="fill_parent"
android:layout_height="wrap_content"
android:orientation="vertical" >
<!-- 上边布局 -->
<LinearLayout
android:layout_width="fill_parent"
android:layout_height="wrap_content"
android:orientation="horizontal" >
<TextView
android:id="@+id/name"
android:layout_width="wrap_content"
android:layout_height="wrap_content" />
<TextView
android:id="@+id/publish"
android:layout_width="fill_parent"
android:layout_height="wrap_content"
android:gravity="right" />
</LinearLayout>
<TextView
android:id="@+id/content"
android:layout_width="wrap_content"
android:layout_height="wrap_content" />
</LinearLayout>
</LinearLayout>
3定义src/cn.bzu.listview/Mainactivity.java文件
package cn.bzu.listview;
import java.util.ArrayList;
import java.util.HashMap;
import java.util.List;
import java.util.Map;
import android.os.Bundle;
import android.app.Activity;
import android.view.Menu;
import android.view.View;
import android.widget.AdapterView;
import android.widget.ListView;
import android.widget.SimpleAdapter;
import android.widget.AdapterView.OnItemClickListener;
import android.widget.Toast;
//第一步:extends Activity
public class MainActivity extends Activity {
// 第二步:定义数据集合
List<Map<String, ?>> data;
ListView listView;
@Override
public void onCreate(Bundle savedInstanceState) {
super.onCreate(savedInstanceState);
setContentView(R.layout.activity_main);
data = getData();
// 第三步:创建SimpleAdapter绑定数据
SimpleAdapter adapter = new SimpleAdapter(this, data,
R.layout.list_item, new String[] { "photo", "name", "publish",
"content" }, new int[] { R.id.photo, R.id.name,
R.id.publish, R.id.content });
listView=(ListView) this.findViewById(R.id.listView);
listView.setAdapter(adapter);
listView.setOnItemClickListener(new ListClickHandler());
}
//第四步:添加单击事件
private class ListClickHandler implements OnItemClickListener{
@Override
public void onItemClick(AdapterView<?> adapterView, View view, int position,
long id) {
Map<String, String> item=(Map<String, String>) data.get(position);
Toast.makeText(MainActivity.this, item.get("name").toString(), Toast.LENGTH_LONG).show();
}
}
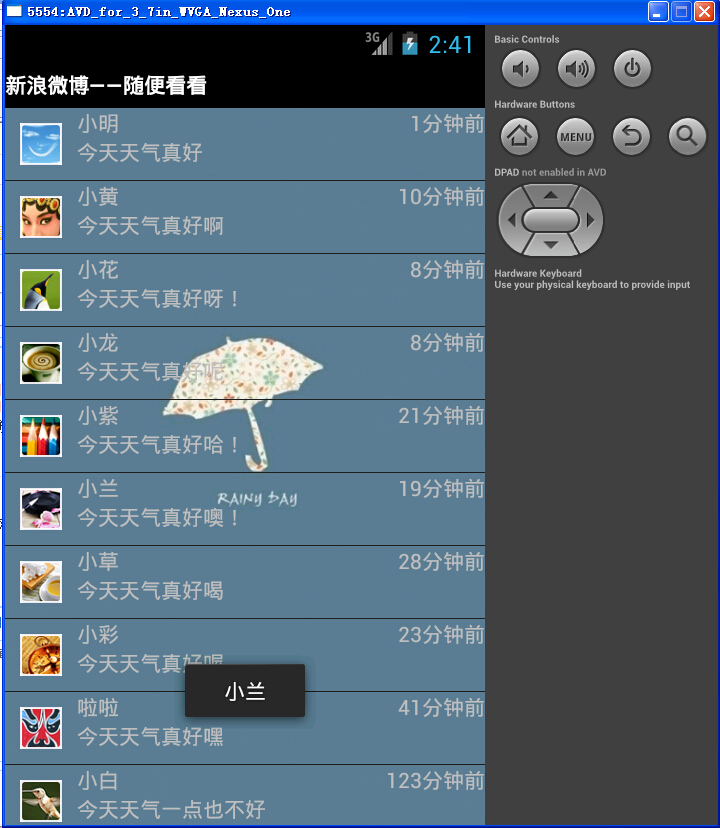
private List<Map<String, ?>> getData() {
List<Map<String, ?>> data = new ArrayList<Map<String, ?>>();
Map<String, Object> item = new HashMap<String, Object>();
item.put("photo", R.drawable.p1);
item.put("name", "小明");
item.put("publish", "1分钟前");
item.put("content", "今天天气真好");
data.add(item);
item = new HashMap<String, Object>();
item.put("photo", R.drawable.p2);
item.put("name", "小黄");
item.put("publish", "10分钟前");
item.put("content", "今天天气真好啊");
data.add(item);
item = new HashMap<String, Object>();
item.put("photo", R.drawable.p3);
item.put("name", "小花");
item.put("publish", "8分钟前");
item.put("content", "今天天气真好呀!");
data.add(item);
item = new HashMap<String, Object>();
item.put("photo", R.drawable.p4);
item.put("name", "小龙");
item.put("publish", "8分钟前");
item.put("content", "今天天气真好呢");
data.add(item);
item = new HashMap<String, Object>();
item.put("photo", R.drawable.p5);
item.put("name", "小紫");
item.put("publish", "21分钟前");
item.put("content", "今天天气真好哈!");
data.add(item);
item = new HashMap<String, Object>();
item.put("photo", R.drawable.p6);
item.put("name", "小兰");
item.put("publish", "19分钟前");
item.put("content", "今天天气真好噢!");
data.add(item);
item = new HashMap<String, Object>();
item.put("photo", R.drawable.p7);
item.put("name", "小草");
item.put("publish", "28分钟前");
item.put("content", "今天天气真好喝");
data.add(item);
item = new HashMap<String, Object>();
item.put("photo", R.drawable.p8);
item.put("name", "小彩");
item.put("publish", "23分钟前");
item.put("content", "今天天气真好喔");
data.add(item);
item = new HashMap<String, Object>();
item.put("photo", R.drawable.p9);
item.put("name", "啦啦");
item.put("publish", "41分钟前");
item.put("content", "今天天气真好嘿");
data.add(item);
item = new HashMap<String, Object>();
item.put("photo", R.drawable.p10);
item.put("name", "小白");
item.put("publish", "123分钟前");
item.put("content", "今天天气一点也不好");
data.add(item);
return data;
}
@Override
public boolean onCreateOptionsMenu(Menu menu) {
getMenuInflater().inflate(R.menu.activity_main, menu);
return true;
}
4编辑AndroidMainfest.xml文件
<manifest xmlns:android="http://schemas.android.com/apk/res/android"
package="cn.bzu.listview03"
android:versionCode="1"
android:versionName="1.0" >
<uses-sdk
android:minSdkVersion="8"
android:targetSdkVersion="15" />
<application
android:icon="@drawable/ic_launcher"
android:label="@string/app_name"
android:theme="@style/AppTheme" >
<activity
android:name=".MainActivity"
android:theme="@style/myTheme"
android:label="@string/title_activity_main" >
<intent-filter>
<action android:name="android.intent.action.MAIN" />
<category android:name="android.intent.category.LAUNCHER" />
</intent-filter>
</activity>
</application>
</manifest>
5编辑mytitlebar文件
<?xml version="1.0" encoding="utf-8"?>
<resources xmlns:android="http://schemas.android.com/apk/res/android">
<style name="myTitleBg">
<item name="android:background">#000000</item>
</style>
<style name="myTheme" parent="android:Theme">
<item name="android:windowNoTitle">false</item>
<item name="android:windowTitleSize">30dp</item>
<item name="android:windowTitleBackgroundStyle">@style/myTitleBg</item>
</style>
</resources>
三 运行图片:


 363
363

 被折叠的 条评论
为什么被折叠?
被折叠的 条评论
为什么被折叠?
 到【灌水乐园】发言


