


简介
Android中有六种的布局方式,分别是:LinearLayout(线性布局)、RelativeLayout(相对布局)、TableLayout(表格布局)、FrameLayout(帧布局)、AbsoluteLayout(绝对布局)、GridLayout(网格布局)。在开发中,我们用的最多的就是线性布局和相对布局。
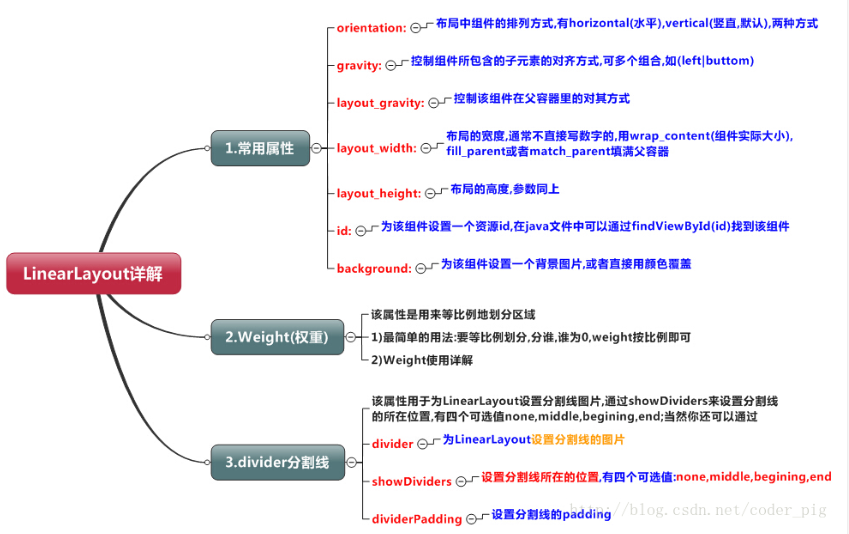
LinearLayout(线性布局)
线性布局是我们在开发中用的最多的一种布局方式。我们在进行屏幕适配时用的比较多的就是LinearLayout的weight(权重属性)。
核心属性图
weight(权重)属性详解
用法
实现代码:
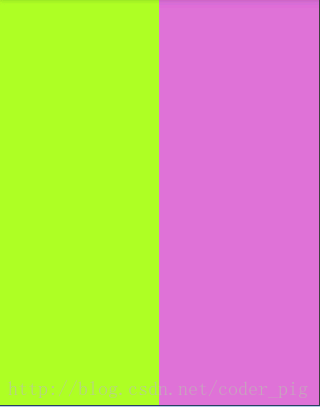
<LinearLayout xmlns:android="http://schemas.android.com/apk/res/android"
    xmlns:tools="http://schemas.android.com/tools"
    android:id="@+id/LinearLayout1"
    android:layout_width="match_parent"
    android:layout_height="match_parent"
    android:orientation="horizontal">

    <LinearLayout
        android:layout_width="0dp"
        android:layout_height="fill_parent"
        android:background="#ADFF2F"
        android:layout_weight="1"/>


    <LinearLayout
        android:layout_width="0dp"
        android:layout_height="fill_parent"
        android:background="#DA70D6"
        android:layout_weight="2"/>

</LinearLayout>
用法归纳:
按比例划分水平方向,将涉及到的view的android:width的属性设置为0dp,然后设置android:weight属性设置比例即可。竖直方向需将android:height属性设置为0dp即可,然后设置android:weight即可。
Java代码中设置weight属性:
setLayoutParams(new LayoutParams(0, LayoutParams.WRAP_CONTENT, 1))但是使用LinearLayout布局仍然存在一些问题。当界面比较复杂的时候,使用多层LinearLayout进行嵌套就会降低渲染速度,而且如果是listView或GridView上的item时,效率会更低。另外太多层的LinearLayout嵌套会占用更多的系统资源,还有可能引发stackoverflow,这个时候就需要RelativeLayout(相对布局)。
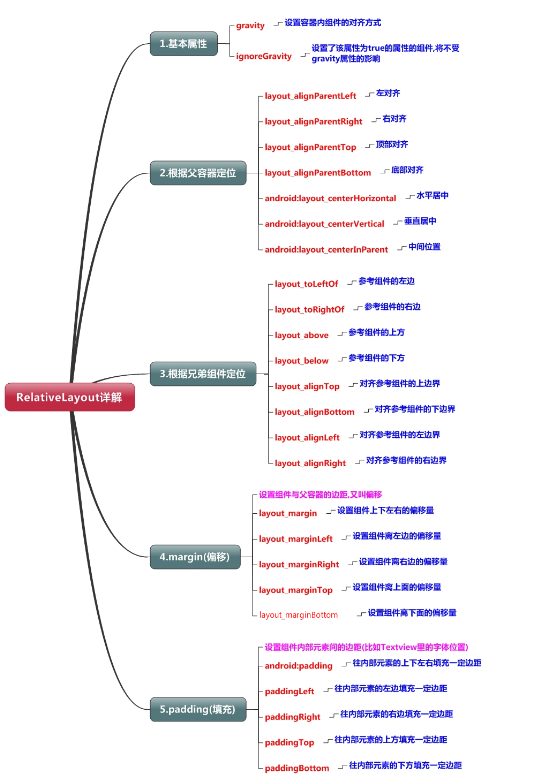
RelativeLayout(相对布局)
核心属性图
父布局定位示意图
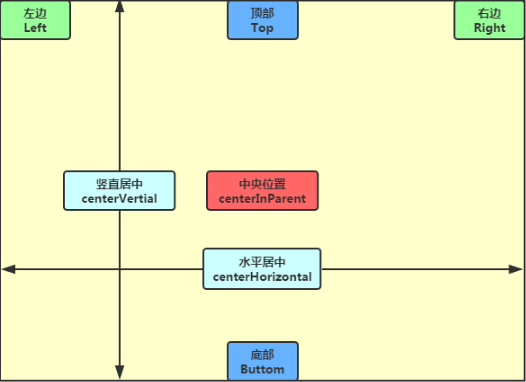
父容器定位示意图
兄弟布局组件定位
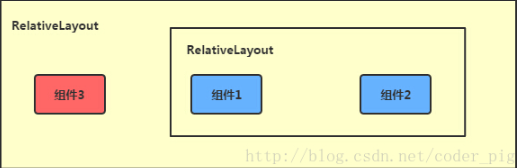
兄弟组件定位
关于兄弟组件定位最经典的例子就是"梅花布局"。
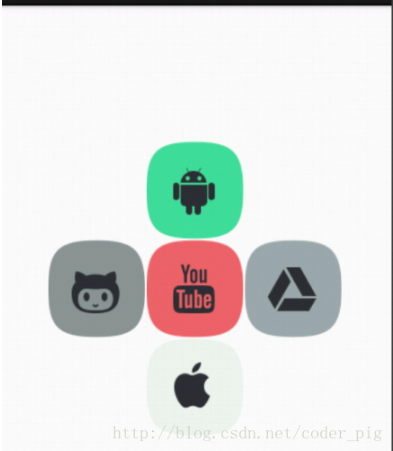
梅花布局
实现代码:
<RelativeLayout xmlns:android="http://schemas.android.com/apk/res/android"
xmlns:tools="http://schemas.android.com/tools"
android:id="@+id/RelativeLayout1"
android:layout_width="match_parent"
android:layout_height="match_parent" >
<!-- 这个是在容器中央的 -->
<ImageView
android:id="@+id/img1"
android:layout_width="80dp"
android:layout_height="80dp"
android:layout_centerInParent="true"
android:src="@drawable/pic1"/>
<!-- 在中间图片的左边 -->
<ImageView
android:id="@+id/img2"
android:layout_width="80dp"
android:layout_height="80dp"
android:layout_toLeftOf="@id/img1"
android:layout_centerVertical="true"
android:src="@drawable/pic2"/>
<!-- 在中间图片的右边 -->
<ImageView
android:id="@+id/img3"
android:layout_width="80dp"
android:layout_height="80dp"
android:layout_toRightOf="@id/img1"
android:layout_centerVertical="true"
android:src="@drawable/pic3"/>
<!-- 在中间图片的上面-->
<ImageView
android:id="@+id/img4"
android:layout_width="80dp"
android:layout_height="80dp"
android:layout_above="@id/img1"
android:layout_centerHorizontal="true"
android:src="@drawable/pic4"/>
<!-- 在中间图片的下面 -->
<ImageView
android:id="@+id/img5"
android:layout_width="80dp"
android:layout_height="80dp"
android:layout_below="@id/img1"
android:layout_centerHorizontal="true"
android:src="@drawable/pic5"/>
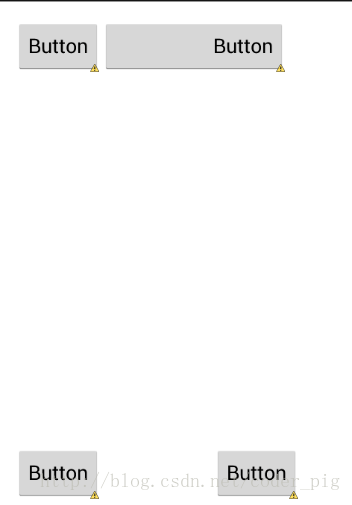
</RelativeLayout>margin与padding的区别
margin代表的是偏移,比如marginleft="5dp"表示组件离容器左边缘偏移5dp;而padding代表的则是填充,比如TextView中的文字,将textView的paddingleft="5dp",则是在组件里的元素的左边填充5dp的空间。 margin针对的是容器中的组件,而padding针对的是组件中的元素。
比较实例代码如下:
<RelativeLayout xmlns:android="http://schemas.android.com/apk/res/android"
    xmlns:tools="http://schemas.android.com/tools"
    android:layout_width="match_parent"
    android:layout_height="match_parent"
    android:paddingBottom="@dimen/activity_vertical_margin"
    android:paddingLeft="@dimen/activity_horizontal_margin"
    android:paddingRight="@dimen/activity_horizontal_margin"
    android:paddingTop="@dimen/activity_vertical_margin"
    tools:context=".MainActivity" >

    <Button
        android:id="@+id/btn1"
        android:layout_height="wrap_content"
        android:layout_width="wrap_content"
        android:text="Button"/>
    <Button
        android:paddingLeft="100dp"
        android:layout_height="wrap_content"
        android:layout_width="wrap_content"
        android:text="Button"
        android:layout_toRightOf="@id/btn1"/>

    <Button
        android:id="@+id/btn2"
        android:layout_height="wrap_content"
        android:layout_width="wrap_content"
        android:text="Button"
        android:layout_alignParentBottom="true"/>
    <Button
        android:layout_marginLeft="100dp"
        android:layout_height="wrap_content"
        android:layout_width="wrap_content"
        android:text="Button"
        android:layout_toRightOf="@id/btn2"
        android:layout_alignParentBottom="true"/>

</RelativeLayout>
运行效果图:
TableLayout(表格布局)
介绍
在HTML中,我们可以通过< table >< tr >< td >等属性就可以生成一个HTML的表格, 而Android中也允许我们使用表格的方式来排列组件,就是行与列的方式,就说我们这节的TableLayout! 但却不像我们后面会讲到的Android 4.0后引入的GridLayout(网格)布局一样,直接就可以设置多少行与多少列。
核心属性图
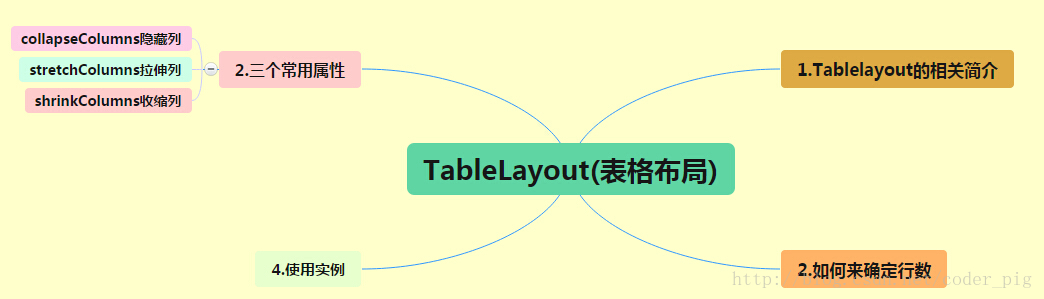
如何确定行数和列数
如果我们直接往TableLayout中添加组件的话,那么这个组件将占满一行!!!
如果我们想一行上有多个组件的话,就要添加一个TableRow的容器,把组件都丢到里面!
tablerow中的组件个数就决定了该行有多少列,而列的宽度由该列中最宽的单元格决定
tablerow的layout_width属性,默认是fill_parent的,我们自己设置成其他的值也不会生效!!! 但是layout_height默认是wrapten——content的,我们却可以自己设置大小!
整个表格布局的宽度取决于父容器的宽度(占满父容器本身)
有多少行就要自己数啦,一个tablerow一行,一个单独的组件也一行!多少列则是看tableRow中 的组件个数,组件最多的就是TableLayout的列数
三个常用属性
如果我们直接往TableLayout中添加组件的话,那么这个组件将占满一行!!!
如果我们想一行上有多个组件的话,就要添加一个TableRow的容器,把组件都丢到里面!
tablerow中的组件个数就决定了该行有多少列,而列的宽度由该列中最宽的单元格决定
tablerow的layout_width属性,默认是fill_parent的,我们自己设置成其他的值也不会生效!!!
但是layout_height默认是wrapten——content的,我们却可以自己设置大小!整个表格布局的宽度取决于父容器的宽度(占满父容器本身)
有多少行就要自己数啦,一个tablerow一行,一个单独的组件也一行!多少列则是看tableRow中 的组件个数,组件最多的就是TableLayout的列数
三个常用的属性
android:collapseColumns:设置需要被隐藏的列的序号
android:shrinkColumns:设置允许被收缩的列的列序号
android:stretchColumns:设置运行被拉伸的列的列序号
以上三个属性的列号都是从0开始算的,比如collapseColumns = "1",对应的就是第2列。可以设置多个,使用","隔开,比如"0,2",如果是所有列都生效,则用"*"号即可。除了这三个常用属性,还有两个属性,分别就是跳格子以及合并单元格:
android:layout_column="2":表示的就是跳过第二个,直接显示到第三个格子处,从1开始算的
android:layout_span="4":表示合并4个单元格,也就说这个组件占4个单元格
属性使用实例:
①、collapseColumns(隐藏列)
在TableRow中定义5个按钮后,接着在最外层的TableLayout中添加以下属性: android:collapseColumns = "0,2"(隐藏第一与第三列)。
<TableLayout
    android:id="@+id/TableLayout2"
    android:layout_width="fill_parent"
    android:layout_height="wrap_content"
    android:collapseColumns="0,2" >

    <TableRow>

        <Button
            android:layout_width="wrap_content"
            android:layout_height="wrap_content"
            android:text="one" />

        <Button
            android:layout_width="wrap_content"
            android:layout_height="wrap_content"
            android:text="two" />

        <Button
            android:layout_width="wrap_content"
            android:layout_height="wrap_content"
            android:text="three" />

        <Button
            android:layout_width="wrap_content"
            android:layout_height="wrap_content"
            android:text="four" />

        <Button
            android:layout_width="wrap_content"
            android:layout_height="wrap_content"
            android:text="five" />
    </TableRow>
</TableLayout>
效果图:

②、stretchColumns(拉伸列)
在TableLayout中设置了四个按钮,接着在最外层的TableLayout中添加以下属性: android:stretchColumns = "1"(设置第二列为可拉伸列,让该列填满这一行所有的剩余空间)
<TableLayout
    android:id="@+id/TableLayout2"
    android:layout_width="fill_parent"
    android:layout_height="wrap_content"
    android:stretchColumns="1" >

    <TableRow>

        <Button
            android:layout_width="wrap_content"
            android:layout_height="wrap_content"
            android:text="one" />

        <Button
            android:layout_width="wrap_content"
            android:layout_height="wrap_content"
            android:text="two" />

        <Button
            android:layout_width="wrap_content"
            android:layout_height="wrap_content"
            android:text="three" />

        <Button
            android:layout_width="wrap_content"
            android:layout_height="wrap_content"
            android:text="four" />
    </TableRow>
</TableLayout>
效果图:

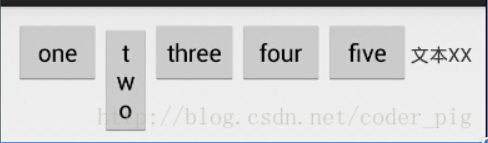
③、shrinkColumns(收缩列)
设置了5个按钮和一个文本框,在最外层的TableLayout中添加以下属性: android:shrinkColumns = "1"(设置第二个列为可收缩列)
<TableLayout
    android:id="@+id/TableLayout2"
    android:layout_width="fill_parent"
    android:layout_height="wrap_content"
    android:shrinkColumns="1" >

    <TableRow>

        <Button
            android:layout_width="wrap_content"
            android:layout_height="wrap_content"
            android:text="one" />

        <Button
            android:layout_width="wrap_content"
            android:layout_height="wrap_content"
            android:text="two" />

        <Button
            android:layout_width="wrap_content"
            android:layout_height="wrap_content"
            android:text="three" />

        <Button
            android:layout_width="wrap_content"
            android:layout_height="wrap_content"
            android:text="four" />

        <Button
            android:layout_width="wrap_content"
            android:layout_height="wrap_content"
            android:text="five" />

        <TextView
            android:layout_width="wrap_content"
            android:layout_height="wrap_content"
            android:text="文本XX" />
    </TableRow>
</TableLayout>
效果图:
FrameLayout(帧布局)
介绍
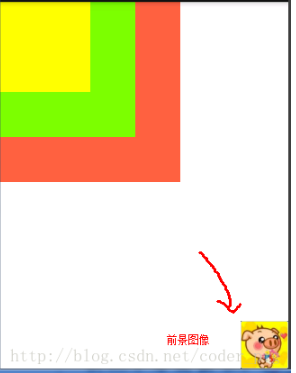
FrameLayout(帧布局)是六个布局中最简单的布局,这个布局直接在屏幕上开辟出一块空白的区域,当我们往里面添加控件的时候,会默认把他们放到这块区域的左上角,而这种布局方式却没有任何的定位方式,所以它应用的场景并不多;帧布局的大小由控件中最大的子控件决定,如果控件的大小一样大的话,那么同一时刻就只能看到最上面的那个组件!后续添加的控件会覆盖前一个!虽然默认会将控件放置在左上角,但是我们也可以通过layout_gravity属性,指定到其他的位置!
常用属性
android:foreground:*设置改帧布局容器的前景图像
android:foregroundGravity:设置前景图像显示的位置
前景图片:永远处于帧布局最上面,直接面对用户的图像,就是不会被覆盖的图片。
实例演示
<FrameLayout xmlns:android="http://schemas.android.com/apk/res/android"
    xmlns:tools="http://schemas.android.com/tools"
    android:id="@+id/FrameLayout1"
    android:layout_width="match_parent"
    android:layout_height="match_parent"
    tools:context=".MainActivity"
    android:foreground="@drawable/logo"
    android:foregroundGravity="right|bottom">

    <TextView
        android:layout_width="200dp"
        android:layout_height="200dp"
        android:background="#FF6143" />
    <TextView
        android:layout_width="150dp"
        android:layout_height="150dp"
        android:background="#7BFE00" />
     <TextView
        android:layout_width="100dp"
        android:layout_height="100dp"
        android:background="#FFFF00" />

</FrameLayout>
效果图
GridLayout(网格布局)
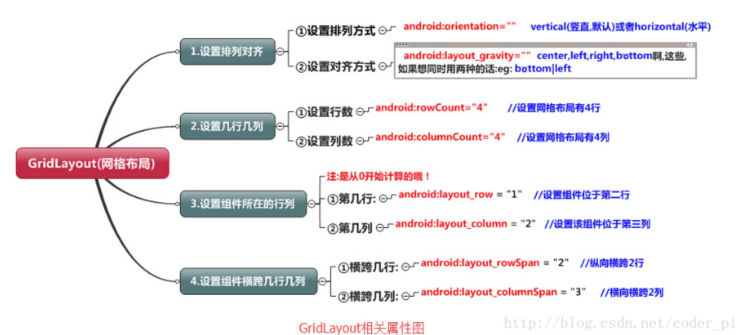
核心属性图
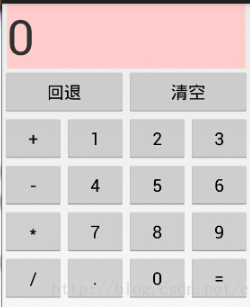
使用实例
效果图:
实现代码:
<GridLayout xmlns:android="http://schemas.android.com/apk/res/android"
    xmlns:tools="http://schemas.android.com/tools"
    android:id="@+id/GridLayout1"
    android:layout_width="wrap_content"
    android:layout_height="wrap_content"
    android:columnCount="4"
    android:orientation="horizontal"
    android:rowCount="6" >

    <TextView
        android:layout_columnSpan="4"
        android:layout_gravity="fill"
        android:layout_marginLeft="5dp"
        android:layout_marginRight="5dp"
        android:background="#FFCCCC"
        android:text="0"
        android:textSize="50sp" />

    <Button
        android:layout_columnSpan="2"
        android:layout_gravity="fill"
        android:text="回退" />

    <Button
        android:layout_columnSpan="2"
        android:layout_gravity="fill"
        android:text="清空" />

    <Button android:text="+" />

    <Button android:text="1" />

    <Button android:text="2" />

    <Button android:text="3" />

    <Button android:text="-" />

    <Button android:text="4" />

    <Button android:text="5" />

    <Button android:text="6" />

    <Button android:text="*" />

    <Button android:text="7" />

    <Button android:text="8" />

    <Button android:text="9" />

    <Button android:text="/" />

    <Button
        android:layout_width="wrap_content"
        android:text="." />

    <Button android:text="0" />

    <Button android:text="=" />

</GridLayout>
代码解析:只是"回退"与"清除"按钮横跨两列,而其他的都是直接添加的,默认每个组件都是 占一行一列,另外还有一点要注意的: 我们通过:android:layout_rowSpan与android:layout_columnSpan设置了组件横跨 多行或者多列的话,如果你要让组件填满横越过的行或列的话,需要添加下面这个属性: android:layout_gravity = "fill"。
归纳
先定义组件的对其方式 android:orientation 水平或者竖直,设置多少行与多少列
设置组件所在的行或者列,记得是从0开始算的,不设置默认每个组件占一行一列
设置组件横跨几行或者几列;设置完毕后,需要在设置一个填充:android:layout_gravity = "fill"。
AbsoluteLayout(绝对布局)
介绍
AbsoluteLayout是直接通过X,Y坐标来 控制组件在Activity中的位置的!另外这个但单位是dp!
核心属性
①控制大小: android:layout_width:组件宽度
android:layout_height:组件高度
②控制位置: android:layout_x:设置组件的X坐标
android:layout_y:设置组件的Y坐标


 1571
1571


 被折叠的 条评论
为什么被折叠?
被折叠的 条评论
为什么被折叠?
 到【灌水乐园】发言


