


什么是Cinder?
1.简介
Cinder从Openstack的Folsom版本(2012年9月发布)开始出现,用以替代Nova-Volume服务,Cinder为Openstack提供了管理卷(volunme)的基础设施。
Cinder是受请求得到、自助化访问的块储存服务,即Cinder有两个显著地特点,第一,必须用户提出请求,才能得到该服务;第二,用户可以自定义的半自动化服务。Cinder实现LVM(逻辑卷管理),用以呈现存储资源给能够被Nova调用的端用户。简而言之,Cinder虚拟化块存储设备池,提供端用户自助服务的API用以请求和使用这些块资源,并且不用了解存储的位置或设备信息。
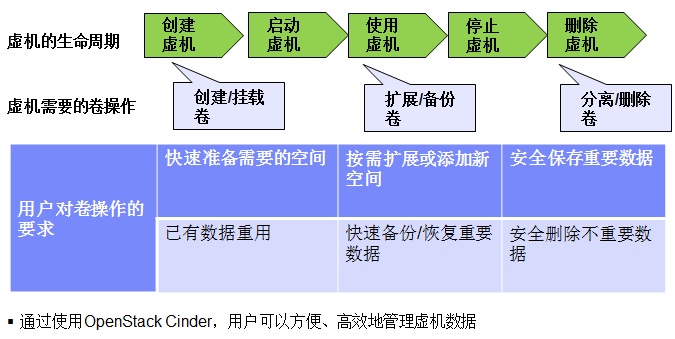
2.虚拟机对存储的要求
下面是我们创建虚拟机实例时需要调用存储服务的流程:
3.相关组件
1.cinder-api:
Accepts API requests, and routes them to the cinder-volume for action.
2.cinder-volume:
Interacts directly with the Block Storage service, and processes such as the cinder-scheduler. It also interacts with these processes through a message queue. The cinder-volume service responds to read and write requests sent to the Block Storage service to maintain state. It can interact with a variety of storage providers through a driver architecture.
3.cinder-scheduler daemon:
Selects the optimal storage provider node on which to create the volume. A similar component to the nova-scheduler.
4.cinder-backup daemon:
The cinder-backup service provides backing up volumes of any type to a backup storage provider. Like the cinder-volume service, it can interact with a variety of storage providers through a driver architecture.
5.Messaging queue:
Routes information between the Block Storage processes.
懒得翻译了,反正感觉也没有什么人在看,就当做是自己的笔记了….
简要说下三个主要组成部分:
–cinder-api 组件负责向外提供Cinder REST API
–cinder-scheduler 组件负责分配存储资源
–cinder-volume 组件负责封装driver,不同的driver负责控制不同的后端存储
cinder-controller部署
注意:以下操作是在controller节点上运行。因为跟之前安装的服务都是大同小异,我只对不同部分做介绍,如果有不明白的,可以留言问我,或者翻翻之前的博客。
1.创建数据库
创建cinder数据库和cinder管理员:
command:
mysql -u root -p123456
CREATE DATABASE cinder;
GRANT ALL PRIVILEGES ON cinder.* TO 'cinder'@'localhost' \
  IDENTIFIED BY '123456';
GRANT ALL PRIVILEGES ON cinder.* TO 'cinder'@'%' \
  IDENTIFIED BY '123456';
exit
outPut:
[root@controller ~]# mysql -u root -p123456
Welcome to the MariaDB monitor.  Commands end with ; or \g.
Your MariaDB connection id is 365
Server version: 10.1.12-MariaDB MariaDB Server

Copyright (c) 2000, 2016, Oracle, MariaDB Corporation Ab and others.

Type 'help;' or '\h' for help. Type '\c' to clear the current input statement.

MariaDB [(none)]> CREATE DATABASE cinder;
Query OK, 1 row affected (0.00 sec)

MariaDB [(none)]> GRANT ALL PRIVILEGES ON cinder.* TO 'cinder'@'localhost' \
    ->   IDENTIFIED BY '123456';
Query OK, 0 rows affected (0.00 sec)

MariaDB [(none)]> GRANT ALL PRIVILEGES ON cinder.* TO 'cinder'@'%' \
    ->   IDENTIFIED BY '123456';
Query OK, 0 rows affected (0.00 sec)

MariaDB [(none)]> exit
Bye
2.创建cinder用户
在openstack中创建cinder用户,并设置为service tenant的管理员:
[root@controller ~]# source ~/admin-openrc
[root@controller ~]# openstack user create --domain default --password-prompt cinder
User Password:
Repeat User Password:
+-----------+----------------------------------+
| Field     | Value                            |
+-----------+----------------------------------+
| domain_id | 098b1a4d36d241ed87e979ec86d32722 |
| enabled   | True                             |
| id        | 897788ab549f4490aa6cf6e93efb3b09 |
| name      | cinder                           |
+-----------+----------------------------------+
[root@controller ~]# openstack role add --project service --user cinder admin
[root@controller ~]#
3.创建API端口
创建cinder and cinderv2 service entities,并创建相对应端口
[root@controller ~]# openstack service create --name cinder \
>   --description "OpenStack Block Storage" volume
+-------------+----------------------------------+
| Field       | Value                            |
+-------------+----------------------------------+
| description | OpenStack Block Storage          |
| enabled     | True                             |
| id          | ac05b107e8744008878aedc102bfbe0b |
| name        | cinder                           |
| type        | volume                           |
+-------------+----------------------------------+
[root@controller ~]# openstack service create --name cinderv2 \
>   --description "OpenStack Block Storage" volumev2
+-------------+----------------------------------+
| Field       | Value                            |
+-------------+----------------------------------+
| description | OpenStack Block Storage          |
| enabled     | True                             |
| id          | ebe25d2e0527457ba8ce2f117b0225fd |
| name        | cinderv2                         |
| type        | volumev2                         |
+-------------+----------------------------------+
[root@controller ~]#
[root@controller ~]# openstack endpoint create --region RegionOne \
> volume public http://controller.example.com:8776/v1/%\(tenant_id\)s
+--------------+-----------------------------------------------------+
| Field | Value |
+--------------+-----------------------------------------------------+
| enabled | True |
| id | b96b9d92e36d41f0a921b9b59292eb0e |
| interface | public |
| region | RegionOne |
| region_id | RegionOne |
| service_id | ac05b107e8744008878aedc102bfbe0b |
| service_name | cinder |
| service_type | volume |
| url | http://controller.example.com:8776/v1/%(tenant_id)s |
+--------------+-----------------------------------------------------+
[root@controller ~]# openstack endpoint create --region RegionOne \
> volume internal http://controller.example.com:8776/v1/%\(tenant_id\)s
+--------------+-----------------------------------------------------+
| Field | Value |
+--------------+-----------------------------------------------------+
| enabled | True |
| id | 89940a77b9034b4a9a0d7685d3021e3c |
| interface | internal |
| region | RegionOne |
| region_id | RegionOne |
| service_id | ac05b107e8744008878aedc102bfbe0b |
| service_name | cinder |
| service_type | volume |
| url | http://controller.example.com:8776/v1/%(tenant_id)s |
+--------------+-----------------------------------------------------+
[root@controller ~]# openstack endpoint create --region RegionOne \
> volume admin http://controller.example.com:8776/v1/%\(tenant_id\)s
+--------------+-----------------------------------------------------+
| Field | Value |
+--------------+-----------------------------------------------------+
| enabled | True |
| id | 6cda84d1a57247699d304b0eeeb916a9 |
| interface | admin |
| region | RegionOne |
| region_id | RegionOne |
| service_id | ac05b107e8744008878aedc102bfbe0b |
| service_name | cinder |
| service_type | volume |
| url | http://controller.example.com:8776/v1/%(tenant_id)s |
+--------------+-----------------------------------------------------+
[root@controller ~]# openstack endpoint create --region RegionOne \
> volumev2 public http://controller.example.com:8776/v2/%\(tenant_id\)s
+--------------+-----------------------------------------------------+
| Field | Value |
+--------------+-----------------------------------------------------+
| enabled | True |
| id | f20f4a5536eb491d9cd1101066745ea9 |
| interface | public |
| region | RegionOne |
| region_id | RegionOne |
| service_id | ebe25d2e0527457ba8ce2f117b0225fd |
| service_name | cinderv2 |
| service_type | volumev2 |
| url | http://controller.example.com:8776/v2/%(tenant_id)s |
+--------------+-----------------------------------------------------+
[root@controller ~]# openstack endpoint create --region RegionOne \
> volumev2 internal http://controller.example.com:8776/v2/%\(tenant_id\)s
+--------------+-----------------------------------------------------+
| Field | Value |
+--------------+-----------------------------------------------------+
| enabled | True |
| id | b24401cc22c34943b5b4819bbc3988ad |
| interface | internal |
| region | RegionOne |
| region_id | RegionOne |
| service_id | ebe25d2e0527457ba8ce2f117b0225fd |
| service_name | cinderv2 |
| service_type | volumev2 |
| url | http://controller.example.com:8776/v2/%(tenant_id)s |
+--------------+-----------------------------------------------------+
[root@controller ~]# openstack endpoint create --region RegionOne \
> volumev2 admin http://controller.example.com:8776/v2/%\(tenant_id\)s
+--------------+-----------------------------------------------------+
| Field | Value |
+--------------+-----------------------------------------------------+
| enabled | True |
| id | eeb0c5598c8c4a63860fb432f56a2be7 |
| interface | admin |
| region | RegionOne |
| region_id | RegionOne |
| service_id | ebe25d2e0527457ba8ce2f117b0225fd |
| service_name | cinderv2 |
| service_type | volumev2 |
| url | http://controller.example.com:8776/v2/%(tenant_id)s |
+--------------+-----------------------------------------------------+
[root@controller ~]# 4.安装相关组件
1.安装
yum install openstack-cinder -y2.修改配置文件
cp -p /etc/cinder/cinder.conf /etc/cinder/cinder.conf.bak
vim /etc/cinder/cinder.conf
[DEFAULT]
...
rpc_backend = rabbit
auth_strategy = keystone
my_ip = 192.168.0.17
[oslo_messaging_rabbit]
...
rabbit_host = controller.example.com
rabbit_userid = openstack
rabbit_password = henry
[database]
...
connection = mysql+pymysql://cinder:123456@controller.example.com/cinder
[keystone_authtoken]
...
auth_uri = http://controller.example.com:5000
auth_url = http://controller.example.com:35357
memcached_servers = controller.example.com:11211
auth_type = password
project_domain_name = default
user_domain_name = default
project_name = service
username = cinder
password = 123456
[oslo_concurrency]
...
lock_path = /var/lib/cinder/tmp
5.同步数据库
su -s /bin/sh -c "cinder-manage db sync" cinder忽略掉有关弃用的输出
6.配置计算节点去使用Cinder
vim /etc/nova/nova.conf
[cinder]
os_region_name = RegionOne
7.相关服务
1.重启openstack-nova-api.service
systemctl restart openstack-nova-api.service2.启动openstack-cinder-api和openstack-cinder-scheduler,并设置为开机自启
systemctl enable openstack-cinder-api.service openstack-cinder-scheduler.service
systemctl start openstack-cinder-api.service openstack-cinder-scheduler.service
controller-block配置
注意,以下操作均在storage节点中执行
1.安装lvm2组件
yum install lvm2 -y2.启动服务并设置为开机自启
systemctl enable lvm2-lvmetad.service
systemctl start lvm2-lvmetad.service
3.创建卷组
/dev/vdb是我额外添加的一块新的硬盘,不是操作系统盘。
1.创建物理卷:
[root@storage ~]# pvcreate /dev/vdb
  Physical volume "/dev/vdb" successfully created
[root@storage ~]#
2.创建cinder-volumes卷组:
[root@storage ~]# vgcreate cinder-volumes /dev/vdb
  Volume group "cinder-volumes" successfully created
[root@storage ~]#
3.编辑/etc/lvm/lvm.conf文件
添加过滤规则,允许访问/dev/vdb,拒绝其他设备。
vim /etc/lvm/lvm.conf
devices {
...
filter = [ "a/vdb/", "r/.*/"]
4.安装其他组件
1.安装openstack-cinder和targetcli
yum install openstack-cinder targetcli -y 2.编辑/etc/cinder/cinder.conf
cp -p /etc/cinder/cinder.conf /etc/cinder/cinder.conf.bak
vim /etc/cinder/cinder.conf
[DEFAULT]
...
rpc_backend = rabbit
auth_strategy = keystone
my_ip = 192.168.0.19
enabled_backends = lvm
glance_api_servers = http://controller.example.com:9292
[oslo_messaging_rabbit]
...
rabbit_host = controller.example.com
rabbit_userid = openstack
rabbit_password = henry
[database]
...
connection = mysql+pymysql://cinder:123456@controller.example.com/cinder
[keystone_authtoken]
...
auth_uri = http://controller.example.com:5000
auth_url = http://controller.example.com:35357
memcached_servers = controller.example.com:11211
auth_type = password
project_domain_name = default
user_domain_name = default
project_name = service
username = cinder
password = 123456
[lvm]   #原文件没有该模块,手动添加至尾行
volume_driver = cinder.volume.drivers.lvm.LVMVolumeDriver
volume_group = cinder-volumes
iscsi_protocol = iscsi
iscsi_helper = lioadm
[oslo_concurrency]
...
lock_path = /var/lib/cinder/tmp
总览:
[root@storage ~]# cat /etc/cinder/cinder.conf | grep -v ^# | grep -v ^$
[DEFAULT]
rpc_backend = rabbit
auth_strategy = keystone
my_ip = 192.168.0.19
enabled_backends = lvm
glance_api_servers = http://controller.example.com:9292
[BACKEND]
[BRCD_FABRIC_EXAMPLE]
[CISCO_FABRIC_EXAMPLE]
[COORDINATION]
[FC-ZONE-MANAGER]
[KEYMGR]
[cors]
[cors.subdomain]
[database]
connection = mysql+pymysql://cinder:123456@controller.example.com/cinder
[keystone_authtoken]
auth_uri = http://controller.example.com:5000
auth_url = http://controller.example.com:35357
memcached_servers = controller.example.com:11211
auth_type = password
project_domain_name = default
user_domain_name = default
project_name = service
username = cinder
password = 123456
[matchmaker_redis]
[oslo_concurrency]
lock_path = /var/lib/cinder/tmp
[oslo_messaging_amqp]
[oslo_messaging_notifications]
[oslo_messaging_rabbit]
rabbit_host = controller.example.com
rabbit_userid = openstack
rabbit_password = henry
[oslo_middleware]
[oslo_policy]
[oslo_reports]
[oslo_versionedobjects]
[ssl]
[lvm]
volume_driver = cinder.volume.drivers.lvm.LVMVolumeDriver
volume_group = cinder-volumes
iscsi_protocol = iscsi
iscsi_helper = lioadm
[root@storage ~]#
5.启动相关服务
启动相关服务并设置为开机自启
systemctl enable openstack-cinder-volume.service target.service
systemctl start openstack-cinder-volume.service target.service
哈哈,云主机被黑了,还被植入了后门程序,懒得弄了,所以直接关机了。因为没有打快照,所以部署教程就到此结束了。其实到这里大家可以创建个虚拟机玩玩了。


 2118
2118


 被折叠的 条评论
为什么被折叠?
被折叠的 条评论
为什么被折叠?
 到【灌水乐园】发言


