


实现以鼠标为中心缩放图片需求的核心思想就是:
初始鼠标位置距离图片左侧的left、top和宽高的比例,与图片放大后的比例相同
计算方式,主要是知道放大后鼠标的位置和放大前鼠标的位置,相减得到偏移的距离,使用transform:translate移动就行。在这个基础上不管是缩小还是放大,都需要把上一次translate对应坐标的值 - 这次得到的值
思维导向图:
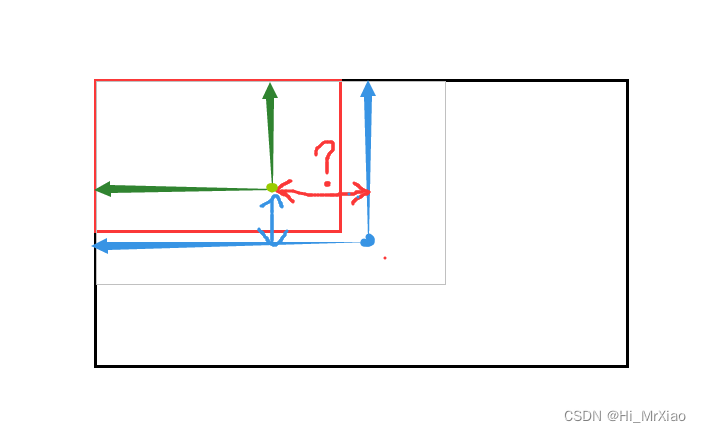
图片缩放元素的需要添加样式 transform-origin: 0 0,将transform效果变换的原点移到元素左上角。
代码如下:
	data () {
	    return {
	     beignImgBoxWidth:"",
	     beignImgBoxHeight:'',
	    	zoomScale:1,
	     beginX:"",
	     beginY:""
	    }
	},
	mounted () {
	},
	methods:{
	    imgLoad(){
	        this.zoomScale=1
	        this.beignImgBoxWidth=$(".imgAuto").width()
	        this.beignImgBoxHeight=$(".imgAuto").height()
	        // 初始加载图片,使图片在盒子里上下左右居中
	        this.beginX = $(".imgBox").width()*0.5 - this.beignImgBoxWidth*0.5;
	        this.beginY = $(".imgBox").height()*0.5  - this.beignImgBoxHeight*0.5;
	        $(".imgAuto").css({
	            "width":this.beignImgBoxWidth+"px",
	            "height":this.beignImgBoxHeight+"px",
	            "transform":"translate(" + this.beginX + "px, " + this.beginY + "px) scale(1)"
	        })
	    },
	    // 缩放图片
	    rollImg(e) {
	        var detail
	        if(e.wheelDelta){
	            detail = e.wheelDelta / 120;
	        }else if(e.detail){
	            detail = - e.detail / 3;
	        }
	        var imgRect=document.querySelector(".imgAuto").getBoundingClientRect()
	        // 大于0 为放大
	        if(detail>0){
	            if(this.zoomScale>=3){
	                this.zoomScale=3
	            }else{
	                this.zoomScale+=0.1
	            }
	        }else{
	            if(this.zoomScale<=1){
	                this.zoomScale=1
	            }else{
	                this.zoomScale-=0.1
	            }
	        }
	        // 初始鼠标位置距离图片左侧的left、top和宽高的比例,与图片放大后的比例相同
	        // 初始鼠标位置距离图片左侧的距离和宽度的比例
	        var oldWidthLeftScale=(e.clientX-imgRect.left)/imgRect.width
	        // 放大后的宽度,scale放大缩小不会更改图片可视宽高,所以使用缩放比例乘以初始加载时图片的宽高就是最新值
	        var newWidth=this.beignImgBoxWidth*this.zoomScale
	        // 图片放大后鼠标距离左侧的距离(新)
	        var newRectLeft=newWidth*oldWidthLeftScale
	        // 放大后左侧的距离减去没放大时左侧的距离就是把放大的图片移动到原来鼠标位置需要移动的距离,使用之前translatex减去最新需要移动的距离
	        this.beginX=this.beginX-(newRectLeft-(e.clientX-imgRect.left))
	// top值同理
	        var oldHeightTopScale=(e.clientY-imgRect.top)/imgRect.height
	        var newHeight=this.beignImgBoxHeight*this.zoomScale
	        var newRectTop=newHeight*oldHeightTopScale
	        this.beginY=this.beginY-(newRectTop-(e.clientY-imgRect.top))
	        $(".imgAuto").css("transform","translate(" + this.beginX + "px, " + this.beginY + "px) scale(" + this.zoomScale + ")")
	    },
	 }


 1万+
1万+


 被折叠的 条评论
为什么被折叠?
被折叠的 条评论
为什么被折叠?
 到【灌水乐园】发言


