


目录
Occlum是一个Intel SGX内存安全、多进程库操作系统(LibOS)。作为一个libOS,它使得合法应用程序在SGX上运行,几乎不需要修改源代码,从而透明地保护用户工作负载的机密性和完整性。
一、Docker部署
1.1 硬件支持
首先,请确保裸机或虚拟机支持SGX。否则,用户只能尝试SW仿真模式。
为了更好地用户体验,要求带有FLC的SGX1或SGX2,用户可以使用cpuid命令检测硬件是否满足Occlum要求。
#SGX2
cpuid | grep SGX2
#FLC
cpuid | grep SGX_LC
注:暂无硬件支持,我们以仿真模式为例。
1.2 环境
实验环境:Ubuntu 22.04.3 LTS
Docker version 20.10.10, build b4856D36
1.3 拉取镜像创建虚机
# 1. Create softlinks on host
mkdir -p /dev/sgx
ln -sf ../sgx_enclave /dev/sgx/enclave
ln -sf ../sgx_provision /dev/sgx/provision
# 2. Create container in two methods:
# (1) With privileged mode特权模式
docker run -it --privileged -v /dev/sgx:/dev/sgx occlum/occlum:latest-ubuntu20.04
# (2) With non-privileged mode非特权模式
docker run -it --device /dev/sgx/enclave --device /dev/sgx/provision occlum/occlum:latest-ubuntu20.04
1.4 简单验证
SGX SDK提供了简单的样例来简单验证SGX是否正常工作。
cd /opt/intel/sgxsdk/SampleCode/SampleEnclave
仿真模式下,需要将该目录下的Makefile中第35行SGX_MODE修改为SIM。
#Makefile中
35 SGX_MODE ?= SIM
make && ./app
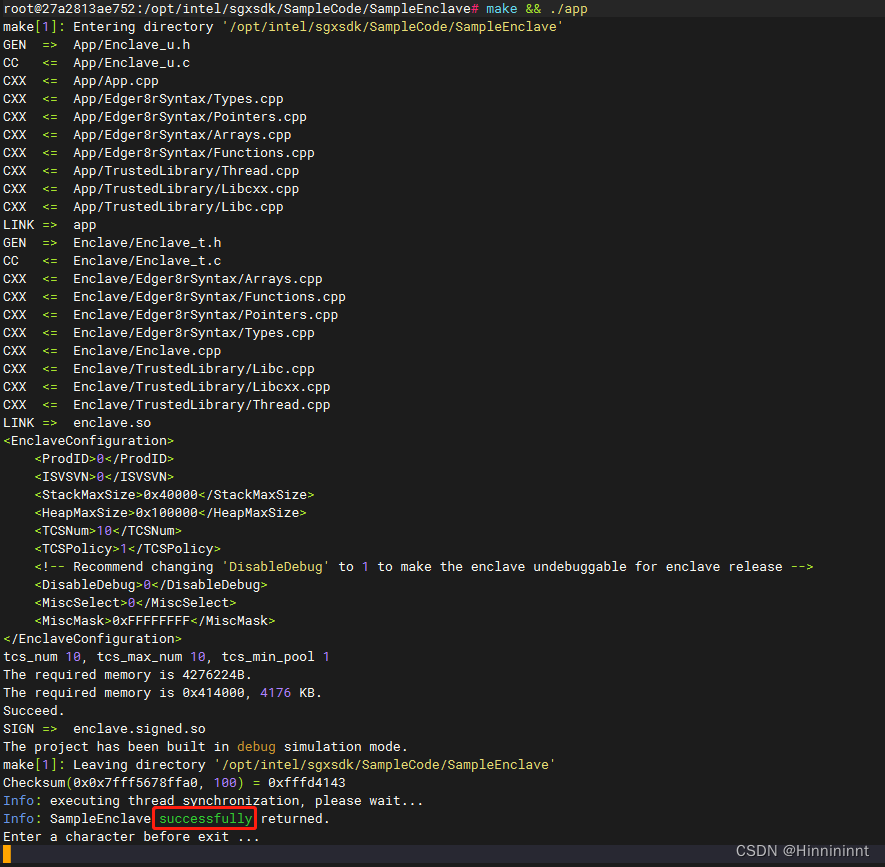
到此,验证ok。Occlum自带的demo位置在/root/demos。
二、Occlum中gcc编译
以Hello World为例,展示如何在Occlum中编译SGX APP。
#include <stdio.h>

int main() {
    printf("Hello World\n");
    return 0;
}
2.1 交叉编译
occlum-gcc -o hello_world hello_world.c
./hello_world
使用occlum-gcc编译时,生成的二进制文件将基于musl-libc库。
请注意,Occlum工具链并非传统意义上的交叉编译:Occlum工具链构建的二进制文件也可在Linux上运行。此属性使得编译、调试和测试用于Occlum的用户程序变得更加方便。
2.2 初始化Occlum实例
mkdir occlum_instance && cd occlum_instance
occlum init
或者
occlum new occlum_instance
occlum init命令在当前工作目录中创建Occlum的编译时和运行时状态。
occlum new命令基本上做了同样的事情,但是在一个新的实例目录中。
每个Occlum实例目录应用于应用程序的单个实例;多个应用程序或单个应用程序的不同实例应使用不同的Occlum实例。
2.3 Occlum构建
cp ../hello_world image/bin/
#仿真模式需要加参数 --sgx-mode SIM
occlum build --sgx-mode SIM
image目录的内容由occlum init命令初始化。镜像目录的结构模仿普通的UNIX FS,包含/bin、/lib、/root、/tmp等目录。将用户程序hello_world复制到镜像/bin/后,通过occlum build命令打包镜像目录,以生成安全的Occlum FS镜像以及Occlum SGX enclave。
2.4 运行
occlum run /bin/hello_world
occlum run命令启动一个Occlum SGX enclave,在幕后验证并加载相关的Occlum FS镜像,产生一个新的LibOS进程来执行/bin/hello_world,最终打印出消息。
三、Occlum中go编译
以Hello World为例,展示如何在Occlum中编译SGX APP。我们需要go_hello.go(源码)、go_hello.yaml(配置文件)和run_go_hello.sh(运行脚本)。
go_hello.go
package main

import (
        "fmt"
        _ "go-sqlite3"
)

func main() {
        fmt.Println("Hello World")
}
go_hello.yaml
includes:
  - base.yaml
targets:
  - target: /bin
    copy:
      - files:
        - ../go_hello
run_go_hello.sh
#!/bin/bash
set -e

BLUE='\033[1;34m'
NC='\033[0m'

rm -f go.mod  && occlum-go mod init go_hello_instance

occlum-go build -o go_hello go_hello.go

# Init Occlum Workspace
rm -rf go_hello_instance && mkdir go_hello_instance
cd go_hello_instance
occlum init
new_json="$(jq '.resource_limits.user_space_size = "2560MB" |
        .resource_limits.kernel_space_heap_size="320MB" |
        .resource_limits.kernel_space_stack_size="10MB" |
        .process.default_stack_size = "40MB" |
        .process.default_heap_size = "320MB" ' Occlum.json)" && \
echo "${new_json}" > Occlum.json

# Copy program into Occlum Workspace and build
rm -rf image && \
copy_bom -f ../go_hello.yaml --root image --include-dir /opt/occlum/etc/template && \
occlum build --sgx-mode SIM

echo -e "${BLUE}occlum run /bin/go_hello${NC}"
time occlum run /bin/go_hello
运行脚本之后,效果如下:

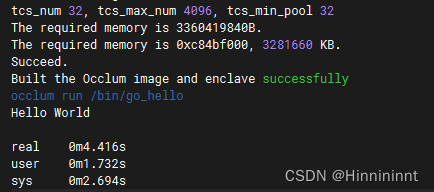
注:go-sqlite3这个包需要导入。
三、Occlum中python编译
以Hello World为例,展示如何在Occlum中编译SGX APP。我们需要
hello.py
#!/usr/bin/python
# -*- coding: UTF-8 -*-

print("hello world!")
python-hello.yaml
includes:
  - base.yaml
targets:
  - target: /bin
    createlinks:
      - src: /opt/python-occlum/bin/python3
        linkname: python3
  # python packages
  - target: /opt
    copy:
      - dirs:
          - ../python-occlum
  # below are python code and data
  - target: /
    copy:
      - from: ..
        files:
          - hello.py
run_python_hello.sh
#!/bin/bash
set -e
BLUE='\033[1;34m'
NC='\033[0m'
script_dir="$( cd "$( dirname "${BASH_SOURCE[0]}" )" >/dev/null 2>&1 && pwd )"
python_dir="$script_dir/occlum_instance/image/opt/python-occlum"
[ -d occlum_instance ] || occlum new occlum_instance
cd occlum_instance && rm -rf image
copy_bom -f ../python-hello.yaml --root image --include-dir /opt/occlum/etc/template
if [ ! -d $python_dir ];then
echo "Error: cannot stat '$python_dir' directory"
exit 1
fi
new_json="$(jq '.resource_limits.user_space_size = "640MB" |
.resource_limits.kernel_space_heap_size = "300MB" |
.env.default += ["PYTHONHOME=/opt/python-occlum"]' Occlum.json)" && \
echo "${new_json}" > Occlum.json
occlum build --sgx-mode SIM
# Run the python demo
echo -e "${BLUE}occlum run /bin/python3 hello.py${NC}"
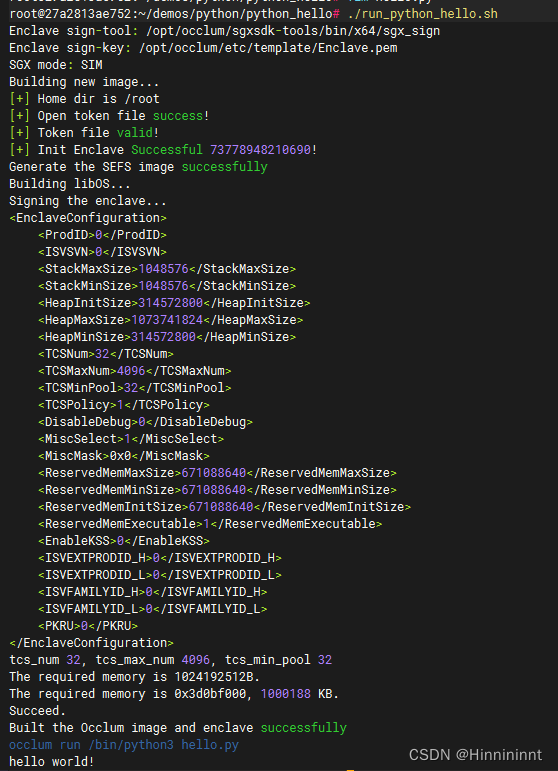
occlum run /bin/python3 hello.py
执行脚本之后,效果如下:


 236
236


 被折叠的 条评论
为什么被折叠?
被折叠的 条评论
为什么被折叠?
 到【灌水乐园】发言


