


最近复习spring相关知识欢迎大家交流指正QQ:767872620
上一章节已经通过单元测试,所以开始控制层的编写
常见的struts1与spring和hibernate有两种方式
一.action未交给spring管理
(1)Struts1的web.xml文件,将整合了hibernate的spring容器放在Servlet大容器中
<?xml version="1.0" encoding="UTF-8"?>
<web-app version="2.4"
xmlns="http://java.sun.com/xml/ns/j2ee"
xmlns:xsi="http://www.w3.org/2001/XMLSchema-instance"
xsi:schemaLocation="http://java.sun.com/xml/ns/j2ee
http://java.sun.com/xml/ns/j2ee/web-app_2_4.xsd
">


          <!--在web容器中实例化spring容器  -->
          <!--指定spring的配置文件,默认从web根目录寻找配置文件,我们可以通过spring提供的classpath:前缀指定从类路径下寻找  -->
          <!--这个spring实例被存放在application域中  -->
<context-param>
	<param-name>contextConfigLocation</param-name>
	<param-value>classpath:applicationContext.xml</param-value>
</context-param>
<listener>
	<listener-class>org.springframework.web.context.ContextLoaderListener</listener-class>
</listener>
<!-- 配置struts1 -->
<servlet>
    <servlet-name>action</servlet-name>
    <servlet-class>org.apache.struts.action.ActionServlet</servlet-class>
    <init-param>
      <param-name>config</param-name>
      <param-value>/WEB-INF/struts-config.xml</param-value>
    </init-param>
    <load-on-startup>2</load-on-startup>
  </servlet>
  <servlet-mapping>
    <servlet-name>action</servlet-name>
    <url-pattern>*.do</url-pattern>
  </servlet-mapping>
  <welcome-file-list>
    <welcome-file>index.jsp</welcome-file>
  </welcome-file-list>
</web-app>
(2)struts-config.xml文件
<?xml version="1.0" encoding="UTF-8"?>
<!DOCTYPE struts-config PUBLIC "-//Apache Software Foundation//DTD Struts Configuration 1.2//EN" "http://struts.apache.org/dtds/struts-config_1_2.dtd">
<!--注意标签顺序: The content of element type "struts-config" must match "(display-name?,description?,data-sources?,form-
 beans?,global-exceptions?,global-forwards?,action-mappings?,controller?,message-resources*,plug-in*)". -->
<struts-config>
 <action-mappings>
 	<action path="/person/list" type="cn.itcast.web.action.PersonAction"
 	validate="false">
 	<forward name="list" path="/WEB-INF/page/personlist.jsp"></forward>
 	</action>
 </action-mappings>
</struts-config>
(3)编写action类
package cn.itcast.web.action;

import javax.servlet.http.HttpServletRequest;
import javax.servlet.http.HttpServletResponse;

import org.apache.struts.action.Action;
import org.apache.struts.action.ActionForm;
import org.apache.struts.action.ActionForward;
import org.apache.struts.action.ActionMapping;
import org.springframework.web.context.WebApplicationContext;
import org.springframework.web.context.support.WebApplicationContextUtils;

import cn.itcast.service.PersonService;

public class PersonAction extends Action {

	@Override
	public ActionForward execute(ActionMapping mapping, ActionForm form,
			HttpServletRequest request, HttpServletResponse response)
			throws Exception {
	/**
	 * 如果action没有交给spring管理,可以通过下面语句从appliaction域中获取spring容器
	 */
WebApplicationContext ctx = WebApplicationContextUtils.getWebApplicationContext(this.getServlet().getServletContext());

	PersonService personService = (PersonService)ctx.getBean("personService");
	request.setAttribute("persons", personService.getPersons());
	return mapping.findForward("list");
	}

}
(4)personlist.jsp页面显示数据,使用jstl遍历显示
<%@ page language="java" import="java.util.*" pageEncoding="UTF-8"%>
<!DOCTYPE HTML PUBLIC "-//W3C//DTD HTML 4.01 Transitional//EN">
<%@ taglib uri="http://java.sun.com/jsp/jstl/core" prefix="c"%>
<%
String path = request.getContextPath();
String basePath = request.getScheme()+"://"+request.getServerName()+":"+request.getServerPort()+path+"/";
%>

<html>
  <head>
    <base href="<%=basePath%>">

    <title>人员列表</title>
    <%//如果建的是j2ee1.4的话,tomcat5.0足以,如果j2ee1.5则必须是tomcat6.0
    	//j2ee1.5中使用的是servlet2.5的规范
    	//j2ee1.4中使用的是servlet2.4的规范
    %>
	<meta http-equiv="pragma" content="no-cache">
	<meta http-equiv="cache-control" content="no-cache">
	<meta http-equiv="expires" content="0">
	<meta http-equiv="keywords" content="keyword1,keyword2,keyword3">
	<meta http-equiv="description" content="This is my page">
	<!--
	<link rel="stylesheet" type="text/css" href="styles.css">
	-->

  </head>

  <body>
   <c:forEach items="${persons}" var="person">
   	ID=${person.id} name=${person.name}<br/>
   </c:forEach>
  </body>
</html>
测试过程:
1.启动tomcat服务
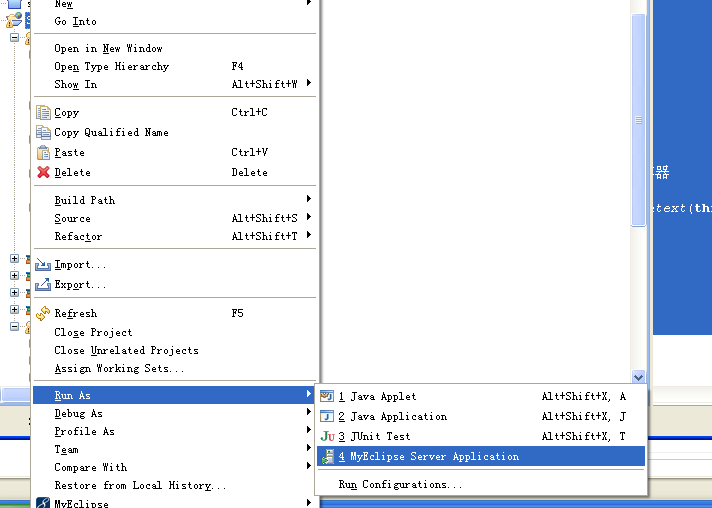
刷新项目->选中项目右击
注意:
<%//如果建的是j2ee1.4的话,tomcat5.0足以,
如果j2ee1.5则必须是tomcat6.0 /
/j2ee1.5中使用的是servlet2.5的规范 //j2ee1.4中使用的是servlet2.4的规范 %>
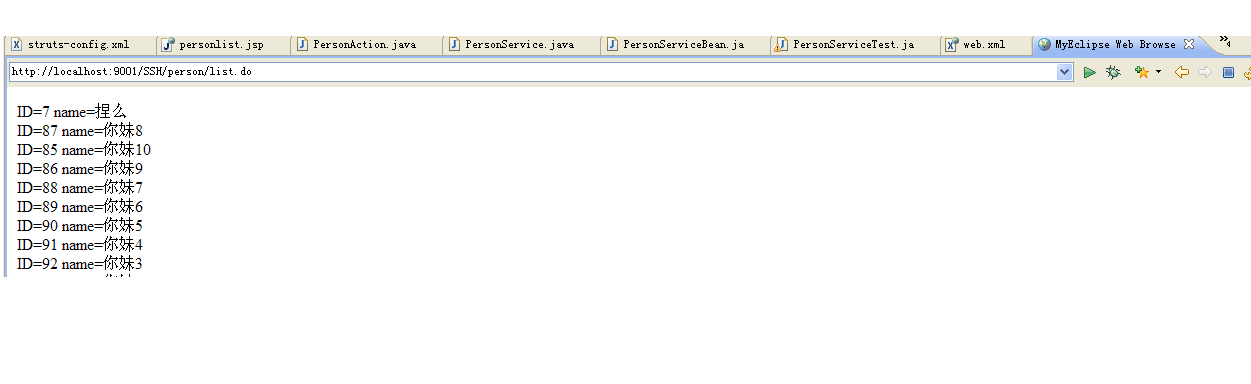
2.使用myeclipse web browse登陆页面测试


 被折叠的 条评论
为什么被折叠?
被折叠的 条评论
为什么被折叠?
 到【灌水乐园】发言


