


一、效果展示:
二、开发准备
Three.js中文文档:Three.js中文网
Three.js文本渲染插件:Troika 3D Text - Troika JS
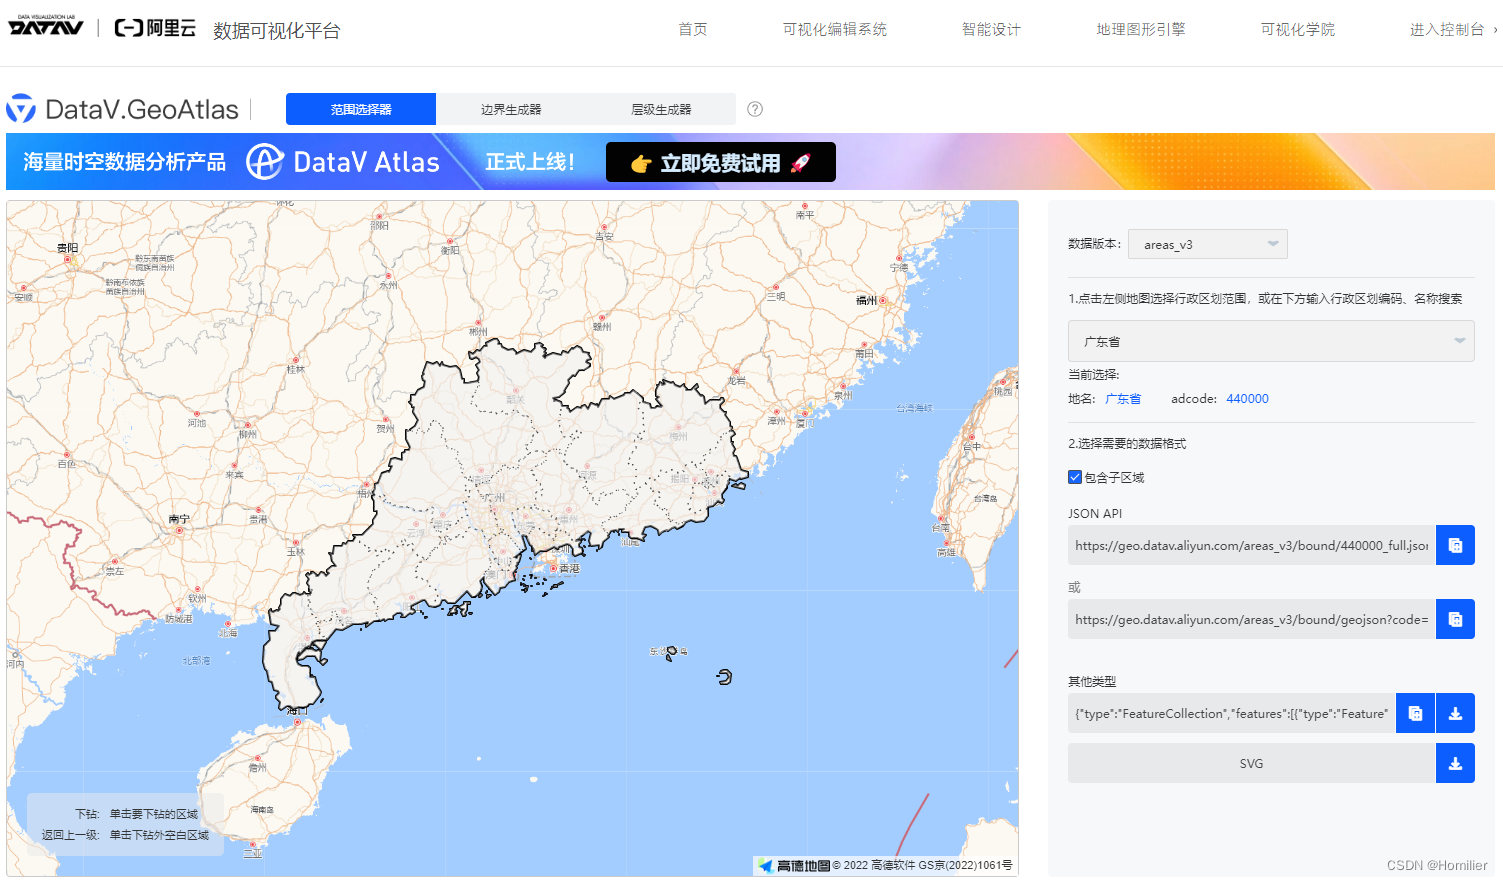
行政区划边界数据查询(阿里云数据可视化平台):DataV.GeoAtlas地理小工具系列
1. 在项目中添加 `threejs` 依赖
npm install three2. 添加相关声明依赖,为Typescript项目提供类型提示和类型检查的支持
npm install @types/three -D3. 添加 `troika-three-text` 依赖,本案例中用于绘制所有市名文字,如无需绘制文字可不用
npm install troika-three-text4. 使用阿里云数据可视化平台的范围选择器工具查询你所需要的区划边界数据,点击右下角其他类型的蓝色下载图标下载JSON文件,并导入项目中。本案例以广东省为例, `@/src/assets/广东省.json`。
三、代码实现
1. 添加canvas组件和基础样式
<template>
  <div>
    <canvas id="three" />
  </div>
</template>

<style scoped>
#three {
  width: 100vw;
  height: 100vh;
  position: absolute;
  top: 0;
  left: 0;
}
</style>
2. 导入three,创建三维场景并设置背景颜色,案例中的蓝底即为此处设置的颜色。
import * as THREE from 'three';
import { onMounted } from 'vue';

onMounted(() => {
  // 创建3D场景对象Scene
  const scene = new THREE.Scene();
  // 设置背景颜色
  scene.background = new THREE.Color("#a4cdff");
});
3. Threejs要把三维场景Scene渲染到web网页上需创建个虚拟相机
// 实例化一个透视投影相机对象
const camera = new THREE.PerspectiveCamera(
30,
window.innerWidth / window.innerHeight,
0.1,
1000
);
// 设置相机在Three.js三维坐标系中的位置,此处修改z坐标为调整正面远近,值越小越近
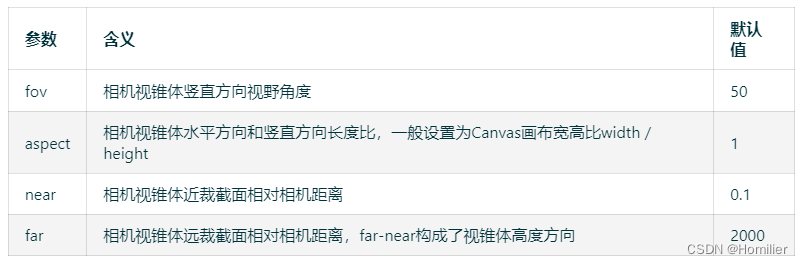
camera.position.z = 200;THREE.PerspectiveCamera构造函数的参数说明
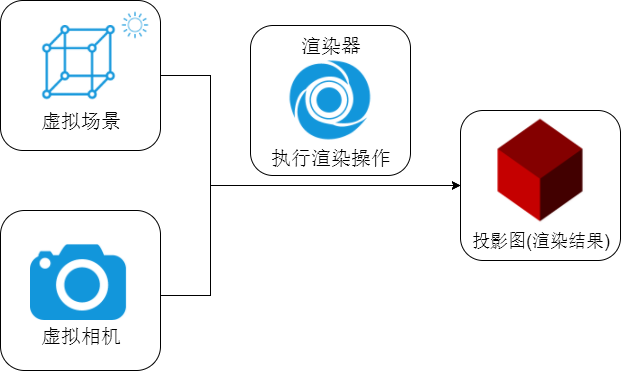
4. 有了场景和相机后,关键还需要一个渲染器去生成影像
// 创建渲染器对象
const threeDemo = document.getElementById("three");
const renderer = new THREE.WebGLRenderer({ canvas: threeDemo, antialias: true });
5. 处理每一帧动画和分辨率问题
function resizeDevicePixel(renderer: THREE.WebGLRenderer) {
  const canvas = renderer.domElement
  const width = window.innerWidth
  const height = window.innerHeight
  const devicePixelWidth = canvas.width / window.devicePixelRatio
  const devicePixelHeight = canvas.height / window.devicePixelRatio

  const needResize = devicePixelWidth !== width || devicePixelHeight !== height
  if (needResize) {
    renderer.setSize(width, height, false)
  }
  return needResize
}

// Three.js 需要一个动画循环函数,Three.js 的每一帧都会执行这个函数
function annimate() {
  renderer.render(scene, camera);
  requestAnimationFrame(annimate);
  // 矫正设备的物理像素分辨率与CSS像素分辨率的比值,解决模糊问题
  if(resizeDevicePixel(renderer)) {
    const canvas = renderer.domElement;
    camera.aspect = canvas.clientWidth / canvas.clientHeight;
    camera.updateProjectionMatrix();
  }
}
annimate();
6. 要让模型动起来还需添加轨道控制器
import { OrbitControls } from "three/examples/jsm/controls/OrbitControls";const controls = new OrbitControls(camera, renderer.domElement);
controls.update();7.以上便完成了所有初始配置,开始进入正题,渲染3D广东省区划图
导入之前下载的广东省区划边界数据:
import GuangDong from './assets/广东省.json';遍历所有城市边界数据生成对应板块模型
let xy = [0, 0, 0, 0];
GuangDong.features.forEach((city, index) => {
  let boundingBox, x = 0, y = 0;
  // 遍历城市的所有块边界数据(城市可能包含陆和岛多个块组成)
  city.geometry.coordinates.forEach((coordinate, cindex) => {
    const data = coordinate[0];
    // 一组二维向量表示一个多边形轮廓坐标
    const pointsArr = data.map(e => new THREE.Vector2(e[0] * 10, e[1] * 10));
    // Shape表示一个平面多边形轮廓,参数是二维向量构成的数组pointsArr
    const shape = new THREE.Shape(pointsArr);
    // 多边形shape轮廓作为ShapeGeometry参数,生成一个多边形几何体
    const geometry = new THREE.ExtrudeGeometry(shape, {
      depth: 2, // 这里设置形状的厚度
      bevelEnabled: false, // 是否开启倒角,默认关闭
    });

    // 计算几何体的中心点并居中
    geometry.computeBoundingBox();
    // 计算平面几何体的中心点
    const { min, max } = geometry.boundingBox;
    xy[2] = (min.x + max.x) / 2;
    xy[3] = (min.y + max.y) / 2;
    if (index === 0) { // 记录第一个几何体的位置,作为其他几何体的位置参考点
      xy[0] = xy[2];
      xy[1] = xy[3];
    }
    // 移动几何体以便中心点位于原点
    const center = new THREE.Vector3();
    geometry.boundingBox!.getCenter(center);
    geometry.translate(-center.x + (xy[2] - xy[0]), -center.y + (xy[3] - xy[1]), -1);
    // 记录每个城市核心板块的位置信息
    if (cindex === 0) {
      boundingBox = geometry.boundingBox;
      x = xy[2];
      y = xy[3];
    }
    let material = new THREE.MeshBasicMaterial({ color: "#fcf9f2" });
    let mesh = new THREE.Mesh(geometry, material);
    scene.add(mesh);

    // 从原始几何体中获取边缘几何体
    const edgesGeometry = new THREE.EdgesGeometry(geometry);
    // 创建一个具有宽度的线条材质(这里我们使用LineBasicMaterial并设置linewidth)
    const edgeMaterial = new THREE.LineBasicMaterial({
        color: 0xcccccc, // 白色边缘
        linewidth: 1, // 边缘宽度
    });
    // 创建线段对象来渲染边缘线条
    const edgeLines = new THREE.LineSegments(edgesGeometry, edgeMaterial);
    scene.add(edgeLines);
  });

  // 渲染市名
  const text = new Text();
  text.text = city.properties.name;
  text.fontSize = 1;
  text.color = 0x333333;
  text.geometry.computeBoundingBox();
  const textCenter = new THREE.Vector3();
  text.geometry.boundingBox.getCenter(textCenter);
  // 计算市中心位置
  const point = city.properties.center
  const { min: { x: minX, y: minY }, max: { x: maxX, y: maxY } } = boundingBox;
  const c1 = [(minX + maxX) / 2, (minY + maxY) / 2];
  const c2 = [(point[0] * 10 - x) + c1[0], (point[1] * 10 - y) + c1[1]];
  // 把市名文字绘制到市中心点
  text.position.set(c2[0] + 0.3, c2[1] + 0.3, 1.2);
  scene.add(text);

  // 在场景中创建圆环
  const ringGeometry = new THREE.RingGeometry(0.4, 0.3, 32);
  // 创建圆环的材质
  const ringMaterial = new THREE.MeshBasicMaterial({color: 0xff0000, side: THREE.DoubleSide});
  const ring = new THREE.Mesh(ringGeometry, ringMaterial);
  // 把圆环绘制到市中心点
  ring.position.set(c2[0]-0.2, c2[1]-0.2, 1.1);
  scene.add(ring);

  // 在场景中创建圆形
  const circleGeometry = new THREE.CircleGeometry(0.2, 32);
  // 创建圆形的材质
  const circleMaterial = new THREE.MeshBasicMaterial({color: 0xff0000});
  const circle = new THREE.Mesh(circleGeometry, circleMaterial);
  // 把圆形直接加到圆环的中心点
  ring.add(circle);
});


 1516
1516

 被折叠的 条评论
为什么被折叠?
被折叠的 条评论
为什么被折叠?
 到【灌水乐园】发言


