


目录
1.报错:Call requires API level 26 (current min is 24): new android.app.NotificationChannel
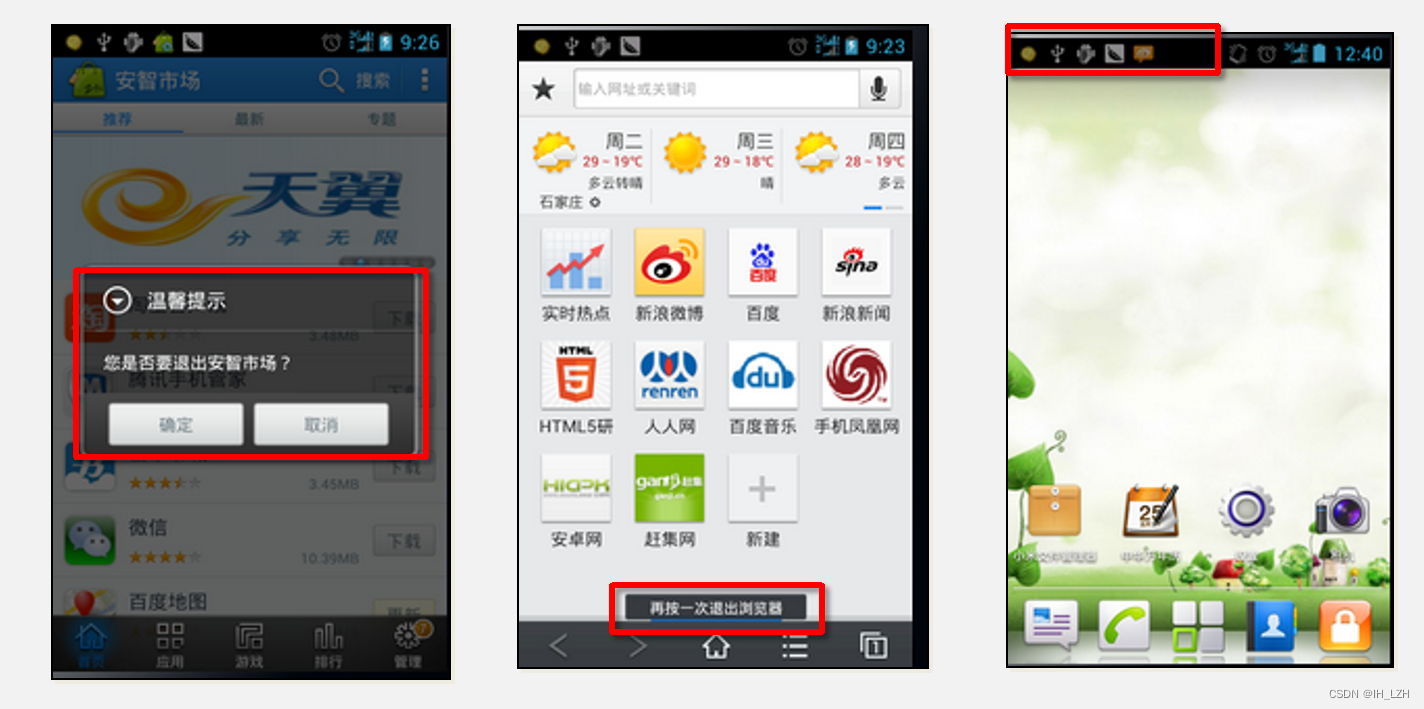
一,Android提示消息
1.提示消息的形式
Android中系统经常会向用户反馈一些提示信息,其展现形式可以分为以下几种:
- 对话框:以弹出层强制用户作出响应
- Toast:显示提示信息,用户不用响应
- Notification:在状态栏显示已通知信息,除非用户查看信息或删除信息,否则一直在状态栏显示。
2.对话框
对话框是以弹出层形式显示内容的视图控件,一般在监听器中使用。对话框的应用也很广泛,很多应用的"新版本"信息、退出时提示、列表项目附加信息等等都是使用对话框形式展现的。在Android中使用AlertDialog类来实现对话框的创建。
(1)默认对话框的创建步骤
- 创建AlertDialog.Builder(AlertDialog的创建器)对象,AlertDialog对象需要通过创建器来创建;
- 调用AlertDialog.Builder对象的方法为对话框设置属性(图标,标题,内容,按钮等);
- 调用AlertDialog.Builder对象的create方法创建对话框;
- 调用AlertDialog.Builder对象的show方法创建对话框;
private void showDialog() {
    //创建对话框构造器对象
    AlertDialog.Builder dialog_build = new AlertDialog.Builder(this)
            .setTitle("关闭应用!")
            .setMessage("确定要关闭应用吗?")
            .setIcon(R.mipmap.genshin)
            .setCancelable(false) //点击屏幕外围不关闭
            .setPositiveButton("确定",new DialogInterface.OnClickListener() {//确定按钮
                @Override
                public void onClick(DialogInterface dialog, int which) {
                    //Toast.makeText(NoticeActivity.this, "启动成功!", Toast.LENGTH_SHORT).show();
                    // 关闭当前Activity
                    NoticeActivity.this.finish();
                }
            })
            .setNegativeButton("取消", new DialogInterface.OnClickListener() {//取消按钮
                @Override
                public void onClick(DialogInterface dialog, int which) {
                    //Toast.makeText(NoticeActivity.this, "启动失败!", Toast.LENGTH_SHORT).show();
                    // 关闭对话框
                    dialog.dismiss();
                }
            });
    //通过构造器构造对话框对象
    AlertDialog dialog = dialog_build.create();
    //显示对话框
    dialog.show();
}
(2) 自定义对话框的创建步骤
对话框的样式也可以自己设置,只需要给AlertDialog.Builder提供布局文件即可。
创建自定义对话框的布局文件:
<?xml version="1.0" encoding="utf-8"?>
<LinearLayout xmlns:android="http://schemas.android.com/apk/res/android"
    android:layout_width="match_parent"
    android:layout_height="match_parent"
    android:orientation="vertical">

    <TextView
        android:layout_width="match_parent"
        android:layout_height="wrap_content"
        android:text="测试消息"/>
    <Button
        android:layout_width="match_parent"
        android:layout_height="wrap_content"
        android:text="测试按钮"/>

</LinearLayout>
给AlertDialog.Builder绑定布局文件:
private void showCustomDialog() {
    //设置对话框自定义视图
    AlertDialog.Builder customDialogBuild = new AlertDialog.Builder(this)
            .setView(getCustomView());
    AlertDialog customDialog = customDialogBuild.create();
    customDialog.show();
}
//获取布局View
private View getCustomView() {
    View view = LayoutInflater.from(this).inflate(R.layout.custom_view_layout, null);
    return view;
}
3.Toast
Toast不干扰用户操作,不需要用户响应(也不可交互),显示时间较短,会自动消失。一般在事件监听器中使用(即当特定事件触发时,显示Toast消息)。
Toast使用基本流程:
- 创建Toast;
- 设置基本属性(上下文,显示内容,显示时长);
- 显示Toast;
btn_notice.setOnClickListener(new View.OnClickListener() {
    Toast.makeText(this, "启动成功!", Toast.LENGTH_SHORT).show();
});
Toast可以通过Toast.setView()来自定义界面,不过不常用。
4.Notification
Notification在状态栏显示提示信息,除非用户查看或关闭信息,状态栏才取消显示。一般使用在收到短信后、收到应用的推送消息后、收到未接电话等场合。Notification需要借助NotificationManager(通知管理器)来实现。
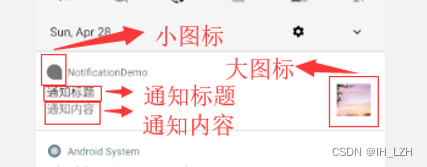
实现Notification,需要用到以下几个类:
- NotificationManager:通知管理器,调用notify()方法可以向系统发送通知;
- Notification.Builder:通知创建器,Notification对象通过创建器来创建;
- Notification:通知类,保存通知相关信息(大图标,小图标,标题,通知信息等);
- NotificationChannel:通知渠道,Android API 26引入的新特性,当minSdk小于26时将无法使用。构造Notification对象时必须传入一个通知渠道;
Notification使用的基本流程:
(1)通过通知管理器获取通知服务(NotificationManager):
//获取通知服务
NotificationManager notificationManager = (NotificationManager) getApplication().getSystemService(
        Context.NOTIFICATION_SERVICE
);
(2)创建通知渠道(NotificationChannel),并设置相关属性:
//创建通知渠道
NotificationChannel channel = new NotificationChannel(
        "channelId",    //渠道id
        "channelName",  //渠道名称
        notificationManager.IMPORTANCE_DEFAULT  //重要级别
);
(3)关联通知服务和通知渠道:
//关联通知服务和通知渠道
notificationManager.createNotificationChannel(channel);
(4)创建通知创建器(Notification.Builder),设置相关信息(图标,标题,通知信息等):
//创建通知构造器对象
Notification.Builder notificationBuilder = new Notification.Builder(
        this,
        "channelId"
)
        .setSmallIcon(R.mipmap.genshin)
        .setContentTitle("启动原神!")
        .setContentText("您今天启动原神了吗?");
(5)通过创建器创建通知对象(Notification):
//通过构造器创建通知对象
Notification notification = notificationBuilder.build();
(6)调用通知管理器发送通知:
//由通知服务发布通知消息
notificationManager.notify(0, notification);
二,菜单
菜单:显示一个应用程序的主界面中不是直接可见的额外选项的视图组件。在Android中支持三种菜单类型:
- 选项菜单(在主窗口点击”Menu“弹出的菜单);
- 上下文菜单(长按某个控件时弹出的菜单);
- 弹出式菜单(点击某个控件时弹出的菜单);
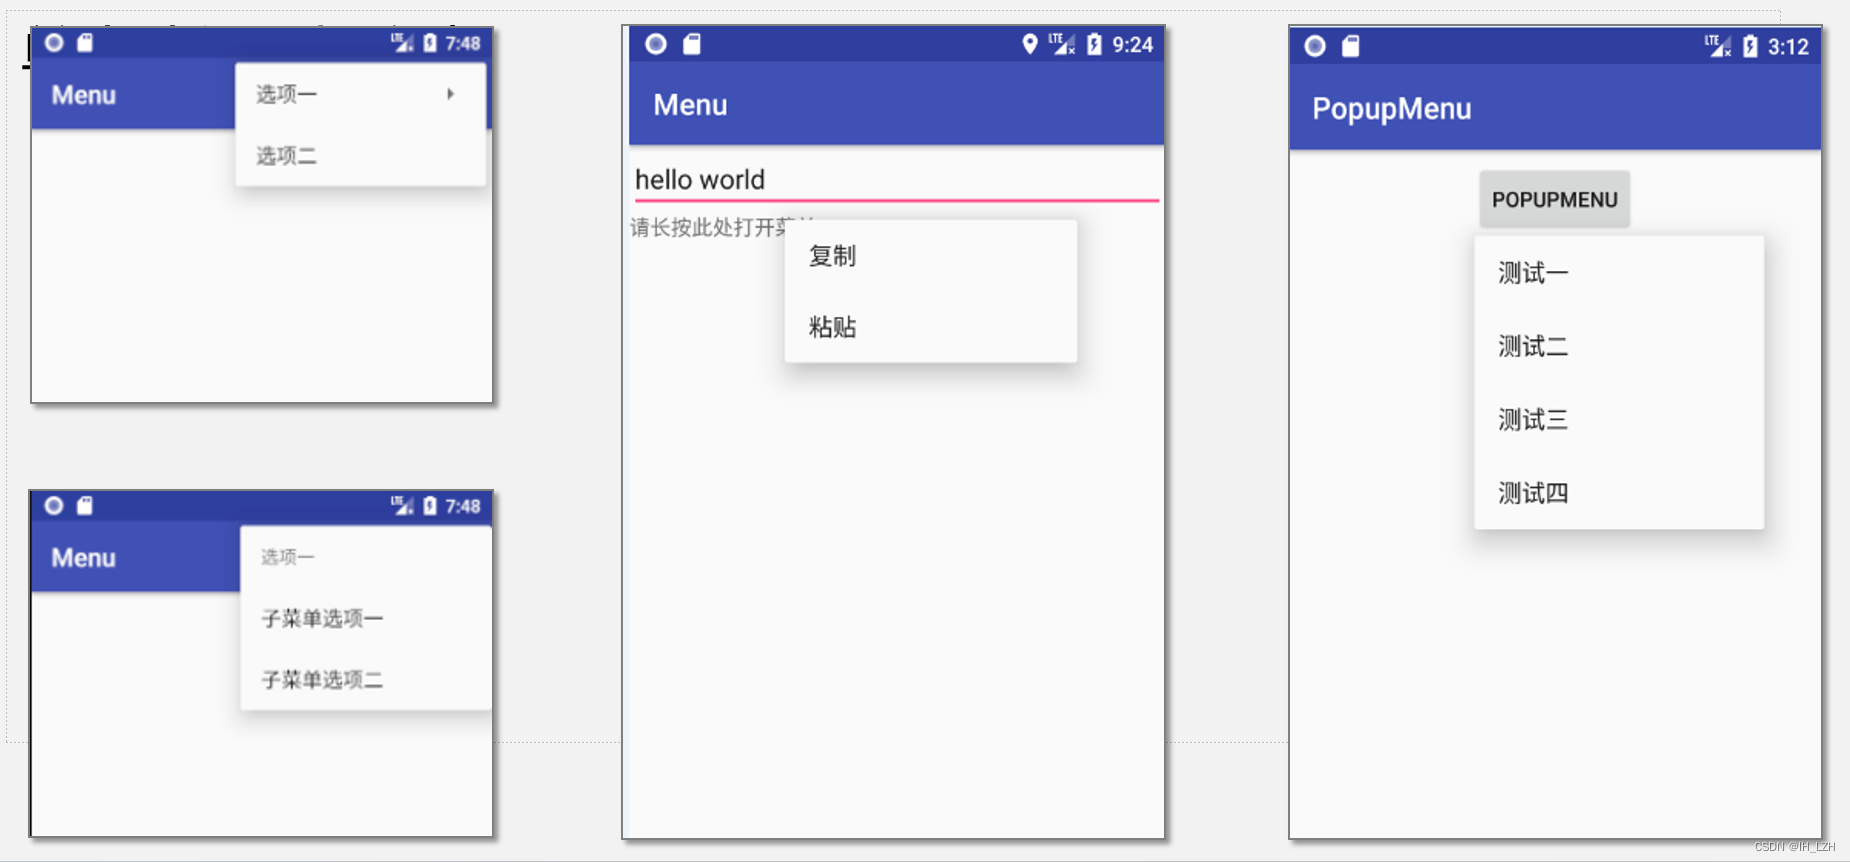
1.选项菜单 OptionsMenu
在主窗口点击”Menu“弹出的菜单,一般包含若干个子菜单,即用户点击”选项菜单“中的某一项时,弹出的附加菜单。
选项菜单实现方法:
(1)创建菜单布局文件:
<?xml version="1.0" encoding="utf-8"?>
<menu xmlns:android="http://schemas.android.com/apk/res/android">

    <item android:title="文件" android:id="@+id/menu_file">
        <menu>
            <item android:title="打开" android:id="@+id/menu_open"></item>
            <item android:title="保存" android:id="@+id/menu_save"></item>
        </menu>
    </item>

    <item android:title="操作" android:id="@+id/menu_action">
        <menu>
            <item android:title="复制" android:id="@+id/menu_copy"></item>
            <item android:title="粘贴" android:id="@+id/menu_paste"></item>
        </menu>
    </item>

</menu>(2)在Activity中创建菜单,传入菜单布局文件(onCreateOptionsMenu方法):
//选项菜单
@Override
public boolean onCreateOptionsMenu(Menu menu) {
    getMenuInflater().inflate(R.menu.layout_menu, menu);
    return super.onCreateOptionsMenu(menu);
}(3)绑定菜单项选择事件,即点击菜单项后会发生的事情(onOptionsItemSelected方法):
@Override
public boolean onOptionsItemSelected(@NonNull MenuItem item) {
    switch(item.getItemId()){
        case R.id.menu_open:
            Log.i("menu", "打开文件成功");
            break;
        case R.id.menu_save:
            Log.i("menu", "保存文件成功");
            break;
        case R.id.menu_copy:
            Log.i("menu", "复制成功");
            break;
        case R.id.menu_paste:
            Log.i("menu", "粘贴成功");
            break;
    }
    return super.onOptionsItemSelected(item);
}
2.上下文菜单 ContextMenu
长按某个控件时弹出的菜单,因此上下文菜单必须与某个控件绑定在一起,实现步骤与选项菜单基本一致,只多了一步绑定控件。
(1)在Activity中创建上下文菜单(onCreateContextMenu)传入布局文件(布局文件与上面一致),并绑定菜单项选择事件(onContextItemSelected):
//上下文菜单
@Override
public void onCreateContextMenu(ContextMenu menu, View v, ContextMenu.ContextMenuInfo menuInfo) {
    getMenuInflater().inflate(R.menu.layout_menu, menu);
    super.onCreateContextMenu(menu, v, menuInfo);
}

@Override
public boolean onContextItemSelected(@NonNull MenuItem item) {
    switch(item.getItemId()){
        case R.id.menu_open:
            Log.i("menu", "打开文件成功");
            break;
        case R.id.menu_save:
            Log.i("menu", "保存文件成功");
            break;
        case R.id.menu_copy:
            Log.i("menu", "复制成功");
            break;
        case R.id.menu_paste:
            Log.i("menu", "粘贴成功");
            break;
    }
    return super.onContextItemSelected(item);
}(2)在onCreate中绑定视图控件(registerForContextMenu):
//上下文菜单比选项菜单多一步注册控件
Button btn_context_menu = findViewById(R.id.btn_context_menu);
registerForContextMenu(btn_context_menu);
3.弹出式菜单 PopupMenu
PopupMenu可以非常方便的在指定view的下面显示一个弹出菜单,使用步骤如下:
(1)创建弹出式菜单对象,传入上下文和控件id:
//创建弹出式菜单对象
PopupMenu popupMenu = new PopupMenu(this, btn_pop_menu);
(2)加载菜单布局,传入菜单布局文件:
//加载菜单布局
popupMenu.getMenuInflater().inflate(R.menu.layout_menu, popupMenu.getMenu());
(3)设置菜单项选择事件,返回是否解决事件:
//设置菜单点击事件
popupMenu.setOnMenuItemClickListener(new PopupMenu.OnMenuItemClickListener() {
    @Override
    public boolean onMenuItemClick(MenuItem item) {
        switch(item.getItemId()){
            case R.id.menu_open:
                Log.i("menu", "打开文件成功");
                break;
            case R.id.menu_save:
                Log.i("menu", "保存文件成功");
                break;
            case R.id.menu_copy:
                Log.i("menu", "复制成功");
                break;
            case R.id.menu_paste:
                Log.i("menu", "粘贴成功");
                break;
        }
        //返回是否解决事件
        return true;
    }
});
(2)设置按钮监听事件:
//设置按钮监听事件
btn_pop_menu.setOnClickListener(new View.OnClickListener() {
    @Override
    public void onClick(View v) {
        popupMenu.show();
    }
});
三,可能会遇到的一些小问题
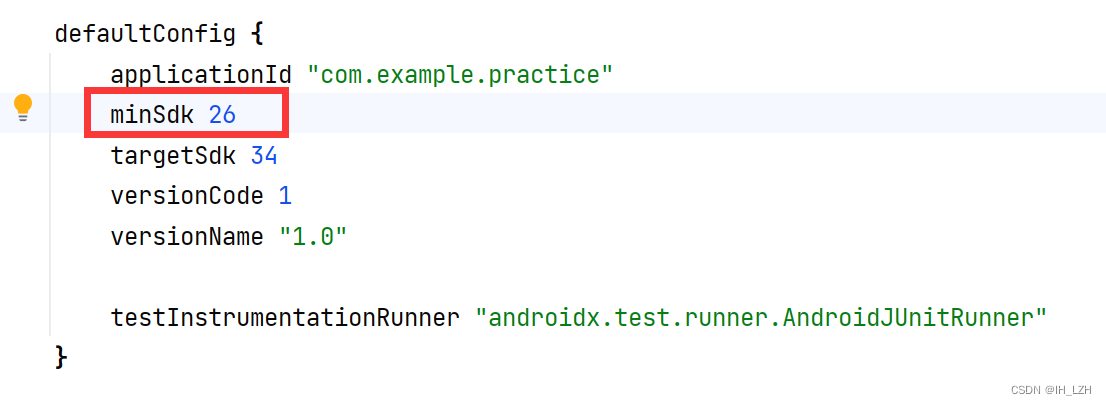
1.报错:Call requires API level 26 (current min is 24): new android.app.NotificationChannel
在使用NotificationChannel通知渠道以及与其相关的方法时,可能会遇到这个报错,这是因为NotificationChannel是Android API 26引入的新特性,小于这个版本就会遇到这个报错,在build.gradle界面将minSdk改为26,报错就消失。
2.Notification通知没反应
Notification通知没反应,如果代码实现没问题的话,大概率是因为通知权限没打开,在setting->Apps->(找到对应app)->Notifications->打开All practice notifications,打开通知权限即可。


 2227
2227


 被折叠的 条评论
为什么被折叠?
被折叠的 条评论
为什么被折叠?
 到【灌水乐园】发言


