


文章目录
1. ES6 Promise
Promise是ES6引入的异步编程的新解决方法,语法是它是一个构造函数,用来封装异步操作并可以获取其成功或失败的结果。
小插曲:
console.log(data);正常打印data。
console.error(data;会打印出红色错误的data。
console.warn(data);会打印出黄色警告的data。
1.1 Promise then方法
promise有三种情况:初始化,成功,失败(错误)。这里我们使用then方法来演示一下成功和失败后,产出的结果。
<!DOCTYPE html>
<html lang="en">
<head>
    <meta charset="UTF-8">
    <meta http-equiv="X-UA-Compatible" content="IE=edge">
    <meta name="viewport" content="width=device-width, initial-scale=1.0">
    <title>Document</title>
</head>
<body>
    <script>
        //实例化promise
        //promise有三种情况:初始化,成功,错误。
        const p = new Promise((resolve,reject)=>{
            setTimeout(function(){
                //如果数据调用成功,则使用resolve方法。成功后它会调用实例对象then方法的第一个携带value参数的函数。
                let data = '数据库中的用户数据';
                resolve(data);
            },1000);
        });
        //打印promise实例化对象,可以看到有一个then方法
        console.log(p);

        //调用promise对象中的then方法
        p.then((value)=>{
            console.log(value);
        },(reason)=>{
            console.log(reason);
        });
    </script>

    <script>
        //实例化promise
        //promise有三种情况:初始化,成功,错误。
        const p = new Promise(function(resolve,reject){
            setTimeout(function(){
                //如果数据调用失败,则使用reject方法。失败后它会调用实例对象then方法的第二个携带reason参数的函数。
                let err = '数据读取失败';
                reject(err);
            },1000);
        });
         //调用promise对象中的then方法
        p.then(function(value){
            console.log(value);
        },function(reason){
            console.log(reason);
        });
    </script>
</body>
</html>
1.2 Promise 读取文件
通过node.js和promise来实现读取文件。其实就是在原来的基础上面加了node.js中的fs模块与promise中的相关参数相结合的操作。
const fs = require('fs');

//使用 promise 封装

const p = new Promise((resolve,reject)=>{
    fs.readFile("./fs/测试.md",(err,data)=>{
        //如果失败
        if(err) reject(err);
        //如果成功
        resolve(data);
    });
});

p.then((value)=>{
    console.log(value.toString());
},(reason)=>{
    console.log("失败了!")
});
1.3 promise 封装ajax
就是将ajax封装到了promise里面。
<!DOCTYPE html>
<html lang="en">

<head>
    <meta charset="UTF-8">
    <meta http-equiv="X-UA-Compatible" content="IE=edge">
    <meta name="viewport" content="width=device-width, initial-scale=1.0">
    <title>Document</title>
</head>

<body>
    <script>
        //这里就是将ajax封装到了promise里面。
        const p = new Promise((resolve, reject) => {

            //ajax的四个步骤
            const xhr = new XMLHttpRequest();
            xhr.open("GET", 'https://api.apiopen.top/getJoke');
            xhr.send();
            xhr.onreadystatechange = function () {
                if (xhr.readyState === 4) {
                    if (xhr.status >= 200 && xhr.status < 300) {
                        resolve(xhr.response);
                    } else {
                        reject(xhr.status);
                    }
                }
            };
        });
        p.then((value)=>{
            console.log(value);
        },(reason)=>{
            console.error(reason);
        });
    </script>
</body>

</html>
1.4 Promise then方法
一定要记住以下4种情况。
1.then方法返回的是非promise类型。
2.then方法返回的是promise类型。
3.then方法返回throw,抛出错误。
4.then方法不返回,默认是undefined,不会报错。
对于上面,第一种情况,如果then方法返回的结果是非promise类型,并且状态为成功,则返回值为对象成功的值。
第二种情况,对于then方法的返回结果是Promise对象,对象状态由回调函数的执行结果决定。
案例:
<!DOCTYPE html>
<html lang="en">
<head>
    <meta charset="UTF-8">
    <meta http-equiv="X-UA-Compatible" content="IE=edge">
    <meta name="viewport" content="width=device-width, initial-scale=1.0">
    <title>Document</title>
</head>
<body>
    <script>
        //创建promise对象
        const p = new Promise((resolve,reject)=>{
            setTimeout(()=>{
                resolve("用户数据");
                // reject("错误");
            },1000);
        });
        const result = p.then(value => {
            console.log(value);
            //1. 非promise类型的属性
            // return '非promise';

            //2. 是promise对象。对应两种resolve正常抛出和reject错误抛出
            // return new Promise((resolve,reject)=>{
            //     // resolve('ok'); //resolve正常抛出
            //     reject('error'); //使用reject抛出错误
            // });

            // 3. throw 抛出错误
            // throw "error";

        },reason => {
            console.warn(reason);
        });
        console.log(result);
    </script>
</body>
</html>

1.5 Promise then方法读取多个链式文件异步
完成类似的这种链式关系,可以再次在then方法内返回一个Promise对象,这就是一个重点。
案例:
const fs = require('fs');
const { resolve } = require('path/posix');

// 通过promise来实现下面注释代码的内容。
// fs.readFile("./fs/测试.md",(err,data)=>{
//     fs.readFile("./fs/测试2.md",(err2,data2)=>{
//         fs.readFile("./fs/测试3.md",(err3,data3)=>{
//             let result = `${data}${data2}${data3}`;
//             console.log(result);
//         });
//     });
// });

const p = new Promise((resolve, reject) => {
    fs.readFile("./fs/测试.md", (err, data) => {
        resolve(data);
    });
});

p.then((value) => {
    //完成上面的那种链式关系,可以再次在then方法内返回一个Promise对象。
    return new Promise((resolve, reject) => {
        fs.readFile("./fs/测试2.md", (err, data) => {
            resolve([value, data]);
        });
    })
}).then((value) => {
    return new Promise((resolve, reject) => {
        fs.readFile('./fs/测试3.md', (err, data) => {
            //此时这里的value已经是一个数组了。
            value.push(data);
            resolve(value);
        })
    });
}).then((value) => {
    //打印上面的三个结果
    console.log(value.join('\r\n'));//将数组内的结果进行拼接,添加上回车。
});
1.6 Promise catch
catch和then方法没多大区别,都可以抛出错误。
<!DOCTYPE html>
<html lang="en">

<head>
    <meta charset="UTF-8">
    <meta http-equiv="X-UA-Compatible" content="IE=edge">
    <meta name="viewport" content="width=device-width, initial-scale=1.0">
    <title>Document</title>
</head>

<body>
    <script>
        const p = new Promise((resolve, reject) => {
            setTimeout(
                () => {
                    reject('出错了');
                }
                , 1000);
        });

        //正常抛出错误我们使用reject和reason参数来实现。
        // p.then((reason)=>{
        //     console.error(reason)
        // })

        //这里我们使用catch来实现抛出错误。
        p.catch((reason) => {
            console.error(reason);
        });
    </script>
</body>

</html>
2. ES6 新的数据结构Set(集合)
2.1 Set 集合介绍
ES6提供了新的数据结构Set(集合)。类似于数组,但成员的值都是唯一的,因为集合实现了iterator接口,所以可以使用扩展运算符和for … of 来进行遍历。
集合的属性和方法:
1. size 返回集合的元素个数。
2. add 增加一个新元素,返回当前集合。
3. delete 删除元素,返回boolean值。
4. has 检测集合中是否包含该元素返回boolean值。
5. 使用clear() 清空集合内容。
6. 使用for … of 来遍历集合。
案例:
<!DOCTYPE html>
<html lang="en">

<head>
    <meta charset="UTF-8">
    <meta http-equiv="X-UA-Compatible" content="IE=edge">
    <meta name="viewport" content="width=device-width, initial-scale=1.0">
    <title>Document</title>
</head>

<body>
    <script>
        //创建一个set对象。
        let s = new Set();
        let s2 = new Set(['111', '222', '333', '444', '555', '666']);

        //使用for ... of遍历数据
        for(let v of s2){
            console.log(v);
        }

        //size属性,元素个数。
        console.log(s2.size);
        //add属性 , 添加
        console.log(s2.add('777'));
        //delete属性,删除元素
        console.log(s2.delete('111'));
        //has属性 ,检测集合。
        console.log(s2.has('222'));
        //clear() ,来清空集合。
        s2.clear()
        console.log(s2);
    </script>
</body>

</html>
2.2 Set集合实用
通过下面的案例能够更加了解Set对象一些特性。Set对象内部没有重复的数据,所以经常转换数组一些小操作,例如:数组去重,算交集,并集,差集等。
<!DOCTYPE html>
<html lang="en">
<head>
    <meta charset="UTF-8">
    <meta http-equiv="X-UA-Compatible" content="IE=edge">
    <meta name="viewport" content="width=device-width, initial-scale=1.0">
    <title>Document</title>
</head>
<body>
    <script>
        //集合有几个小案例可以实现:如下几点。
        //1.数组去重
        const arr = [1,2,3,4,5,6,1,1,1,2,2,3,4,5,6,3];
        let result = [...new Set(arr)]; //先定义为将arr传给Set对象,后使用扩展运算符和数组,生成数组。
        console.log(result);


        //2.两个数组的交集
        const arr2 = [4,5,8,9,0];
        //使用filter过滤
        let result2 = [...new Set(arr)].filter(item => {
            let s2 = new Set(arr2);
            if(s2.has(item)){
                return true;
            } else {
                return false;
            }
        });
        console.log(result2);
        // 也可以直接简化成下面的样子,推荐使用下面的例子。
        let result3 = [...new Set(arr)].filter(item => new Set(arr2).has(item));
        console.log(result3);


        //3. 求数组并集
        let union = [new Set([...arr,...arr2])];
        console.log(union);


        //4.求数组差集
        //这里的差集就是交集的逆运算。
        let diff = [...new Set(arr)].filter(item => !new Set(arr2).has(item));
        console.log(diff);
    </script>
</body>
</html>
3. ES6 Map数据结构
ES6提供了Map数据结构。它类似于对象,也是键值对的集合。但是," 键 "的范围不限于字符串,各种类型的值(包括对象)都可以当作键。Map也是先了iterator接口,因此,也可以是用扩展运算符和for … of进行遍历。
map的属性和方法:
1. size Map元素的个数。
2. set 增加一个新元素,返回当前的Map。
3. get 返回键名对象的键值。
4. has 检测Map中是否包含某个元素,返回boolean值。
5. delete 删除某个元素,要指定键名。
6. clear() 清空,返回undefined。
案例:
<!DOCTYPE html>
<html lang="en">
<head>
    <meta charset="UTF-8">
    <meta http-equiv="X-UA-Compatible" content="IE=edge">
    <meta name="viewport" content="width=device-width, initial-scale=1.0">
    <title>Document</title>
</head>
<body>
    <script>
        //1. set 添加map元素。
        m = new Map();
        m.set('name','张三');
        m.set('age',"18");
        m.set('change',function(){
            console.log("法外狂徒张三");
        });
        //可以声明key,key也可以是键。
        let key = {
            school: '清华'
        }

        m.set(key,['张三','李四','王五']);
        console.log(m);


        //2. size 查看Map的元素个数。
        console.log(m.size);

        //3. delete 删除Map的某个元素。
        m.delete('age');
        console.log(m);

        //4. get 获取Map的某个元素
        m1 = m.get(key);
        console.log(m1);

        //5. for ... of 遍历
        console.log("下面是遍历:")
        for(let v of m){
            console.log(v);
        }

        //5. clear() 清空
        console.log(m.clear());
    </script>
</body>
</html>
4. ES6 class类
4.1 了解ES5的实现方法
ES5一般是用prototype来给函数创建方法来调用的。
<!DOCTYPE html>
<html lang="en">

<head>
    <meta charset="UTF-8">
    <meta http-equiv="X-UA-Compatible" content="IE=edge">
    <meta name="viewport" content="width=device-width, initial-scale=1.0">
    <title>Document</title>
</head>

<body>
    <script>
        //ES5的实现方法。
        function Phone(brand, price) {
            this.brand = brand;
            this.price = price;
        }
        //向Phone添加方法
        Phone.prototype.call = function () {
            console.log("我可以打电话!");
        }

        //实例化对象
        let xiaomi = new Phone('小米', 2500);
        //调用call方法
        xiaomi.call();
        console.log(xiaomi);
    </script>
</body>

</html>

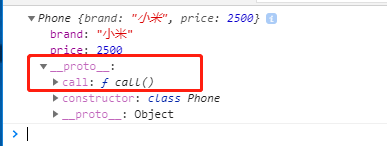
4.2 ES6 的class实现
这里使用class来模拟上面情况,需要注意的是:constructor构造函数固定,方法定义格式必须要个按照下面定义的形式。
<!DOCTYPE html>
<html lang="en">

<head>
    <meta charset="UTF-8">
    <meta http-equiv="X-UA-Compatible" content="IE=edge">
    <meta name="viewport" content="width=device-width, initial-scale=1.0">
    <title>Document</title>
</head>

<body>
    <script>
        class Phone {
            //构造方法,名字不能修改!!!
            constructor(brand, price) {
                this.brand = brand;
                this.price = price;
            }

            //定义call方法格式如下:
            call() {
                console.log("我可以打电话!");
            }
        }

        let xiaomi = new Phone("小米", 2500);
        console.log(xiaomi);
    </script>
</body>

</html>
4.3 class 静态成员
要理解:实例对象 , 函数对象 , 类的调用关系!!
注意一下几点:
1. 实例对象属性和函数对象的属性不是互通的。不能相互调用。
2. 实例对象的属性和构造函数的原型对象是想通的
<!DOCTYPE html>
<html lang="en">
<head>
    <meta charset="UTF-8">
    <meta http-equiv="X-UA-Compatible" content="IE=edge">
    <meta name="viewport" content="width=
    , initial-scale=1.0">
    <title>Document</title>
</head>
<body>
    <script>
        function Phone(){
        }
        //这里设置的是函数对象的属性,并不属于实例对象。
        Phone.name = '手机';
        Phone.change = function(){
            console.log("我能打电话");
        };

        //这里设置的构造函数原型对象的size方法。
        Phone.prototype.size = "5.5inch";

        //因为上面的name和change是函数对象的属性,而不是实例对象属性,所以实例对象不能调用。
        let xiaomi = new Phone();
        console.log(xiaomi.name);
        // console.log(xiaomi.change());

        //实例对象的属性和构造函数的原型对象是想通的!!!因此这里可以调用。
        console.log(xiaomi.size);
    </script>
</body>
</html>
对于class而言,和上面差不多,静态成员是static定义的。而且需要记住在class中定义的static,属于类,并不能被实例对象所调用。
<!DOCTYPE html>
<html lang="en">

<head>
    <meta charset="UTF-8">
    <meta http-equiv="X-UA-Compatible" content="IE=edge">
    <meta name="viewport" content="width=
    , initial-scale=1.0">
    <title>Document</title>
</head>

<body>
    <!-- <script>
        function Phone(){
        }
        //这里设置的是函数对象的属性,并不属于实例对象。
        Phone.name = '手机';
        Phone.change = function(){
            console.log("我能打电话");
        };

        //这里设置的构造函数原型对象的size方法。
        Phone.prototype.size = "5.5inch";

        //因为上面的name和change是函数对象的属性,而不是实例对象属性,所以实例对象不能调用。
        let xiaomi = new Phone();
        console.log(xiaomi.name);
        // console.log(xiaomi.change());

        //实例对象的属性和构造函数的原型对象是想通的!!!因此这里可以调用。
        console.log(xiaomi.size);
    </script> -->
    <script>
        class Phone {
            //从结果看出static标出的属性(name)或者方法change(),它属于类class,并不属于实例对象。
            static name = "手机";
            static change() {
                console.log("我可以打电话");
            }
        }

        let xiaomi = new Phone();
        console.log(xiaomi.name); //打印出undefined。
        console.log(Phone.name); //打印出手机。
    </script>

</body>

</html>
4.4 ES5的继承表现
ES5的继承主要通过函数的prototype来实现。
注意下面:
设置子级函数构造函数的原型是父级函数,这样子级函数就可以调用父级函数的方法了。
<!DOCTYPE html>
<html lang="en">
<head>
    <meta charset="UTF-8">
    <meta http-equiv="X-UA-Compatible" content="IE=edge">
    <meta name="viewport" content="width=device-width, initial-scale=1.0">
    <title>Document</title>
</head>
<body>
    <script>
        //ES5的构造函数继承
        //定义一个父级Phone
        function Phone(brand,price){
            this.brand = brand;
            this.price = price;
        }
        //定义父级方法call
        Phone.prototype.call = function(){
            console.log("我可以打电话");
        }

        //定义一个子级SmartPhone
        function SmartPhone(brand,price,color,size){
            Phone.call(this,brand,price);
            this.color = color;
            this.size = size;
        }
        //设置子级SmartPhone构造函数的原型
        SmartPhone.prototype = new Phone; //这样SmartPhone的实例对象,就会有父级的Phone的方法。
        SmartPhone.prototype.constructor = SmartPhone;

        SmartPhone.prototype.photo = function(){
            console.log("我可以拍照");
        }
        SmartPhone.prototype.game = function(){
            console.log("我可以玩游戏。");
        }

        let xiaomi = new SmartPhone("小米",2500,'蓝色','5.5');
        console.log(xiaomi);
    </script>
</body>
</html>

4.6 class类继承表现
对于class继承,就和后端语言差不多形式,extends的继承。
注意:
可以进行函数重载,就是重新在子类定义函数即可。
super()这个方法,只能用于constructor构造函数,不能用于其他的普通方法中。
<!DOCTYPE html>
<html lang="en">
<head>
    <meta charset="UTF-8">
    <meta http-equiv="X-UA-Compatible" content="IE=edge">
    <meta name="viewport" content="width=device-width, initial-scale=1.0">
    <title>Document</title>
</head>
<body>
    <script>
        class Phone{
            constructor(brand,price){
                this.brand = brand;
                this.price = price;
            }
            call(){
                console.log("我可以打电话。");
            }
        }

        class SmartPhone extends Phone{
            constructor(brand,price,color,size){
                super(brand,price);
                this.color = color;
                this.size = size;
            }

            photo(){
                console.log("我打电话");
            }

            game(){
                console.log("我可以玩游戏");
            }
        }

        let xiaomi = new SmartPhone("小米",2500,'蓝色','5.5');
        console.log(xiaomi);
        xiaomi.call();
        xiaomi.photo();
        xiaomi.game();
    </script>
</body>
</html>

4.7 class 的getter 和 setter
在ES5中,get和set,分别是获取属性和设置属性。而ES6中,get(getter)和set(setter)的表现有所不同。
需要注意:
set设置方法时,要有参数,因为set是设置内容,要有参数传递。
<!DOCTYPE html>
<html lang="en">
<head>
    <meta charset="UTF-8">
    <meta http-equiv="X-UA-Compatible" content="IE=edge">
    <meta name="viewport" content="width=device-width, initial-scale=1.0">
    <title>Document</title>
</head>
<body>
    <script>
        class Phone{
            //设置get
            get price(){
                console.log("小米手机价格实惠。");
                return '2500';
            }
        }
        let s = new Phone();
        console.log(s.price);//调用类中price的内容和返回值。
    </script>
    <script>
        class Phone1{
            //设置class的set,注意因为是设置,所以price1要有一个参数。
            set price1(newVal){
                console.log("设置price1属性。");
            }
        }
        let s1 = new Phone1();
        s1.price1 = '2500';//给price1设置时,就会调用price1下面内容。
    </script>
</body>
</html>


 371
371


 被折叠的 条评论
为什么被折叠?
被折叠的 条评论
为什么被折叠?
 到【灌水乐园】发言


